/


Latest Post

Free Shipping is today!! And a Scary Cute Waterfall fun fold


Today there is FREE Shipping on all orders over $75!!! 


It's a great time to get those items on your wish list or from the Holiday Catalog. 

Local gals, let me know if you need anything; I'll be ordering in the evening.

Click here to shop.

~~~

I have two more fabulous swap cards to share with you from our September Team swaps.  My Flowerbug's are so talented and creative. 

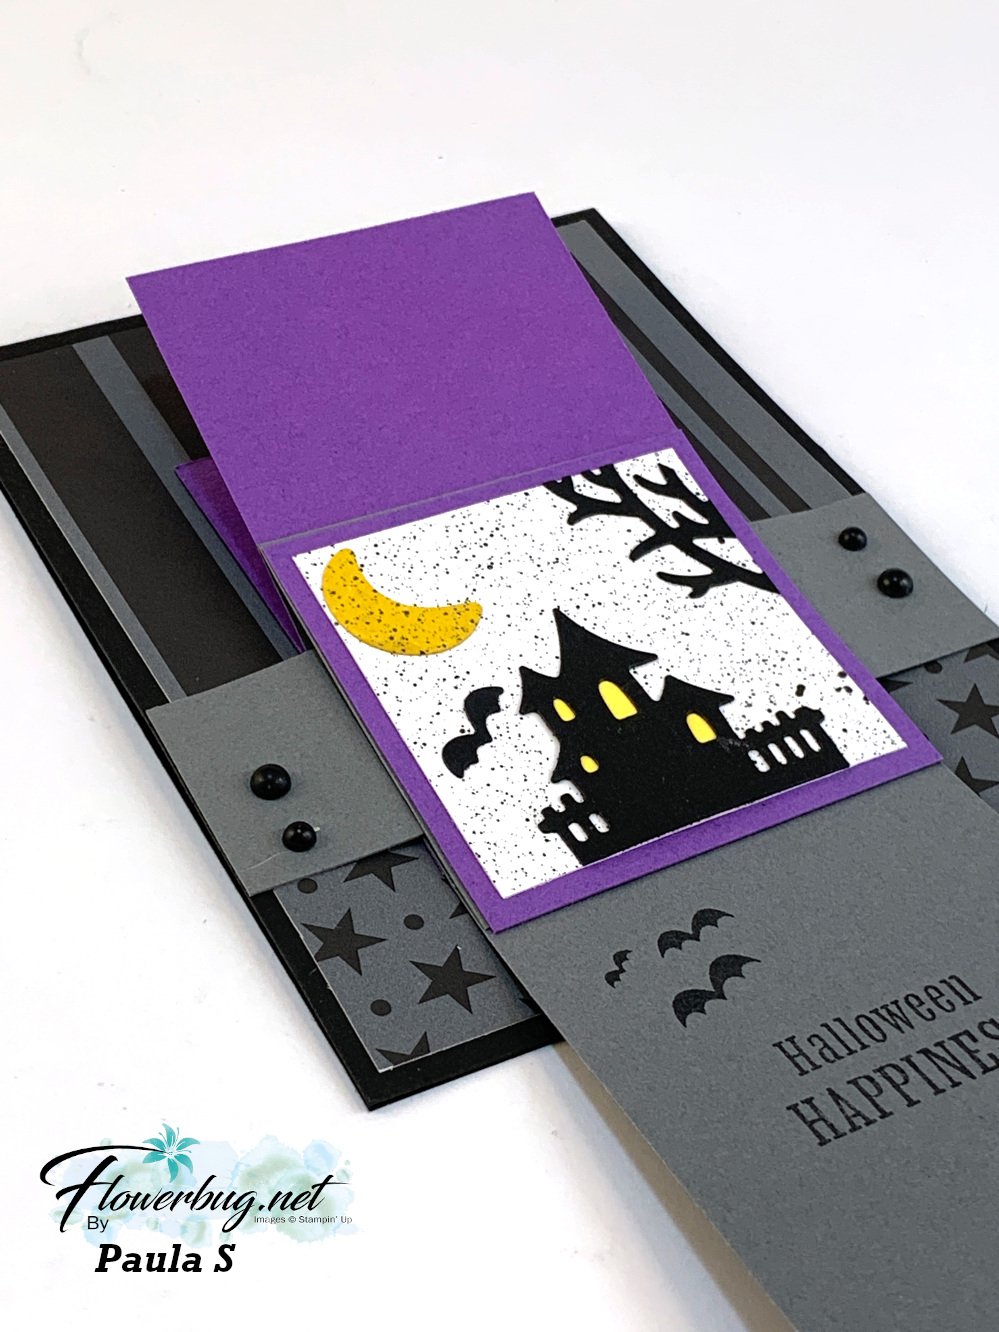
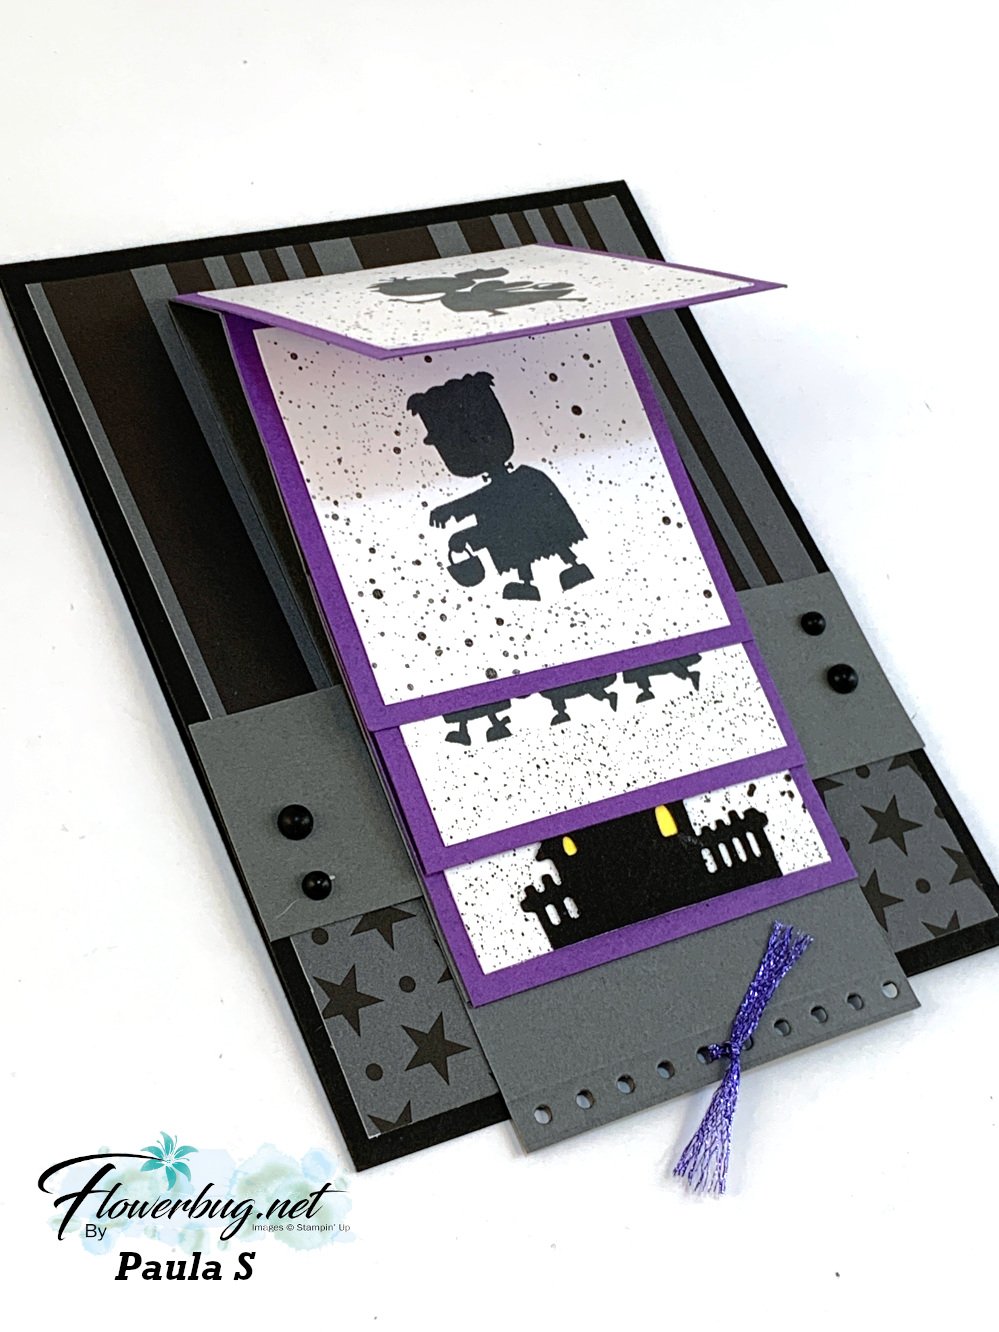
Paula made a Waterfall card!  These are not difficult but a bit intimidating maybe….  I shared a FB Live video here on how to make one.  

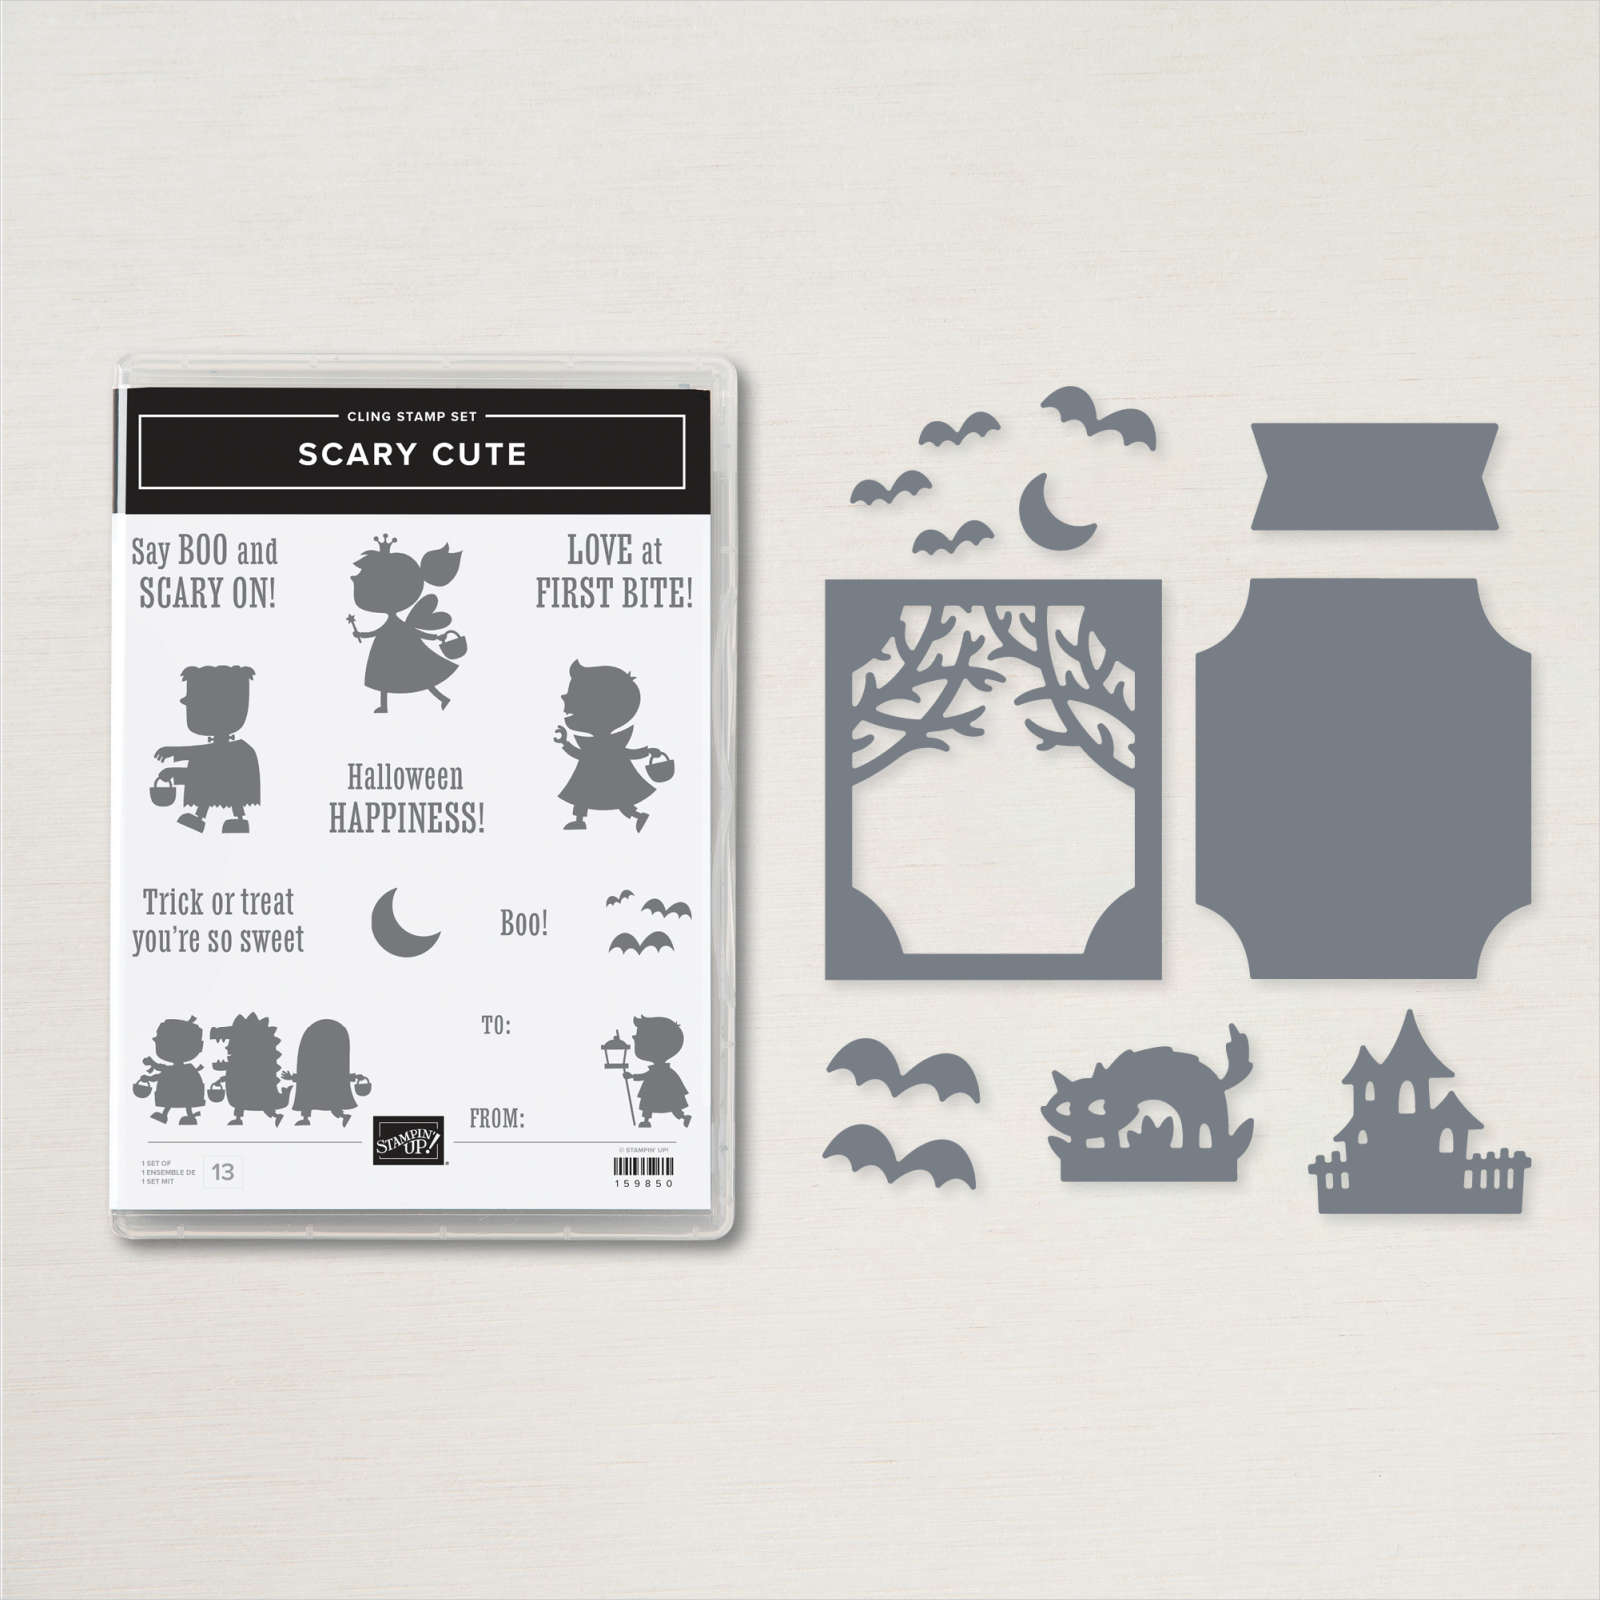
She featured the Scary Cute bundle seen here as well as the Black & White designs DSP here.  The colors are Black, White & Gorgeous Grape.  

She also used the Blossoming Happiness dies for her bottom border so she'd have a spot to add the Orchid Oasis 1/8" metallic ribbon for the pull.  

Measurements: 

  • Black card 4 1/4" X 11" scored at 5 1/2"
  • Basic Gray strip 5 1/2" X 1 1/4", waterfall strip is 2 1/2" X 10" scored at 5 1/4", 6", 6 3/4" & 7 1/2"
  • Gorgeous Grape squares are 2 1/2"
  • White squares are 2 1/4"
  • DSP is 4" X 5 1/4"

Here's a peak of the last inside panel with the die-cut & spooky scene.  She stamped the greeting on the long inside strip.  

Again, if you want to know how to make one of these waterfall cards check out my video here.  

~~~

Next is a colorful Halloween card made by Sharon using this same bundle.  She also added stamps from the Best Witches & Bewitching stamp sets. 

Her colors include Rich Razzleberry, Parakeet Party, Black & Daffodil Delight.  She used the Deckle dies for her front layers and inside as well.  

Here's a photo of this cute bundle.  Click on it to see it in my store. 

I hope you're enjoying these card swaps and getting inspired by them too!  There's lots more to come!!

~~~

October Specials

Starter Kit special! Get $155 in product for just $99

click here

~~~

Order online here

Host code links: KSAEED9Y or JPJ4FKYJ

Get a free embellishment from me with online orders over $50!

~~~

Earn free products with my loyalty rewards! 

Click here to download yours and earn a $50 shopping spree!

All Posts

  • Save time on finishing the inside of your cards with this trick!


    I’m excited to share these stunning snowflake cards with you today. We made them at my card clubs in December.
    Living in North Dakota, we usually see a lot of snow in the winter so these cards are great for many occasions.

    I used the Snowflake Kisses bundle seen here. It’s filled with wonderful greeting images and lots of snowflake dies.

    My colors include Pretty Peacock with Cloud Cover and Gorgeous Grape with Fresh Freesia. I think blues & purples are perfect for snowflakes. We used a blending brush to add more color to the large snowflake die-cut.

    After creating the cards above I thought I’d try combining the colors on the large die-cut.

    Isn’t that pretty? I just love combining Gorgeous Grape with Pretty Peacock on the Fresh Freesia die-cut. Blending Brushes make this a breeze!

    Look how we finished the inside.

    I wanted to add snowflakes to the inside of the card but didn’t want to die-cut tons of them for my club gals. So I came up with creating a snowflake stencil.
    I cut multiple snowflakes from a piece of card stock and we used Blending Brushes to add pretty snowflakes to our White layer. I truly love the effect it gives.

    If you’d like the free project sheet for this card click here. You can download or print it.

    See how this card is made in the video below. I also shared a second Snowflake Kisses fun fold card.

    *You’ll receive a PDF with multiple projects featuring this product
    after the 20th of the month.
    ~~~

    The Last Chance list has been updated!
    Click here to shop.

    Get a free PDF tutorial with any online order from me in December!

    Leave a Reply

    Your email address will not be published. Required fields are marked *

  • The new Swirled Designs bundle is super fun!


    I had to point you to the new Swirled Designs bundle in our newest Online Exclusives release. It has the neatest sets of dies and stamps in it!

    See what I mean? The extra layers on the dies make them super playful and the stamps will be great for stamping backgrounds. Basic shapes like ovals and stars are something we’ll always use for multiple occasions.

    Look closer at this card made by Stampin’ Up! I love when we get new product that’s unique and we haven’t seen before.

    See what I mean? You can use the stamps to add the details to the inside of the die-cut shapes like above. I just love this card! See this bundle here.

    *You’ll receive a PDF with multiple projects featuring this product
    after the 20th of the month.
    ~~~

    The Last Chance list has been updated!
    Click here to shop.

    Get a free PDF tutorial with any online order from me in December!

    Leave a Reply

    Your email address will not be published. Required fields are marked *

  • The Branching Out bundle is retiring! Check out this fun fold card with video tutorial!


    We made this card earlier this fall and I realize I haven’t shared it with you yet. I also made a video too – scroll down….

    The colors include Pecan Pie with Crumb Cake, Early Espresso & Shaded Spruce. I used various wood-like designer series papers for the side panel. See how it has a double fold?

    Also notice the ‘white’ snow on the pine boughs plus snow in the background. You can achieve that without heat embossing. We used White Craft ink and stamped over the pine. Easy & a fun accent!

    The stamp set is retiring but the dies are not. The bundle is on the last chance list now. Click here to see it.
    It’s been one of my favorite products in our Holiday catalog this year. It’s timeless and can be used for fall, winter or Christmas!

    Besides the video tutorial here’s a free project sheet for you too. Click here to download or print it.

    I’m glad the dies are not retiring but I have to say the stamp set is among my top 5 favorites!

    Below is the video tutorial which gives you tips on stamping the branches with the pines and pine cones.

    *You’ll receive a PDF with multiple projects featuring this product
    after the 20th of the month.
    ~~~

    The Last Chance list has been updated!
    Click here to shop.

    Get a free PDF tutorial with any online order from me in December!

    Leave a Reply

    Your email address will not be published. Required fields are marked *


Notice: LeeAnn Greff, Independent Stampin’ Up! Demonstrator, Manager. The content of this website is my sole responsibility as an independent Stampin’ Up! demonstrator and the use of, and content of, the classes, services, or products offered on this website is not endorsed by Stampin’ Up! Copyright 2025