/


Latest Post

Third card from the Boho Indigo Product Medley


This is the last card in the trio we made with the Boho Indigo Product Medley.  

Almost everything is from the Product Medley except the punched flowers (Confetti Flowers Border punch) and Stitched Nested Labels. 

The vase is stamped in Misty Moonlight and die-cut with the Boho dies in the Medley. The leaves are stamped in Pear Pizzazz. 

The little flowers are punched from a piece of Designer Paper in the medley and the centers are added with a Chalk Marker. They're curled up a bit with a stylus.

Measurements:

  • Misty Moonlight card base 5 1/2" X 8 1/2"
  • Designer Paper 2" X 4 1/4"
  • Pear Pizzazz strip 1/2" X 4 1/4"
  • White & Navy CS for Stitched Nested Labels

Here are all of the cards we made with the pretty Boho Indigo Product Medley. You can see them all by paging through my blog posts the last few days. 

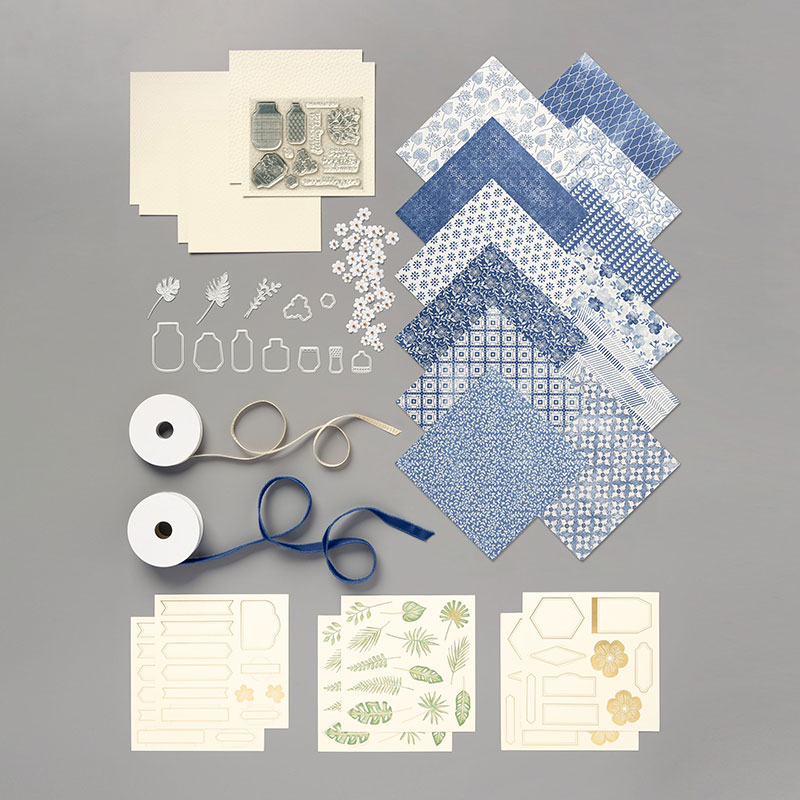
The Boho Indigo Product Medley comes with a whole bunch of products all in one box including stamps, dies, beautiful designer paper in 6 X 6" size, textured card stock, die-cuts, ribbon and paper/bead flowers.  The colors are Misty Moonlight, Night of Navy, Vanilla, White, Garden Green & gold. 

If you purchase this Medley in July you'll earn a $5 coupon code to redeem in August. Yay for Bonus Days!!

There's even a refill option (without the stamps, dies & ribbon).  It is on back order until mid July but still orderable.  It includes the papers and the flowers.  See that here. 

~~~

Bonus Days are here!

 
For every $50 you spend in July you'll receive a $5 coupon to redeem in August!  

~~~

Current Host code is 3MFE2KKP

Get a free 2020 card stock sampler with online orders over $60. 

Order online here

 Get my Tasteful Touches pdf tutorial free with any online order in July


It includes directions, photos and measurements for 10 cards!

All Posts

  • A WOW fun fold card with Dragonfly Dreams!


    This weekend my Flowerbug's Team held our monthly card swap & Team gathering.  Our theme was window cards and I'll be sharing them all week long!

    Check out this special Z fold card Jacki made!  

    Her colors are Terracotta Tile, Black & White and the Dandy Garden Designer paper seen here.  Did you know that the Dragonfly Punch coordinates with this Designer Paper?  She punched her dragonflies directly out of the paper!  No stamping for these at all! See the Dragonfly Garden bundle here. 

    Check out the whole suite of products here. 

    This card features almost two full card bases with just a few score lines. It looks a lot harder than it is.  

    • Terracotta Tile – 5 1/2" X 8 1/2" scored at 4 1/4"
    • Whisper White – front is 4" X 5 1/4", inside fold is 5 1/4" X 8" scored on the long edge at 4" X 6". 
    • Designer paper – 1 3/4" X 5" 

    Her 'window' in the front is 2 3/8" and the black circle on the inside fold is the same.  The White greeting circle is 2 1/8".  All of these circles are cut with the Circle dies in the Annual Catalog. 

    Steps to assemble this card:

    • You'll adhere the White front to the main card base and then cut your window. 
    • Stamp on the inside White card before adhering to the inside of the main card.
    • Add the Designer paper to the inside fold.
    • Die-cut the greeting circles and adhere together. 
    • Fold the card closed and add the circle to the inside fold 'through' the front window.  Perfect placement!   

    More window cards posted tomorrow and all week long! 

    ~~~

    Current Host code is 39A9QQZP

    Order online here

    All online orders receive a free PDF of the new Butterfly Bouquet bundle

    with 15 projects!


    ~~~

    Get a free adhesive package from me with an online order over $50 using the host code above. 3 sheets of Dimensionals and 1 for die-cuts!

    *If your order is over $150 do not use the code; you'll still receive a gift! 

    Below are the Multipurpose Glue stands we're making. They're $6 each and available in my Shop here.  

    Leave a Reply

    Your email address will not be published. Required fields are marked *

  • Create gorgeous backgrounds with just a few common stamping items! Video tutorial!


    On Tuesday's FB live I shared a fun and easy technique for gorgeous backgrounds.  Once you create them you can use them to create stunning, beautiful cards like these:

    This was my first try at this technique this week.  Honestly it's not a new technique at all but I hadn't done it for years! The stamp set is called Soar Confidently (seen here) and I hadn't used it yet.  I think it works wonderfully with a pretty background. 

    I used Highland Heather, Gorgeous Grape, Bermuda Bay and Pacific Point Stampin' Write markers on an E block and spritzed with plain water.  Then 'stamp' on our Basic White CS and let dry with the block on it (this prevents warping).  Then stamp on it with any black ink.  

    Here are a few more samples I shared: 

    The left card above features the Dragonfly Garden stamp set and the right is the Floating & Fluttering set. 

    See what I mean?  And it's fun too!  Each time you do it they turn out differently so it's kind of addicting!  Watch the video below to see how easy it can be.  

    ~~~

    Current Host code is 39A9QQZP

    Order online here

    All online orders receive a free PDF of the new Butterfly Bouquet bundle

    with 15 projects!


    ~~~

    Get a free adhesive package from me with an online order over $50 using the host code above. 3 sheets of Dimensionals and 1 for die-cuts!

    *If your order is over $150 do not use the code; you'll still receive a gift! 

    Below are the Multipurpose Glue stands we're making. They're $6 each and available in my Shop here.  

    Leave a Reply

    Your email address will not be published. Required fields are marked *

  • Gorgeous Butterflies with the Brilliant Wing dies


    I was playing around with these dies and came up with these striking colored butterflies.   

    I used the designer paper as a template to sponge through.  This is what's left after you use the Brilliant Wings dies to cut out the 6 butterflies.  Although in hindsight I should have sponged on the other side so the die fit.  It was upside down on the die; I had to hold it up to the light to get the die placed correctly.  

    I added a piece of White CS behind these butterflies and used the Stitched with Whimsy dies to add that pretty stitched edge.  See those here. 

    Click on the image below to see these items in my store. Remember this designer paper is available through May 3rd or while supplies last.


    The greeting is from the Vine Design stamp set on a 1/2" strip of Poppy Parade card stock. 

    ~~~

    Current Host code is 39A9QQZP

    Order online here

    All online orders receive a free PDF of the new Butterfly Bouquet bundle

    with 15 projects!


    ~~~

    Get a free adhesive package from me with an online order over $50 using the host code above. 3 sheets of Dimensionals and 1 for die-cuts!

    *If your order is over $150 do not use the code; you'll still receive a gift! 

    Below are the Multipurpose Glue stands we're making. They're $6 each and available in my Shop here.  

    Leave a Reply

    Your email address will not be published. Required fields are marked *


Notice: LeeAnn Greff, Independent Stampin’ Up! Demonstrator, Manager. The content of this website is my sole responsibility as an independent Stampin’ Up! demonstrator and the use of, and content of, the classes, services, or products offered on this website is not endorsed by Stampin’ Up! Copyright 2025