/


Latest Post

The next 3 months of gorgeous Paper Pumpkin kits – wow!


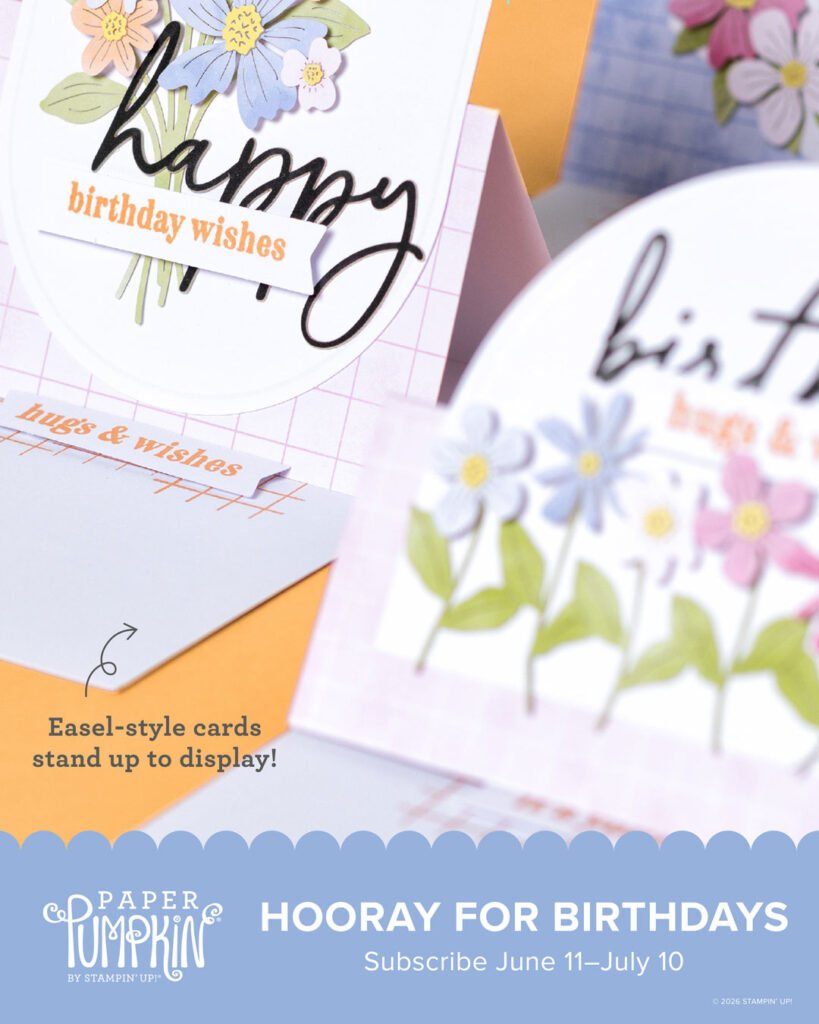
If you love working with ready to create kits; you have to see the next 3 months of Paper Pumpkin card kits! I think they’ll be some of our favorites ever! Here’s a sneak peek:

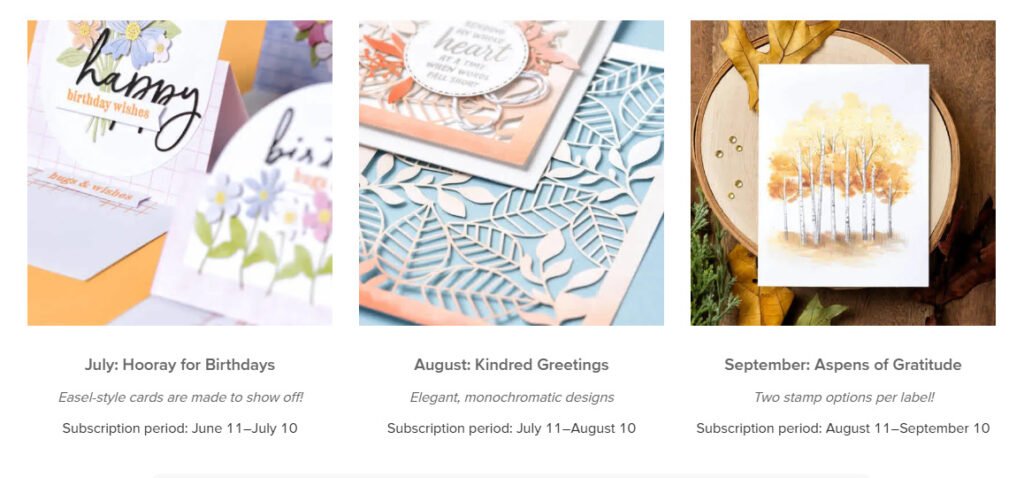
If you subscribe before July 10th you’ll receive the Hooray for Birthdays kit. Go here to subscribe and get a fun kit in the mail each month.

Remember you are in charge of which kits you receive. You can pause or skip any kit at any time. We always get a hint of what the upcoming kits will be.

Or get a pre-paid subscription in either 3, 6 or 12 months increments. It’s so nice to get a fun surprise in the mail each month! And you save when purchasing a pre-paid subscription plus earn FREE product credits! Shop here for this option.

And remember that once you’re a subscribe you have access to all of the past kits, refills and extras available. A great perk!

Here’s the flyer for the next 3 months. It describes each kit in detail.

All Posts

  • Retro style circles layout; super easy! Catch the Live video tonight!


    Tonight at 7:30 pm Central Time I'm sharing how to make these retro style circle cards on Facebook Live.  Click here to join me.   You can also see this video below!

    Basically you need three sizes of circle dies or punches for the start of this layout.  Cut them in half and layer together with the edges meeting on one side. Adhere and add a long greeting between the two. 

    Watch how on my FB Live replay!

    Measurements:

    • 5 1/2" X 8 1/2" card base
    • 3 1/2" X 4 3/4" Whisper White; the greeting strip is about 5" long and either 1/2" or 3/4" wide depending on your greeting image.
    • 1" X 5 1/2" horizontal strip
    • Circles from the Stitched Shapes dies are the largest three circles. 

    You'll want ink, stamps and embellishments that coordinate with your Designer Paper.  Remember you could use card stock instead of DSP. 


    Products used:

    • Designer papers – Heartwarming Hugs, new Classic Christmas & Snowflake Splendor
    • Stamps – Tree Angle, Snowflake Wishes & Curvy Christmas
    • Colors – Real Red & Olive, Seaside Spray & Night of Navy, Sahara Sand & Cherry Cobbler  
    • Other: Stitched Shapes dies, Curvy Dies & Pick a Banner punch

    ~~~

    November Specials!

    Current Host code is GRC9VVUU


    All online orders receive my FREE Curvy Celebrations 22 project PDF Tutorial! 

    Leave a Reply

    Your email address will not be published. Required fields are marked *

  • Curvy Christmas & the Postage Punch


    Check out this easy card using the new Curvy Christmas stamp set and the Postage Punch!  

    It's super simple! Here's how I made it:

    1. Stamp the curvy trees image on the White CS using Shaded Spruce ink.  Color the trees with a Light Shaded Spruce Blends marker.  Add a tiny star using Cherry Cobbler ink on one tree. Adhere it to the Cherry Cobbler layer and to the main card.
    2. Punch out three pieces of Classic Christmas designer paper with the Postage Punch seen here.  Adhere to the White CS. 
    3. Stamp the greeting in Cherry Cobbler ink on a 1/2" strip of White CS.  Punch the ends with the Banners Pick a Punch. Add it to the card with mini dimensionals. 
    4. Finish with a few Holiday rhinestones. 

    You can see this stamp set here; it's only available through January 4th.  And the Classic Christmas Designer Paper is here while supplies last. 

    Remember that everyone who orders any of these products or places an online order with me in November will receive a free 22 project PDF tutorial featuring the Curvy Celebration products! 


    ~~~

    November Specials!

    Current Host code is GRC9VVUU


    All online orders receive my FREE Curvy Celebrations 22 project PDF Tutorial! 

    Leave a Reply

    Your email address will not be published. Required fields are marked *

  • Gift Wrapped Box Fold Card with video


    Check out this cute Christmas card we made at my October Card Clubs!  It's a box fold card; a super cute but easy fun fold. 

    The colors are Real Red with Granny Apple Green & White. The dies on the front are the Stitched Shapes and Hippos & Friends.

    It even folds flat for mailing!  As you can see the back is similar to the front; leaving some space to write or sign the card.  

    I used the Gift Wrapped punch bundle from the Holiday catalog.  You can see it here. 

    Check out the video and measurements below. 

    Here's the video: 


    Measurements:

    Real Red 4 1/4" X 11" scored at 5 1/2", 7", 9" and 10 1/2"
    Granny Apple Green 3 5/8" X 4 7/8" (2 pieces) plus scrap for die-cut
    Whisper White 3 1/2" X 4 3/4" (2 pieces) plus scrap for circle die-cut and bow

    ~~~

    November Specials!

    Current Host code is GRC9VVUU


    All online orders receive my FREE Curvy Celebrations 22 project PDF Tutorial! 

    Leave a Reply

    Your email address will not be published. Required fields are marked *


Notice: LeeAnn Greff, Independent Stampin’ Up! Demonstrator, Manager. The content of this website is my sole responsibility as an independent Stampin’ Up! demonstrator and the use of, and content of, the classes, services, or products offered on this website is not endorsed by Stampin’ Up! Copyright 2025