/


Latest Post

Stunning cards in the Lovely Lavender card kit to go!


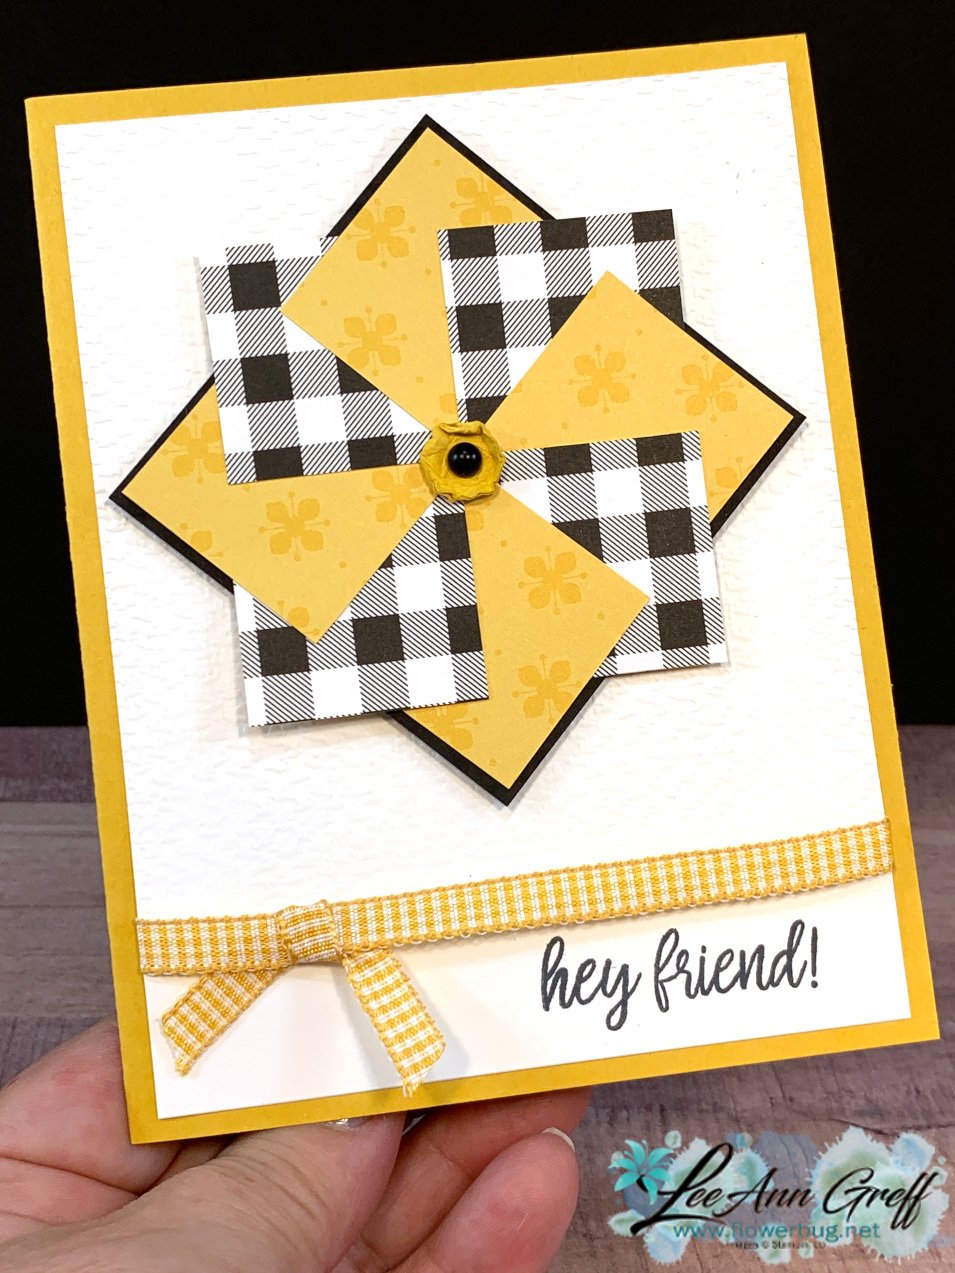
I love these gorgeous cards so much!  They have lots of details & elements but they're still quick to create!

This card kit includes 12 cards; you'll make 4 each of 3 card designs. It's based on the Lovely Lavender Paper Pumpkin refill kit but I've added an extra 4 cards, changed them up and added on extra product to jazz them up.

The kit includes the following:

  • 12 card bases, greeting labels & die-cut elements for the 12 cards
  • a share of Fine Shimmer Purple gems
  • a share of Paper Butterfly Accents
  • 12 envelopes
  • The PDF tutorial with photos & step by step directions

This kit does not include stamps or inks. You'll need greetings, purple ink & adhesives to complete the cards. I used the Charming Sentiments set. 

Click here to reserve your kit for $28 plus shipping. 

I have a limited supply of these kits; do not wait long to reserve yours!  The kits will be mailed out at the end of February. The PDF tutorial will be sent via email immediately after payment. Check your junk folder. 

I have 6 other pre-cut card kits & 1 scrapbook kit available in my shop right now.  Save on shipping and order more than one! 

Here's a photo of the other new February kit or tutorial I'm offering. 

~~~

February Specials: 

Earn FREE products with your Stampin' Up! purchase during

Sale-a-Bration! *click here

*current host code link:  M7NAN4HT

It's the best time to get a pre-paid Sale-a-Bration subscription

& earn free Sale-a-Bration products!  


~~~

Get a free Gold Foiled cards & envelopes kit

with an online order over $55 in February

All online orders in February will receive this free tutorial with 8 projects!

All Posts

  • Artistic Dies & sponging; super simple but WOW!


    I couldn't decide which to use behind the sponged die-cut so I made both White & Black.   You can see that video here from Tuesday's FB live earlier this week.  

    Which one do you prefer? 

    The reviews were mixed.  Most prefer the Black because the colors pop more.  But others liked the White for a softer look. 

    The card bases are Pale Papaya and Polished Pink. The strips are Pear Pizzazz. I used sponge daubers in Pear, Papaya, Fresh Freesia and Polished Pink to add color to the pretty die-cut.  See these dies here and the bundle here.  

    The pretty scalloped die-cut is from the Scalloped Contour dies seen here.  The oval is from the Double Oval punch. 

    Below is the video where I demo'd this card.  Don't forget to follow my FB page here and my YouTube channel here so you won't miss anything!

     ~~~

    May Specials & Promotions!

    Get $55 in free product with purchase of the Stampin' Up! Starter Kit!  Choose $155 in product of your choice for just $99 and get FREE SHIPPING as well! 


    Earn an extra $25 in free product if your order is over $250!  That means you get $50 in free product!  *combine your order with a friend.

    Get a NEW embellishment from the Annual Catalog with an online order

    over $50 before tax & shipping. 

    Host code: JDZNQ7PP  Click here to order

    Use this host code if your order is under $150. If it's over you'll still get the jewels but you'll also earn host benefits! Better yet, choose the Starter Kit and get $55 in FREE product and FREE Shipping as well!  Click here!

    *All online orders in May receive a free PDF full of project ideas with 2 new catalog suites! 

    Leave a Reply

    Your email address will not be published. Required fields are marked *

  • Can you tell which is stamped and which is Designer paper?


    I made these on FB live this week using the Expressions in Ink suite.  Can you tell which background is stamped and which is Designer Paper?  

    My top favorite suite in the new Annual catalog is the Expressions in Ink.  See it here or on page 96-97.  It's filled with stamps & paper that mimic alcohol ink backgrounds.  Toss in the beautiful gold accents and it's stunning!  

    Here's a close up of the card.  Can you tell if I stamped it or if it's designer paper?  

    Yes; I did stamp it!  These images are so neat!  I can see lots of uses for both the greetings and the faux alcohol ink stamps.  See how in the video below. Mmm; I think I'll try a one sheet wonder with these…..! 

    And look at the leaves die-cuts!  I cut them from In Color Shimmer Vellum & Gold Foil paper.  The tag is from the Tailor Made Tags dies. 

    Here's the FB Live replay video.  Sorry the text isn't flipped so you can read it.  FB changed their settings and the tool icon is gone.  

     ~~~

    May Specials & Promotions!

    Get $55 in free product with purchase of the Stampin' Up! Starter Kit!  Choose $155 in product of your choice for just $99 and get FREE SHIPPING as well! 


    Earn an extra $25 in free product if your order is over $250!  That means you get $50 in free product!  *combine your order with a friend.

    Get a NEW embellishment from the Annual Catalog with an online order

    over $50 before tax & shipping. 

    Host code: JDZNQ7PP  Click here to order

    Use this host code if your order is under $150. If it's over you'll still get the jewels but you'll also earn host benefits! Better yet, choose the Starter Kit and get $55 in FREE product and FREE Shipping as well!  Click here!

    *All online orders in May receive a free PDF full of project ideas with 2 new catalog suites! 

    Leave a Reply

    Your email address will not be published. Required fields are marked *

  • Inspired Thoughts Bundle; a beautiful scene


    I created this card for an online swap I participated in last month.  I just love it!

    The main 4 trees die-cut can be cut apart which opens a whole world of possibilities! 

    Here's how I made it:

    1. Die-cut the trees and hill using the Inspiring Canopy dies (seen below).  
    2. Cut the 4 trees apart at the bottom connection point. Set aside.
    3. Sponge clouds using Pool Party ink onto the 4" X 5 1/4" Basic White CS.  I used the Basic Border dies (cloud).
    4. Sponge Calypso Coral ink onto the bottom third of this piece. 
    5. Adhere the trees to the edge of each side. 
    6. Add the hill piece; trim off excess from hill and trees. Adhere to the Calypso Coral card base. 
    7. Finish with Genial Gems.  

    You can see the beautiful Inspired Thoughts bundle here.  

     ~~~

    May Specials & Promotions!

    Get $55 in free product with purchase of the Stampin' Up! Starter Kit!  Choose $155 in product of your choice for just $99 and get FREE SHIPPING as well! 


    Earn an extra $25 in free product if your order is over $250!  That means you get $50 in free product!  *combine your order with a friend.

    Get a NEW embellishment from the Annual Catalog with an online order

    over $50 before tax & shipping. 

    Host code: JDZNQ7PP  Click here to order

    Use this host code if your order is under $150. If it's over you'll still get the jewels but you'll also earn host benefits! Better yet, choose the Starter Kit and get $55 in FREE product and FREE Shipping as well!  Click here!

    *All online orders in May receive a free PDF full of project ideas with 2 new catalog suites! 

    Leave a Reply

    Your email address will not be published. Required fields are marked *


Notice: LeeAnn Greff, Independent Stampin’ Up! Demonstrator, Manager. The content of this website is my sole responsibility as an independent Stampin’ Up! demonstrator and the use of, and content of, the classes, services, or products offered on this website is not endorsed by Stampin’ Up! Copyright 2025