/


Latest Post

What? Whisper White card stock is discontinued! Snowflake Splendor card & bookmark in a pocket


Sad news!  Here's a message from Stampin' Up! regarding our favorite White card stock:

We are sad to announce that the supplier’s mill producing our Whisper White cardstock has permanently closed due to impacts from the COVID-19 pandemic. Unfortunately, we weren’t given much notice on this closure. This means that the technology unique to this particular supplier is now unavailable to us and we can no longer offer our Whisper White cardstock and related products, such as Whisper White Note Cards & Envelopes. Please note that this won’t affect any of our other cardstocks, this only affects Whisper White.

We know Whisper White has a huge fan base; we’re big fans, too! And we are crushed that it’s going away. Even though this decision was out of our hands, rest assured that we jumped right into action to find the best replacement paper possible. We have dedicated many hours to source and test alternative cardstock options from several suppliers to find the perfect fit that still maintains the Stampin’ Up! quality you know and trust. We are happy to share that we have found a winner for our new cardstock, Basic White!

Our new Basic White products will become available to purchase as soon as we have them in stock. Additionally, due to the nature of sourcing, some Basic White products may not be available before the Whisper White products sell out. Please know that we are working on getting these products available to you as fast as possible.

Below is a list of all products that will be replaced with our new Basic White cardstock. These items are now available while supplies last with an order limit of 2 per item per order.

  • Whisper White 12" x 12" (30.5 x 30.5 cm) Cardstock (124302)
  • Assorted Memories & More Cards & Envelopes (149710)
  • Whisper White Note Cards & Envelopes (131527)
  • Whisper White 3" x 3" (7.6 x 7.6 cm) Envelopes (145829)
  • Whisper White 8-1/2" x 11" Cardstock (100730)
  • Whisper White 8-1/2" x 11" Thick Cardstock (140272)
  • Whisper White Medium Envelopes (107301)

If you love any of these products I recommend you order them ASAP.  Remember there is a limit of 2 per customer. Go here to order.

~~~

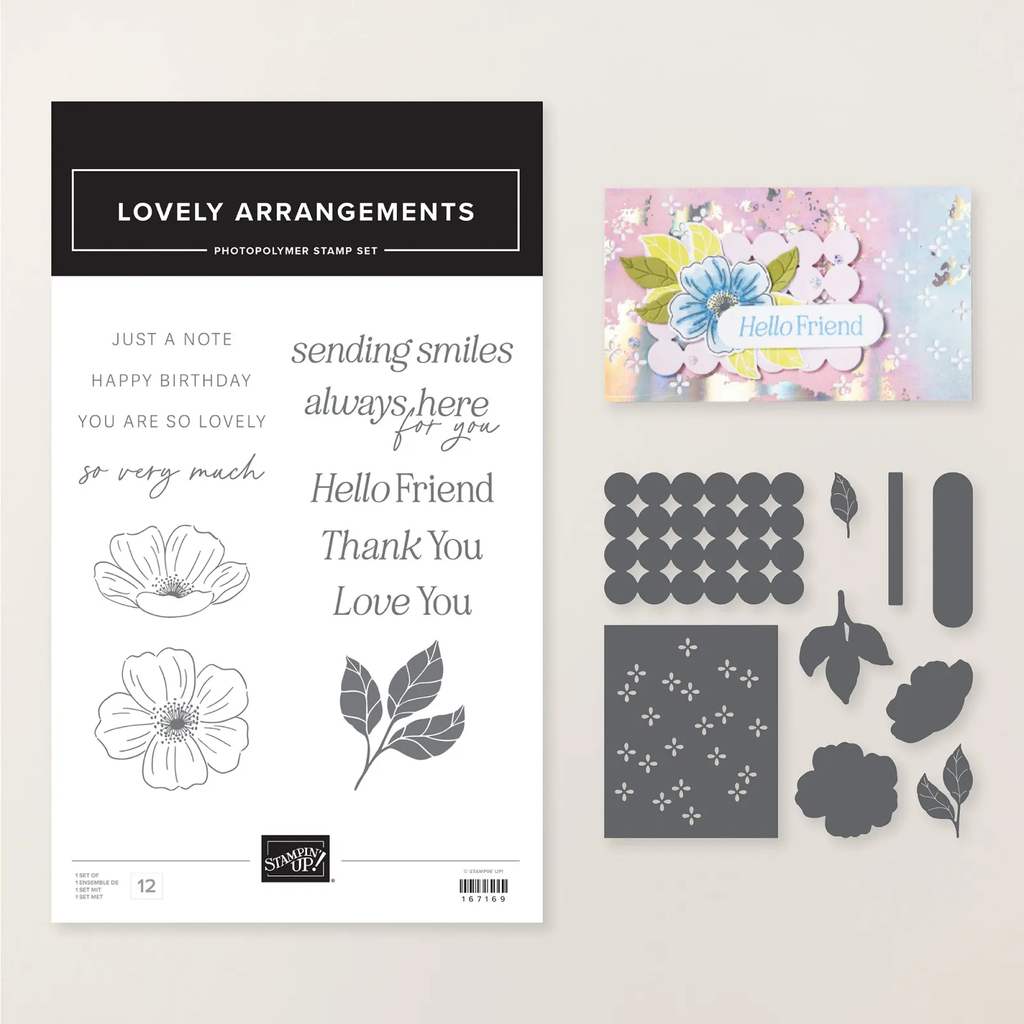
Here's a few sparkly projects featuring the Snowflake Splendor designer paper.  I think I could play with this for the next few months!  Here in ND we're usually in snow through March for sure and usually into April. 

For this card I simply cut a few snowflakes from the White panel and adhered it to the designer paper with Dimensionals.  The greeting is heat embossed using White powder on a Highland Heather Stitched Nested Label and a swirl of Iridescent ribbon is added behind it.  

This pretty paper is on the Closeout Sale happening now here.  It's 30% off while supplies last.  The Snowflake Wishes bundle is returning next year; I've used it a ton! 

Today is the last day to get my Snowflake Splendor kit to go.  It includes these same products: a half pkg. of this pretty paper, Iridescent ribbon and the pretty blue faceted gems plus 10 pre-cut fun fold cards.  That's $20 in product AND the 10 pre-cut cards for just $28.  Go here to get yours.    Or get the tutorial here. 

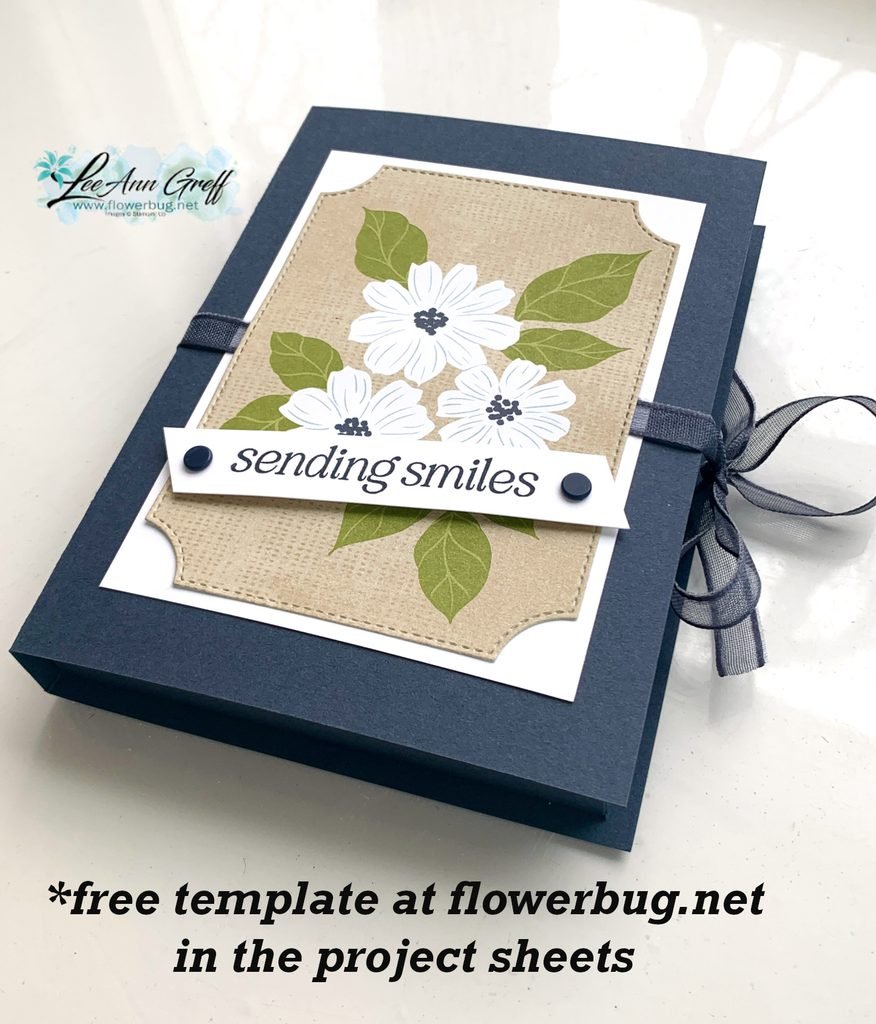
Here are the directions for the bookmark pocket:

  • Start with a 6” square for bookmark pocket; score lightly at 3”
  • Fold the Designer Paper in half at the 3” mark.  Then fold down the upper corner and glue down.
  • Use Stampin’ Seal on the lower and right side edges to close the pocket.
  • Punch the ends of the Highland Heather strip (1 ¼” X 8”, scored at 4)  and adhere across the lower middle. 
  • Stamp the greeting in Pacific Point ink onto the White Nested label die-cut (1 ½” X 2 ¾” finished size). Add with Stampin’ Dimensionals.
  • Add a few White snowflakes with Multipurpose Glue. Add a few Blue Gems.
  • Stamp the greeting on the Bookmark using Pacific Point ink.  Add some snowflakes in Highland Heather ink, stamping off first for a lighter hue
  • Punch the upper end with the Fancy Tag Topper punch. Fold a 6” length of ribbon in half and insert the folded end in the front and pull the tails through the loop.  Tighten carefully, one end at a time. 


~~~


December Ordering Special: 

Current Host code is AHJNPWNB

Order online here

All online orders will receive my 16 Christmas cards class PDF!

Get a free package of 220 Red Rhinestones from me with an online order over $50 using the host code above.

Below are the Multipurpose Glue stands we're making. They're $6 each and available in my Shop here.  

All Posts

  • Save time on finishing the inside of your cards with this trick!


    I’m excited to share these stunning snowflake cards with you today. We made them at my card clubs in December.
    Living in North Dakota, we usually see a lot of snow in the winter so these cards are great for many occasions.

    I used the Snowflake Kisses bundle seen here. It’s filled with wonderful greeting images and lots of snowflake dies.

    My colors include Pretty Peacock with Cloud Cover and Gorgeous Grape with Fresh Freesia. I think blues & purples are perfect for snowflakes. We used a blending brush to add more color to the large snowflake die-cut.

    After creating the cards above I thought I’d try combining the colors on the large die-cut.

    Isn’t that pretty? I just love combining Gorgeous Grape with Pretty Peacock on the Fresh Freesia die-cut. Blending Brushes make this a breeze!

    Look how we finished the inside.

    I wanted to add snowflakes to the inside of the card but didn’t want to die-cut tons of them for my club gals. So I came up with creating a snowflake stencil.
    I cut multiple snowflakes from a piece of card stock and we used Blending Brushes to add pretty snowflakes to our White layer. I truly love the effect it gives.

    If you’d like the free project sheet for this card click here. You can download or print it.

    See how this card is made in the video below. I also shared a second Snowflake Kisses fun fold card.

    *You’ll receive a PDF with multiple projects featuring this product
    after the 20th of the month.
    ~~~

    The Last Chance list has been updated!
    Click here to shop.

    Get a free PDF tutorial with any online order from me in December!

    Leave a Reply

    Your email address will not be published. Required fields are marked *

  • The new Swirled Designs bundle is super fun!


    I had to point you to the new Swirled Designs bundle in our newest Online Exclusives release. It has the neatest sets of dies and stamps in it!

    See what I mean? The extra layers on the dies make them super playful and the stamps will be great for stamping backgrounds. Basic shapes like ovals and stars are something we’ll always use for multiple occasions.

    Look closer at this card made by Stampin’ Up! I love when we get new product that’s unique and we haven’t seen before.

    See what I mean? You can use the stamps to add the details to the inside of the die-cut shapes like above. I just love this card! See this bundle here.

    *You’ll receive a PDF with multiple projects featuring this product
    after the 20th of the month.
    ~~~

    The Last Chance list has been updated!
    Click here to shop.

    Get a free PDF tutorial with any online order from me in December!

    Leave a Reply

    Your email address will not be published. Required fields are marked *

  • The Branching Out bundle is retiring! Check out this fun fold card with video tutorial!


    We made this card earlier this fall and I realize I haven’t shared it with you yet. I also made a video too – scroll down….

    The colors include Pecan Pie with Crumb Cake, Early Espresso & Shaded Spruce. I used various wood-like designer series papers for the side panel. See how it has a double fold?

    Also notice the ‘white’ snow on the pine boughs plus snow in the background. You can achieve that without heat embossing. We used White Craft ink and stamped over the pine. Easy & a fun accent!

    The stamp set is retiring but the dies are not. The bundle is on the last chance list now. Click here to see it.
    It’s been one of my favorite products in our Holiday catalog this year. It’s timeless and can be used for fall, winter or Christmas!

    Besides the video tutorial here’s a free project sheet for you too. Click here to download or print it.

    I’m glad the dies are not retiring but I have to say the stamp set is among my top 5 favorites!

    Below is the video tutorial which gives you tips on stamping the branches with the pines and pine cones.

    *You’ll receive a PDF with multiple projects featuring this product
    after the 20th of the month.
    ~~~

    The Last Chance list has been updated!
    Click here to shop.

    Get a free PDF tutorial with any online order from me in December!

    Leave a Reply

    Your email address will not be published. Required fields are marked *


Notice: LeeAnn Greff, Independent Stampin’ Up! Demonstrator, Manager. The content of this website is my sole responsibility as an independent Stampin’ Up! demonstrator and the use of, and content of, the classes, services, or products offered on this website is not endorsed by Stampin’ Up! Copyright 2025