/


Latest Post

Rainbow of Happiness Easel card with video tutorial


The other card we made at my February card clubs was this bright rainbow easel card. We have so many wonderful rainbow themed products right now. 

Details:

  • The rainbows and small clouds are die-cut using the Rainbow dies (currently unavailable through March 28th). 
  • The rainbows are cut from the Ombre 12 X 12" Specialty paper in the annual catalog (seen here). 
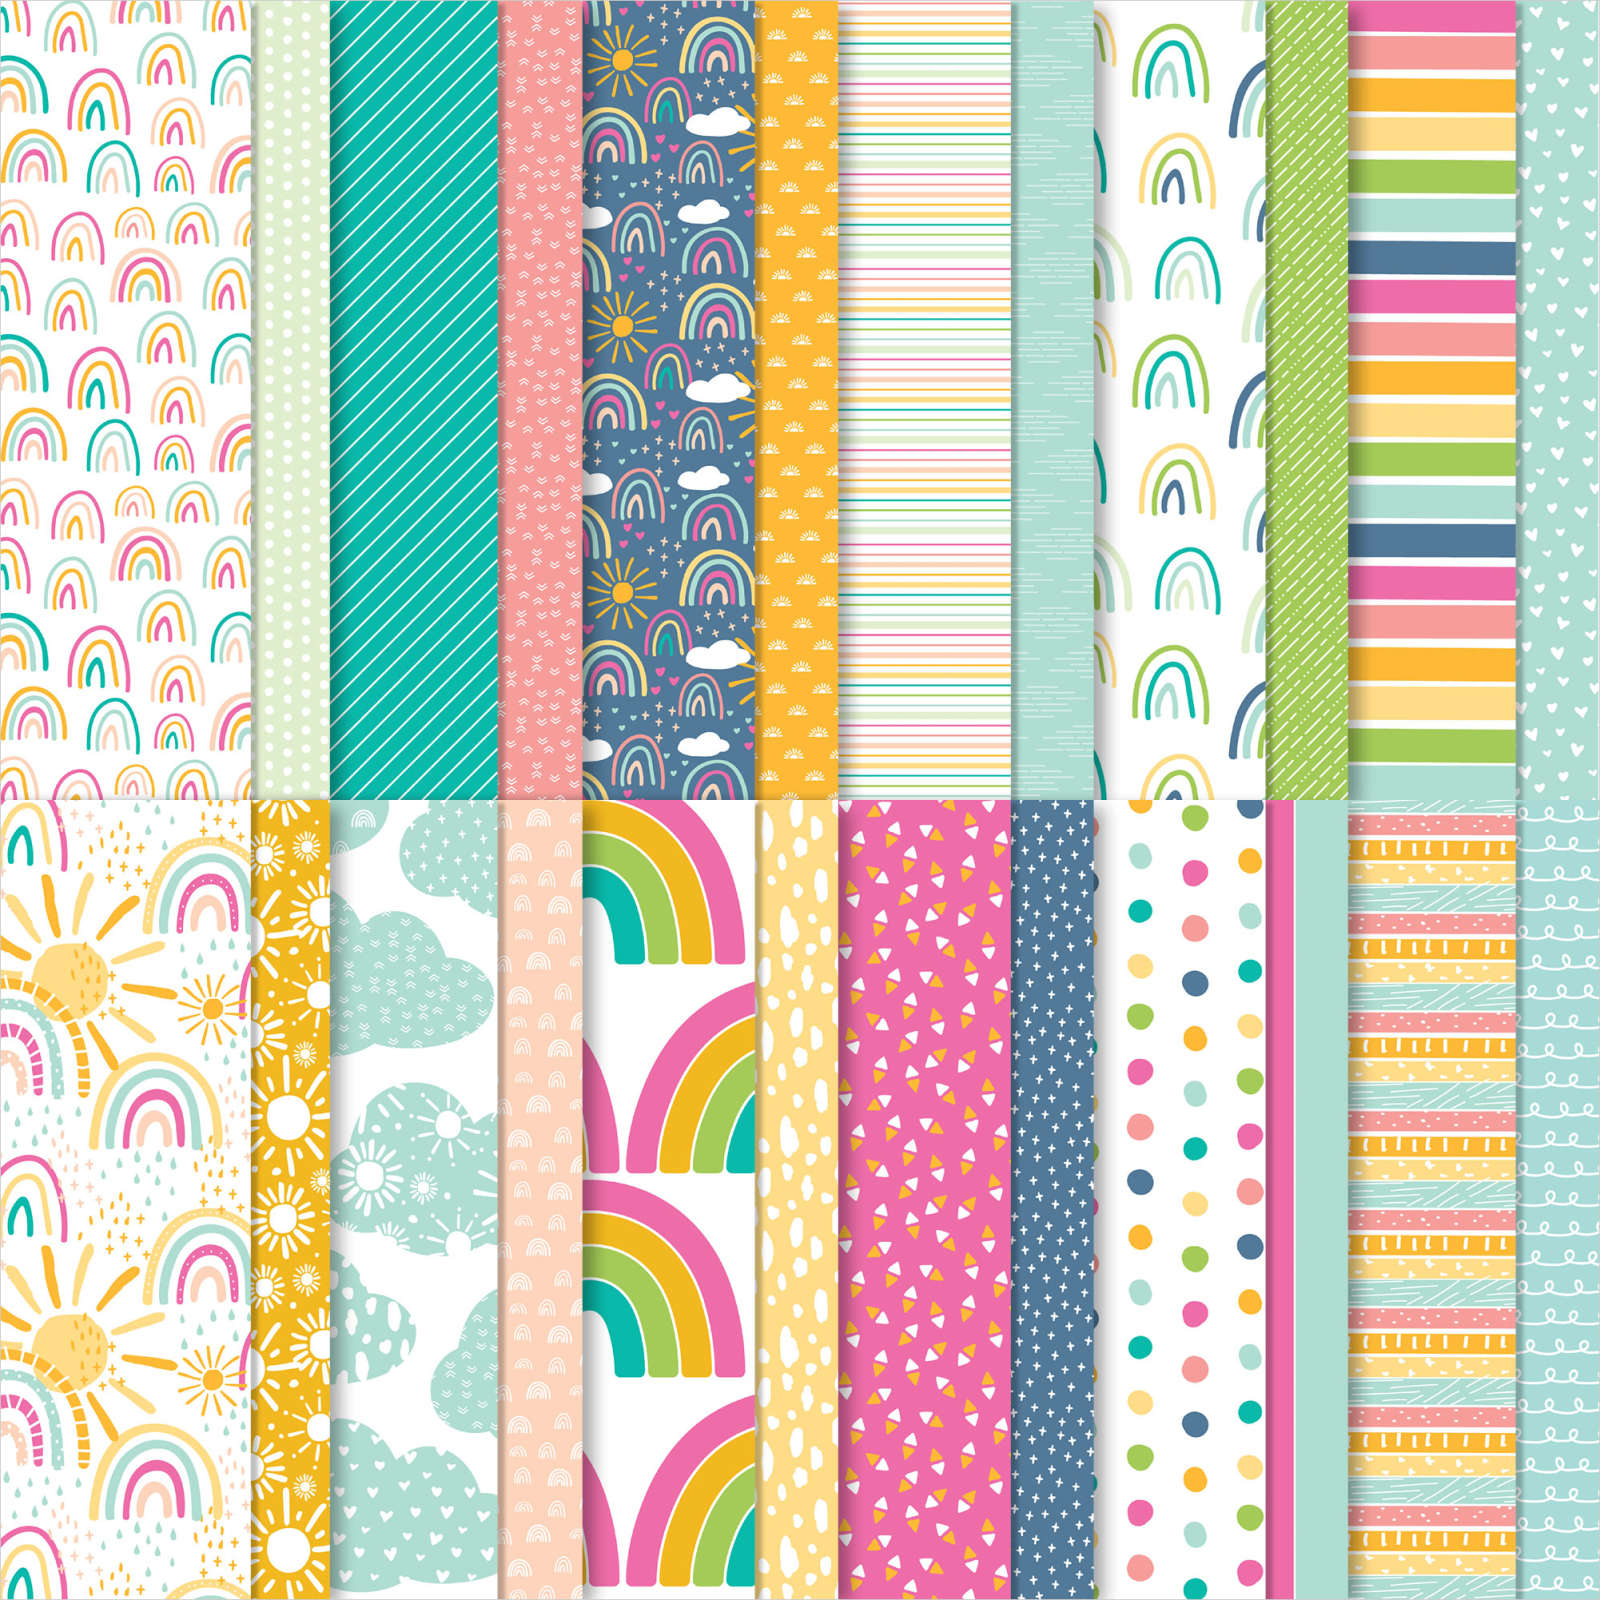
  • The clouds are punched using the new Cloud punch from either the Simply Ombre DSP, the Sunshine & Rainbows DSP or the Supple Shimmer paper. *The cloud punch matched the Sunshine & Rainbow DSP perfectly! 
  • The stamped images are from the Rainbow of Happiness & the Celebrating You stamp set; both in the 2022 Jan-June catalog
  • The DSP inside the card is the Sunshine & Rainbow paper from the Sale-a-Bration catalog; it's free with any $50 order. 
  • They could add either raindrops from the Silver & Clear Epoxy Essentials or the Artistry Blooms sequins. 
  • The frame was made by cutting a rectangle from a 4" X 5 1/4" Basic White CS with the Stitched Rectangle dies.  

Have you noticed this gorgeous glimmery specialty paper in the annual catalog?  It's perfect for rainbows & that touch of glitter.

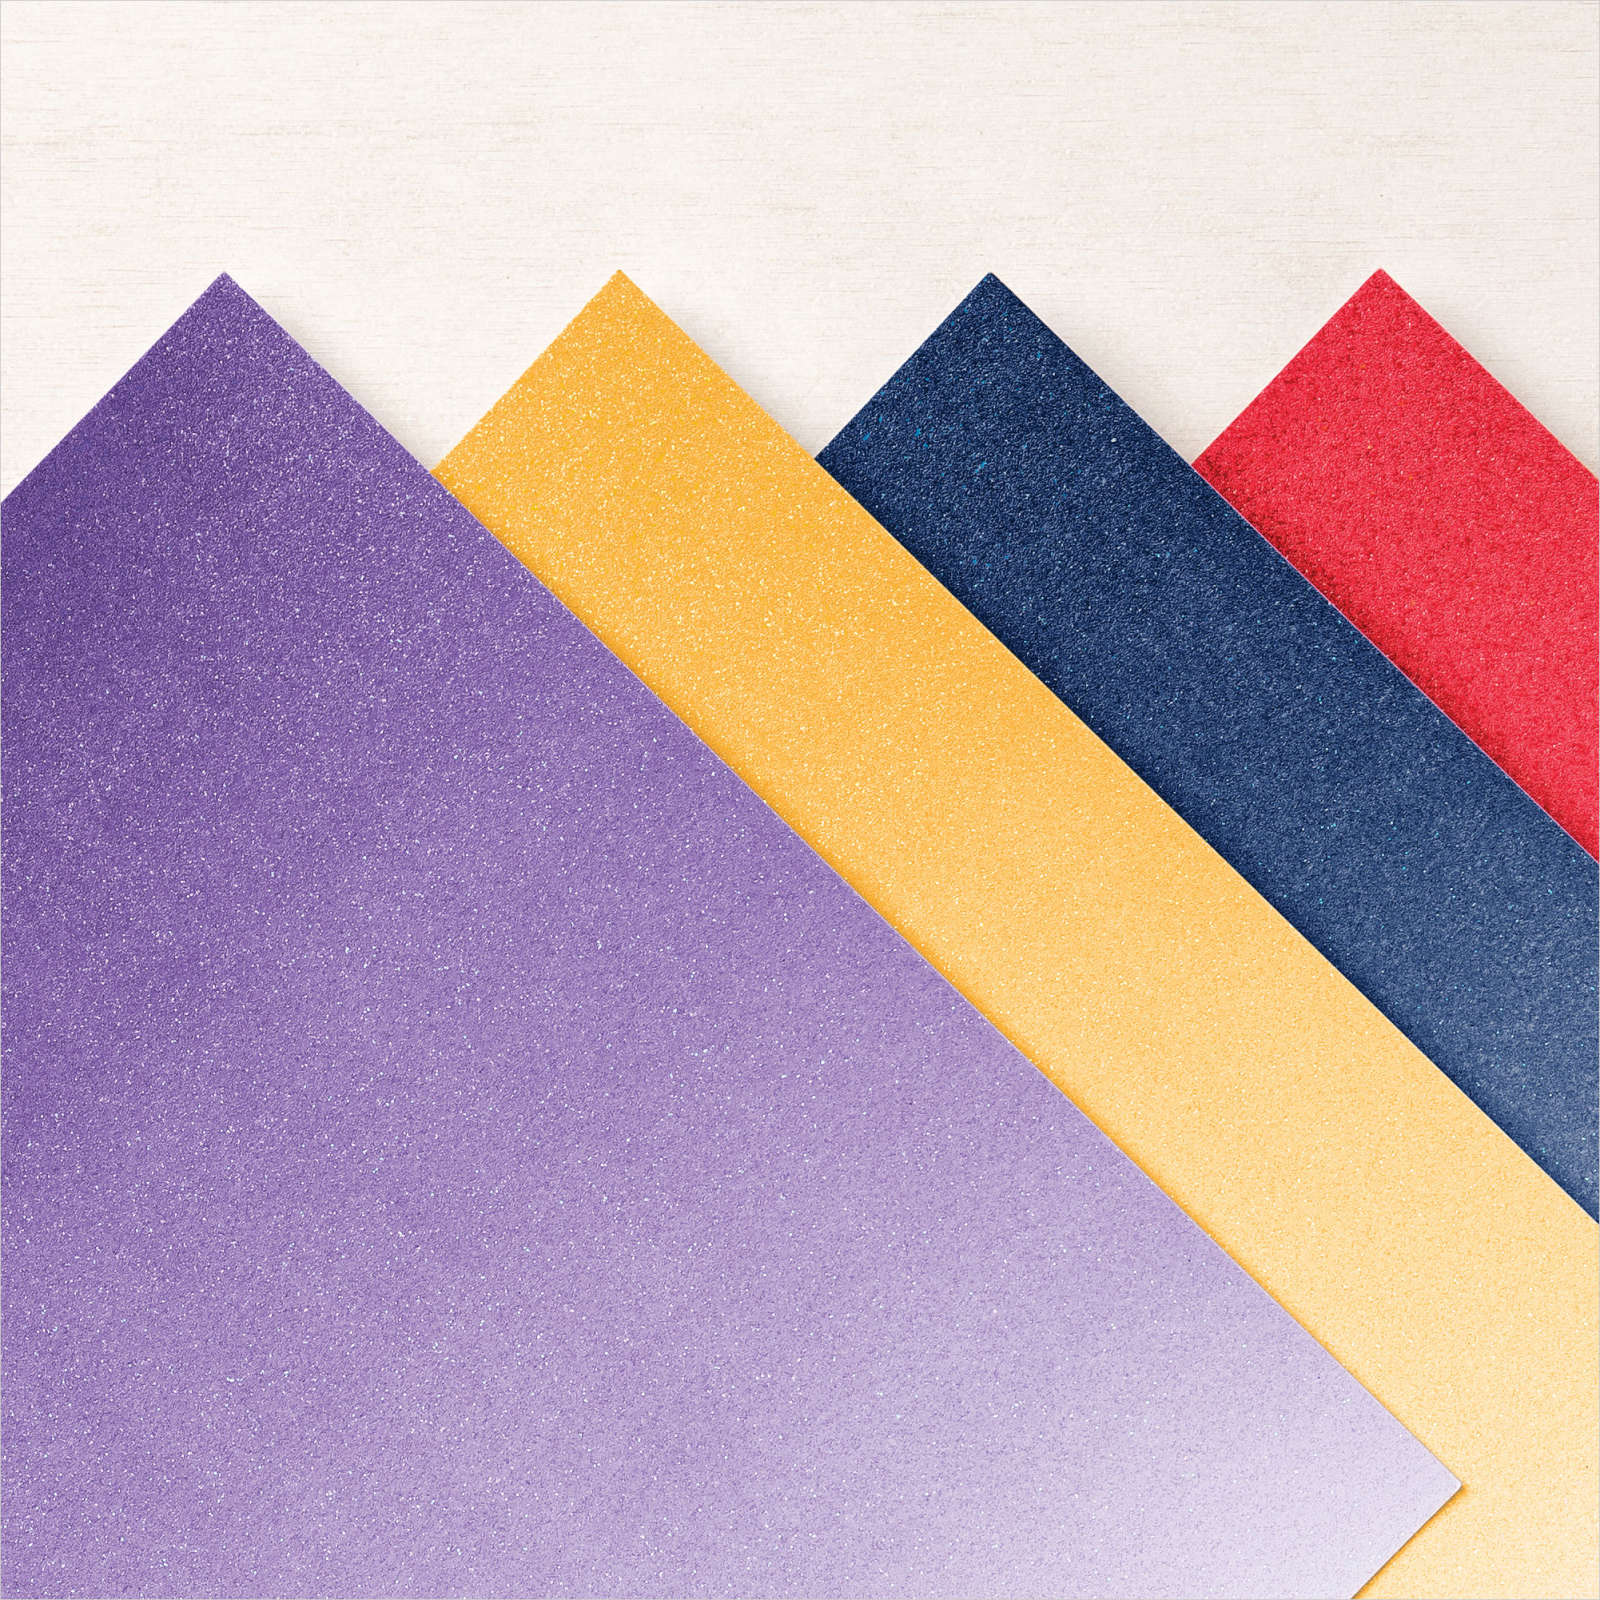
You can see the glimmer better in this close up. 

Did you know the Sunshine & Rainbows 6 X 6" DSP coordinates with our new Cloud punch?  The cloud punch is currently unavailable but it will be back after March 28th. 

 See the DSP here; it's so happy & bright.  Remember it's retiring after Monday; the last day of Sale-a-Bration.  It's free with any $50 order. 

They could add greetings inside the easel if they wanted to.  We used Night of Navy ink for all greetings.  

Measurements: 

  • Pool Party easel card base 4 1/4" X 11" scored at 3 3/4" & 5 1/2"
    Pool Party 4" X 5 1/4"
    White 4" X 5 1/4" for rectangle frame
    DSP inside 2" X 4"

Click on the photo below to watch the video; there are quite a few important tips for success in making this special card.

~~~

 Hot Deals & Gifts Galore in February:

Choose $125 in product PLUS any 2 stamp sets free in February!

It's just $99. Get FREE shipping too!

Host codes: EU76H4H7

 *click here to order 

End of February special; 6 FREE card kits!


In addition to these card kits you'll also receive the PDF tutorial for them AND a free embellishment too! 

All Posts

  • Fabulous Holiday Catalog Open House & BOGO event – tomorrow, Sept. 4th!!


    Tomorrow is my annual BOGO sale, combined with the new Holiday Catalog open house!  The deals are incredible!

    Here's how it works. For every dollar you spend on my retired Stampin' Up! products you can choose new FREE products from the catalogs or online merchandise.  It's amazing!  

    I've saved up a year of products for this annual event. I have lots of designer paper, stamp sets, kits and more.  

    If you're near me in Minot, ND I hope you'll stop in and bring a friend too! There will be product displays, free cards with orders & as always lots of yummy treats. 

    *The new Holiday Catalog goes live tomorrow, September 4th. And so does the new Scrapbooking line too!  (see link below) 

    **Leftover product will be boxed up for my Mystery Box sale coming later this month

    ~~~

    September Specials:

    *current host code links: M0Z4KJD7 or CT3XZ9TD

    ~~~

    Check out the new Scrapbooking Line from Stampin' Up! 

    See the Brochure here

    ~~~

    All online orders will receive a free PDF tutorial featuring the

    Splendid Autumn suite

    Leave a Reply

    Your email address will not be published. Required fields are marked *

  • Unique fun fold card with the new Regal Winter suite – free project sheet & video too


    I shared the neatest fun fold card on last week's video.  It features the upcoming new suite called Regal Winter from the Holiday Catalog.  This catalog goes live on Wednesday, September 4th. 

    My colors were inspired by the beautiful Regal Winter designer series paper. Fresh Freesia, Blackberry Bliss & White. 

    It looks like a normal card front doesn't it?  It's not!  The right side has a fold to it and the edge is tucked under the diagonal layer. 

    Isn't that neat?  And it's super easy to make too, but to understand it you may have to watch the video below. Or click here to see it.  

    Here's the view of the inside once opened.  That center Blackberry Layer is attached to only the left side. The DSP strip is centered on it and helps you center the whole piece between the two outer flaps.  It's easy; watch the video! 

    **I'll be sharing two more pretty cards featuring this new suite on Tuesday's FB Live video (Sept 3rd). If you're on Facebook I hope you're following me.  If not find me here. 


    I created a free project sheet for you; click on the following link to download or print it.  Download Regal Flora Diagonal Latch card

    Below is the video for this card and another neat idea with the Full of Life DSP. Don't forget to subscribe to my YouTube Channel while you're there.  I post a new video each week! 

    ~~~

    September Specials:

    *current host code links: M0Z4KJD7 or CT3XZ9TD

    ~~~

    Check out the new Scrapbooking Line from Stampin' Up! 

    See the Brochure here

    All online orders will receive a free PDF tutorial featuring the

    Splendid Autumn suite


    Leave a Reply

    Your email address will not be published. Required fields are marked *

  • Incredible Seagull fun fold card with measurements!


    Lori made this adorable card for our August card swap.  

    It looks like a normal card front doesn't it. But wait!  It opens up like this:

    Isn't that neat?  The side flaps sneak under the front panel. 

    She chose the use the Lily Pond Lane designer paper for her card.  It's actually on sale right now – but the sale on our Designer Papers end tomorrow!  See all of the papers on sale here. 

    She added a white layer in the back for signing. It needed to be able to fold for the card to work so there's a crease in the center. 

    She used the Charming Duck Pond stamp set for her images & greetings. It's part of the Lily Pond Lane suite. 

    Measurements:

    • Card base – 2 pieces at 4 1/4" X 8 1/4" score at 2 1/4", 4" and 6 1/4" – the widest flap is on the left and right sice when the 2 pieces are sitting next to each other. 
    • 4 1/4" X 4 1/4" front. Glue onto the middle of the folded pieces to hold them together. 
    • White – 4" square for back of card
    • DSP 4 X 4" front, 2 at 1 1/2" X 4" inner panels & 2 at 2" X 4" outer panels 

    Thank you for the measurements Lori!  Here's an view of this neat card from above. 

    I hope to make one of these cards on a video soon.

    ~~~

    August Specials:

    *current host code links: M0Z4KJD7 or CT3XZ9TD


    Redeem your $5 coupon now! 

    ~~~

    Today is the last day to get a free In Color ribbon share with any online order over $55 from me!


    All online orders will receive a free PDF tutorial featuring the

    Season of Green & Gold suite

    Leave a Reply

    Your email address will not be published. Required fields are marked *


Notice: LeeAnn Greff, Independent Stampin’ Up! Demonstrator, Manager. The content of this website is my sole responsibility as an independent Stampin’ Up! demonstrator and the use of, and content of, the classes, services, or products offered on this website is not endorsed by Stampin’ Up! Copyright 2025