/


Latest Post

Playful Patterns cards kit to go; time limited!


The August cards kit to go features the fun & unique Playful Patterns designer paper.  It's perfect for so many happy occasions. 

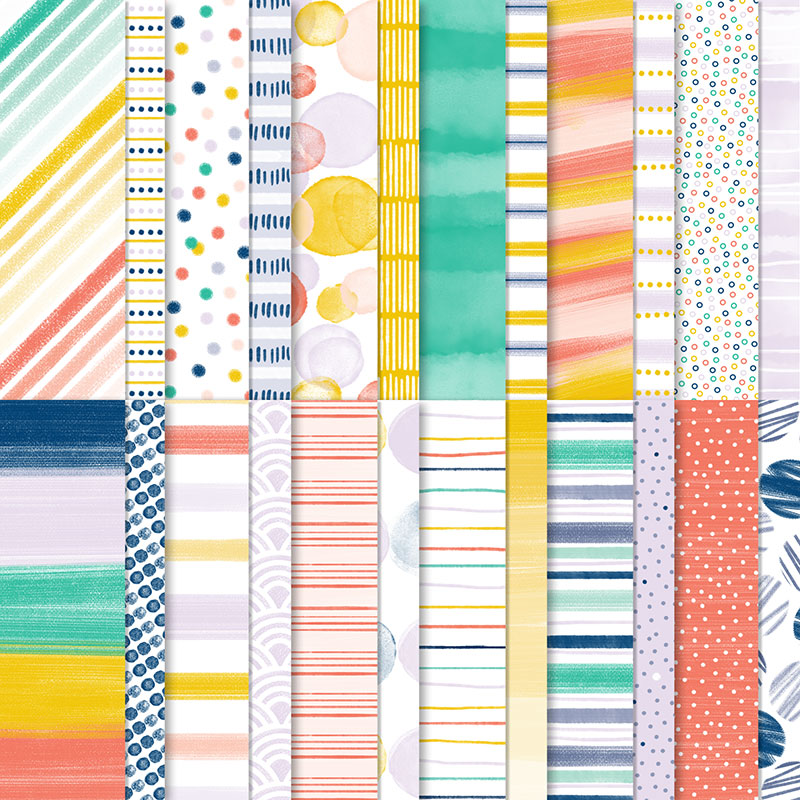
I created 10 cards for this cards kit to go in the beautiful array of colors in the designer paper. 

Aren't they neat?!  This paper totally inspired me to create fun, playful cards.  I only used a few inks too!  Night of Navy, Coastal Cabana, and Crushed Curry! 

This kit to go includes $20 in product and the 10 cards pre-cut also.  Here's what's included:

  • 1/2 package of the 6" Playful Patterns designer paper
  • 1 full package of the Playful Patterns ribbon combo pack
  • 1/2 pkg. of the Playful Patterns Resin Dots
  • the 10 pre-cut cards including punched & die-cut pieces
  • the pdf written tutorial sent in an email

I used the Many Mates stamp set to finish the cards.  If you'd like to add it on you can get it at 10% off with the kit. 


This pre-cut kits are available through August 20th.  But there is an option to get the Playful Patterns cards pdf tutorial without the kit too. 

  • $28 for the full kit to go; order here.
  • $60 for the full kit and the Many Mates stamp set here
  • $15 for the Tutorial here


I actually have two kits available in August.  If you want both this kit to go AND the Life is Beautiful kit seen here send me a note and I can combine shipping and save you some money!  Send to lagreff60@gmail.com for a combined shipping price. 

~~~

Bonus Days are here!

 
Redeem your $5 coupons now!  

~~~

Current Host code is QW7SUYVX

Get a free package of new Iridescent Pearls in August with an online order over $55. 

Order online here

 Get my Flowers for Every Season pdf tutorial free with all online order in August!


It includes directions, photos and measurements for 12 cards!

All Posts

  • A WOW fun fold card with Dragonfly Dreams!


    This weekend my Flowerbug's Team held our monthly card swap & Team gathering.  Our theme was window cards and I'll be sharing them all week long!

    Check out this special Z fold card Jacki made!  

    Her colors are Terracotta Tile, Black & White and the Dandy Garden Designer paper seen here.  Did you know that the Dragonfly Punch coordinates with this Designer Paper?  She punched her dragonflies directly out of the paper!  No stamping for these at all! See the Dragonfly Garden bundle here. 

    Check out the whole suite of products here. 

    This card features almost two full card bases with just a few score lines. It looks a lot harder than it is.  

    • Terracotta Tile – 5 1/2" X 8 1/2" scored at 4 1/4"
    • Whisper White – front is 4" X 5 1/4", inside fold is 5 1/4" X 8" scored on the long edge at 4" X 6". 
    • Designer paper – 1 3/4" X 5" 

    Her 'window' in the front is 2 3/8" and the black circle on the inside fold is the same.  The White greeting circle is 2 1/8".  All of these circles are cut with the Circle dies in the Annual Catalog. 

    Steps to assemble this card:

    • You'll adhere the White front to the main card base and then cut your window. 
    • Stamp on the inside White card before adhering to the inside of the main card.
    • Add the Designer paper to the inside fold.
    • Die-cut the greeting circles and adhere together. 
    • Fold the card closed and add the circle to the inside fold 'through' the front window.  Perfect placement!   

    More window cards posted tomorrow and all week long! 

    ~~~

    Current Host code is 39A9QQZP

    Order online here

    All online orders receive a free PDF of the new Butterfly Bouquet bundle

    with 15 projects!


    ~~~

    Get a free adhesive package from me with an online order over $50 using the host code above. 3 sheets of Dimensionals and 1 for die-cuts!

    *If your order is over $150 do not use the code; you'll still receive a gift! 

    Below are the Multipurpose Glue stands we're making. They're $6 each and available in my Shop here.  

    Leave a Reply

    Your email address will not be published. Required fields are marked *

  • Create gorgeous backgrounds with just a few common stamping items! Video tutorial!


    On Tuesday's FB live I shared a fun and easy technique for gorgeous backgrounds.  Once you create them you can use them to create stunning, beautiful cards like these:

    This was my first try at this technique this week.  Honestly it's not a new technique at all but I hadn't done it for years! The stamp set is called Soar Confidently (seen here) and I hadn't used it yet.  I think it works wonderfully with a pretty background. 

    I used Highland Heather, Gorgeous Grape, Bermuda Bay and Pacific Point Stampin' Write markers on an E block and spritzed with plain water.  Then 'stamp' on our Basic White CS and let dry with the block on it (this prevents warping).  Then stamp on it with any black ink.  

    Here are a few more samples I shared: 

    The left card above features the Dragonfly Garden stamp set and the right is the Floating & Fluttering set. 

    See what I mean?  And it's fun too!  Each time you do it they turn out differently so it's kind of addicting!  Watch the video below to see how easy it can be.  

    ~~~

    Current Host code is 39A9QQZP

    Order online here

    All online orders receive a free PDF of the new Butterfly Bouquet bundle

    with 15 projects!


    ~~~

    Get a free adhesive package from me with an online order over $50 using the host code above. 3 sheets of Dimensionals and 1 for die-cuts!

    *If your order is over $150 do not use the code; you'll still receive a gift! 

    Below are the Multipurpose Glue stands we're making. They're $6 each and available in my Shop here.  

    Leave a Reply

    Your email address will not be published. Required fields are marked *

  • Gorgeous Butterflies with the Brilliant Wing dies


    I was playing around with these dies and came up with these striking colored butterflies.   

    I used the designer paper as a template to sponge through.  This is what's left after you use the Brilliant Wings dies to cut out the 6 butterflies.  Although in hindsight I should have sponged on the other side so the die fit.  It was upside down on the die; I had to hold it up to the light to get the die placed correctly.  

    I added a piece of White CS behind these butterflies and used the Stitched with Whimsy dies to add that pretty stitched edge.  See those here. 

    Click on the image below to see these items in my store. Remember this designer paper is available through May 3rd or while supplies last.


    The greeting is from the Vine Design stamp set on a 1/2" strip of Poppy Parade card stock. 

    ~~~

    Current Host code is 39A9QQZP

    Order online here

    All online orders receive a free PDF of the new Butterfly Bouquet bundle

    with 15 projects!


    ~~~

    Get a free adhesive package from me with an online order over $50 using the host code above. 3 sheets of Dimensionals and 1 for die-cuts!

    *If your order is over $150 do not use the code; you'll still receive a gift! 

    Below are the Multipurpose Glue stands we're making. They're $6 each and available in my Shop here.  

    Leave a Reply

    Your email address will not be published. Required fields are marked *


Notice: LeeAnn Greff, Independent Stampin’ Up! Demonstrator, Manager. The content of this website is my sole responsibility as an independent Stampin’ Up! demonstrator and the use of, and content of, the classes, services, or products offered on this website is not endorsed by Stampin’ Up! Copyright 2025