/


Latest Post

Over the Moon Fun-Fold card


My friend Marilyn made this card for a swap with her Card Club this month.  Many of my Club gals swap cards every other month.  They are loving this and actually 'using' their products!  

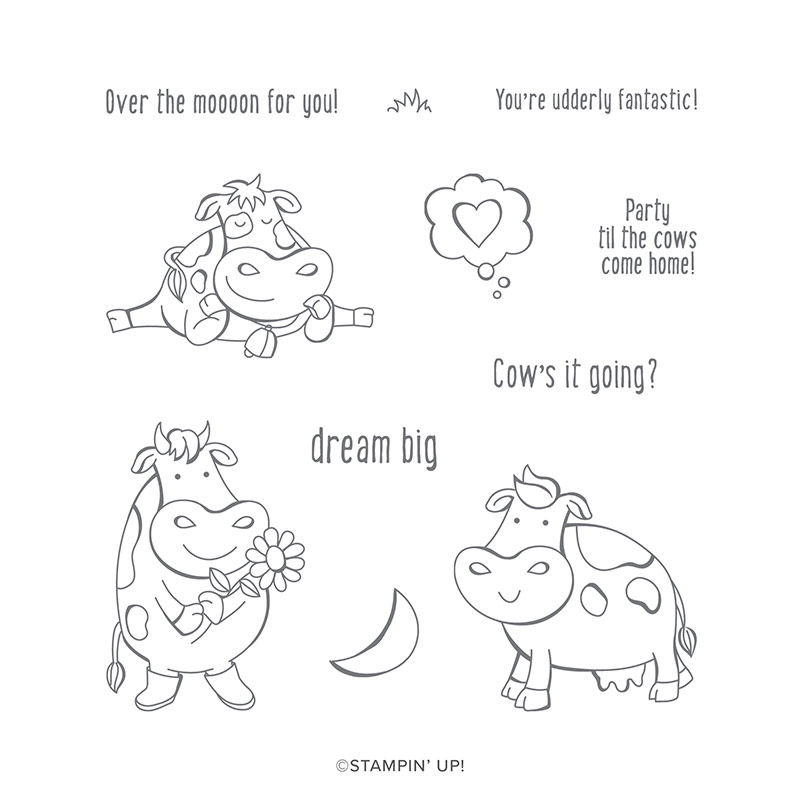
It's made with the 'Over the Moon' stamp set seen here.  

Isn't it cute?  It's a fun fold card where the front panel swings open on the bottom.

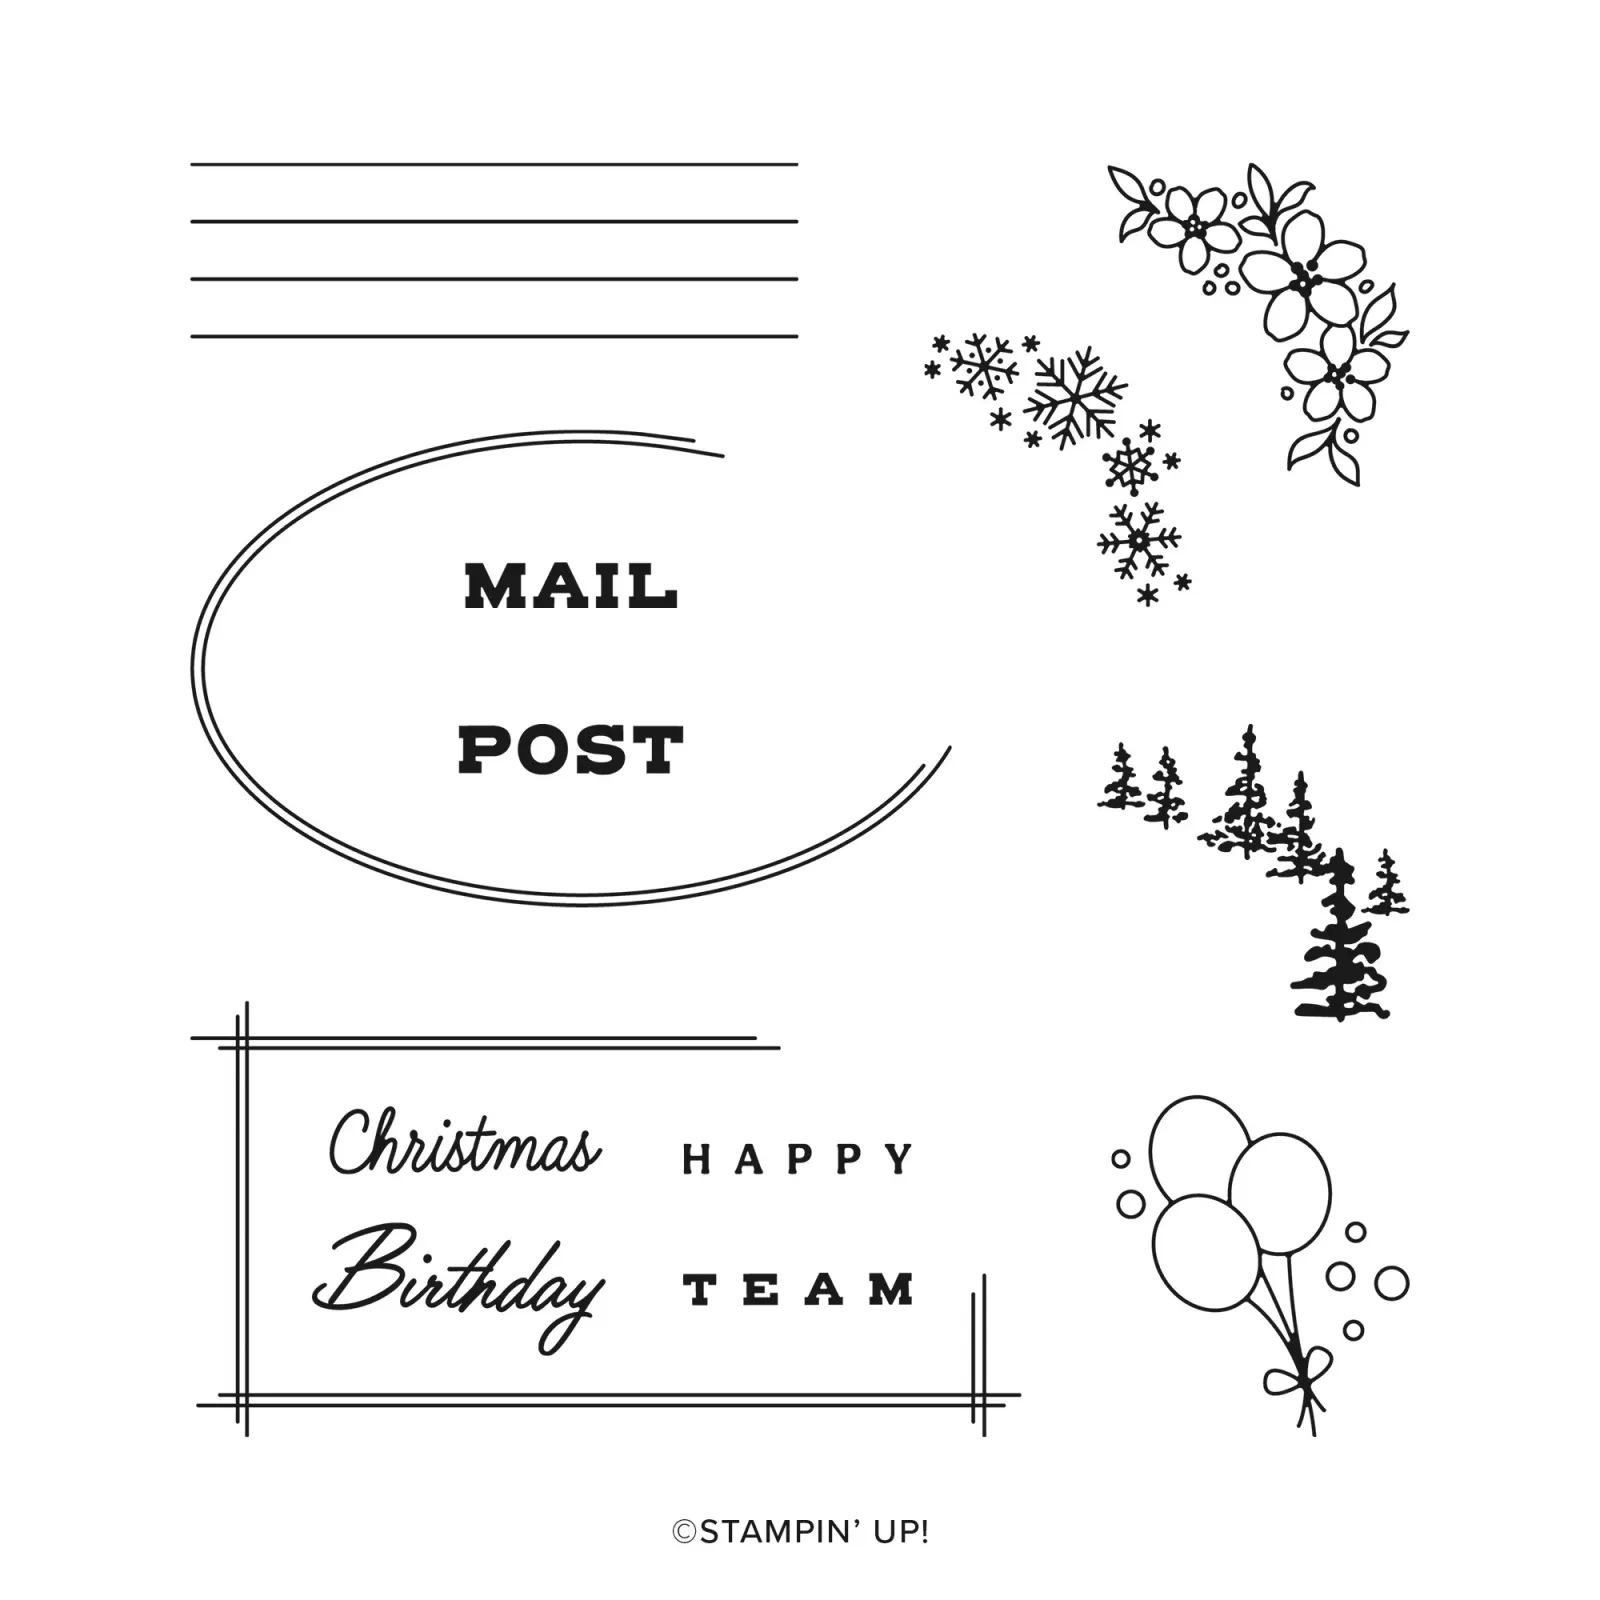
The black spots look like patterned paper but they're stamped using the 'Love What You Do' stamp set seen here.  Aren't they perfect?!!!

Measurements:

  • Black back – 4 1/4" X 5 1/2", bottom front 2 3/4" X 4 3/4" scored at 4 1/4", front panel 3" X 4 1/4" stitched rectangle
  • Real Red 2 5/8" X 4" stitched rectangle
  • White front 2 1/4" X 3 1/2" stitched rectangle, lower front spotted, stamped panel 2 1/2" X 4" 

~~~

Four February Specials just for you besides Sale-a-Braton

and the Product Coordination Release! 

    1. Earn a ticket in the drawing for each $25 you order online in February for a free Little Ladybug stamp set!

Order online here

2. All online orders will receive a free pdf cards tutorial in an email.

3. And if your order is over $55 you'll get a free package of Champagne Rhinestones too!

February Host Code is 4CQKPWRV

Order online here

4. Choose any FREE stamp set when you purchase the Starter kit during Sale-a-Bration; of any value! Plus you'll get a free paper trimmer and a 6 X 6 sampler of new Designer Paper!  It's just $99 plus tax; shipping is free!  Click here to join my awesome Flowerbug's Team! 


All Posts

  • Lovely Blossoms card kit to go or PDF tutorial; reserve yours now!


    Here’s the second card kit I created for February. I’m showcasing the Lovely Blossoms designer paper with these pretty cards:

    4 of the 5 layouts are fun folds. Each one shows you a special way to use this pretty designer paper. With it’s pretty color combinations they’re sure winners!

    You can choose from the pre-cut kit to go or the PDF tutorial. Both include the exclusive ‘how to’ video link.

    The pre-cut kit includes the 10 pre-cut cards, a half package (6″ X 12″) of the designer paper, a share of Moody dots and Secret Sea ribbon. It also includes the PDF tutorial with exclusive, private video link. Everything is cut for you except the designer paper in your kit. It’s $31 and can be reserved here. You’ll receive the tutorial immediately in an email. The kit will ship out at the end of the month, barring any supply issues.

    The PDF tutorial is just $16 and can be purchased here. The tutorial will be emailed to you immediately after purchase.

    I have two more NEW kits to go added this month. Save on shipping costs and grab more than one. See them all here.

    ~~~

    February Specials

    Product of the Month is the new Painted Illusions 12 X 12″ designer paper

    Get the NEW Stampin’ Positioner FREE when you choose the Starter Kit in February! Click here

    Bonus Days – Redeem your coupons in February!

    February’s PDF of the Month!

    Two NEW kits just released here:

    Check out the Last Chance List; new items are added and available

    while supplies last

    Leave a Reply

    Your email address will not be published. Required fields are marked *

  • Nature Walk card kit to go or choose the PDF tutorial option. Both include the exclusive video!


    I had to feature the Nature Walk designer paper for a card kit & tutorial. It’s just gorgeous with deep, rich prints.

    I paired it with the new Covered in Flowers Accents from the Spring catalog, the retiring butterflies and White Baker’s Twine. See those pretty floral & botanical die-cuts on the cards? That’s the Flower Accents! They come in a large single sheet of thick pre-cut pieces. They’re white but can be colored or textured. They were so fun to use on these cards!

    3 of the 5 designs are fun fold layouts. The kit & tutorial include 2 of each. You can choose from the PDF tutorial for $16 or the pre-cut card kit which includes up to $20 in Stampin’ Up! product for just $31.

    Everything is cut for you in this kit except for your new 1/2 package of the designer paper. You will need your own greeting images, inks, adhesives and paper trimmer.

    Reserve your kit here. Purchase the PDF tutorial here. It includes step by step directions, photos, a supply list and measurements.

    The tutorial with exclusive video link is sent via email immediately after purchase. The kit is sent at the end of February.

    See all of my kits here! There are TWO more added to the Shop this month!

    ~~~

    February Specials

    Product of the Month is the new Painted Illusions 12 X 12″ designer paper

    Get the NEW Stampin’ Positioner FREE when you choose the Starter Kit in February! Click here

    Bonus Days – Redeem your coupons in February!

    February’s PDF of the Month!

    Two NEW kits just released here:

    Check out the Last Chance List; new items are added and available

    while supplies last

    Leave a Reply

    Your email address will not be published. Required fields are marked *

  • Neat fun fold card 3 ways! With free tutorial & video


    We made this special card at my January card clubs. They could choose between 3 colors and themes too!

    I featured the Addressed to You stamp set for all three cards. See the cute ovals & rectangle with the ‘filled in’ images on the right? Those are all part of this unique stamp set! See it here.

    I used the retiring Textured Notes dies seen here. They’re the stitched edge rectangle dies used twice on this card. They are on the last chance list right now and reduced in price too!

    This card opens with a type of flip/flap feel. Here’s how we cut off the tabs on the card base. Once you score your card you’ll make a pencil mark from the top and bottom at 1″. Then trim off the corners.

    My colors include Pool Party, White and either Pretty in Pink, Fresh Freesia or Peach Pie.

    I created a free project sheet for this card with measurements, supplies and step by step directions. Click here to print or download it.

    More details:

    • I used the images that finished the lined oval & rectangle to decorate the inside ‘left’ edge on the cards.
    • We used Blends markers to color in the small images.
    • The DSP is the Beach Boardwalk designer paper for the left edge.
    • The greetings are from the stamp set called ‘The Right Words’ seen here. It’s one of my favorite greeting sets.

    I was in the middle of the video tutorial for this card but the video failed right before I started the project. And I made my last packet. So I do not have a video for it. But hopefully the project sheet above helps you out.

    ~~~

    February Specials

    Product of the Month is the new Painted Illusions 12 X 12″ designer paper

    Get the NEW Stampin’ Positioner FREE when you choose the Starter Kit in February! Click here

    Bonus Days – Redeem your coupons in February!

    February’s PDF of the Month!

    Two NEW kits just released here:

    Check out the Last Chance List; new items are added and available

    while supplies last

    Leave a Reply

    Your email address will not be published. Required fields are marked *


Notice: LeeAnn Greff, Independent Stampin’ Up! Demonstrator, Manager. The content of this website is my sole responsibility as an independent Stampin’ Up! demonstrator and the use of, and content of, the classes, services, or products offered on this website is not endorsed by Stampin’ Up! Copyright 2025