/


Latest Post

More Monochromatic swaps featuring flowers


I’m sharing more of my Team’s monochromatic swaps today. These pretty cards all feature flowers. 

This first stunning card is made by Barb who used the Spotlight on Nature stamp set. I was shocked to see it on the Last Chance list and it’s already out of stock! 

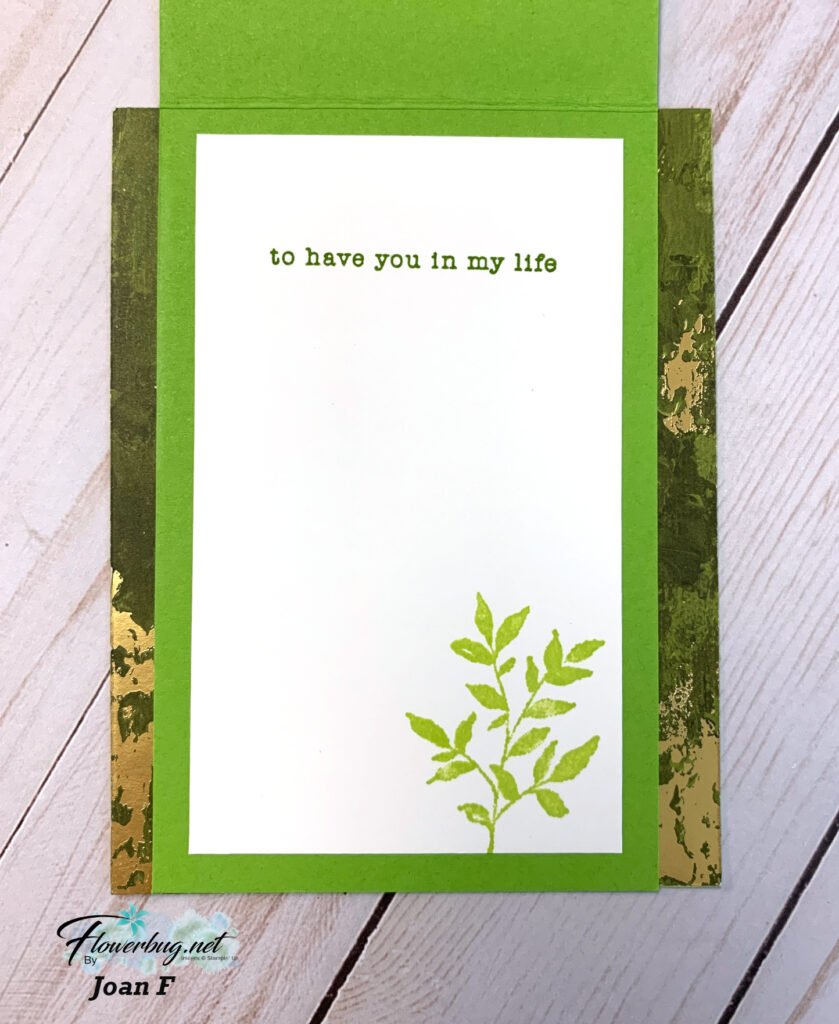
Joan is a master at coloring!  Look at the shadow effect she achieved on the flowers and leaves! It looks like it’s raised but it’s simply stamped and Blends marker was added all around the image.

The other stamps she used are Sentimental Framing and Textured Notes. The inks are Granny Apple Green & Memento Black. She added Holographic Resin Dots, a linen thread bow and Wink of Stella on the butterfly to finish it off.  

She gave me measurements I can share with you too! 

  • Lemon Lime Twist 4 1/4″ X 5 1/2″
  • Granny Apple Green 3 1/2″ X 11″ scored at 5 1/2″
  • White 3 1/4″ X 5 1/2″, inside is 3″ X 5″, greeting is 3 1/4″ X 1″
  • Season of Elegance DSP 2 pieces at 3/4″ X 5 1/2″

Here’s a view of the card opened:  

/

You’ve created a beautiful card Joan! 

~~~

Next is a card made by Joan’s mom, Barb. It’s her first time swapping with us and she did a wonderful job! 

Barb chose the Gallery Blooms stamp set. She stamped the flower in Night of Navy and used Wink of Stella to pull the color into the image. Very cool idea! 

She used the Textured Notes dies (2nd & 3rd largest) for her blue layers of Night of Navy and Blueberry Bushel. 

Measurements:

  • Night of Navy card base 4 1/4″ X 11″ score at 5 1/2″
  • Blueberry Bushel 4 3/4″ X 3/4″, scrap for greeting
  • White 2 3/4″ X 4 1/2″ for die-cut, inside is 3 1/2″ X 4 3/4″

Beautiful job Barb!

~~~

Next is a pretty card made by Candace featuring the pretty Charming Day bundle seen here. 

Her colors include White, Soft Seafoam and Basic Gray.  She added color to the floral die-cut with Blends markers and then added Wink of Stella to all of the die-cuts. 

The pretty leaf die-cuts also have Soft Seafoam Blends added. The texture is the Exposed Brick embossing folder seen here.   I just love the clean look of this pastel color with White.

Here’s the inside view.  Simply stamping the flower image in the same ink is a beautiful say to finish it. 

I’ll be sharing our swap cards all week; stay tuned! 

~~~

August Specials

Lots of In Color products are discounted in August!!

Go here to see them all. 

Get a free card class with any online order over $55 during August!

Order online here

The last chance list has new products! See them here. 

All Posts

  • Easiest Shake Card Ever; plus the quickest Christmas cards you can make!!


    Have you wanted to make a shaker card but didn't want to deal with the Foam Adhesive and window sheets?  Well I have a solution for you!  Use a clear envelope!  Yes; it works beautifully!

    I used one of the Wonder of the Season cards, cutting it down to 4" X 5 1/4" and adding another layered strip.  I then inserted it into one of our clear envelopes (seen here) and folded the excess to the back, securing it with Tear & Tape.  Then I added some Sequins for Everything and sealed it up.  It's adhered to a Real Red card base and the greeting is adhered to the front. 

    The stamps are from the Tag Buffet stamp set. 

    You can watch how I did this in the video below; it's one of the first projects. 

    In the video I also shared the Wonder of the Season Memories & More projects.  These cards are beautiful and filled with gold & red foil accents.  I love these because they are super quick & easy!  All I added were some Red rhinestones!  No stamping or extra card stock!  

    Here are a few I made:

    Remember I only used three products on these!  All you need are the cards (seen here) and the cards & envelopes (seen here) and Red Rhinestones.

    You can use the 3 X 4" cards for the pretty card bases so the foil accents show.  Or flip the front to the inside and use the larger 4" X 6" cards on the front.  This way you can still see that pretty foil on the inside! 

    Watch the video below to see these projects & more! 

    December Ordering Special: 

    Current Host code is NQHKDKZR

    Order online here

    All online orders will receive my 16 Christmas cards class PDF!

    Get a free package of 220 Red Rhinestones from me with an online order over $50 using the host code above.


    Leave a Reply

    Your email address will not be published. Required fields are marked *

  • Wow Peace & Joy card!


    Look at this amazing card Jacki made for our Flowerbug's swap last month!  Count the layers! 

    I count 8 layers on the front alone!  She used lots of Holiday catalog products to make this gorgeous card including the following:

    • Peace & Joy Bundle seen here
    • Brightly Gleaming Specialty DSP
    • Plush Poinsettia Specialty paper seen here
    • Snowflake Adhesive Backed sequins

    Aren't those Joy dies amazing? They include all 3 layers of the greeting.  It also includes the words Joy & Peace too. 

    December Ordering Special: 

    Current Host code is NQHKDKZR

    Order online here

    Get a free package of 220 Red Rhinestones from me with an online order over $50 using the host code above.


    Leave a Reply

    Your email address will not be published. Required fields are marked *

  • Video with Stampin’ Up! Stitched Dies for some easy WOW cards!


    Look at these fun and unique cards made with the Stitched Triangle dies!  

    Aren't they neat?  Our Stitched dies are quite versatile and can be used in a variety of ways as you can see! 

    I used the Well Said stamp set, Well Written & Stitched Triangle dies.  The DSP is 5 1/4" X 4" and the Vellum ¾" X 4”

    These cards were created on last week's FB Live video.  If you're not following me yet here's the link to my FB page.  Be sure to like & follow so you catch them every week on Tuesdays at 11 am CT.  

    Check out the Stitched Rectangle cards below.  I cut all of the Playful Patterns Designer Paper layers at the same time using just 2 dies.  

    How did I do it?  Start out with a piece measuring 5 1/4" X 4" and choose the 3rd & 6th dies from the outside.  Perfect layers! 

    I then layered the Designer Paper with card stock and added a die-cut greeting from the Best Year stamp set. 

    Supplies & Measurements:

    • Coastal Cabana, Crushed Curry, & Calypso Coral
    • Tasteful Label dies, Detailed Bands dies, rhinestones
    • DSP – 5 ¼” X 4”, and cut with dies at 3 ¾” X 3” & 3 1/8” X 1 ¾”
    • CS – 4 5/8” X 3 ¼” and 3 3/8” X 2”

    Remember you can find me here on Facebook 6 times a month! 

    ~~~

    Today's the last day for my November specials:

    Current Host code is NQHKDKZR

    Order online here


    All online orders receive my FREE Curvy Celebrations 22 project PDF Tutorial! 

    Below are the Multipurpose Glue stands we're making. They're available in my Shop here.  


    We can fit three in a box for almost the same shipping cost. They are $6 each and shipping is about $3-4 in US.   They make great gifts for your stamping friends!  

    Leave a Reply

    Your email address will not be published. Required fields are marked *


Notice: LeeAnn Greff, Independent Stampin’ Up! Demonstrator, Manager. The content of this website is my sole responsibility as an independent Stampin’ Up! demonstrator and the use of, and content of, the classes, services, or products offered on this website is not endorsed by Stampin’ Up! Copyright 2025