/


Latest Post

Magical Meadow & Winter Meadow fun fold cards


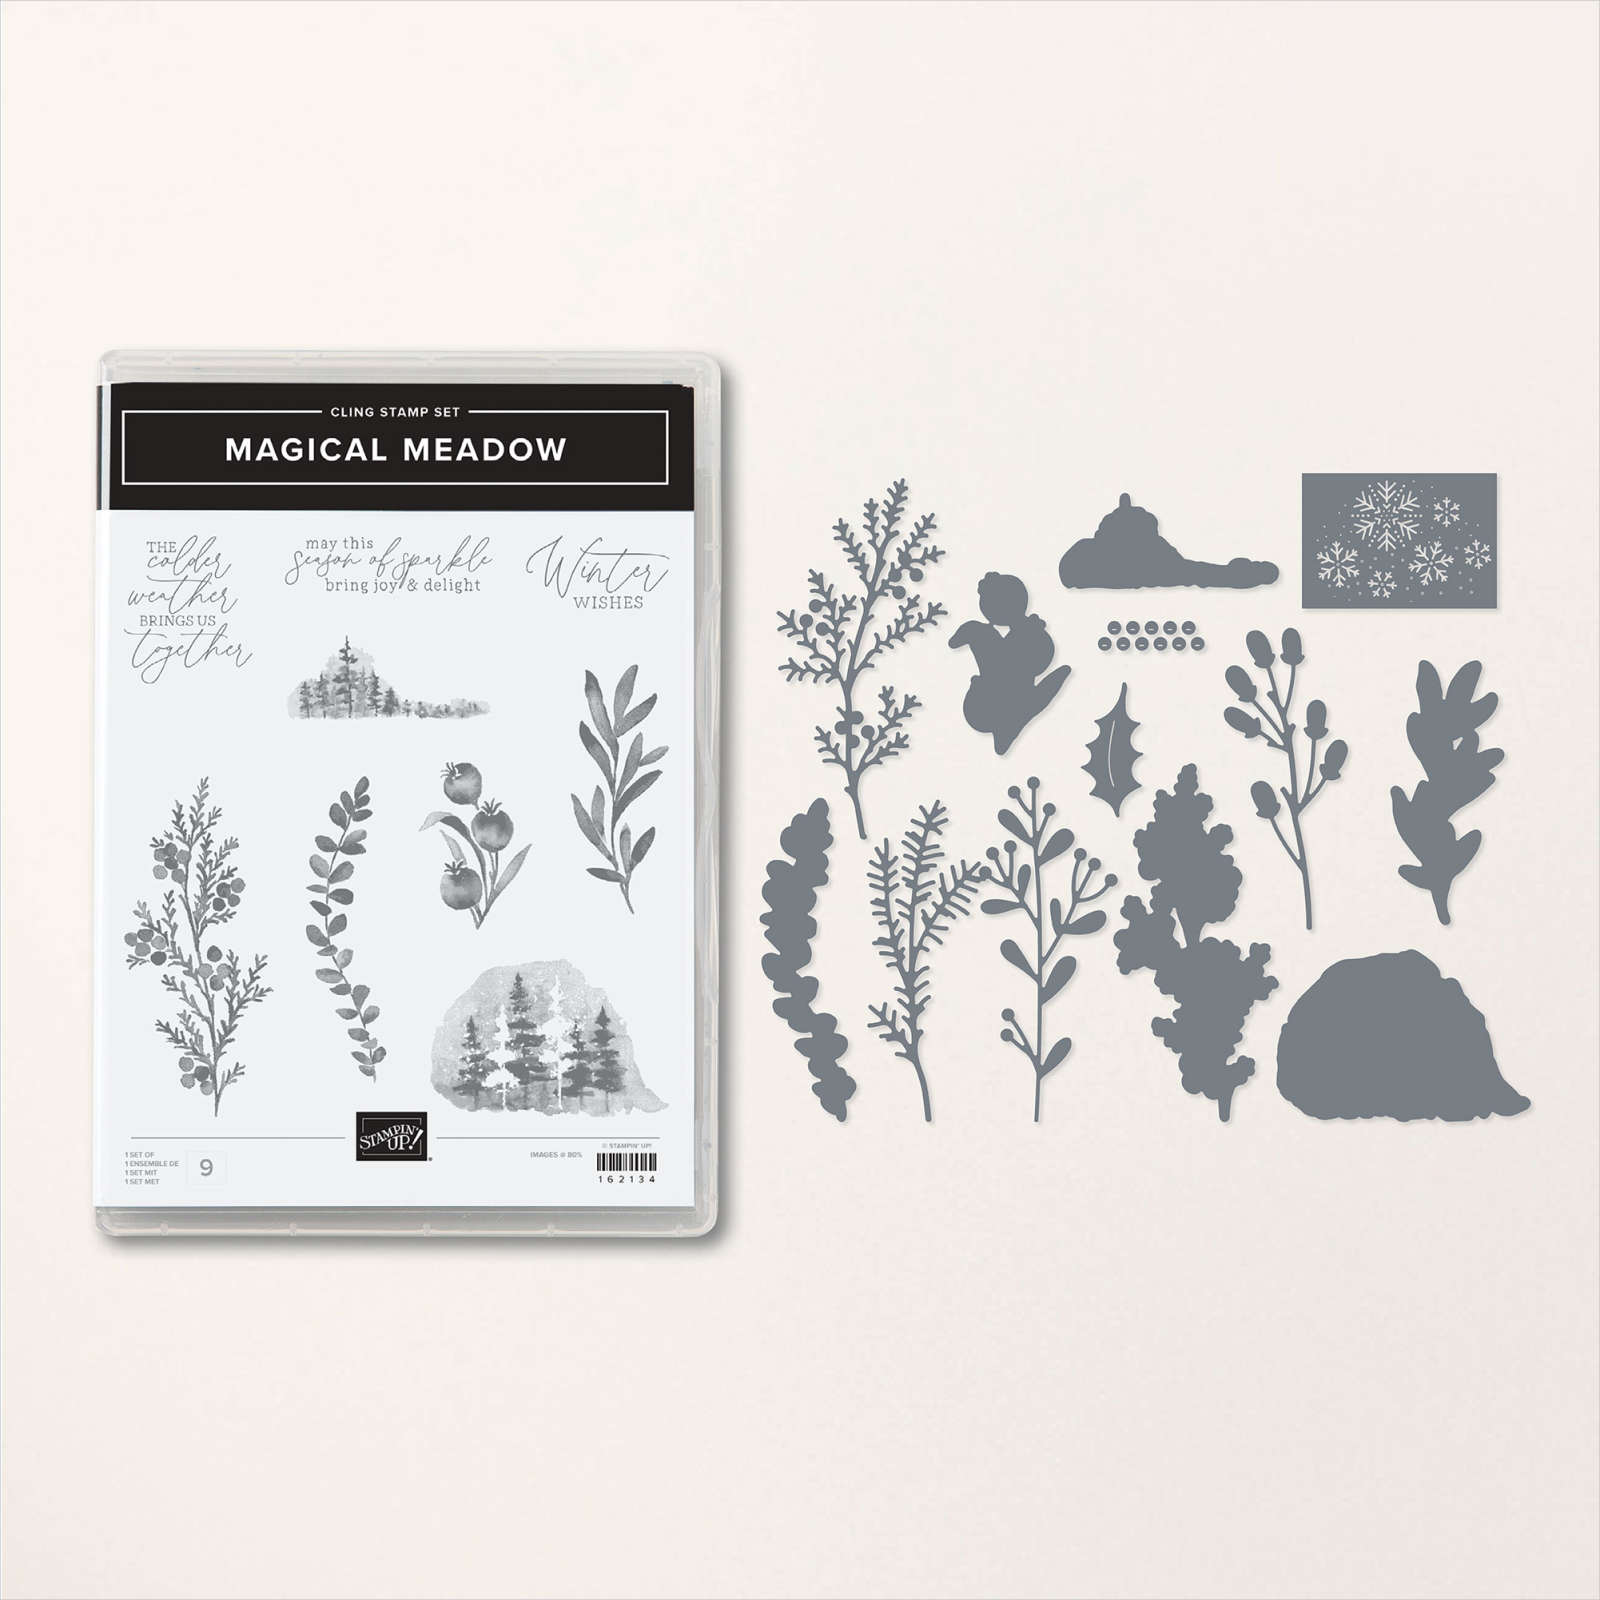
Today I'm sharing two gorgeous cards made with the Magical Meadow bundle and the Winter Meadow designer paper.  Judith created multiple projects using this suite as the Artist of the Month on my Flowerbug's Team for November.

First is a window card using the Deckled Circle dies: 

Her colors include Gray Granite & Whisper White. The die-cut greeting is from the Autumn Leaves dies. I've always liked the ribbon tied around the window like this; a unique touch! 

Measurements:

  • Card back is 4 1/4" X 5 1/2"
  • Designer paper 8" X 5 1/4" score at 4", window die-cut is 2 1/2"

The designer paper is carrying over but sadly the Magical Meadow bundle is retiring soon; it's still available while supplies last. 

This next card is a fabulous way to feature your double sided designer paper.  

Start with a 11" X 4 1/4" layer. Score the left side at 1" and the center at 5 1/2". Fold back the 1" score line and secure closed. She used the Deckled Circle dies and the Silver & White ribbon on her greeting layer; both from the 2023 Holiday catalog. 

Add a layer inside or just a simple greeting like she did. 

The Winter Meadow designer paper is gorgeous as you can see. Beautiful water-colored scenes make your design work easy! I'm so glad it's carrying over for a few more months.  See it here. 

I'll share more projects tomorrow!

~~~

November Specials: 

*current host codes:  4D2ZDS6Q or 77277NNH

Click on the image below to see the Holiday Last Chance items 


All Posts

  • WOW! Check out this Beautiful Butterflies stained glass technique


    I was amazed by Candy's card swap this month!  Look at this beauty!!


    It's called the Stained Glass technique and she made it for our July Team swap featuring Window Sheets.  

    Her colors include Pretty Peacock with Highland Heather. The bundle is called Beautiful Butterflies and can be seen here. 

    Steps:

    • She stamped the butterfly image on a window sheet using Black Stazon ink. 
    • Turn it over and color with Blends markers. 
    • Add adhesive sheet to the Blends side. Press onto slightly crinkled aluminum foil. 
    • Adhere to a second butterfly stamped on White CS for support and to cover the foil. 
    • Fussy cut; add to card. 

    Other products used here:

    Measurements:

    • Card base 11" X 4 1/4" score at 4 1/4" & 5 1/2"
    • Highland Heather 4" square
    • DSP strip 1 1/8" X 4"
    • inside 4" square

    Thank you for creating your incredible swap card Candy!  Great job!!

    ~~~

    July Specials:


    New Online Exclusives are here!  Click here

    ~~~

    Get my Turtle-y Cute PDF tutorial free with any online order in July!

    Leave a Reply

    Your email address will not be published. Required fields are marked *

  • Wow; Mixed Florals Reverse Image Technique with window sheets!


    I'm continuing to share our July team swaps featuring window sheets. 

    Look at the stunning card made by Paula. For her card swap she made a Reverse Image technique cased from Kylie Bertucci.  

    The stamp & die bundle is called Mixed Florals and can be seen here.

    She used Crushed Curry for her card base and Floral Impressions designer paper.  I'm so impressed by her gorgeous coloring with the Blends markers!  What pretty shading she achieved! 

    Below you can see how she also colored the reverse side so when you flipped up the card front it's just as pretty on the inside!  So neat.  I also love the diagonal slant on the front. 

    The card opens to reveal 3 layers!  

    Measurements:

    • Crushed Curry card base- 1 at 4 1/4" X 11" scored at 5 1/2", another at 7 1/4" X 4 1/4" scored at 5 1/2" (cut on the diagonal) and two extra slat pieces to cover both front & inside of the card. 
    • DSP – 4" X 5 1/4" X 3 pieces
    • White inside 3 1/2" X 4 3/4"; plus die-cuts 


    Thanks so much for your creative & beautiful card Paula! 

    ~~~

    July Specials:


    New Online Exclusives are here!  Click here

    ~~~

    Get my Turtle-y Cute PDF tutorial free with any online order in July!

    Leave a Reply

    Your email address will not be published. Required fields are marked *

  • Free Shipping starts today! Get an extra $10 in rewards with me. Adorable Tractor & Co card


    Today starts the Free Shipping promotion that lasts for 3 days! And I'm adding on to your rewards too!

    When you order $75 in product from me you'll receive an extra bonus of $10 in product rewards. Here's how it works:

    • Once your order reaches the $75 mark (before tax) the free shipping will kick in. 
    • You'll automatically receive 10% product rewards from Stampin' Up! 
    • I'll gift you an extra $10 in rewards to your online account.  *you must opt in for both contact and gift rewards though.  
    • You'll have up to a year to redeem these rewards. 
    • You'll also receive a gift of a DSP sampler from me as well (see details below). 

    Shop online here. 

    ~~~

    Look at this super cute tractor card Candace made!  This bundle has some amazing pieces in it.  

    This new Tractor & Co bundle is from our Online store and can be found here.  

    Here's the inside view where you can see how she trimmed a portion of her card front away to create the window effect. *She'd normally stamp or add to the inside but she had to rush to get them mailed out in time.  

    Measurements:

    • White card base 11" X 4 1/4" score at 5 1/2". Trim away 1 3/8" from the center 
    • Navy layers – top is 5 1/4" X 1 3/8", lower is 5 1/4" X 1 1/4"
    • White torn edge 5" X 1"
    • scraps for tractor & tree die-cuts

    Her colors & sponging are amazing as usual.  She used Silver foil for her tire rims and clear rhinestones for the starry sky.  

    ~~~

    July Specials:


    New Online Exclusives are here!  Click here

    ~~~

    Get my Turtle-y Cute PDF tutorial free with any online order in July!

    Leave a Reply

    Your email address will not be published. Required fields are marked *


Notice: LeeAnn Greff, Independent Stampin’ Up! Demonstrator, Manager. The content of this website is my sole responsibility as an independent Stampin’ Up! demonstrator and the use of, and content of, the classes, services, or products offered on this website is not endorsed by Stampin’ Up! Copyright 2025