/


Latest Post

Lots of amazing Masculine card ideas this week!!


This weekend my Flowerbug's Team met for our monthly gathering and swap.  Our theme was masculine cards and wow, did they get creative. I'll be sharing them all week long!

Note that each of these animals are stamped in just one color.  There's no need to color them in; let the beautiful images be the star!

This first card is made by Kim; she used the Wildlife Wonder stamp set from the 2022 Annual Catalog by Stampin' Up!  


The unique dies she stamped & layered are from the Diorama dies seen here. 

Her card is a book binding fun fold.  The main card measures 4 1/4" X 11" scored at 4 1/2" & 5 1/2" for the side & front fold.  The designer paper is from the He's the Man DSP on page 134 of the Annual Catalog.  It measures 3/4" X 4" & 4 1/4" X 4". 

~~~

Next is another simple yet striking card made by Marilyn.  She used the Wild & Sweet stamp set seen here in the Annual Catalog. 

Again, simply stamping the gorgeous detailed image in one color is all you need.  The colors include Early Espresso, Mossy Meadow & Pear Pizzazz with Very Vanilla.  

Other products are the Fern 3D folder, Stylish Shapes, Stitched Rectangles & Picture This dies.  The gems are the Rustic Metallic Adhesive-Backed dots.  

Measurements:

  • Card base 5 1/2" X 8 1/2"
  • Fern embossed layer 5 1/4" X 4",
  • Vanilla & Early Espresso die-cuts 4" X 2 5/8"

~~~

This next card was made by Paula; she featured TWO new Sale-a-Bration items on her unique card. 

I love that she made the rings of Love designer paper the star by 'framing' it. The 1 3/4" X 3" 'frame' is made with our new 'Deckled Rectangle dies' seen here. This DSP is from the Sale-a-Bration selection called Rings of Love seen here. It's free with any $50 Stampin' Up! order. 

The greetings are from the Amazing Phrasing stamp set; also in the Sale-a-Bration catalog & seen here.  She stamped on the Sahara Sand layer before she textured it with the Timber 3D embossing folder.  The White Frayed ribbon adds a neat detail.

~~~

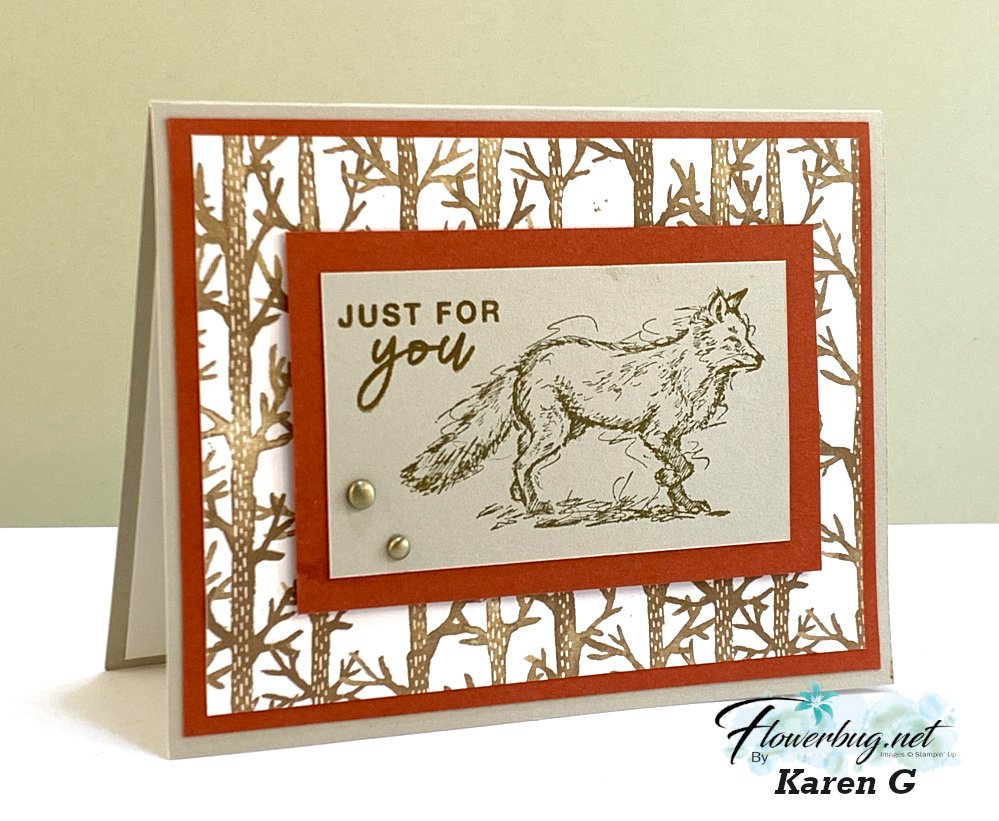
Last but not least is a wonderful card made by Karen.  She is featuring the Stylish Sketches stamp set; a free choice from the current Sale-a-Bration catalog. *see it here


Her colors include Cajun Craze with Sahara Sand. I really like the images stamped on the Sahara Sand instead of our usual White or Vanilla.  

That pretty DSP is from the Sale-a-Bration selection called Rings of Love seen here. It's free with any $50 Stampin' Up! order.  The greeting is from the coordinating Ringed with Nature set in the Holiday catalog.  

Measurements are:

  • Card base 5 1/2" X 8 1/2"
  • Cajun Craze 5 1/4" X 4" and 4" X 2 1/2"
  • DSP 5" X 3 3/4"
  • Sahara Sand stamped layer 3 1/2" X 2"

Stay tuned for more manly card ideas tomorrow and all this week!  

~~~

July Specials

Get free items here in July & August during Sale-a-Bration! 


Host code: SX67P4XQ


Get a free card class in the mail with a $55 order from July 1-30th.

 *click here to order 

Earn free products with my loyalty rewards! 

Click here to download yours and earn a $50 shopping spree!

~~~

Get either of my Designer Paper shares; or both & save on shipping!  

Holiday Catalog DSP or Annual Catalog DSP (I have 2 spots left) 


All Posts

  • A simple trick makes this Floating Pop-Up card work; with measurements & video!


    This special fancy fold card is super unique and makes you wonder just how it's sort of floating!  You will be shocked at what it takes to make it work.  

    I used the Crane of Fortune bundle to create this card. The colors are so soft & pretty – Gray Granite, Calypso Coral, White & Early Espresso. 

    The front panel flips up as you open the card and it even wobbles a bit.  You can see how it works in the video, or scroll down to the next photo.  

    I stamped the main image on a die-cut from the Stitched So Sweetly dies. They are on the retiring list; so if you don't have them yet you know what you need to do! 

    The Good Fortune dies include the pretty leaves I used to hold my card open. When doing this be sure to add Dimensionals under the image to support the card open.  

    You need two little pieces of card stock under the front layers to make the pop-up work.  Mine are 1/2" X 2 1/2" but size really does not matter here.  Just fold them in half and secure one side to the card base and the other to the top layer. Do this on each side of the front panel. Again, please watch the video here to see how it works.  

    Please follow me on Facebook here to catch my Live videos each week.  I share 6 each month and my focus is to inspire you to stamp by sharing great ways to use Designer Paper, unique fun folds and easy techniques.  


    Click on the photo below to watch the video. 


    ~~~

    The Last Chance list is out!
    Tons of items from the 2021-22 Annual Catalog are retiring and many are deeply discounted from 20-50% off.
     
    Remember that these items are while supplies last and may run out. 
    Click here to see it all online along with the discounts.

    Host codes: E7S6DEAP

     *click here to order 

    If your order is over $50 you'll receive free Polished Dots or In Color jewels and 3 hand made cards from me.


    Don't forget about my loyalty rewards! 

    Click here to download yours and earn a $50 shopping spree!  

    Leave a Reply

    Your email address will not be published. Required fields are marked *

  • Blending Brush border idea with Artfully Layered; so pretty!


    I created these pretty cards on last week's FB Live video.  I LOVE the colors and style; they're so my style!  

    I chose to play with the Artfully Layered bundle seen here in colors of Coastal Cabana and Granny Apple Green.  Having a lot of 'white space' makes the textures & pretty leaves the clear star of the card. 

    I used a blending brush to blend the two inks on a piece of White card stock and then cut the leaf die-cut from that.  

    For the multi-colored border underneath I used the blending brush to add the same colors.  I love the effect!  

    The cross-hatch texture is made with the dies in the bundle.  There are two of them in the set that give textures. 

    I also used the Faux Sea Glass shapes for accents.  

    The measurements are in the post below but here they are again: 

    • White card base 5 ½” X 8 ½”
    • White 3 ½” X 4 ¾”, sponged layer 3 ¾” X 5”

    Click on the photo below to watch the video; it's the first project of three.  And be sure to follow me on Facebook here. 

    ~~~

    The Last Chance list is out!
    Tons of items from the 2021-22 Annual Catalog are retiring and many are deeply discounted from 20-50% off.
     
    Remember that these items are while supplies last and may run out. 
    Click here to see it all online along with the discounts.

    Host codes: E7S6DEAP

     *click here to order 

    If your order is over $50 you'll receive free Polished Dots or In Color jewels and 3 hand made cards from me.


    Don't forget about my loyalty rewards! 

    Click here to download yours and earn a $50 shopping spree!  

    Leave a Reply

    Your email address will not be published. Required fields are marked *

  • Sailboats & Palm Trees featured in today’s card swaps!


    Today's post are the last of my talented Flowerbug Team swaps for April.  Our theme was water, trees or leaves and I've been sharing their cards all week!  It's so fun to see everyone's style and actually receive cards from people across the country.  I LOVE swapping! 

    The first card is made by Candy; she is featuring the Paradise Palms bundle seen here.  Her colors include Mossy Meadow, Crumb Cake and Black.  


    That pretty die-cut across and under the greeting is part of the Palm dies in the bundle.  She used the Double Oval punch for her greeting.  

    It's stunning and a perfect 'guy' card!  Thank you for sharing your fabulous card with us.  

    The next card was made by Tammi. She used the Let's Set Sail bundle in the 2022 Jan-June Stampin' Up! catalog.  This bundle is returning in the upcoming Annual Catalog in May.  I love this punch! 


    She created her own watercolor background by washing diluted color (Pool Party & Balmy Blue) onto her White CS.  She also textured her background with the Tasteful Textile embossing folder.  This folder is retiring now and it's on sale too! I'm so sad about it as I think it's a staple. It is a perfect way to add texture without a lot of busyness.  See it here; get it while you can! 

    ~~~

    The Last Chance list is out!
    Tons of items from the 2021-22 Annual Catalog are retiring and many are deeply discounted from 20-50% off.
     
    Remember that these items are while supplies last and may run out. 
    Click here to see it all online along with the discounts.

    Host codes: E7S6DEAP

     *click here to order 

    If your order is over $50 you'll receive free Polished Dots or In Color jewels and 3 hand made cards from me.


    Don't forget about my loyalty rewards! 

    Click here to download yours and earn a $50 shopping spree!  

    Leave a Reply

    Your email address will not be published. Required fields are marked *


Notice: LeeAnn Greff, Independent Stampin’ Up! Demonstrator, Manager. The content of this website is my sole responsibility as an independent Stampin’ Up! demonstrator and the use of, and content of, the classes, services, or products offered on this website is not endorsed by Stampin’ Up! Copyright 2025