/


Latest Post

Look at this! Ornate Borders wow!


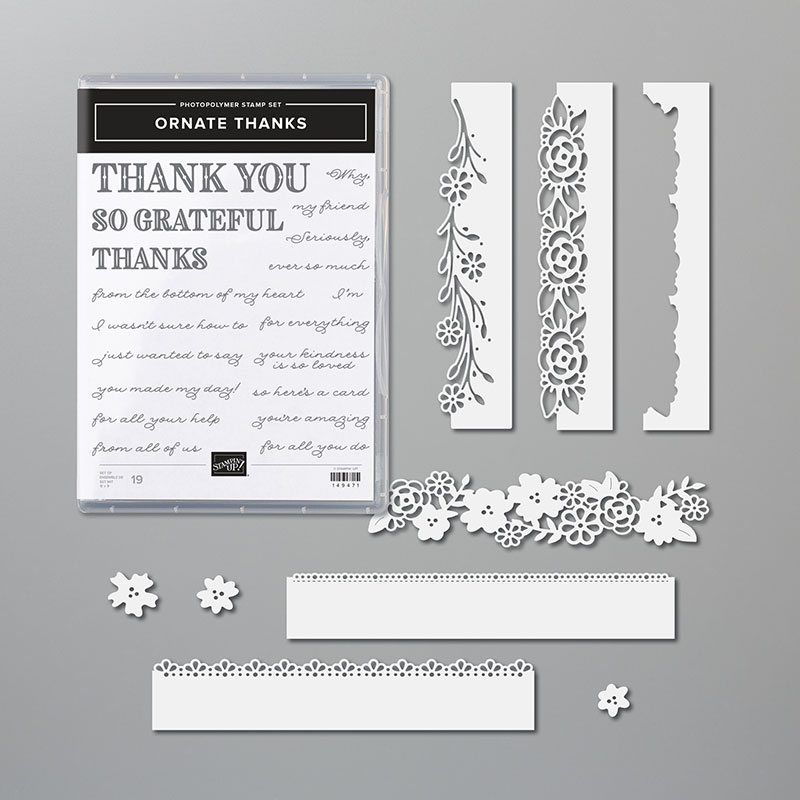
This is one of the cards I made for everyone who orders the Ornate Thanks bundle (or the Ornate Garden Suite) from me this month. 

I used THREE of the Ornate Border dies for this card! 

It's Blueberry Bushel with White accents.  I will sure miss this color!  It will be retiring in just 9 days!  Be sure to get any of the 5 retiring in colors while you can. Once the list comes out on April 22nd they go very fast.

Isn't that border die amazing?  And so simple too. The Blueberry Bushel card starts out as usual at 5 1/2" X 8 1/2", scored at 4 1/4".  Then I used the detailed floral border die on the lower edge. *save a few of the leaves for the flower accent in the corner. 

I used the dotted border die on the lower edge of the White card stock.  Stamp your greetings and add the ribbon and bow. 

Next cut out the third detailed floral die-cut from a strip of White card stock.  Trim off just a little section of the flowers to add to the upper left corner; with a few of the extra leaves from the lower edge die-cut. 

Adding a White layer inside the card for stamping and/or writing your message highlights the gorgeous floral trim on the front.  

This is just one of the FREE 3 cards you'll receive from me when you purchase either the Ornate Thanks bundle OR the entire Ornate Garden Suite from me this month.  See it all here in my online store. 

And remember that all online orders over $55 in April will receive a free Simple Shammy from me too! Details below. 

~~~~

Two April ordering specials to choose from:

All online orders in April will receive my tutorial of the month; with 16 cards

featuring the Ornate Garden products seen here.

**Order either Ornate bundle from me and get a free 3 cards pre-cut kit! Order both and get a 6 cards kit with pdf tutorial! 

Orders between $55 and $99 will receive a free Simple Shammy!

Use this host code for April: MMM4SXSB  

~~~~~

Or….

Join my Little Ladybug party! 

While supplies last; the first 10 people in April to order over $100 using this exclusive party host code 49HFZ6G3 will get a free Little Ladybug cards class that includes the stamp set and a 4 cards pre-cut kit! 

There is just 1 set left!

Sold out! 


All Posts

  • Merry Christmas to you!


    Merry Christmas! I hope you are able to spend it with loved ones.

    It’s my favorite time for our family! Our kids are coming as usual and we have a good time playing games, making puzzles, lots of sweet treats and good meals too. We also play Minute to Win It games and have an appetizer showdown too!

    Leave a Reply

    Your email address will not be published. Required fields are marked *

  • Pretty Bridge fold card with Snowflake Kisses with free project sheet & video tutorial


    I shared this pretty card on last week’s Live video. It features the Elegant Pine Snowflake designer paper and the Snowflake Kisses bundle.

    My colors include Pretty Peacock, White & Lost Lagoon above. The Elegant Pine Snowflake designer paper is beautiful and can be seen here.

    I created a second card with Secret Sea as the card base instead of Pretty Peacock. Which do you prefer?

    This card is a bridge fun fold layout. It starts out with a 5 1/2″ X 8 1/2″ card base but requires two extra cuts from the center score line down 1 1/8″ from each edge. It’s easy with our Paper Trimmer. Watch the video below to see how it’s done.

    I created a free project sheet for you with photos and measurements. Click here to print or download it.

    I hope you try one. If you haven’t made one before please watch the video below. They are quite fun to make & open!

    The photo below shows the card closed, the main panel lifted and the inside! Tip: We used a handmade stencil to sponge snowflakes on the inside. *cut snowflakes from a piece of card stock and sponge or blend ink through the windows.

    Below is the video tutorial which includes a second card with this bundle. I hope you watch it! Don’t forget to subscribe to my YouTube channel here.

    *You’ll receive a PDF with multiple projects featuring this product
    after the 20th of the month.
    ~~~

    The Last Chance list has been updated!
    Click here to shop.

    Get a free PDF tutorial with any online order from me in December!

    Leave a Reply

    Your email address will not be published. Required fields are marked *

  • Save time on finishing the inside of your cards with this trick!


    I’m excited to share these stunning snowflake cards with you today. We made them at my card clubs in December.
    Living in North Dakota, we usually see a lot of snow in the winter so these cards are great for many occasions.

    I used the Snowflake Kisses bundle seen here. It’s filled with wonderful greeting images and lots of snowflake dies.

    My colors include Pretty Peacock with Cloud Cover and Gorgeous Grape with Fresh Freesia. I think blues & purples are perfect for snowflakes. We used a blending brush to add more color to the large snowflake die-cut.

    After creating the cards above I thought I’d try combining the colors on the large die-cut.

    Isn’t that pretty? I just love combining Gorgeous Grape with Pretty Peacock on the Fresh Freesia die-cut. Blending Brushes make this a breeze!

    Look how we finished the inside.

    I wanted to add snowflakes to the inside of the card but didn’t want to die-cut tons of them for my club gals. So I came up with creating a snowflake stencil.
    I cut multiple snowflakes from a piece of card stock and we used Blending Brushes to add pretty snowflakes to our White layer. I truly love the effect it gives.

    If you’d like the free project sheet for this card click here. You can download or print it.

    See how this card is made in the video below. I also shared a second Snowflake Kisses fun fold card.

    *You’ll receive a PDF with multiple projects featuring this product
    after the 20th of the month.
    ~~~

    The Last Chance list has been updated!
    Click here to shop.

    Get a free PDF tutorial with any online order from me in December!

    Leave a Reply

    Your email address will not be published. Required fields are marked *


Notice: LeeAnn Greff, Independent Stampin’ Up! Demonstrator, Manager. The content of this website is my sole responsibility as an independent Stampin’ Up! demonstrator and the use of, and content of, the classes, services, or products offered on this website is not endorsed by Stampin’ Up! Copyright 2025