/


Latest Post

Hurry! The Clearance Rack has new products & incredible deals up to 60% off! Do not wait!


A sale is always exciting but a clearance rack refresh is even more so because the discounts are steep! 

Click here or on the photo above to see it all.  Remember these items are while supplies last and every hour items sell out! 

There are tons of designer papers, gems, specialty papers, card & envelope combos, card kits, punches & more! 

~~~

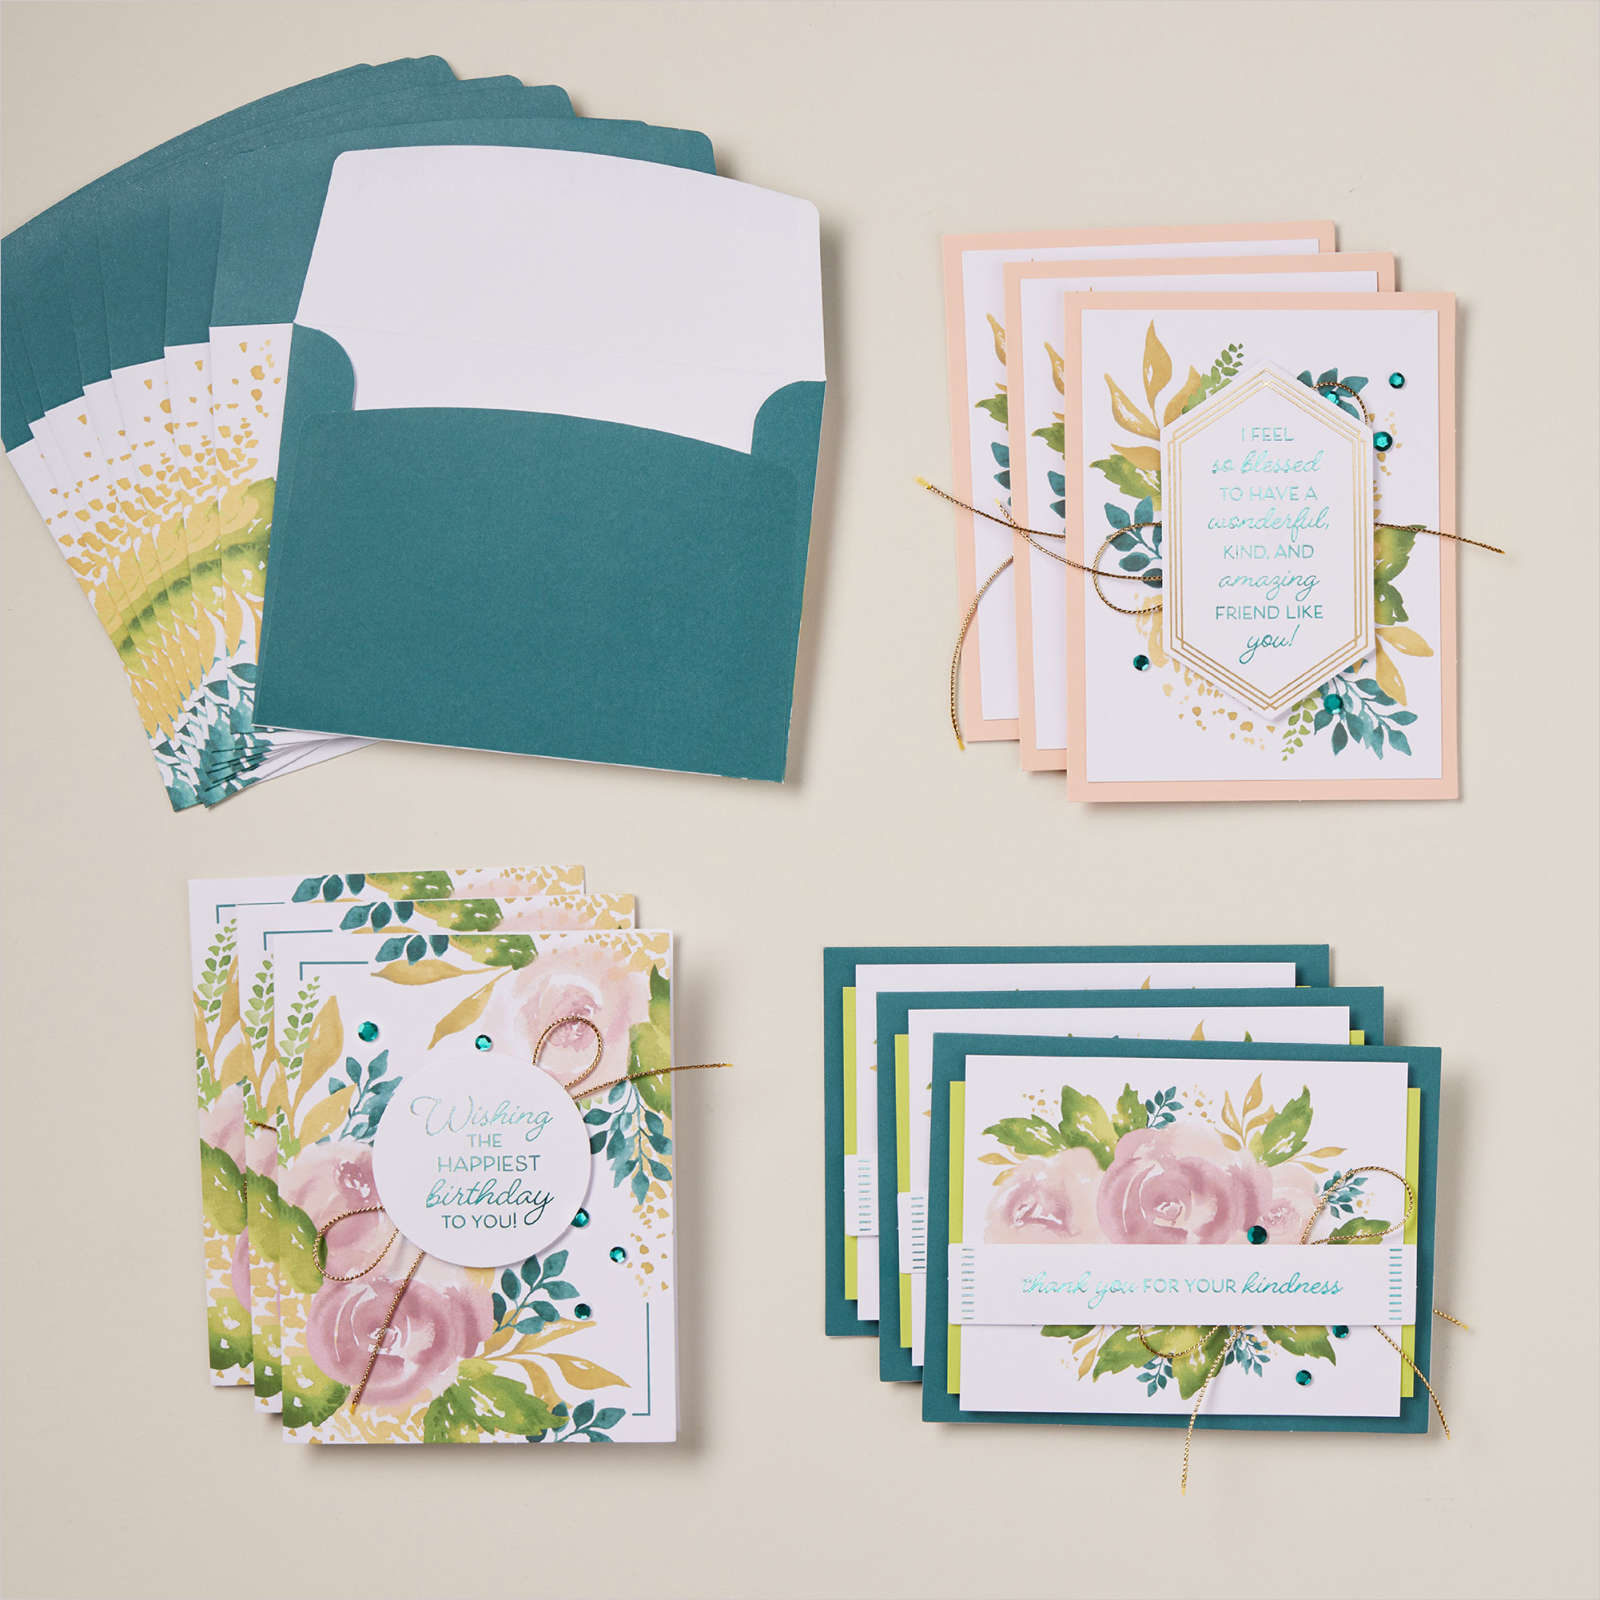
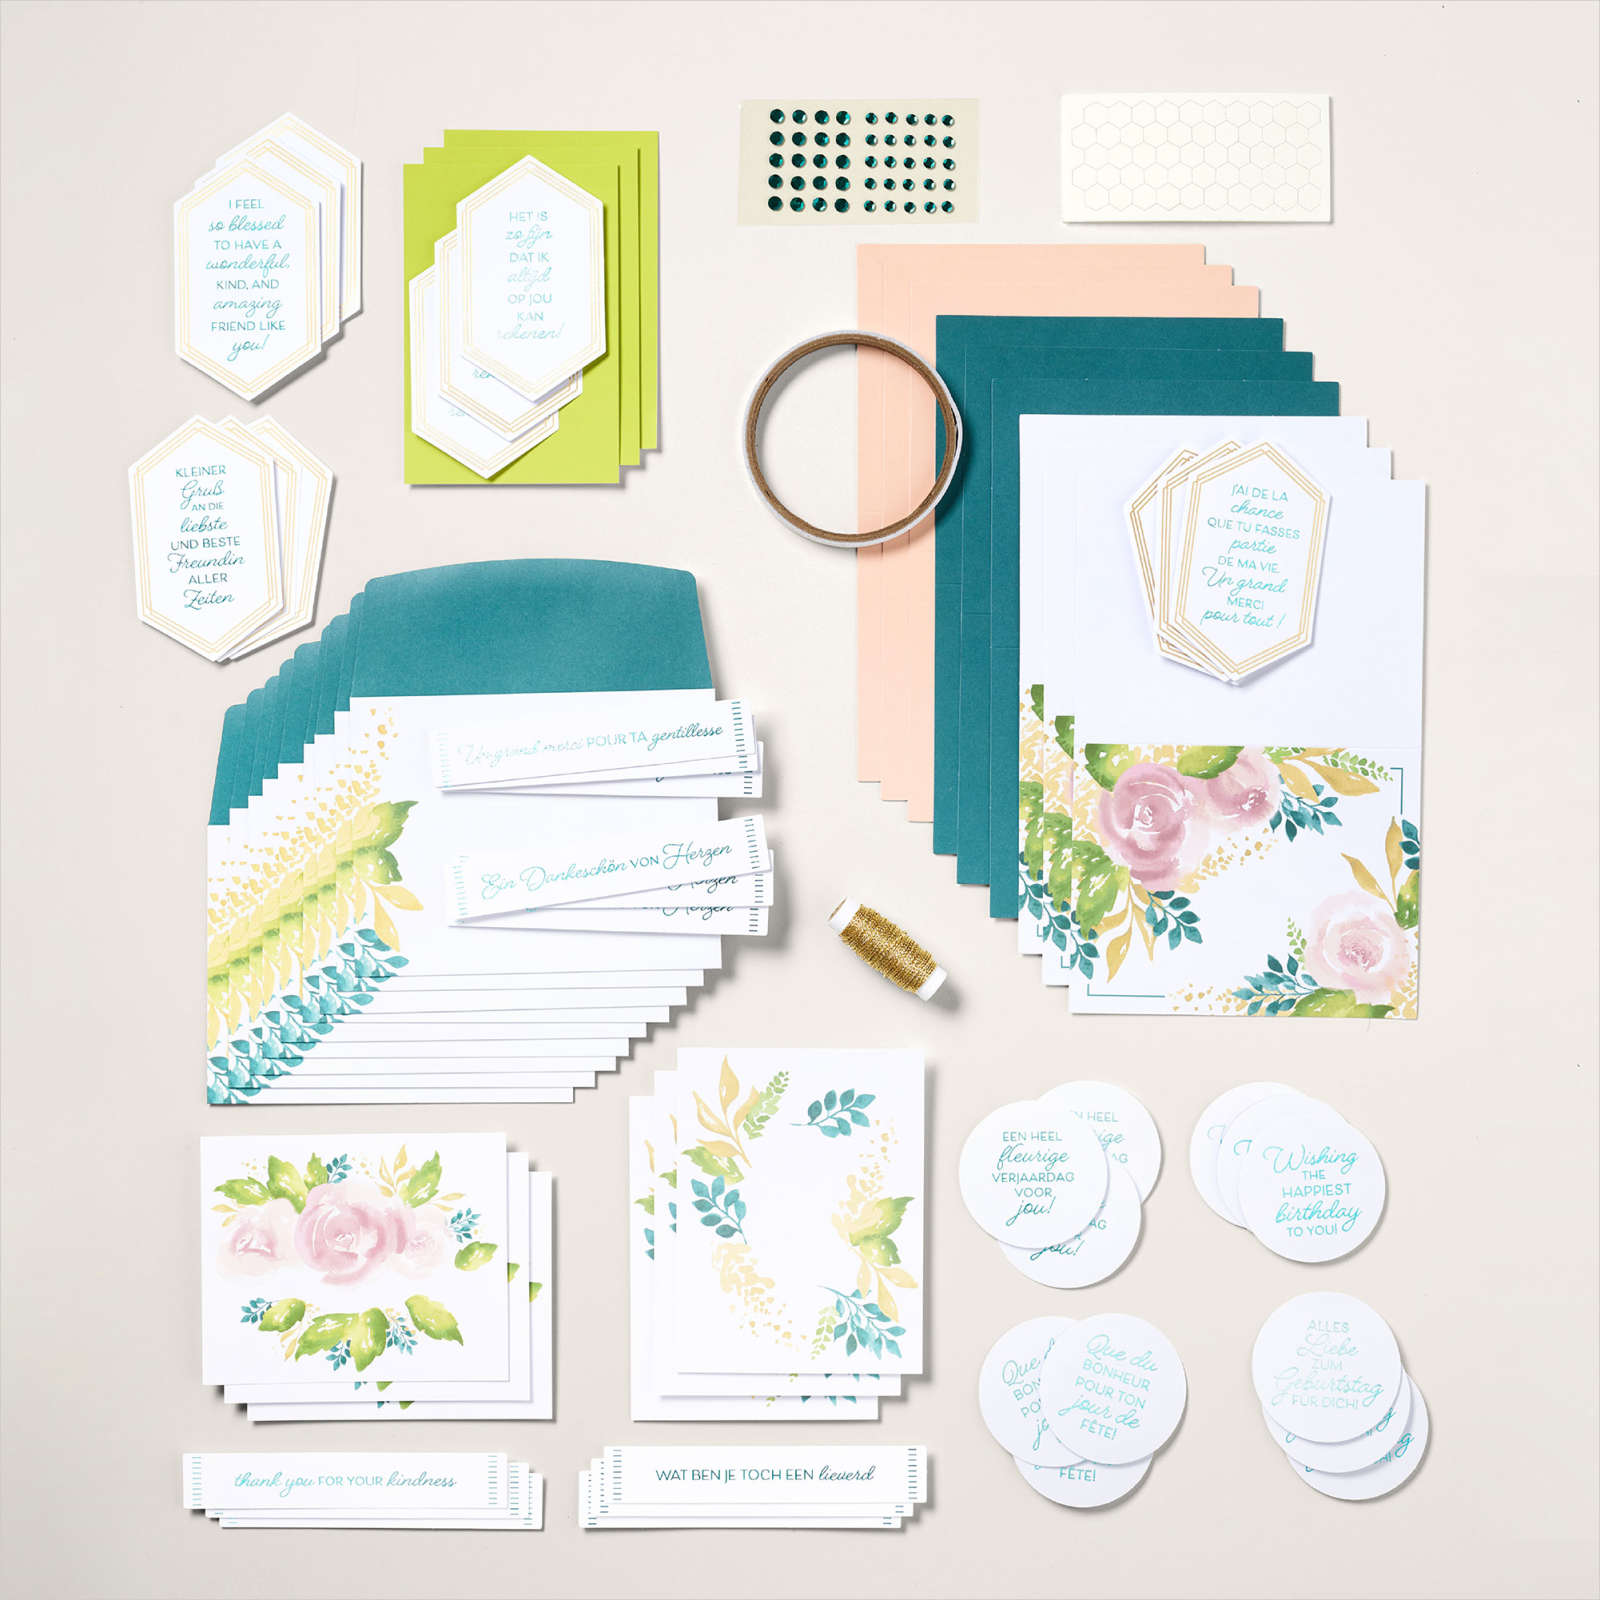
There's a new card kit in our Kits Collection.  It's called the Painted Wishes card kit and it's beautiful! *See it here 

Makes 9 cards: 3 each of 3 designs
* Folded card size: 5-1/2"" x 4-1/4" 
* 9 pre-printed envelopes
* Gold & Pretty Peacock foiled labels
* Pretty Peacock sequins
* Gold cord

Product colors: Garden Green, Lemon Lime Twist, Moody Mauve, Petal Pink, Pretty Peacock, Wild Wheat


Kits by Stampin’ Up! are perfect for new crafters, busy crafters, or crafters who want quick and easy projects. All-inclusive project kits have everything you need in one box! Give as a gift or try them yourself. Kits are while supplies last. 

~~~

December Specials: 

Get a free embellishment from the 2023 Holiday catalog with an

online order over $50


*current host codes:  PN2C7Z4E or 77277NNH

Click on the image below to see the Holiday Last Chance items 

All Posts

  • Stunning Prairie Grass sunset scene with a masked moon & video tutorial


    I'm thrilled to share this amazing card with you today.  We made it at my July card clubs. 

    I created a beautiful sunset with stamps, ink and a 'moon mask'.  I used Blending Brushes with Secret Sea, Darling Duckling and Timid Tiger inks.  

    It features the beautiful Prairie Grass stamp set seen here.  Since I'm from North Dakota where we have tons of 'prairie' this set was a must have!  *Unfortunately it is now out of stock but you can add your email to be informed when it's available. It should be back around August 11th. 

    After stamping the grassy image we added a post-it note mask made from a circle punch. Then we blended the inks on little by little.  It's important to use less ink and more time to get this pretty soft effect. 

    See the flap on the left side of the card above?  That flap holds down the front of the card.  So simple but a fun technique. Notice the light sponging on the greeting inside?  

    I created a free project sheet for this card.  You can print or download it by clicking on the following link: Download Prarie Grass July 2025

    And here's the video below where I share how to create this gorgeous card and two other cards featuring this amazing Prairie Grass stamp set. 

    ~~~

    July Specials:


    New Online Exclusives are here!  Click here

    ~~~

    Get my Turtle-y Cute PDF tutorial free with any online order in July!

    Leave a Reply

    Your email address will not be published. Required fields are marked *

  • Gorgeous Prairie Grass Joy Fold card with video & free project sheet


    I shared this pretty card on last week's Live video.  

    Isn't it pretty?  The colors include Fresh Freesia with Black accents. All of my projects featured the brand new Prairie Grass stamp set seen here.  

    I also used the amazing Thoughtful Journey DSP seen here.  It's absolutely perfect for scene builder stamps like this one and has some of the best and easiest backgrounds to start with.  

    This card is called a 'Joy Fold' – who knows why but it's actually one fold name I haven't forgotten. Basically it has two flaps that overlap each other. It gives you multiple opportunities to use your Designer Papers or textured layers.  

    The embossing folder here is called Glass & Gardens seen here.  It's unavailable right now but you can add yourself to the list to be notified when it's back in stock.  

    Here's the free project sheet for this card with measurements, directions and supplies.  Click on the following link to print or download it.  Download Prairie Grass JoyFold card

    And here's the video below where I share two other cards featuring this amazing Prairie Grass stamp set. 

    ~~~

    July Specials:


    New Online Exclusives are here!  Click here

    ~~~

    Get my Turtle-y Cute PDF tutorial free with any online order in July!

    Leave a Reply

    Your email address will not be published. Required fields are marked *

  • WOW! Check out this Beautiful Butterflies stained glass technique


    I was amazed by Candy's card swap this month!  Look at this beauty!!


    It's called the Stained Glass technique and she made it for our July Team swap featuring Window Sheets.  

    Her colors include Pretty Peacock with Highland Heather. The bundle is called Beautiful Butterflies and can be seen here. 

    Steps:

    • She stamped the butterfly image on a window sheet using Black Stazon ink. 
    • Turn it over and color with Blends markers. 
    • Add adhesive sheet to the Blends side. Press onto slightly crinkled aluminum foil. 
    • Adhere to a second butterfly stamped on White CS for support and to cover the foil. 
    • Fussy cut; add to card. 

    Other products used here:

    Measurements:

    • Card base 11" X 4 1/4" score at 4 1/4" & 5 1/2"
    • Highland Heather 4" square
    • DSP strip 1 1/8" X 4"
    • inside 4" square

    Thank you for creating your incredible swap card Candy!  Great job!!

    ~~~

    July Specials:


    New Online Exclusives are here!  Click here

    ~~~

    Get my Turtle-y Cute PDF tutorial free with any online order in July!

    Leave a Reply

    Your email address will not be published. Required fields are marked *


Notice: LeeAnn Greff, Independent Stampin’ Up! Demonstrator, Manager. The content of this website is my sole responsibility as an independent Stampin’ Up! demonstrator and the use of, and content of, the classes, services, or products offered on this website is not endorsed by Stampin’ Up! Copyright 2025