/


Latest Post

Sale-a-Bration ends today!! How many critters can you make with the Cutest Cow bundle?!


Today is the last day of Sale-a-Bration!  Sadly, it's our last chance to earn free products! 

~~~

On last week's video I shared how to make a fun cow card and a pig too. Today I'll share the sheep version!

I decided to use a Pool Party card base to coordinate with the Sunny Days designer paper. The Deckled circle dies are an easy way to create a cute card.  The greeting is from the Heartfelt Hellos stamp set seen here.  Both the DSP & stamps are still available for FREE with any $50 purchase in our Sale-a-Bration promotion.  I'm so sad this promotion ends today!

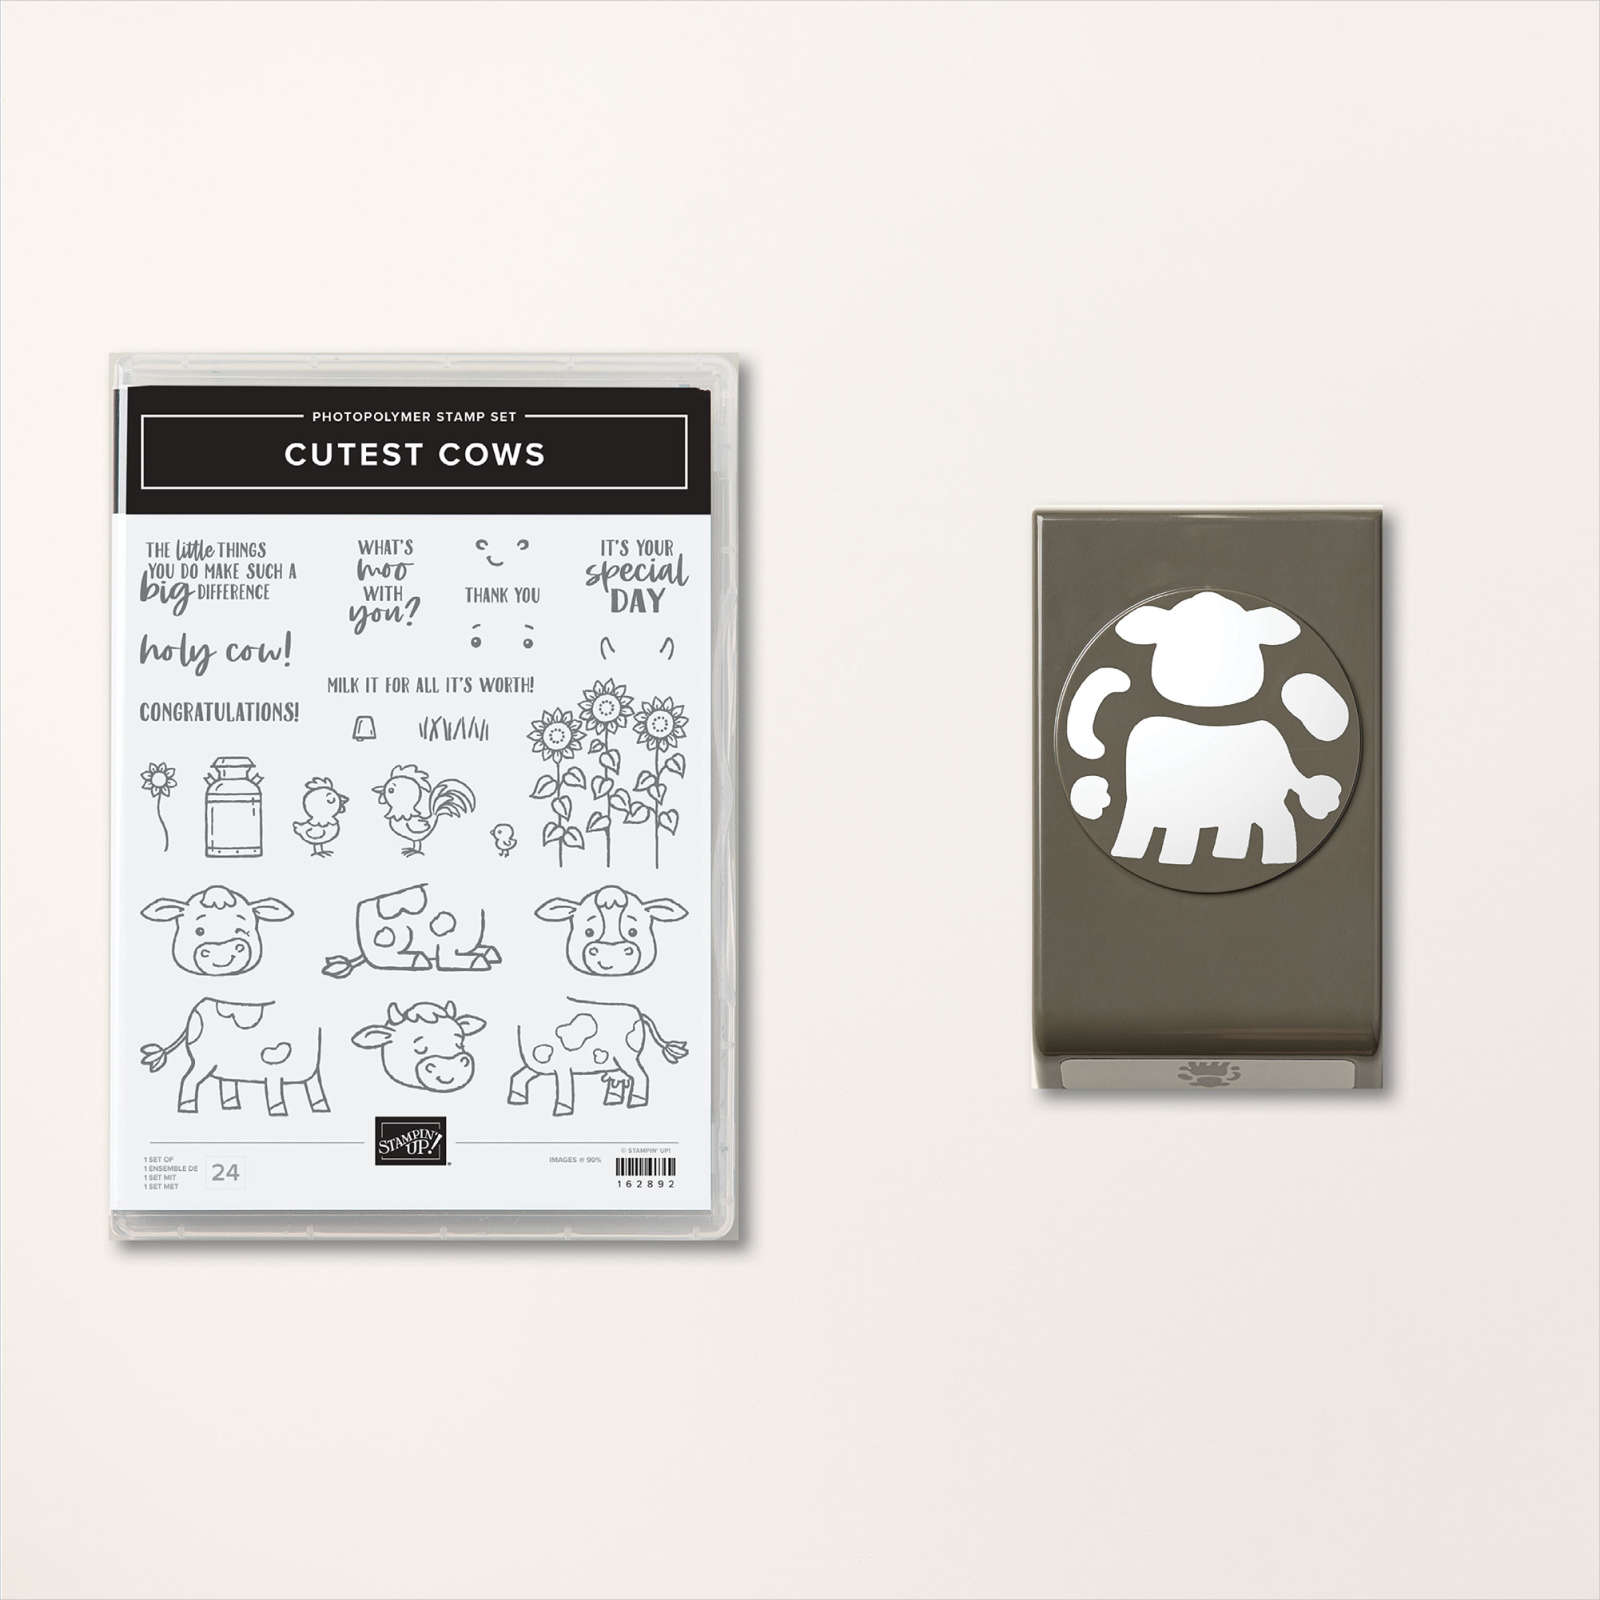
I used the adorable Cutest Cow bundle here.  

I wanted to use puff paint for the fuzzy sheep body & the top of her head but it's not currently part of our products so I used the punch and punched a bunch of white pieces to add for her fur. In hindsight I should have used a cotton ball – pulling it apart and adding thin bits of it with glue.  That would have been much easier! 

Click here or on the photo below to see this cute bundle online.  


Click here or on the photo below to watch the video. I share this plus two more cards using this adorable punch bundle. 

~~~

February Specials end today: 

It's our last chance to earn FREE Stampin' Up! products with

Sale-a-Bration! *click here

*current host code link: ZQW9KYDC

It's also the last chance to get a pre-paid Paper Pumpkin subscription

& earn free Sale-a-Bration products!  

~~~

Get a free Gold Foiled cards & envelopes kit

with online orders over $55 through today; February 29th  

All online orders in February will receive this free Nature's Sweetness tutorial with 8 projects!

All Posts

  • A few favorite craft storage tips


    I thought I'd share some of my favorite ways to store my stamping products.  Some people enjoy organizing more than creating! 

    First is how I store my stamp sets.  In a dresser drawer.  I purchased a few dressers from IKEA many years ago and they've held up very well despite multiple moves.  

    Here's a photo of my craft studio.  I am very, very lucky to have such a beautiful room in our home for my business and classes. 


    Here's how I store my 8 1/2" X 11" card stock and paper scraps.  In front of each color of card stock I keep a cello bag for the scraps in that color. I've used this method for years and it really helps me use my scraps.

    Next is how I store my 12 X 12" designer paper and scrapbook pages. 

    It's a shoe storage cabinet! My 12 X 12" paper fits like it was made just for it!  You can get two stacks side by side in it since it's about 30" wide.    Plus it has a divider to fit even more paper above it.  I love the way the doors hinge open.  There are three doors and it's only about a foot deep.

    Lastly here's how I store my inks, markers and ribbon. These are Stampin' Up! storage and they're fully customizable to fit what you need.  Click here to see the options. 

    I love that it fits right on my work area for easy reach. As you can see I organize my inks in rainbow order. I'm not sure why my Blends aren't but I know my granddaughter will love to do that for me this week while she's here.  

    ~~~

    December Specials:

    *current host code link:  

    P243X6VH

    3 new designer papers!

    ~~~

    Available December 3rd; while supplies last!

    ~~~

    ~~~

    Leave a Reply

    Your email address will not be published. Required fields are marked *

  • Merry Christmas!


    I hope you enjoy a beautiful Holiday with family & friends.  

    Leave a Reply

    Your email address will not be published. Required fields are marked *

  • Diagonal Fun Fold with new products! Free project sheet & video too.


    Today I'm sharing a neat fun fold I hadn't made for awhile.  It's a diagonal fold that is fun and easy. 


    I used a few new, upcoming products from both the 2025 Spring and the 2025 Sale-a-Bration catalogs.  The greeting & punch are made with the Bright Borders set and coordinating To the Point punch.  The designer paper is the Toadstool Gardens 6" DSP from the SAB catalog.  It's free with any $60 purchase from January 7th – February 28th, 2025.  

    I made over 20 of them for a mail out swap I joined.  The colors include Melon Mambo & Granny Apple Green. 


    I share how to make it in the video here and seen below.  Basically it involves trimming off half of one side of the card base, flipping it and adhering it back to the card front.  The only confusing this can be adding your designer paper.  I suggest using a non-directional paper when trying this out. 

    Here's the free project sheet you can print or download. Click on the following link: Download Bright Borders Diagonal fun fold


    Below is the video if you'd like to see how to assemble this card. I also share a pretty Sophisticated Sled project too.

    ~~~

    December Specials:

    *current host code link:  

    P243X6VH

    3 new designer papers!

    ~~~

    Available December 3rd; while supplies last!

    ~~~

    ~~~

    Leave a Reply

    Your email address will not be published. Required fields are marked *


Notice: LeeAnn Greff, Independent Stampin’ Up! Demonstrator, Manager. The content of this website is my sole responsibility as an independent Stampin’ Up! demonstrator and the use of, and content of, the classes, services, or products offered on this website is not endorsed by Stampin’ Up! Copyright 2025