/


Latest Post

Flowering Foils specialty paper; a new FREE SAB choice available today!


It starts today!  The 2nd Sale-a-Bration choices are now available!  There are 5 of them; two specialty papers and three stamp sets.  Click here to see them. 

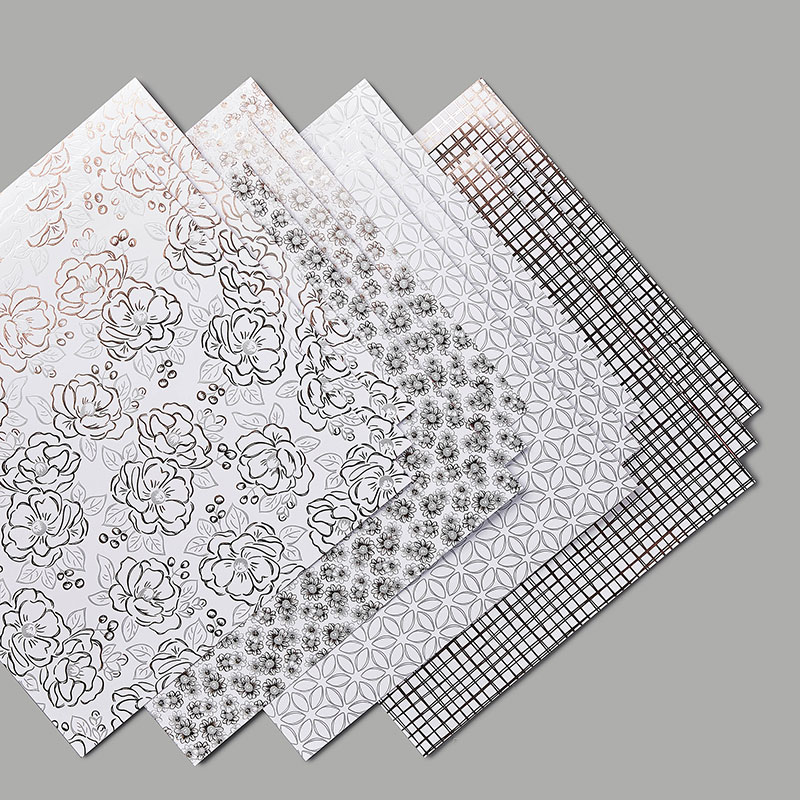
Today I'm focusing on the Flowering Foils specialty paper.  It has Rose Gold and Silver Foil designs on a White background.  They're 12" sheets and you get 3 each of 4 single sided designs.  You can add color to them like the cards shown below; or use them as is.  

Beautiful!  I will have lots of ideas for you this month featuring this paper.  It's already the top pick of my customers!  All I can say is the way everyone is ordering it already; it will not last long! 

Here's a video from Stampin' Up! featuring these projects.

~~~

Four March Specials besides Sale-a-Braton

and the Product Coordination Release seen here!

March host code is TRYUEHDZ 

1. All online orders will receive a free Mountain View pdf cards tutorial in an email.

2. If your order is over $55 you'll get a Sale-a-Bration paper sampler and metallic cards & envelopes kit!  A great start to beautiful card making. 

March host code is TRYUEHDZ

Order online here

3. THE Best deal! Choose any FREE stamp set when you purchase the Starter kit during Sale-a-Bration; of any value! Plus you'll get a free paper trimmer and a 6 X 6 sampler of new Designer Paper!  It's just $99 plus tax and you can choose $125 in products with free shipping! Be either a 'Happy Shopper' and enjoy the discount or make extra spending money.

Click here to join my awesome Flowerbug's Team! 

4. Earn a ticket in the drawing for each $25 you order online in March for a free Little Ladybug stamp set!

Order online here


All Posts

  • Curvy Christmas & the Postage Punch


    Check out this easy card using the new Curvy Christmas stamp set and the Postage Punch!  

    It's super simple! Here's how I made it:

    1. Stamp the curvy trees image on the White CS using Shaded Spruce ink.  Color the trees with a Light Shaded Spruce Blends marker.  Add a tiny star using Cherry Cobbler ink on one tree. Adhere it to the Cherry Cobbler layer and to the main card.
    2. Punch out three pieces of Classic Christmas designer paper with the Postage Punch seen here.  Adhere to the White CS. 
    3. Stamp the greeting in Cherry Cobbler ink on a 1/2" strip of White CS.  Punch the ends with the Banners Pick a Punch. Add it to the card with mini dimensionals. 
    4. Finish with a few Holiday rhinestones. 

    You can see this stamp set here; it's only available through January 4th.  And the Classic Christmas Designer Paper is here while supplies last. 

    Remember that everyone who orders any of these products or places an online order with me in November will receive a free 22 project PDF tutorial featuring the Curvy Celebration products! 


    ~~~

    November Specials!

    Current Host code is GRC9VVUU


    All online orders receive my FREE Curvy Celebrations 22 project PDF Tutorial! 

    Leave a Reply

    Your email address will not be published. Required fields are marked *

  • Gift Wrapped Box Fold Card with video


    Check out this cute Christmas card we made at my October Card Clubs!  It's a box fold card; a super cute but easy fun fold. 

    The colors are Real Red with Granny Apple Green & White. The dies on the front are the Stitched Shapes and Hippos & Friends.

    It even folds flat for mailing!  As you can see the back is similar to the front; leaving some space to write or sign the card.  

    I used the Gift Wrapped punch bundle from the Holiday catalog.  You can see it here. 

    Check out the video and measurements below. 

    Here's the video: 


    Measurements:

    Real Red 4 1/4" X 11" scored at 5 1/2", 7", 9" and 10 1/2"
    Granny Apple Green 3 5/8" X 4 7/8" (2 pieces) plus scrap for die-cut
    Whisper White 3 1/2" X 4 3/4" (2 pieces) plus scrap for circle die-cut and bow

    ~~~

    November Specials!

    Current Host code is GRC9VVUU


    All online orders receive my FREE Curvy Celebrations 22 project PDF Tutorial! 

    Leave a Reply

    Your email address will not be published. Required fields are marked *

  • Peaceful Nativity WOW card


    Look what happens when you combine a beautiful background with the Nativity Dies?!  

    Candace created this gorgeous card for our October Christmas cards swap with my Flowerbug's Team.  She is a master at sponging backgrounds.  I believe she used Pacific Point here.  She simply added a greeting (from For Unto Us set) embossed in Silver and the pretty scenic die-cuts in Black.  

    Click here to see the For Unto Us stamp set and here for the Peaceful Nativity bundle. 

    More Team swaps tomorrow! 

    ~~~

    November Specials!

    Current Host code is GRC9VVUU


    All online orders receive my FREE Curvy Celebrations 22 project PDF Tutorial! 


    Leave a Reply

    Your email address will not be published. Required fields are marked *


Notice: LeeAnn Greff, Independent Stampin’ Up! Demonstrator, Manager. The content of this website is my sole responsibility as an independent Stampin’ Up! demonstrator and the use of, and content of, the classes, services, or products offered on this website is not endorsed by Stampin’ Up! Copyright 2025