/


Latest Post

Easter Bunny Floating Panel card with a free project sheet & video tutorial!


We made this sweet card at my March Card Clubs – it features the Easter Bunny bundle.  This bundle is currently unavailable.  you can get the Easter Bunny stamp set now but the Bunny punch is returning in May. 

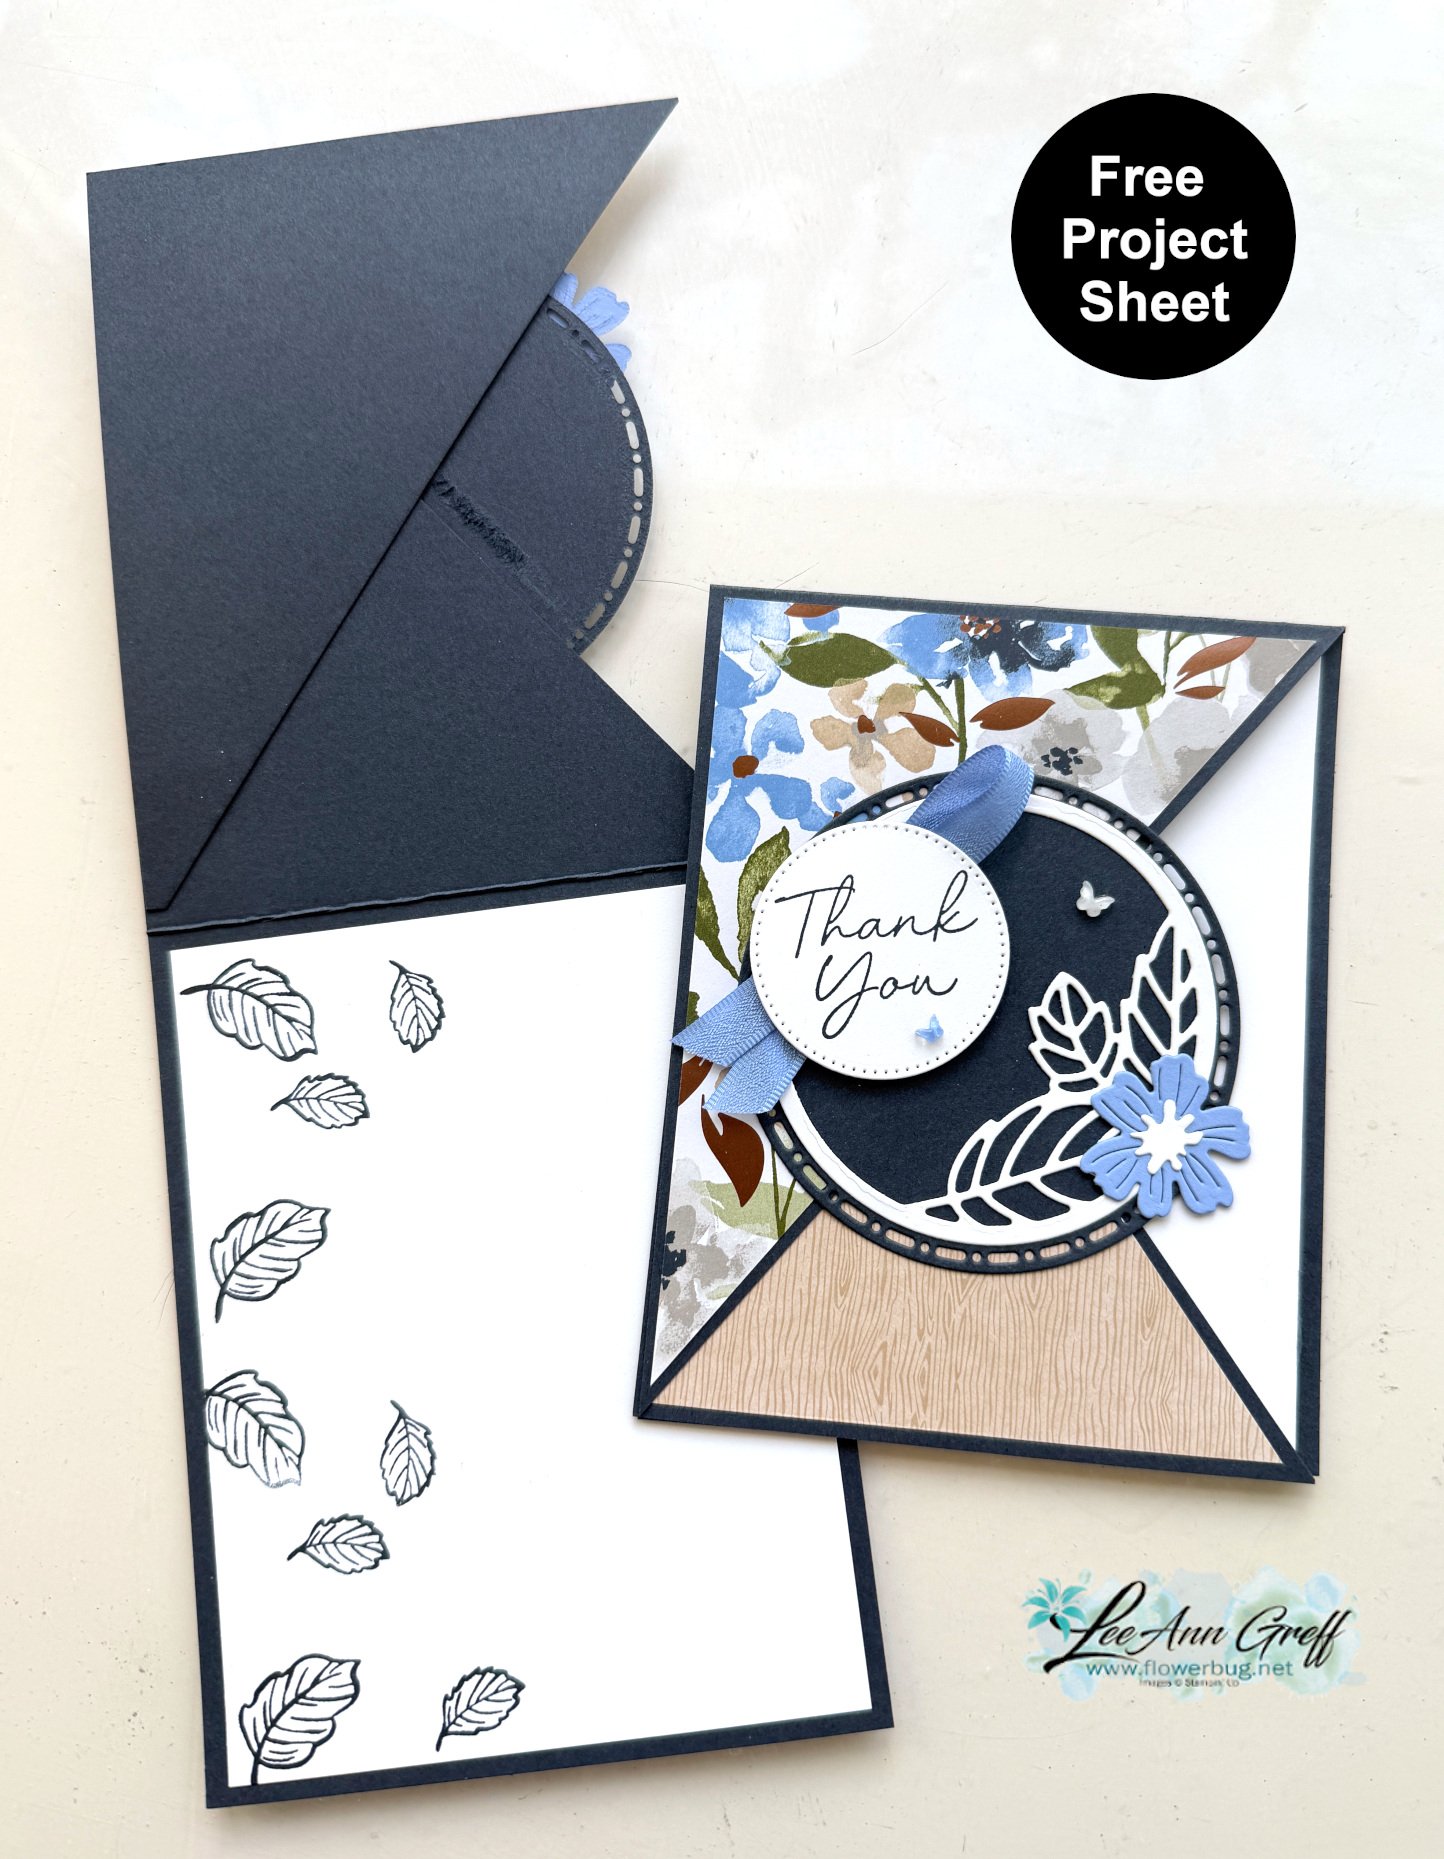
It's a Floating Panel fun fold card; one of my current favorite folds lately.  It's both fun to make and easy to create too!  

My colors include Fresh Freesia, Blackberry Bliss and Daffodil Delight.   Below you'll see the baby version. I gave my gals the choice of Easter or baby.  

The greetings for the baby card are from Charming Sentiments. Click here for the PDF project sheet for measurements & products used. 

I used a variety of products on this card: 

  • Stamps – Easter Bunny, Charming Sentiments
  • Ink – Fresh Freesia, Blackberry Bliss
  • Paper – Fresh Freesia, Daffodil, Blackberry Bliss, Basic White, Tea Boutique, Butterfly Kisses, Flowers & More host
  • Other – Basic Borders dies, Cane Weave 3D folder, Dimensionals, Brass Butterflies 

Do you see his little cottontail? I tore off a piece from a cotton ball and rolled it into a ball. It's adhered with out Multipurpose liquid glue.   

Here are the measurements:

  • Card base 4 1/4" X 11" score at 2 3/4" & 5 1/2". Scraps for bunny & circle punch. Two strips 1/2" X 1 1/2" for the floating panel hinges
    • DSP pieces four pieces at 1 1/4" X 4"
    • White front square 2 3/4", inside 5 1/4" X 4"
    • Blackberry Bliss square 2 7/8"
    • Greeting strips 3/4" X 3 1/2"

Here's a tip on the Floating panel:  You need just two pieces of card stock about 1/2" X 2 1/2". Fold them in half and adhere to the center fold; one on each side.  Your front panel is adhered to this. 

*Watch the video below (or click here) where I share the tips on creating this card; it's the second project of 4! 

~~~

March Specials:

See the new Online Exclusives here! 

*current host code: QBQB4TBF or BFE4C2KM

See the Jan-Apr 2023 Last Chance list here *sale prices start April 4th 

See the 2022-2023 Annual Catalog Last Chance list here

Get a free class kit with online orders over $55 when using the host code above!

I have two left! *after that you'll receive a pack of 10 handmade cards! 

Earn free products with my loyalty rewards! 

Click here to download yours and earn a $50 shopping spree!

All Posts

  • Lori’s card shows that the Sunshine & Tulips bundle is a big WOW


    My January Team swap included cards from our newest product offerings – the 2026 Spring catalog and our Online products. Lori chose to feature the Sunshine & Tulips bundle.

    Isn’t it gorgeous?! Her colors include Pool Party, Azure Afternoon, Gold & Shaded Spruce. The paper behind the tulip die-cuts is the Splash of Sparkles specialty paper seen here. It’s filled with amazing colors and patterns!

    This large, stitched edge die-cut is in the bundle. It also includes outline dies for both the tulips and leaves. You can see her tulip die-cuts above – in multiple colors including gold! See this special & unique bundle here.

    Here’s what she did for the inside of her card; so cute!

    Thank you for the amazing card Lori!

    January Specials:

    Bonus days are here!

    Get this free PDF with all online orders in January!

    The 2026 Spring Catalog is live!

    January’s Product of the Month
    Fabulous Sayings set
    Get it for $5 with any $75 purchase

    Check out the newest Kits in our Kit Collection here.

    Leave a Reply

    Your email address will not be published. Required fields are marked *

  • Gears & Textures bundle; another wow with Candace’s fun fold card


    Today I’m sharing a neat card made by Candace; my talented team member. She used the Gears & Textures bundle to make this:

    You can see the Gears & Textures bundle here. It’s so special & unique and perfect for masculine cards. But as you can see in Candace’s card it’s great for gals too!

    She made her own paper with the stamps in the set. She used Pretty in Pink, Night of Navy & Flirty Flamingo inks. She added die-cut gears from the Metallic Textured Specialty papers seen here.

    If you want to make a card like this start out with a 4 1/4″ X 11″ piece of card stock scored at 5 1/2″. Trim off a 1 1/2″ piece from one end. Then trim off another 2 1/2″ piece which is the vertical center piece. The stamped paper layers are 1 1/4″ X 4″ on the top & bottom and the center is 2 1/4″ X 4″.

    Thanks for the amazing fun fold card Candace!

    January Specials:

    Bonus days are here!

    Get this free PDF with all online orders in January!

    The 2026 Spring Catalog is live!

    January’s Product of the Month
    Fabulous Sayings set
    Get it for $5 with any $75 purchase

    Check out the newest Kits in our Kit Collection here.

    Leave a Reply

    Your email address will not be published. Required fields are marked *

  • Sweet Encircled with Love Valentine’s card


    Tracey created this striking card with the Made with Love designer paper:

    I love the abstract designer paper pieces she added to her White layer. Then to make sure the greeting was the focal point she added the top square of DSP. Perfect!
    This is a great example of taking leftover pieces of coordinating DSP and layering them up. A great way to use scraps!

    She used the Encircled with Love stamp set seen here along with the 1 3/4″ & 1 7/8″ circle punches. Her colors include Real Red, Flirty Flamingo with White which she got from the pretty designer paper.

    See the Made with Love designer paper here.

    Your card inspired me to look at and use my DSP scraps Tracey! Thank you.

    January Specials:

    Bonus days are here!

    Get this free PDF with all online orders in January!

    The 2026 Spring Catalog is live!

    January’s Product of the Month
    Fabulous Sayings set
    Get it for $5 with any $75 purchase

    Check out the newest Kits in our Kit Collection here.

    Leave a Reply

    Your email address will not be published. Required fields are marked *


Notice: LeeAnn Greff, Independent Stampin’ Up! Demonstrator, Manager. The content of this website is my sole responsibility as an independent Stampin’ Up! demonstrator and the use of, and content of, the classes, services, or products offered on this website is not endorsed by Stampin’ Up! Copyright 2025