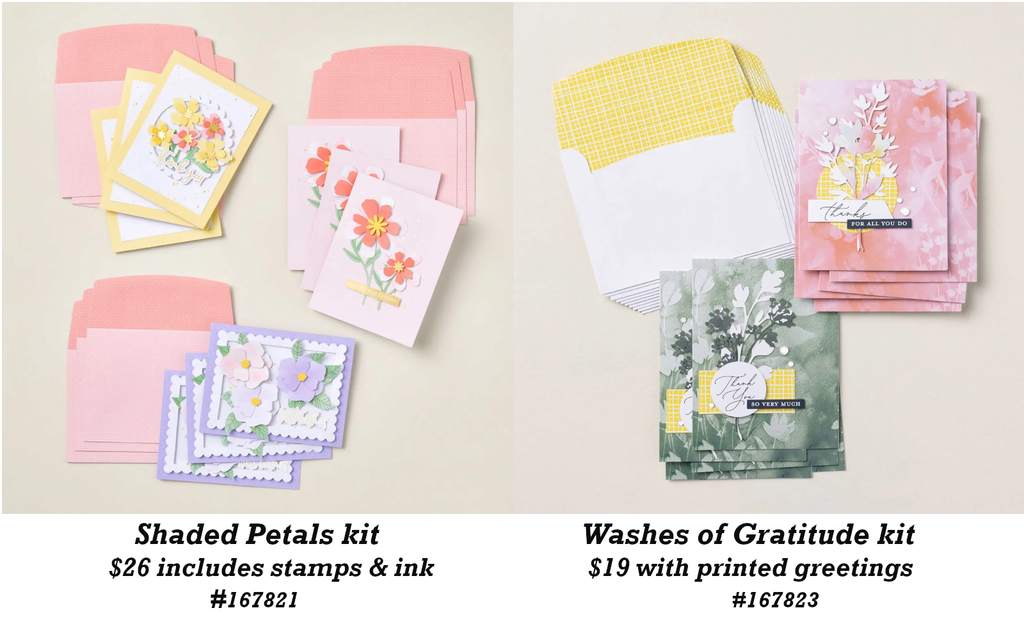
/


Latest Post

Last few days to get the new Stampin’ Positioner FREE!


Through March 2nd you can get the new Stampin’ Positioner in the Starter Kit.

It’s a fabulous deal! Pick out up to $125 in product of your choice and pay just $99 plus tax. Shipping is FREE! And they’re adding the new Stampin’ tool to your box as a free gift.

Here’s a video tutorial on using this new tool.

Click here to grab the deal!

If you have trouble getting clear, clean images a stamping tool like this will help immensely! It’s also wonderful for greetings; perfectly inked every time. Check out the video below:

A few details on choosing the Starter Kit from Stampin’ Up!:

  • You’ll receive 20-25% off all future orders as long as your active.
  • There’s NO pressure or need to hold classes or ‘sell’ products.
  • Enjoy the discount as long as you’d like. It’s a great way to stock up on items you want – at a discount! When you’re done, you simply stop ordering and go back to being a customer.
  • You have through July to meet your first quarterly minimum of $300. *remember you get 20% off that amount!
  • You’ll have access to amazing online groups with tips, projects and lots more. It’s fabulous to be a part of our Stamping Community!
  • Get all of my project tutorials free (at least 4 a month) from me as one of my Team Members.

~~~

February Specials

Product of the Month is the new Painted Illusions 12 X 12″ designer paper

Get the NEW Stampin’ Positioner FREE when you choose the Starter Kit in February! Click here

Bonus Days – Redeem your coupons in February!

February’s PDF of the Month!

Two NEW kits just released here:

Check out the Last Chance List; new items are added and available

while supplies last

All Posts

  • Two days left and they’ll be gone!


    The retiring list is coming out this week Wednesday and these bright and vibrant In Colors will be gone within hours!  They're the 2018-20 In Colors seen on page 164 of the Annual Catalog. Click here to see everything available in these colors; there's a lot! 

    Be sure to order by Wednesday before they're gone!  

    I created 5 cute cards; one in each color using the Daisy Lane & Sweetly Swirled stamp sets.  These cards are going out to my family this week.  

    2018 retiring in colors

    I used Black ink for the greetings and swirls and the In Color inks for the daisy. The Medium Daisy punch is part of a bundle with the Daisy Lane stamp set seen here. Remember that it will not be available as a bundle after May, 2020. Even if both items return in the next catalog, bundles always retire from one catalog to the next. 

    Here's the Lovely Lipstick version: 

    2018 retiring in colors

    Details:
    Main cards 5 1/2" X 8 1/2"
    Black 3 1/2" X 4 1/2"
    White 3 1/4" square plus 3/4" strips for greetings
    In Color DSP 1" X 3 1/4"


    2018 retiring in colors

    Products used:

    Sweetly Swirled & Daisy Lane stamp sets, Retiring 2018-20 In colors plus Black ink, Daisy punch, Faceted gems, In Color ribbons & In Color enamel dots

    See the Retiring In Color items here while supplies last! 

    ~~~~

    April ordering specials:

    All online orders in April will receive my tutorial of the month; with 16 cards

    featuring the Ornate Garden products seen here.

    **Order either Ornate bundle from me and get a free 3 cards pre-cut kit! Order both and get a 6 cards kit with pdf tutorial! 

    Ornate Garden collage

    Orders over $55 will receive a free Simple Shammy!

    Use this host code for April if your order is under $150.  If it's over you'll get host benefits!

     MMM4SXSB  

    Leave a Reply

    Your email address will not be published. Required fields are marked *

  • Best Dressed FB Live cards


    I made these 3 pretty cards during my weekly 'Stamp with Me' Facebook Live last night.  

    Best Dressed cards

    Each Thursday at 8 pm CT we'll finish 3 cards together in about 30 minutes.   Prep your pieces ahead of time using the measurements I provide and you'll be surprised how quickly you can make your cards!  Join me here: 

    I used the Best Dressed Designer paper seen here but you can substitute other paper, colors, stamps and punches. The stamped greetings are from the Peaceful Moments set here. I use this stamp set so much; the sentiments are wonderful.

    After the video many people share their finished cards. It's so fun to see what products everyone uses and how similar (or not) they are to mine. 

    Here are the details and close up views of these three cards: 

    April 16 Best Dressed Olive.

    Old Olive 5 1/2" X 8 1/2", Best Dressed DSP is 4" X 3", Lovely Lipstick is 4 1/4" X 3 1/4", White strip is 3/4" X 4 1/4".  A fast, easy card. 

    April 16 Best Dressed Olive.

    Purple Posy 4 1/4" X 8 1/2" scored at 5 1/2", Mint Macaron 3 1/4" X 8 1/2" scored at 4 1/4", yellow DSP is 4" X 2 3/4", floral DSP is 3" X 4", Stitched So Sweetly die-cut in White, 2 1/4" Mint circle, punched butterflies , Mint 1/8" ribbon

    April 16 Best Dressed Olive.

    • Purple Posy 4 1/4" X 9 3/4" scored at 5 1/2", DSP is 4" square, Detailed Band die-cut (see it here) in Purple Posy (Or use a border and any punch or die-cut)

    ~~~~

    April ordering specials:

    Image may contain: possible text that says 'CLEARANCE RACK REFRESHED TODAY'

    ~~~

    All online orders in April will receive my tutorial of the month; with 16 cards

    featuring the Ornate Garden products seen here.

    **Order either Ornate bundle from me and get a free 3 cards pre-cut kit! Order both and get a 6 cards kit with pdf tutorial! 

    Ornate Garden collage


    Leave a Reply

    Your email address will not be published. Required fields are marked *

  • Color Challenge with Seriously the Best with Ornate Frames


    My Flowerbug's Team had a color challenge this past month – to use Black and White with a 'Pop' of color.  Here's the card I made: 

    Seriously the Best Black  White & Poppy

    This card literally took me 5 minutes to make.  Here's the steps:

    1. Cut a White card base 5 1/2" X 8 1/2"
    2. Cut the See a Silhouette DSP to 4" X 5 1/4".  Adhere to the card
    3. Die-cut two pieces a White 2 1/2" X 4"  stitched rectangle and a Black Ornate Frame.
    4. Stamp the greeting and leaves in Black Memento ink.  Add the flowers in Poppy Parade ink. Adhere to the card.
    5. Stamp the 'I miss you a lot' greeting on a scrap of White. Punch out with the Classic Label punch. Add with mini dimensionals.
    6. Add a few rhinestones. Done! 

    You can see the See a Silhouette stamp set here and the Ornate Frames dies here.  Remember that if you order any Ornate bundle from me in April you get a free 3 cards pre-cut kit!  Details below: 

    ~~~~

    April ordering specials:

    Image may contain: possible text that says 'CLEARANCE RACK REFRESHED TODAY'

    ~~~

    All online orders in April will receive my tutorial of the month; with 16 cards

    featuring the Ornate Garden products seen here.

    **Order either Ornate bundle from me and get a free 3 cards pre-cut kit! Order both and get a 6 cards kit with pdf tutorial! 

    Ornate Garden collage

    Orders between $55 and $149 will receive a free Simple Shammy! (over that and receive your own host benefits plus a Shammy!)

    Use this host code for April: MMM4SXSB  

    Leave a Reply

    Your email address will not be published. Required fields are marked *


Notice: LeeAnn Greff, Independent Stampin’ Up! Demonstrator, Manager. The content of this website is my sole responsibility as an independent Stampin’ Up! demonstrator and the use of, and content of, the classes, services, or products offered on this website is not endorsed by Stampin’ Up! Copyright 2025