/


Latest Post

A fun way to add color to the Happy Place stamp with video tutorial


I shared how to add color to the large ‘Happy’ from the Happy Place stamp set on last week’s Live video. What do you think?

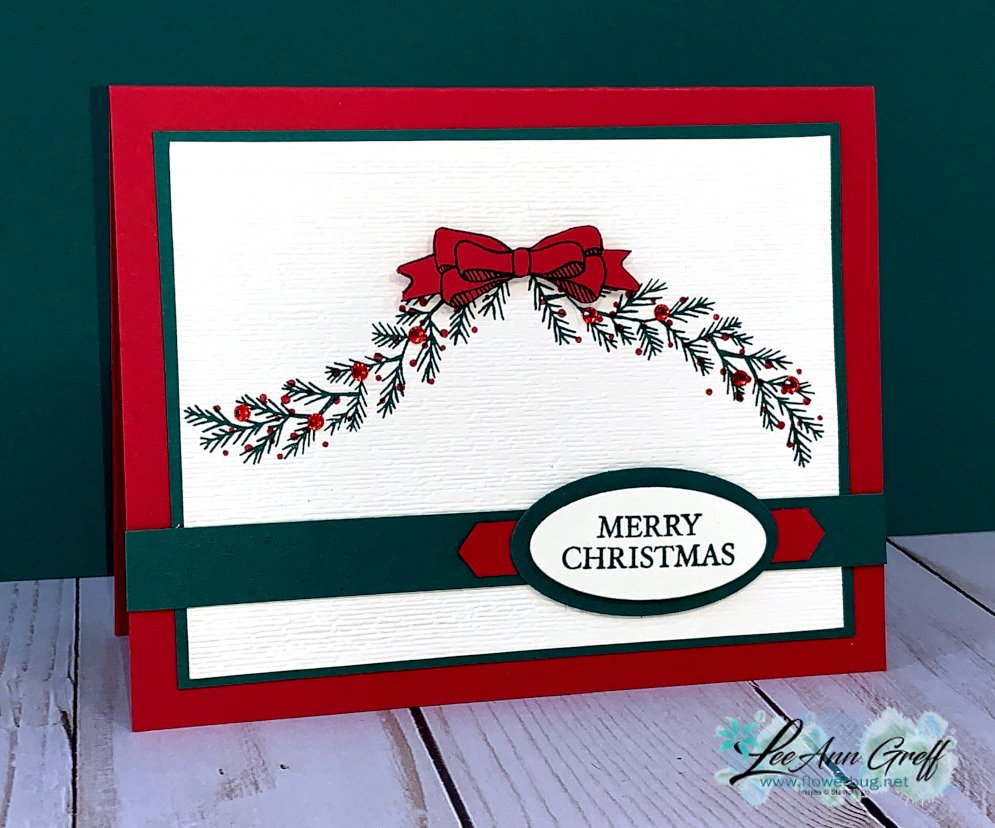
We made this cute card at my September card clubs. The colors include Lost Lagoon, Calypso Coral & White. You might wonder how I achieved the two-toned inking on the Happy image. I used inks – Lost Lagoon for the water and Calypso Coral for the sky. For this sample I used large ink pads. But for my Clubs we used smaller ink spots. It was a lot easier this way!

You might also wonder where I got the rectangle Perennial Postage die shape. I had to die-cut a larger rectangle twice to get this size. It was pretty easy and I share how in the video below.

We textured the Lost Lagoon layer with the Wave 3D embossing folder and the curvy leaf dies are from the Label Me Grateful dies seen here. I love them! The inside greeting is from the With You in Mind stamp set.

It’s an easy fold that shows off the inside of the card and the designer paper we added. This DSP is the Subtles 6″ designer paper which has some great patterns.

I really enjoyed playing with this fun stamp set. I’ll share another project from the video tomorrow. See the Happy Place set here.

I created a free project sheet for you with measurements, photos, directions and a supply list with links. Click on this link to print or download it.

Below is the video tutorial for this card and one more. Don’t forget to subscribe to my YouTube Channel while you’re there!

~~~

  To see all of the new Online items click here.  Or download & save the Download Online Exclusives flyer 

Get a free project tutorial with any online order in September! 

All Posts

  • 24 hour Holiday Extravaganza Tuesday, November 24th!


    This Tuesday is a huge sale on almost everything in the Annual Catalog!  There are a few exceptions but you can get your favorites or stock up on card stock, ink, embellishments & more all at 10% off!  That adds up and is almost like free shipping!

    Here is the list of excluded items for the sale.  download the 2020 Holiday Extravaganza sale excluded list

    **All orders using the host code below that are over $55 will receive 3 things FREE from me:

    1. A free Winter Snow embossing folder
    2. 10 free cards from me!
    3. My 22 project Curvy Celebrations PDF tutorial.

    ~~~

    Check out my November specials below:

    Current Host code is A2MTFYEB

    Order online here


    All online orders receive my FREE Curvy Celebrations 22 project PDF Tutorial! 

    Below are the Multipurpose Glue stands we're making. They're available in my Shop here.  


    We can fit three in a box for almost the same shipping cost. They are $6 each and shipping is about $3-4 in US.   They make great gifts for your stamping friends!  

    Leave a Reply

    Your email address will not be published. Required fields are marked *

  • Mini Coffee Carriers; a special gift with treats & glue stands!


    Have you noticed the mini coffee carriers on page 9 of the Holiday catalog? They're actually quite large and should not be called mini!  You can see the entire suite here. 

    My friend Marilyn made this one for me; casing the catalog project on page 10.  It's so cool! 

    She used the Heartwarming Hugs and Wrapped in Christmas stamp set.  She wrapped her coffee cups with Real Red CS. Tip; use strong adhesive like Tear & Tape for this. 

    Here's another version. I made these for my Flowerbug's Team that attended OnStage@Home a few weeks ago.  It was filled with treats, apple cider packet and a liquid glue stand that we make *see photo below

    I actually sprayed my coffee cups with a mixture of rubbing alcohol and Real Red ink refill.  

    Here are the Multipurpose Glue stands included in the gift above. We have them available in my Shop here.  They are $6 each. 


    We can fit three in a box for almost the same shipping cost.  They make great gifts for your stamping friends!  

    ~~~

    November Specials!

    Current Host code is A2MTFYEB


    All online orders receive my FREE Curvy Celebrations 22 project PDF Tutorial! 

    Leave a Reply

    Your email address will not be published. Required fields are marked *

  • Three easy cards with Curvy Christmas set


    I mentioned I'd made quite a few cards with the Curvy Christmas stamp set.  I wanted to share a few of them.  

    To clarify these products, the Curvy Christmas & Classic Christmas 6" Designer Paper will be available through January 4th or while supplies last.  You can see it all here: 

    I used the pine bow to create a garland and added a fussy cut bow. Super quick card! 

    Here I used the Pine Tree punch and Perfectly Plaid stamp set with the Classic Christmas DSP.  The White card base measures 5 1/2" X 7", scored at 4 1/4".  Add a 1" strip of DSP on the inside right edge.  

    Above I used the Curvy Dies on my White layer.  Look how perfectly the dies match the stamp!  I added a few greenery die-cuts and one from the Poinsettia dies on the top. I may have gotten a little carried away with my Red rhinestones!  

    Remember that all online orders in November get my 22 project PDF for the Curvy Celebrations bundle.  Order online here. 

    FREE 22 project PDF Tutorials for Curvy Celebrations! 

    ~~~

    November Specials!

    Current Host code is A2MTFYEB


    All online orders receive my FREE Curvy Celebrations 22 project PDF Tutorial! 

    Leave a Reply

    Your email address will not be published. Required fields are marked *


Notice: LeeAnn Greff, Independent Stampin’ Up! Demonstrator, Manager. The content of this website is my sole responsibility as an independent Stampin’ Up! demonstrator and the use of, and content of, the classes, services, or products offered on this website is not endorsed by Stampin’ Up! Copyright 2025