/


Latest Post

2022 Holiday Carryover List & Last Chance Sale list is here!


They've announced which Holiday catalog products will carry over and which ones will retire. 

The sales period starts December 1st and they are while supplies last. 

Click here to see the carryover list.

Click here to see the Last Chance list.  Select items are reduced from 20-60%!! 


I shared this fun card on Tuesday's FB Live this week.  Here's a link to the video.  

It's a wiper card featuring the Christmas Lights bundle and the Santa Express designer paper.  

The colors include Shaded Spruce, Mint Macaron and Blushing Bride.  Of course they came from the colors in the Santa Express DSP.  This paper will be 40% off starting December 1st with the Last Chance sale.  But remember it's while supplies last!  

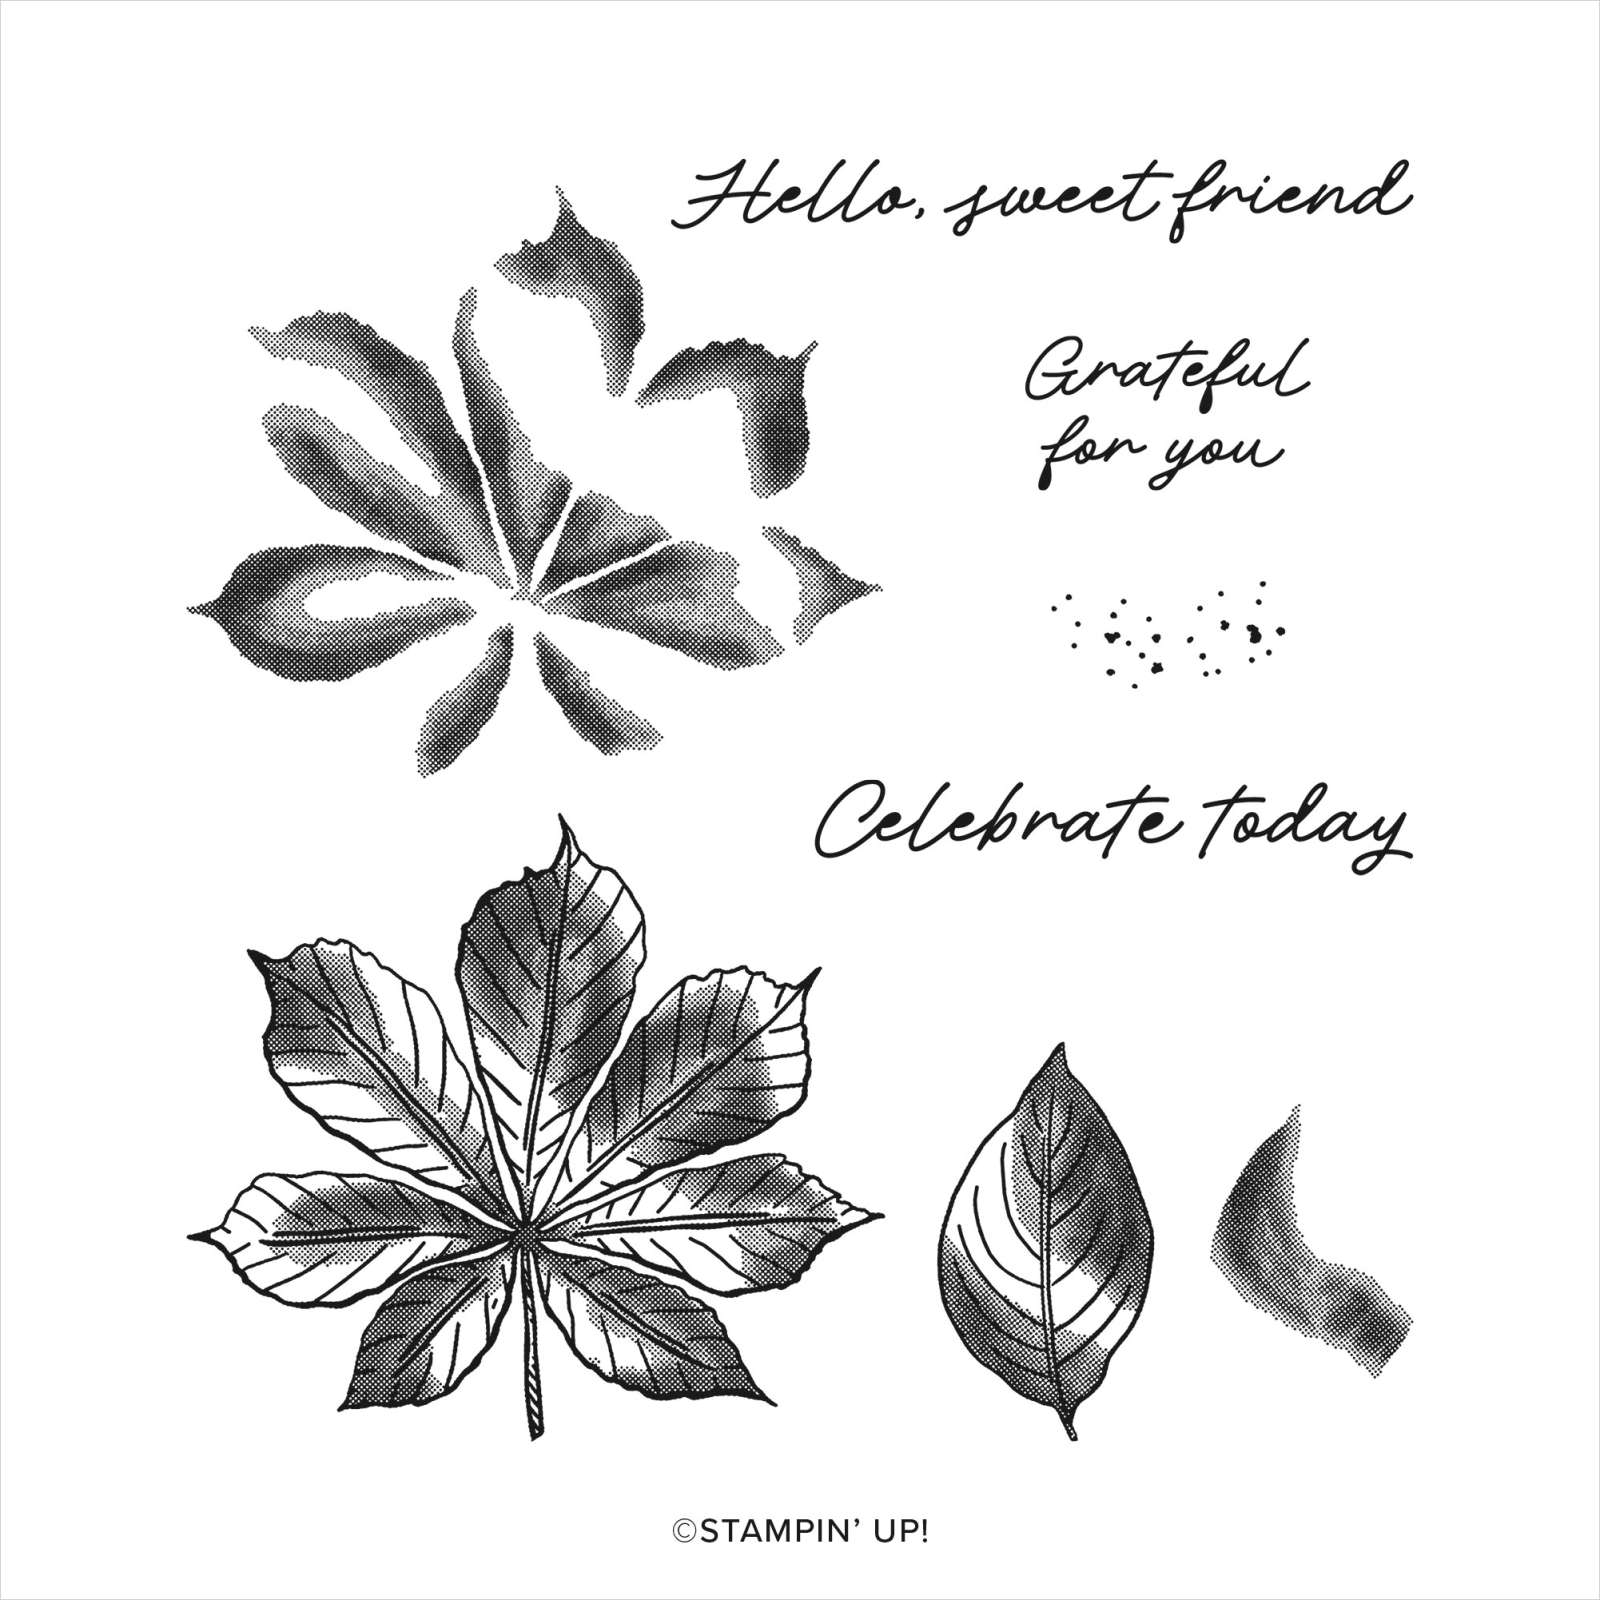
Inks include Shaded Spruce, Mint Macaron, White Craft & Blushing Bride.  The 'Joy' greeting is from the Brightest Glow stamp set.

Here are the measurements of each piece.  But honestly to figure out how to put it together you may want to watch the video.  

  • Shaded Spruce 8 1/2" X 4 1/4" scored at 5 1/2" & 7", 8 1/2" X 2" scored at 5 1/2" & 7", inside
    piece is 2" X 1" scored at 1" to the corner diagonally
    • Mint Macaron 5 1/4" X 4"
    • Blushing Bride 5 1/4" X 1" & scraps for snowflakes
    • DSP 1 1/8" X 4" for right side, 2 pieces at 1 3/8" X 1 3/4" for left
    • White 5 1/4" X 4" for back and scraps for snowflakes & oval greeting

Here's a photo of the wiper mechanism.  This is the scored end of the 8 1/2" X 2" layer. 


It's a super fun card to open and then open again and again!  There are endless possibilities to add to your wiper pop-up; think greetings, animals, balloons, stars….  

Here’s the project sheet for you with measurements and product list Download Christmas Lights Wiper card Nov 2022

The Christmas Lights bundle includes the stamped snowflakes and these pretty snowflake die-cuts too. 

The oval die-cut is from the All That dies in the Annual catalog.  The embossing folder is Wintry; in the Annual catalog. 

Here's the video; click on the photo to watch it.  

~~~

Order online here

Host code link: KA9ZYZB6

November Specials: 

1. Get a pack of mini Stampin' Dimensionals from me with online orders over $55!


2. All orders in November will receive a big project tutorial – a collection of 12 cards featuring this new collection of products.

Earn free products with my loyalty rewards! 

Click here to download yours and earn a $50 shopping spree!

All Posts

  • Beautiful Peaceful View card the easy way with video & free project sheet


    For my June card clubs I knew I wanted to feature the Peaceful View stamp set.  This gorgeous stamp makes it easy to create a stunning card with.  I've asked for this type of stamp for years and finally got one! 


    Could you ask for a more perfect background for this image?  Where did it come from?  It's a piece of designer series paper – from the Thoughtful Journey 6" X 6" DSP seen here.   It's absolutely the perfect choice and much easier than creating a coloreful background with ink. 

    The majority of the papers work well for this stamp so my club members could pick their favorite. 

    We inked the tree scene with Secret Sea ink and stamped on the designer paper.  It's then adhered to a full 4 1/4" X 5 1/2" piece of Balmy Blue CS before it's added to the front flap of the card base (front is folded back once).  

    For the greetings I stamped the More Messages stamp a few times and used the coordinating die to cut them all out.  I had tons of greetings for them to choose from.  They then layered them onto another Balmy Blue strip or die-cut. 

    What I love about this latest messages bundle is that the greetings and die-cuts are larger than ever before. See the bundle here. 

    Here's the free project sheet with measurements and supplies for you: Download Peaceful View June Club

    Below is the video for this card and another where I show you how to add color to the stamp. I'll share details on that project tomorrow.  

    ~~~

    July Specials:

    New Online Exclusives are here!  

    ~~~

    Last Chance List has been updated!  see it all here. Don't miss out on the deals!

    ~~~

    Get my Turtle-y Cute PDF tutorial free with any online order in July!

    Leave a Reply

    Your email address will not be published. Required fields are marked *

  • A gorgeous scene made with Wooded Acres; on the Last Chance List


    I was playing around with the Wooded Acres stamp set and made a pretty scene by adding a blended background. 

    You may know I love creating pretty scenes with my stamps, ink and blending brushes. 

    Here are the steps:

    1. I stamped this image on a long post-it note and fussy cut the area above the ground off.  I stamped it on my White CS and then added the post-it note to mask the sky. 
    2. Now I added Garden Green ink with a Blending Brush for grass. 
    3. I removed the post it and replaced it with the other half to sponge the sky. I used Timid Tiger, Calypso Coral and Balmy Blue. 
    4. I layered it with Black and White card stock. 
    5. I then stamped the same image on the Balmy Blue card base to extend the trees.  

    What do you think?  

    This stamp set is now on sale on the Last Chance List. You can see the stamp set here. 

    If you'd like to get tips on blending a smooth sky please watch this video. 

    ~~~

    July Specials:

    New Online Exclusives are here!  

    ~~~

    Last Chance List has been updated!  see it all here. Don't miss out on the deals!

    ~~~

    Get my Turtle-y Cute PDF tutorial free with any online order in July!

    Leave a Reply

    Your email address will not be published. Required fields are marked *

  • Double Flap fun fold with free project sheet & video tutorial


    Today I'm sharing the second card I made on last week's video.  It's a double flap fold card featuring the Sunrise Sailing bundle.

    The colors include Cloud Cover, Secret Sea, Strawberry Slush and Daffodil Delight.  

    I created a mask for the sun with a 1 7/8" circle punched from a post-it note. I used blending brushes & Strawberry Slush and Daffodil Delight inks. I also added just a hint of Strawberry Slush ink on the bottom of the cloud die-cuts. 

    The Designer Paper is our new 6 X 6" In Color designer paper seen here.  

    I showcased the Sunrise Sailing bundle seen here.  I love the stamp images AND the dies in this bundle.  They're wonderful and really spark creativity. There are THREE different size sailboats in the dies!  

    As you can see in the sample in the photo below you can make a card with just the embossing folder! 

    You can see in the photo below how the front square flap lifts to the right to reveal a peek at the inside. I added the cloud to the back of this square and placed it so it could 'latch' on the larger cloud to hold the card closed.   

    I create a free project sheet for this card. I also share it on the same day as my video on my Flowerbug's Stamp & Share FB group here .       Download Sunrise Sailing Latch card

    You can see the card fully opened below.  I love this easy but fun card fold.


    You'll find the video tutorial for this card and another Sailing card below. Don't forget to subscribe to my YouTube channel while you're watching!  

    I'll share another card with this bundle on Wednesday. 

    ~~~

    July Specials:

    New Online Exclusives are here!  

    ~~~

    Last Chance List has been updated!  see it all here. Don't miss out on the deals!

    ~~~

    Get my Turtle-y Cute PDF tutorial free with any online order in July!


    Leave a Reply

    Your email address will not be published. Required fields are marked *


Notice: LeeAnn Greff, Independent Stampin’ Up! Demonstrator, Manager. The content of this website is my sole responsibility as an independent Stampin’ Up! demonstrator and the use of, and content of, the classes, services, or products offered on this website is not endorsed by Stampin’ Up! Copyright 2025