/


Latest Post

Amazing WOW projects with Hey Chuck; Part 2


Each month one of my Flowerbug's Team is featured as an Artist of the Month.  For July Annette chose the adorable Hey Chuck bundle seen here.  I know you'll be amazed at her fabulous projects I'll be sharing. 

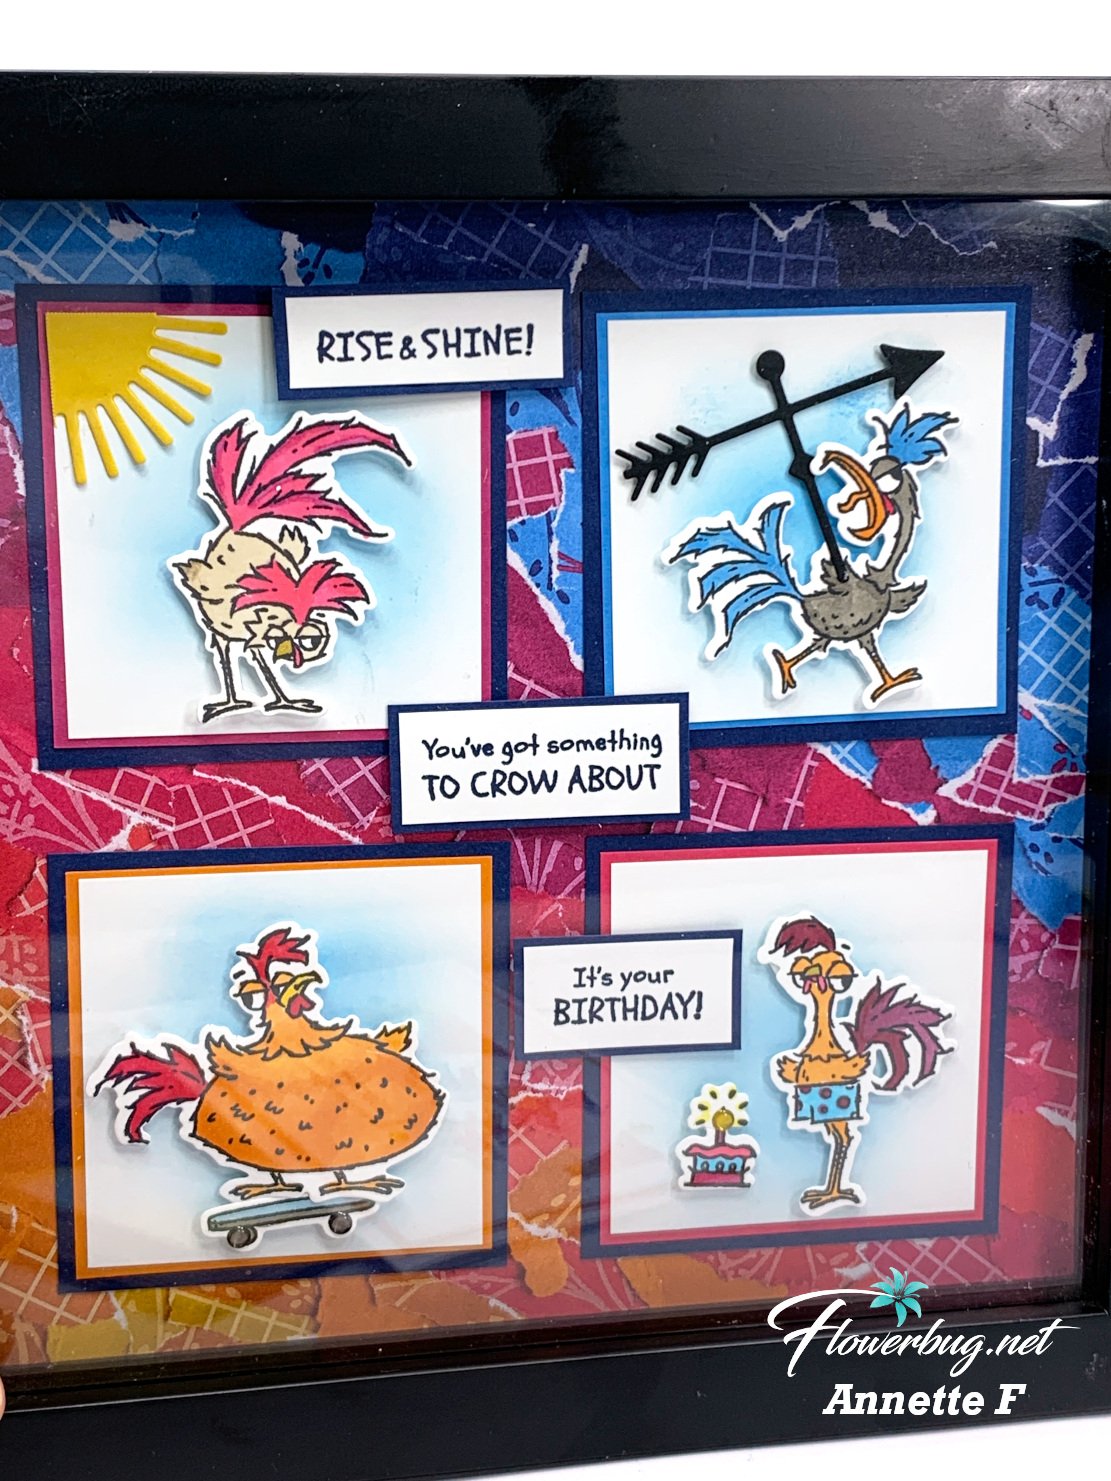
First up today is a stunning framed sampler.  

Just look at her incredible scenes!  I think the bit of blue behind each image sets them off incredibly. 

Sampler details:

  • She used Azure Afternoon ink and blending brushes to add a bit of blue behind her die-cut rooster scenes. 
  • The designer paper behind it all is the Masterfully Made designer series paper seen here. 
  • She colored the images with Blends markers and popped them up on the squares. 
  • Her 4 white squares measure 2 5/8", colored squares are 2 3/4" and the black are 2 7/8" squares 
  • The black frame is 9" in size; the glass opening is 7 1/2" 
Here's the Hey Chuck bundle she used.  The dies are back now and available!

~~~

Look at this hilarious rooster!  And the perfect greeting for him….. 


She used the Dots & Spots die for her background and that strip of the Masterfully Made DSP is a perfect addition to this card and her color choices. The white on white theme makes the image pop! 

The dimension she achieved by popping up the rooster and the greeting with Dimensionals makes such a difference to this card.  

Details:

  • Dots & Spots white layers are 5" X 3 3/4", Pumpkin Pie layer is 5 1/8" X 3 7/8"
  • Stitched circle is from the Stylish Shapes dies
  • DSP strip is 4" X 1"

~~~

Next is a fun fold card featuring the Glorious Gingham designer paper.  
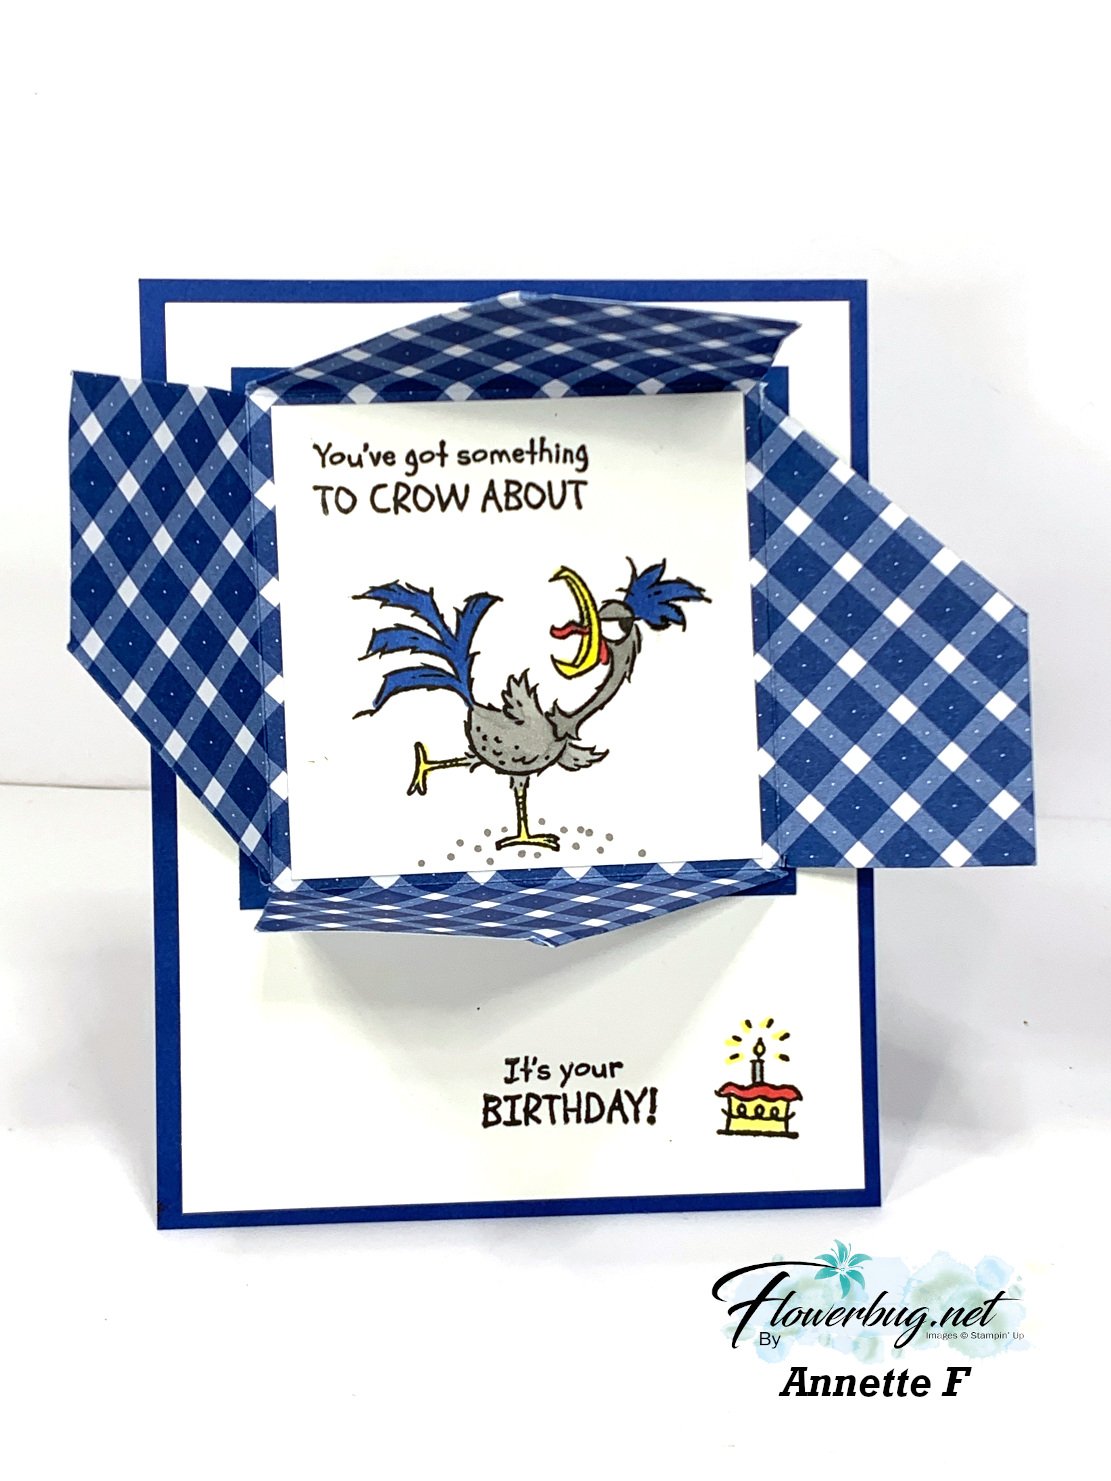

She got the idea from Karen Titus.  The DSP is 6" square and you score and cut it to fold in on itself.  Here's what it looks like when it's closed up: 


I'll be sharing how to make one of these cards very soon!  


More to come tomorrow! 

~~~

August Specials: 

 *current host codes: KY99RPXP 

ShopwithLeeAnn.com

Redeem your Bonus Days coupons in August!  

Free Gift with orders in August: 

Get a pack of at least 5 beautiful cards with orders over $50 this month. 

The more you order the more cards you get!

*cards are previous card kits to go; over the top and many fun folds.  
 

All Posts

  • Free Shipping Thursday!! And a quick & pretty card with Fragrant Forest


    Stampin' Up! announced that Thursday, December 14th is a day of FREE shipping! 

    All orders over $75 will have no added cost of shipping

    Start making your list!

    ~~~

    On last week's Live video I featured the Fragrant Forest stamp set. Trees are one of my 'go to' choices for card making; I like most botanical images though. I find them comforting and versatile and this large background stamp is truly beautiful. 

    I kept my colors to White & Pretty Peacock. If you ever struggle with color combos try just one with White or Vanilla; they're usually quite beautiful. 

    Dies used here include the Countryside Corner dies (2023-24 annual catalog) & Forever Forest dies (2023 Holiday catalog) for the die-cut mountains on the bottom of the card . The greeting die-cut is from the Stylish Shapes dies; a definite must have! See the Fragrant Forest stamp set here. 

    Here's the inside view: 

    Here's a free project sheet for this card; click on this link to download it.  Download Frosty Fragrant Forest card

    You might wonder just how I achieved the bottom half of this stamp on the inside of the card. Watch the video here. 

    I cut my stamp apart! 

    Cutting your stamps can make them so much more versatile!  And they fit right back together on your block if you do want to use the entire stamp.  Try it! 

    Click here or on the photo below to watch my video.  Please subscribe to my YouTube channel too!  

    ~~~

    December Specials: 

    Get a free embellishment from the 2023 Holiday catalog with an

    online order over $50


    *current host codes:  PN2C7Z4E or 77277NNH

    Click on the image below to see the Holiday Last Chance items 

    Leave a Reply

    Your email address will not be published. Required fields are marked *

  • Get FREE Shipping – today only! *Don’t miss the savings!


    Today is a Free Shipping day!  All Stampin' Up! orders over $75 will receive their shipping free!

    Besides saving $$ on shipping costs, here are more reasons to order today:

    1. Take advantage of the discounts in the Clearance Rack and Last Chance lists
    2. Order Paper Pumpkin pre-paid subscription – no added shipping costs! 
    3. Stock up on the basics you always use – card stock, adhesives, embellishments & more
    4. Get a Holiday catalog embellishment pkg. from me if your order is over $50 


    ~~~

    December Specials: 

    Get a free embellishment from the 2023 Holiday catalog with an

    online order over $50

    *current host codes:  PN2C7Z4E or 77277NNH

    Love kits?  Check out my pre-cut card kits to go here!

    I offer two new kits & tutorials each month!


    Leave a Reply

    Your email address will not be published. Required fields are marked *

  • How to get more use of your Fragrant Forest stamp; cut it up!


    I shared this pretty card in last week's Live video. I featured the Fragrant Forest background stamp set seen here in all 3 projects. 

    Today's card also features the Beary Cute stamp set & punch. It was available in a bundle but unfortunately the punch has sold out now.  But the stamp set is still available. 

    I used Night of Navy with Mossy Meadow here. I stamped the entire White layer with the background stamp (watch the video with tips on getting even coverage with a background stamp) then cut the circle using the new Deckled Circle dies. I added it to a larger Navy Deckled circle die-cut which covered up the die-cut line from the first circle cut. 

    The bears were stamped in Balmy Blue ink but in hindsight I'd like them in a dark gray ink on White.  The lower strip for the greeting is torn. 

    I created a free project sheet for this card; click on this link to see it. Download Fragrant Forest & Beary Cute card  *subscribe to my blog so you don't miss a thing and can access all of my project sheets in one place! 

    Are you wondering how I achieved the inside trees image without inking the entire stamp? Here's how!

    I was trying to mask the stamp but it has lots of little pine needles between the tree layers.  It wasn't working so I thought, 'why aren't I trimming the stamp?'.  I have no problem doing it; it just isn't my first thought.  It works like a gem and makes it so much easier to use this pretty stamp set!

    Do you cut your stamps apart? I tend to do it with images that have a greeting with it. Or if I like part of a greeting and want to use it separately. Honestly they fit right back together when put onto your block.  It just makes sense!  I encourage you to try it. 

    Click here or on the photo below to watch my video.  Please subscribe to my YouTube channel too!  

    ~~~

    December Specials: 

    Get a free embellishment from the 2023 Holiday catalog with an

    online order over $50


    *current host codes:  PN2C7Z4E or 77277NNH

    Love kits?  Check out my pre-cut card kits to go here!

    I offer two new kits & tutorials each month!


    Leave a Reply

    Your email address will not be published. Required fields are marked *


Notice: LeeAnn Greff, Independent Stampin’ Up! Demonstrator, Manager. The content of this website is my sole responsibility as an independent Stampin’ Up! demonstrator and the use of, and content of, the classes, services, or products offered on this website is not endorsed by Stampin’ Up! Copyright 2025