/


Latest Post

Welcome Easter; three adorable card swaps!


I received these cards in a long distance swap I participated in.  Unfortunately their labels came off so I don't know who made two of them so I cannot give credit.  So if you know of if it's yours please let me know!

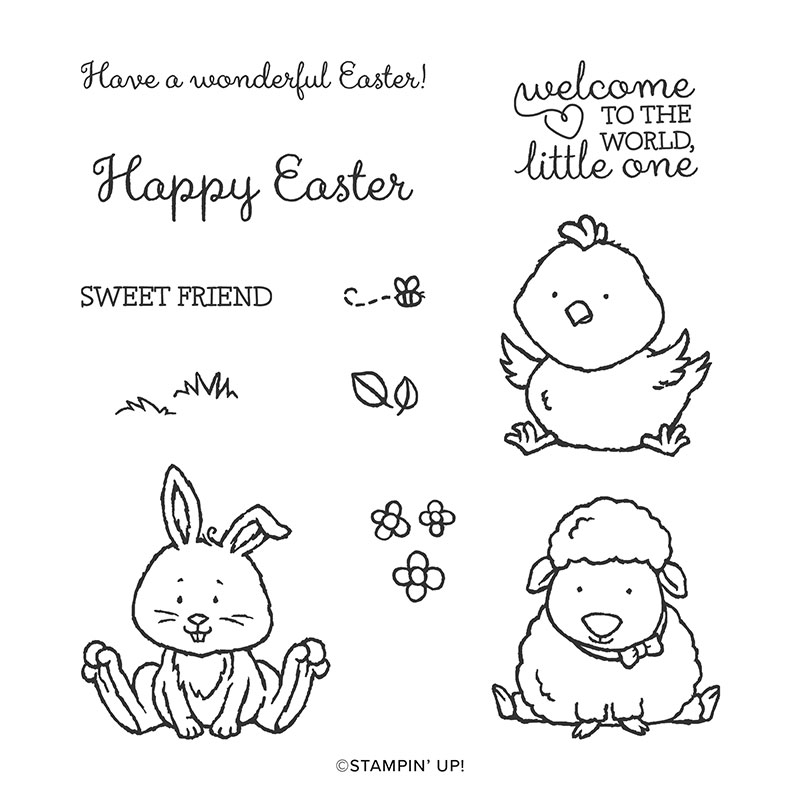
They're so adorable I just had to share them with you! You can see this stamp set here: 


I love this peek-a-boo bunny here!  Yes; it's fussy cut.  There aren't dies for it.  She used Highland Heather and our Subtles designer paper.  I really like how she die-cut a circle from the square, flipped it over to reveal the reverse side of the designer paper. Very cool!  See all of our packages of 6 X 6" designer paper here. 

That thin strip of Best Dressed designer paper adds a spring-like touch to it!  The sequins are from our Adhesive Backed package. 

I know Karen Titus made this one. I just love her water-coloring!  Adding that bit of light gray or tan with a Blends marker adds so much depth!  

The White is 2 5/8" stitched square from the Stitched Shapes dies.  The other colors are Seaside Spray, Gray Granite, Petal Pink and Soft Seafoam and are 1 3/4" square.  This layout really highlights the main image. 

Have a wonderful Easter weekend! 

~~~~

Two April ordering specials to choose from:

All online orders in April will receive my tutorial of the month; with 16 cards

featuring the Ornate Garden products seen here.

Orders between $55 and $99 will receive a free Simple Shammy!

Use this host code for April: MMM4SXSB  

~~~~~


All Posts

  • How to use leftover pieces to create projects


    I'm sure you have a few piles of extra die-cuts, greetings or stamped images leftover from other projects right?  I seem to have lots! I give bunches of these to my friend Joanne in AZ as she loves to use them to remake cards to benefit the needy. 

    I had a few extra Santa hat die-cuts left from this project. 

    It's made with the Sending Cheer bundle. I shared this diamond flap card on a video here.  Unfortunately the dies are sold out but the stamp set is hugely discounted right now; see it here. It was $24 and is now $14.40. 

    I had enough die-cuts and other elements left to create a few more cards; here's one:

    The layout is quite similar but it's not a fun fold card. Simple but cute! I used Poppy Parade for this card base. The colorful designer paper is the Merry, Bold & Bright but it's also sold out now.  Our Last Chance sale from the Holiday catalog is really reducing our options!  

    Here's a different card layout using similar pieces: 

    I had a leftover textured layer that was perfect for the Santa element. It's the Christmas Tidings embossing folder – discounted on the Last Chance sale and seen here. 


    Easy-peasy and two more Christmas cards made. 

    ~~~

    December Specials: 

    Get a free embellishment from the 2023 Holiday catalog with an

    online order over $50


    *current host codes:  PN2C7Z4E or 77277NNH

    Love kits?  Check out my pre-cut card kits to go here!

    I offer two new kits & tutorials each month!

    Leave a Reply

    Your email address will not be published. Required fields are marked *

  • Fragrant Forest & Countryside Corners in a fun fold layout with video


    I've been sharing my Fragrant Forest projects from last week's Live; this is the third one. I have a video below to watch plus free project sheets for each card too.  See this stamp set here.

    I chose a simple color combo of White & Pretty Peacock. The designer paper on the upper flap is the Hello, Irresistible from our Online Exclusives line. 

    The die-cuts are the Countryside Corners from the Annual catalog; seen here. Can you see the raised lines on the inside white? I used my Simply Scored 1/4" from each edge. 

    Here's the free project sheet with measurements, photo and more: Download Fragrant Forest Funfold card

    I couldn't decide if I like the clean look of the card on the lower right or the added forest on the lower left card. Which do you prefer? 

    Here's the inside view of the upper left card.  I used the Lasting Joy stamp set for my greeting and sentiments. I find I'm reaching for this one often. See it here. 

    You might wonder just how I achieved inking only the bottom half of this stamp on the inside of the left card above. Watch the video here. 

    I cut my stamp apart! 

    Cutting your stamps can make them so much more versatile!  And they fit right back together on your block if you do want to use the entire stamp.  Try it! 

    Click here or on the photo below to watch my video.  Please subscribe to my YouTube channel too!  

    ~~~

    December Specials: 

    Get a free embellishment from the 2023 Holiday catalog with an

    online order over $50


    *current host codes:  PN2C7Z4E or 77277NNH

    Love kits?  Check out my pre-cut card kits to go here!

    I offer two new kits & tutorials each month!


    Leave a Reply

    Your email address will not be published. Required fields are marked *

  • Free Shipping Thursday!! And a quick & pretty card with Fragrant Forest


    Stampin' Up! announced that Thursday, December 14th is a day of FREE shipping! 

    All orders over $75 will have no added cost of shipping

    Start making your list!

    ~~~

    On last week's Live video I featured the Fragrant Forest stamp set. Trees are one of my 'go to' choices for card making; I like most botanical images though. I find them comforting and versatile and this large background stamp is truly beautiful. 

    I kept my colors to White & Pretty Peacock. If you ever struggle with color combos try just one with White or Vanilla; they're usually quite beautiful. 

    Dies used here include the Countryside Corner dies (2023-24 annual catalog) & Forever Forest dies (2023 Holiday catalog) for the die-cut mountains on the bottom of the card . The greeting die-cut is from the Stylish Shapes dies; a definite must have! See the Fragrant Forest stamp set here. 

    Here's the inside view: 

    Here's a free project sheet for this card; click on this link to download it.  Download Frosty Fragrant Forest card

    You might wonder just how I achieved the bottom half of this stamp on the inside of the card. Watch the video here. 

    I cut my stamp apart! 

    Cutting your stamps can make them so much more versatile!  And they fit right back together on your block if you do want to use the entire stamp.  Try it! 

    Click here or on the photo below to watch my video.  Please subscribe to my YouTube channel too!  

    ~~~

    December Specials: 

    Get a free embellishment from the 2023 Holiday catalog with an

    online order over $50


    *current host codes:  PN2C7Z4E or 77277NNH

    Click on the image below to see the Holiday Last Chance items 

    Leave a Reply

    Your email address will not be published. Required fields are marked *


Notice: LeeAnn Greff, Independent Stampin’ Up! Demonstrator, Manager. The content of this website is my sole responsibility as an independent Stampin’ Up! demonstrator and the use of, and content of, the classes, services, or products offered on this website is not endorsed by Stampin’ Up! Copyright 2025