/


Latest Post

Tune In Double Diagonal fun fold card with video & free project sheet


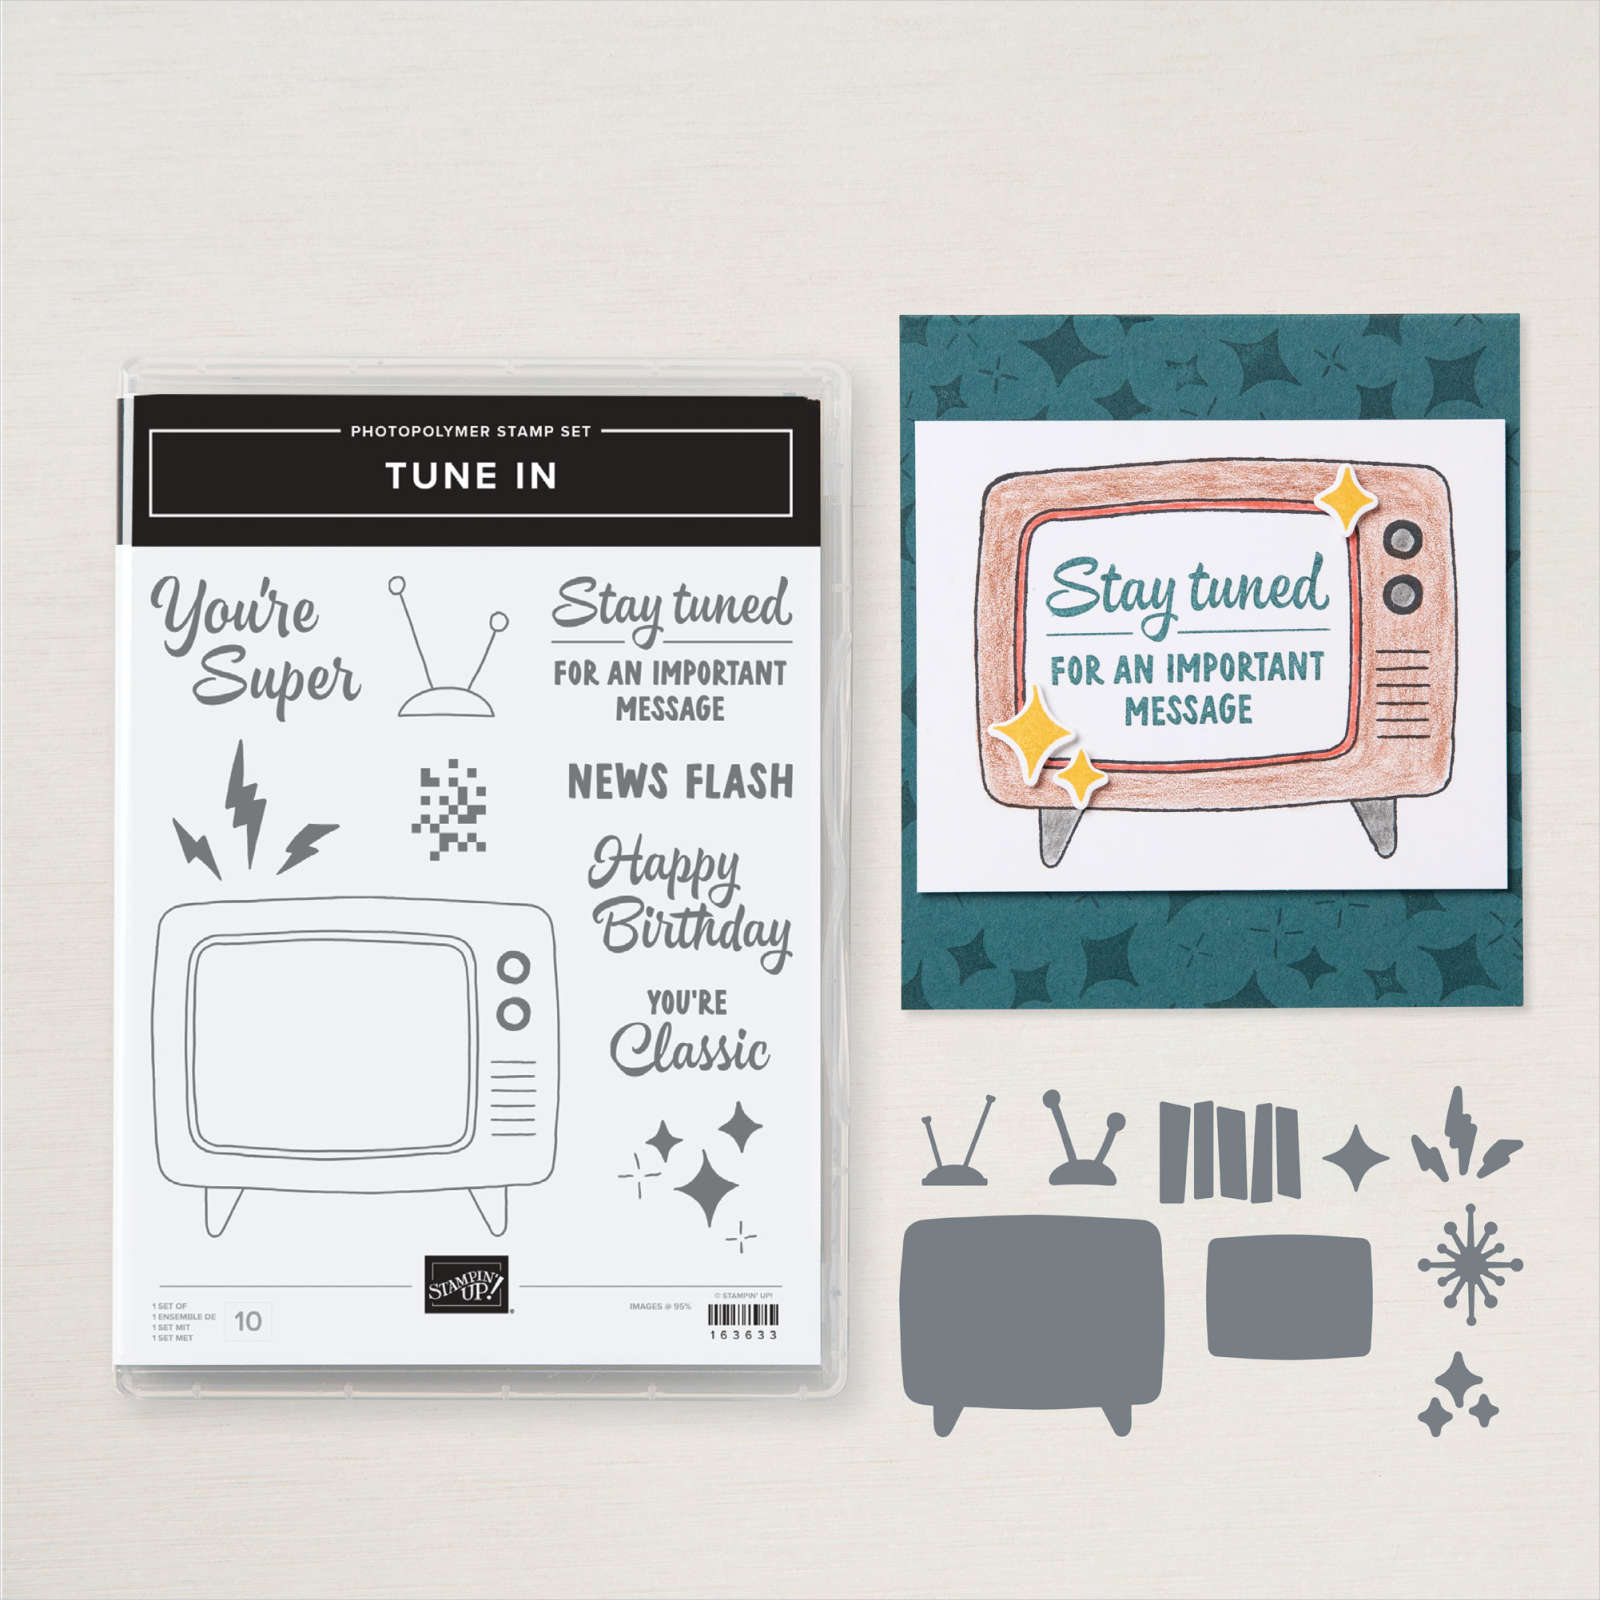
We made this neat card at my June card clubs. It features the Tune In stamp & die bundle 

My colors include Blueberry Bushel, Gray Granite & White. That plaid designer paper I heat embossed the greeting onto is the Tartan Foil DSP seen here. It's one of our online exclusive products (while supplies last). 

This bundle is so fun to play with and feels quite retro for many of us.  Check it out here. This neat stamp & die bundle is discounted in June; grab it now while it's on sale! It's an extra 10% off in June – was $41.25 and is now $36.75. A great price for this neat bundle!

The stamps are fabulous and the dies are over the top!! So much fun creativity you can do with this bundle.

Here's how the card opens. The left diagonal cut folds under the front vertical flap.  

Do you see that stamped white background on both the inside Gray Granite and the front Blueberry Bushel layer? That's done with the White Craft ink pad and a stamp in the bundle. 

There are a ton of layers on this card.  If you'd like to make this fun fold here's the free project sheet you can download and print. Download June Tune In Double Diagonal fold


See all of the Stamp & Die bundles on sale in June here. 

Below is the video tutorial for this fun fold card as well as one more neat card using the Tune In Bundle.  

~~~

June Specials: 

*current host code links: GF24T6XG or 3A73HXYB

~~~

All online orders receive my free tutorial of the month & if your order is over $55 you'll also receive a free gift from me

All Posts

  • Painted Poppies in a window


    Adding dimension and interest to a clean & simple card can be a challenge.  Adding a window with the Stitched Nested Label dies does it easily.

    I had this window piece in my bag of White scraps, so it was extra easy to make this card. I used the Stitched Nested Labels; which are a 'must have' in my opinion. Next time you want a die-cut, consider die-cutting it in the center of a larger piece so you can use both pieces! 

    The top White piece is 3 1/2" X 4 3/4", the second White layer is 3 5/8" X 4 7/8".  The Granny Apple Green piece is 1 1/2" X 5 1/2".

    Just like yesterday's card I used my Dark Poppy Parade blends marker to color the new 1/4" White Crinkled ribbon for the bow. Both of the images are stamped in Black Memento ink. I colored the green leaves and bud with a Granny Apple Green Blends marker.  The poppy flower is colored by stamping with one of the stamps in the Painted Poppies set.  

    The greeting is from the Sending you Thoughts stamp set; it's free with any $50 order right now during our Sale-a-Bration promotion.  You can see all of the free items here. 

    I love the new Peaceful Poppies suite and have created 10 project sheets to send to everyone who places an order in January.  Details below:  

    ~~~

    January Specials 

    All online orders will receive a 10 cards pdf tutorial in an email.


    And if your order is over $65 you'll get a free Coastal Weave embossing folder too!


    January Host Code is GEEFZCZV

    Order online here


    Leave a Reply

    Your email address will not be published. Required fields are marked *

  • Peaceful Poppies; easy cards!


    The new Peaceful Poppies designer series paper is gorgeous with bright, pretty colors and lots of poppies!  There's one sheet in particular that makes it super easy to make quick, floral cards. Click here to see it in my store. 

    It's the sheet of paper on the far left above.  

    I cut the paper at 5 1/2" across and above the flowers.  Then into 3" strips.  Now I have 8 panels of flowers ready for cards!  

    I made two cards here adding a 1" X 5 1/2" strip of Poppy Parade on the left and a white punched border using the Decorative Ribbon Border punch. The cards are Old Olive cut at 4 1/4" X 11" scored at 5 1/2" 

    The greetings are from the new Sale-a-Bration set 'Sending you Thoughts' on page 11 of that catalog.  You can see it here. The punch they're stamped on is the Timeless Label punch seen here.  

    You might wonder where I found that pretty crinkled Poppy Parade ribbon. It's the new 1/4" White crinkled ribbon that I colored Poppy with my Dark Poppy Parade blends.  I LOVE being able to color my ribbon the exact color I need for my projects!  

    Check out all of the Sale-a-Bration items here; remember you get a free choice for every $50 or $100 you spend! 

    ~~~

    January Specials 

    All online orders will receive a 10 cards pdf tutorial in an email.


    And if your order is over $65 you'll get a free Coastal Weave embossing folder too!


    January Host Code is GEEFZCZV

    Order online here


    Leave a Reply

    Your email address will not be published. Required fields are marked *

  • Snowman Peek-a-Boo card with video


    This interactive card is fun& adorable and my gals loved it at our December club events.  

    They were anxious that it would be difficult.  There is a little trick to it but once you 'get it' you'll find it's pretty easy. 

    I cased this card from my very creative friend, Julie Davison.  Her style is simple yet fun.  Her layouts are the best!

    My color scheme came from the Let it Snow specialty designer paper from the Holiday catalog.  Unfortunately that paper is out of stock.  It was VERY popular!  It's Coastal Cabana, Real Red, White and Black. 

    The Snowman Season set is still available as a bundle through today; January 2nd.  Get it at 10% off now.  It will return this year but not as a bundle at the discount. See the stamp set here and the punch here

    Here's the corrected video; not upside down!  Ha! 


    Measurements:
    Red card 5 1/2" X 8 1/2"
    Coastal Cabana tag 2" X 5 3/4" scored at 3 1/2" and 4", front layer is 2 3/8" X 3 1/4"
    White front 2 1/8" X 3", small snowman piece is 1 1/2" X 1 3/4"; inside 3 1/2" X 4 3/4"
    Designer paper 3 1/4" X 4 1/4"

    January Host Code is GEEFZCZV

    Order online here

    Leave a Reply

    Your email address will not be published. Required fields are marked *


Notice: LeeAnn Greff, Independent Stampin’ Up! Demonstrator, Manager. The content of this website is my sole responsibility as an independent Stampin’ Up! demonstrator and the use of, and content of, the classes, services, or products offered on this website is not endorsed by Stampin’ Up! Copyright 2025