/


Latest Post

There’s so much you can do with the Merriest Moments bundle!


On this week's FB Live I featured the Merriest Moments bundle seen here – a beautiful bundle that includes a Hybrid embossing folder. This type of folder enables you to die-cut AND emboss at the same time!  

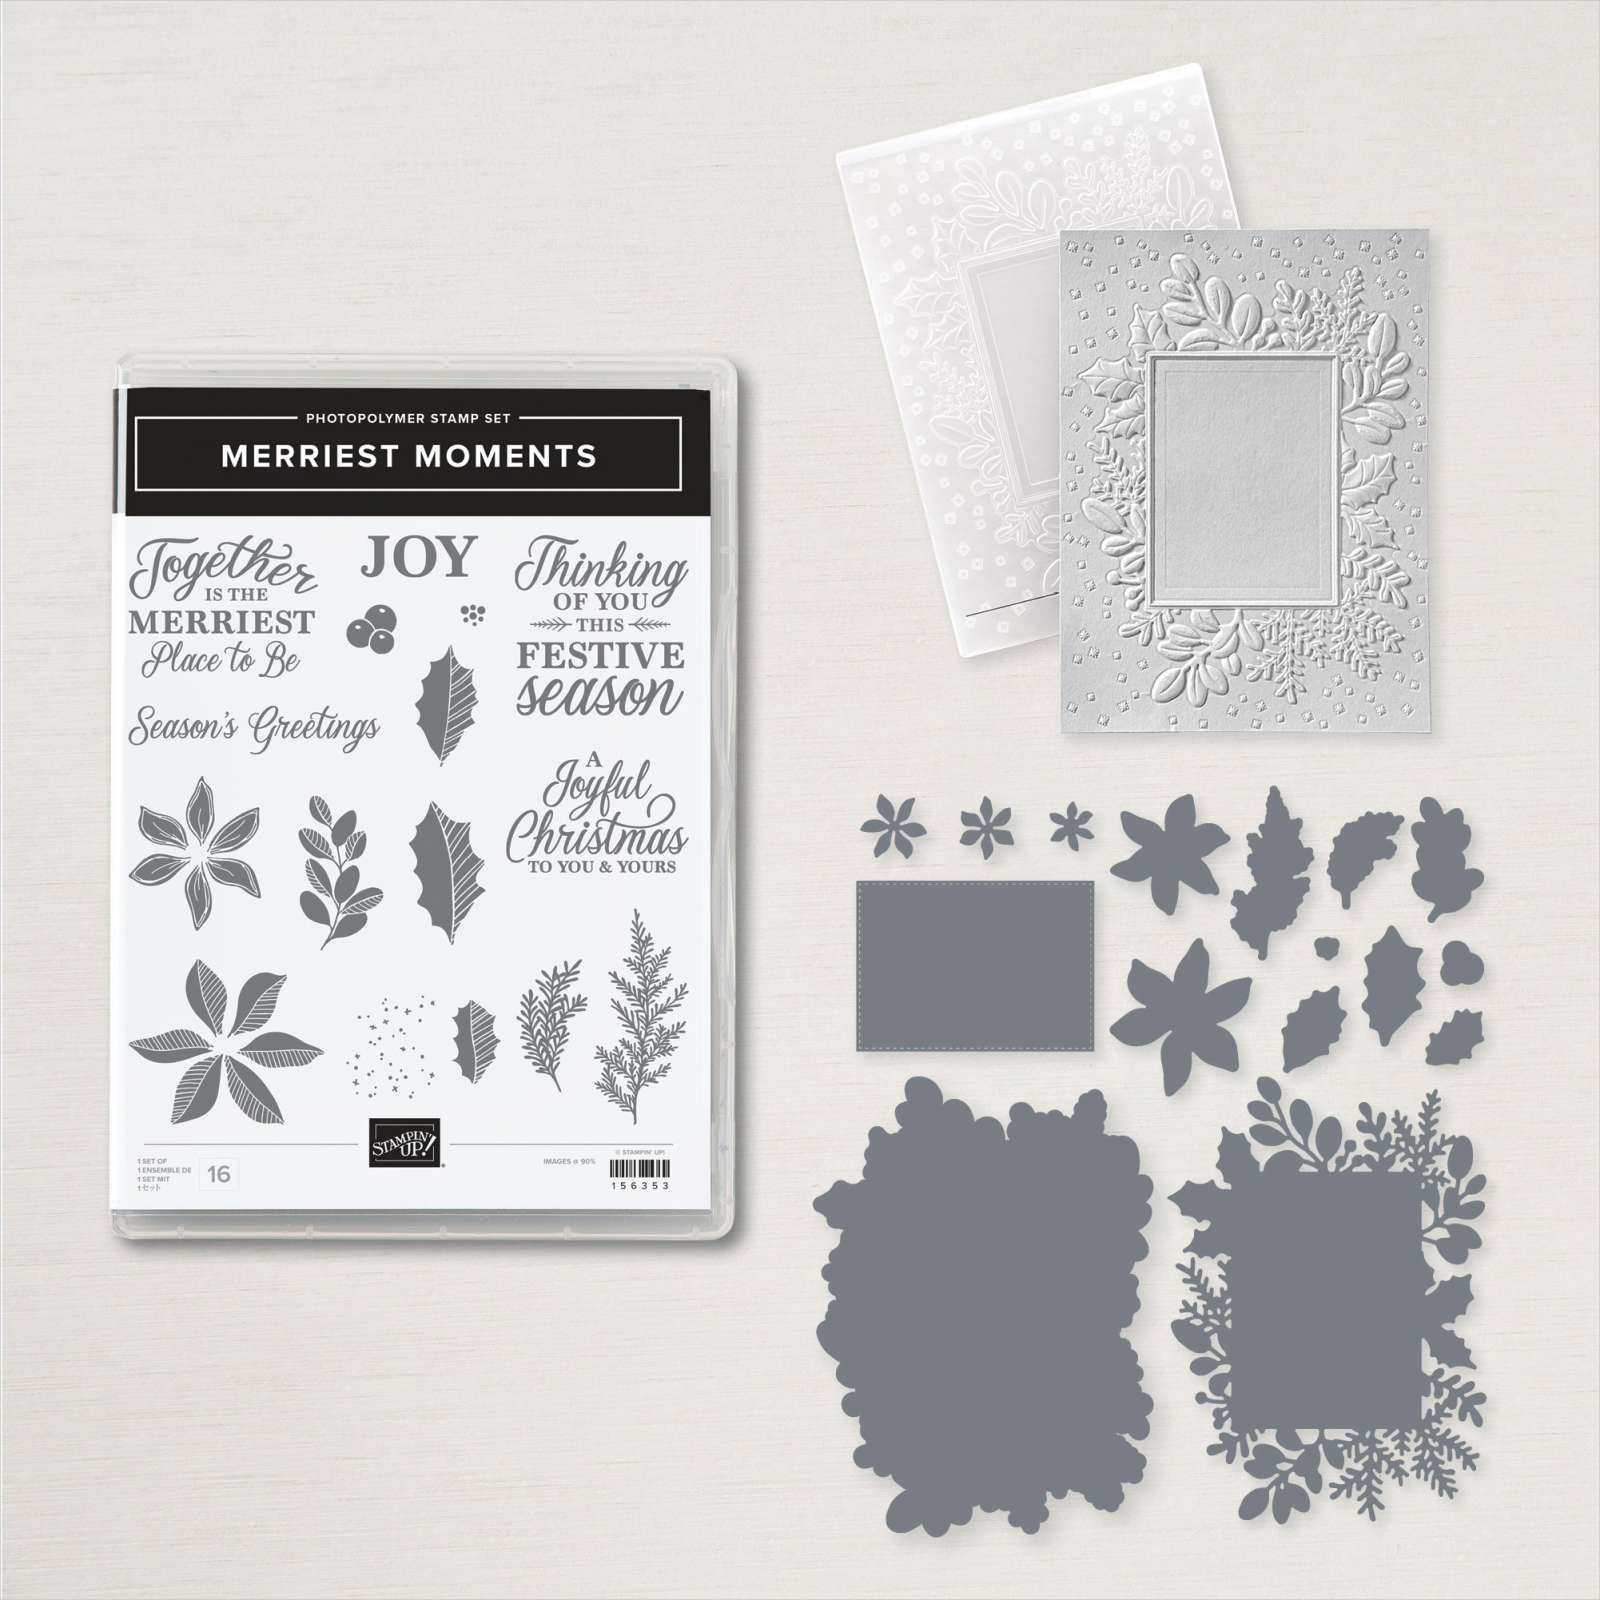
However it's important to only use the large outline die inside your Hybrid folder.  Do not use the detailed die.  You can use that after or before you emboss. 

Look at these gorgeous cards in Evening Evergreen, White, Red & Just Jade. 

This next card really shows off the stunning die-cut & texture as well as the pretty holiday greeting.  That cute baby poinsettia is made from our Red velvet paper and the dies in this bundle.  The colors are Evening Evergreen, White and Red. 

The set of cards below have a window die-cut in the Thick White card base after texturing.  I did run the front back through the Hybrid embossing folder again after I cut the window because it flattened a bit when die-cut.  *This is shown in the video below or click here. 

I added just a few die-cuts and the greeting to finish them.  Simple yet beautiful! 

Next is a gorgeous card we made at my October Card Clubs.  The pretty die-cut has been sponged with ink before or after it's embossed with the Hybrid embossing folder.  Either way works fine. 

I chose an unlikely combo of Old Olive & Just Jade.  Who knew they'd be so beautiful together?! 

See this amazing bundle here in my store.   

Below is the video where I show how to make most of these cards.  I hope you watch it and get inspired to create yourself! 

~~~

October Specials

Host code: G3FX9NGA

*click here to order

Get a free package of Gold & Rose Gold Metallic specialty paper from me with a $50 online order in October! 

All online orders will receive my October Gingerbread & Peppermint PDF tutorial free! 


All Posts

  • Pretty Center pop-out fun fold card with free project sheet & video tutorial


    I'm so excited to share this super neat fun fold card with you today!  It's called a Center Pop-out fun fold.  I found this neat fold from my friend Terri Gaines. 

    I chose to feature the Thankful Garden bundle seen here and the Lovely Garden Designer paper seen here. 

    I love these stencils!  They are so easy to work with. Watch the video below for a special tip on lining them up.

    This card looks like it might be hard to assemble but with the center 'brace' that helps the center panel pop out it's quite simple.  It will really help you understand how to make it if you watch the video tutorial below. 

    My colors include Melon Mambo with Blueberry Bushel. Here's how the card looks with the inside brace added before I adhered the center panel: 

    I made the yellow/green version on the video to show a different color combo.  

    I colored the flowers by using the stencils included in the bundle. So easy and makes you look like a true artist with the high and low lights added with blending brushes.  

    Here's the free project sheet with measurements & step by step directions.  Click on the following link to download or print it.  Download Thankful Garden Center pop up card 

    Which one do you prefer?  

    Below is the video tutorial for this card and another unique fun fold using the Lovely Garden designer series paper.  

    ~~~

    March Specials:

    *current host code link:  

    PNQMAWXD

    Get a free Floral Delight tutorial with any online order in March!

     Free Iridescent Foil gems!

    Leave a Reply

    Your email address will not be published. Required fields are marked *

  • Delicate Wings card kit to go; limited quantity left


    I loved the Delicate Wings Paper Pumpkin kit so much I bought a bunch of refill packages.  I transformed the kit from 9 cards to 12 and have some available in my store.  They're so pretty!  

    If you love butterflies and glitz you'll enjoy making these pretty cards.  It includes the following:

    • pre-cut or punched layers for all 12 cards
    • a share of Iridescent Foil gems
    • a share of Pretty Peacock & Gold metallic ribbon
    • the PDF tutorial with directions, measurements, photos & a supplies list

    The tutorial will be emailed to you immediately after payment.  Please check your spam folder.  The kit will be mailed out within a few days. 

    You will need greeting stamps, adhesives and a paper trimmer. 

    You can see this pre-cut kit to go here.  It's $29 plus shipping.  If you're already signed up to receive a kit this month message me and you can pay without additional shipping costs.  

    I have many other kits available right now; grab two or more and save on shipping!  www.flowerbugshop.com 

    ~~~

    March Specials:

    *current host code link:  

    PNQMAWXD

    Get a free Floral Delight tutorial with any online order in March!

     Free Iridescent Foil gems!

    Leave a Reply

    Your email address will not be published. Required fields are marked *

  • Delicate Wishes fancy fold with measurements!


    Jacki made this extra special fun fold for our February Team swap (the theme was circles). 

    Isn't is gorgeous!  She used the Delicate Wishes bundle seen here. Her colors include Daffodil Delight, Lemon Lolly, Shy Shamrock & Early Espresso with White.

    Products used:

    • Delicate Wishes bundle seen here
    • Bough punch (low inventory)
    • Bloom Impressions DSP (Sale-a-Bration)
    • Soft Waves 3D embossing folder seen here
    • Stylish Shapes dies seen here

    The main panel is cut at an angle and fold out.  So cool!!

    Measurements:

    • Crushed Curry card base 4 1/4" X 5 1/2"
    • White back layer 4" X 5 1/4", angled layer 12" long – 2" tall at the left end and 4" tall at the right, score at 4" & 8" 
    • Circle die-cuts are 2 1/8", 2 1/2" (center), inside is 2 1/2" & 3" layered


    ~~~

    March Specials:

    *current host code link:  

    UBYVA7HN

    Get a free Floral Delight tutorial with any online order in March!

     Free Iridescent Foil gems!

    Leave a Reply

    Your email address will not be published. Required fields are marked *


Notice: LeeAnn Greff, Independent Stampin’ Up! Demonstrator, Manager. The content of this website is my sole responsibility as an independent Stampin’ Up! demonstrator and the use of, and content of, the classes, services, or products offered on this website is not endorsed by Stampin’ Up! Copyright 2025