/


Latest Post

Striking Nests of Winter card kit to go; reserve yours ASAP


Today I’m sharing my second card kit to go for November. It is a former paper pumpkin kit called the Nests of Winter; but I jazzed them up a bit plus added more.

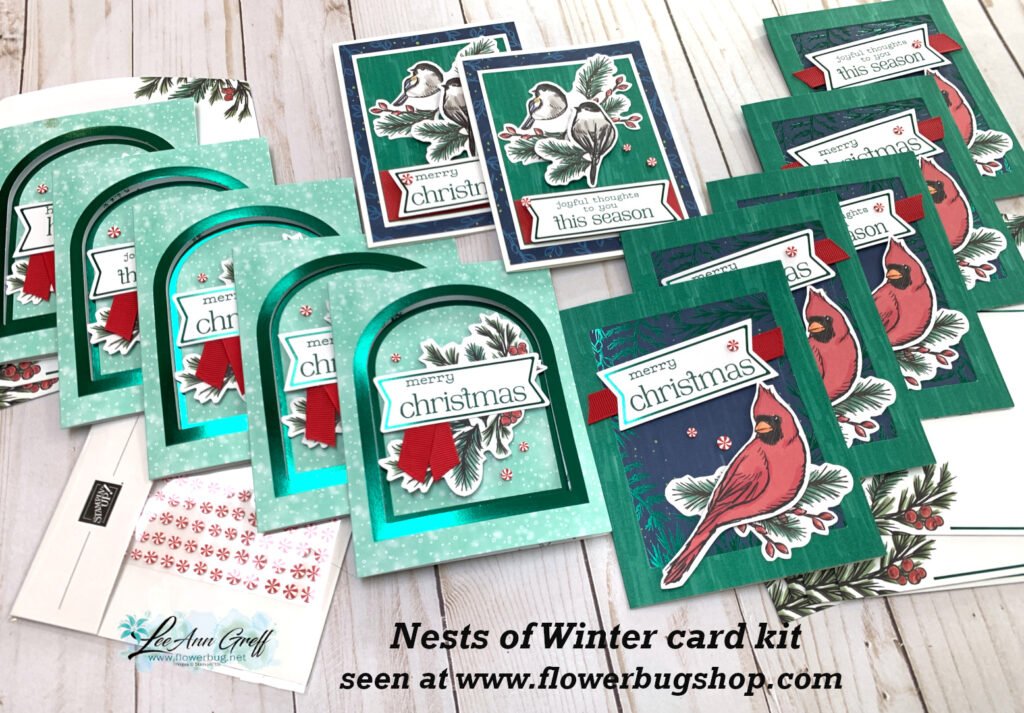
This pretty kit includes lots of foil accents and a wintery bird theme. I added Christmas greetings but they could easily be winter themed all occasion cards too. This kit includes 12 cards with envelopes and a share of Peppermint gems plus the PDF tutorial. It includes so much product you could make even more cards with just a few card bases.

This card kit will go out in mid to late November, before Thanksgiving, giving you plenty of time to get them out for Christmas if needed. The PDF will be sent to you via email immediately after payment.
*You will need greetings, ink and a paper trimmer to complete them.

You can see it here on my Shop along with many more kit & tutorial options. It’s $29 plus shipping. See all of my kits here.

~~~

November Specials

New Online products are available on November 4th.
See them here.

Get the Peaceful Garden suite tutorial FREE with any online order in November!

All Posts

  • Star & Snowflake Ornaments; so pretty!


    I had to give these gorgeous star projects a try!  Sara from Stampin' Up! made them for a tree topper but they were one sided.  I decided to turn her idea into ornaments by making them 2-sided.  

    They're made with our Stitched Stars dies seen here.  I used the largest and third smallest to make these. I used the Gingerbread & Peppermint DSP but unfortunately it was on the retired list and is sold out now. 

    You probably wonder where the snowflakes come from.  They are called 'Wonderful Snowflakes' and they also just sold out! The retiring list can be so hard; items you want can be gone in an instant! 

    You need a good stack of Dimensionals between each layer like this: 

    You can see why you need a smaller star inside; to support the stacks of Dimensionals. *There's a second stack under that smaller star.  You'll add a second large star on top of the dimensional stack seen above. 

    Tips:

    • I found a stack of 4 to work best.
    • I added a rolled up mini glue dot to the tip of each star point to secure them together.  It's not necessary but does finish if off so they stay closed. 
    • Add the cord with a glue dot to one of the star points. 

    They were so fun to make I couldn't stop! I plan to add these to my cookie trays or to Christmas presents instead of a traditional bow. 

    I thought this last one would look sort of ho hum in this pattern.  But once I added our Red Rhinestones to the snowflake it sure came to life!  

    Below is the video to see exactly how to make these pretty ornaments.  They're the third project I share. 

    ~~~

    December Specials:

    Host code:  6YCWV7QN

     *click here to order 

    Use the host code above & get a free card stock sampler ring with a $50 order in December! 

    See the last chance list here

    See the July-December catalog carry over list here

    Leave a Reply

    Your email address will not be published. Required fields are marked *

  • Origami Christmas Tree card; soooo easy!


    I make one of these trees almost every year.  Why? Because they are easy & fun and we always have new Designer Paper for me to play with. 

    All you need are four squares of DSP. No scoring or other measurements.  Watch the video here or below to see how it's done. 

    Here are the supplies:

    • Card stock – Old Olive & Mossy Meadow card bases, Real Red & Cherry Cobbler layers, White greeting strip & inside
    • Designer Paper – Heartwarming Hugs (out of stock now) and Sweet Stockings
    • Greeting image from the Christmas Cheer stamp set
    • Star topper from the Starlit punch
    • Embossing folder – Evergreen Forest (out of stock temporarily) 

    Measurements: 

    • Card base 5 ½” X 8 ½”
    • DSP – 4 square pieces at 1 ¼”, 1 ¾”, 2 ¼” & 2 ¾”
    • Textured front & White inside are 4” X 5 ¼”

    Below is the video for you. I share another special card project and some pretty star/snowflake ornaments as well.  

    ~~~

    December Specials:

    Host code:  6YCWV7QN

     *click here to order 

    Use the host code above & get a free card stock sampler ring with a $50 order in December! 

    See the last chance list here

    See the July-December catalog carry over list here

    Leave a Reply

    Your email address will not be published. Required fields are marked *

  • Easy Christmas Ornament card


    I think this is pretty clever & unique; it's a 'faux' Christmas ornament on a card. And it's quick & easy too!  

    It looks so real; like you could lift it off!  And you actually could if you use temporary adhesive; or add it to a pocket.  

    I shared this project on a FB Live last week.  It's the second project I made in this video.  

    Products used:

    • Merry Melody embossing folder on the White CS
    • The ornament is made with the largest smooth circle in our Circles dies. 
    • The DSP is called Painted Christmas and is in low inventory right now.  
    • Elegant Trim for the 'hanger'. 
    • Brushed Metallic specialty CS for the 'hanger'. 
    • Heat embossing for the greeting – from the Words of Cheer stamp set. 
    • CS is Real Red, White & Evening Evergreen 

    Here's a close-up of it. 

    I give a few hints in the video on achieving this.  Basically you want to stamp your greeting first and add it to your DSP.  THEN cut both pieces out at the same time with your circle die. 

    Below is the video for you. I share another special card project and some pretty star/snowflake ornaments as well.  

    ~~~

    December Specials:

    Host code:  6YCWV7QN

     *click here to order 

    Use the host code above & get a free card stock sampler ring with a $50 order in December! 

    See the last chance list here

    See the July-December catalog carry over list here

    Leave a Reply

    Your email address will not be published. Required fields are marked *


Notice: LeeAnn Greff, Independent Stampin’ Up! Demonstrator, Manager. The content of this website is my sole responsibility as an independent Stampin’ Up! demonstrator and the use of, and content of, the classes, services, or products offered on this website is not endorsed by Stampin’ Up! Copyright 2025