/


Latest Post

Spooky Treats alternative card with Aspen Tree dies


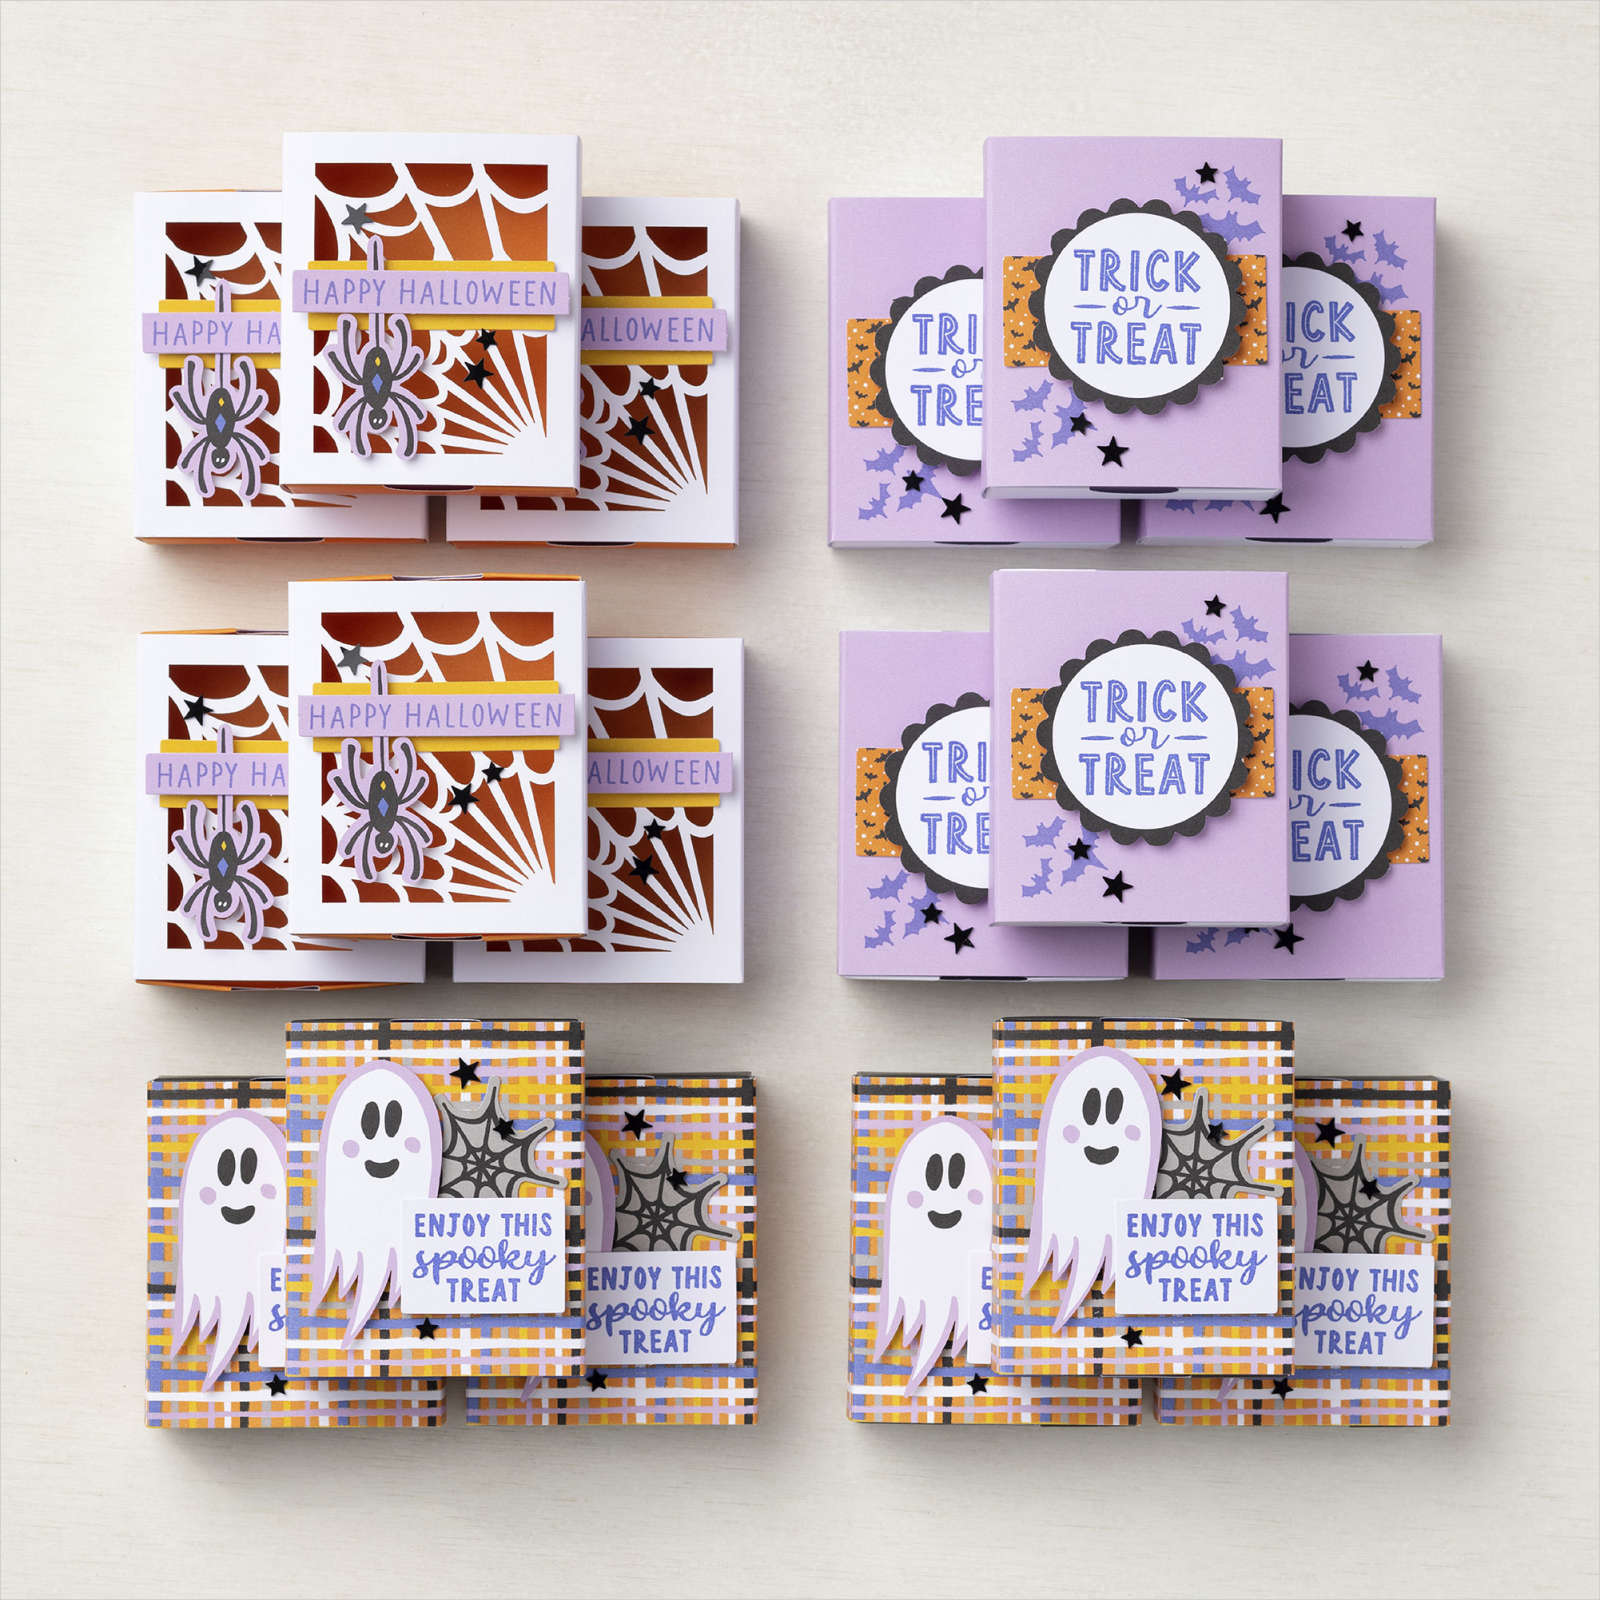
Here's one of the projects I shared on Tuesday's FB Live video this week.  I focused on the Spooky Treats Paper Pumpkin kit.  

Good news!  This kit is still available – you can get the full kit here.  Or if you're a subscriber you can get the refill here.  

 In the video seen here, I share a bunch of alternative projects with both my Paper Pumpkin subscribers AND my Flowerbug's Team. 

Here's the stamp set that is included in the kit; it's so cute!

Here's what the Spooky Treats kit makes if you follow the kit directions as directed. It includes 18 nice size treat boxes; perfect to add your candy or Halloween treats in.  

I look forward to getting these kits in the mail each month.  I know that October's kit is Christmas cards.  We always get a hint on what it will be. That way you can opt out or even choose to get more than one kit!

You have a few choices when purchasing Paper Pumpkin.  You can subscribe to get one kit each month here.  Or purchase a pre-paid subscription here.  You can choose from a 1, 3, 6 or 12 month pre-paid subscription.  

You can see how I stamped the inside below.  The card base is Orchid Oasis. 

I used three inks and our blending brushes to create the smooth background under the Aspen Tree dies. I share a few tips on getting smooth results in the video.  

Click on the photo below to watch the video: 

~~~

September Specials


New weekly deals come out on September 1st, 8th, 15th & 22nd! 

Order online here

Host codes: KSAEED9Y or JPJ4FKYJ

Get free cards from me with online orders!

Earn free products with my loyalty rewards! 

Click here to download yours and earn a $50 shopping spree!

All Posts

  • Harvest Meadow Fun Fold cards kit to go


    Today I'm sharing one of my September cards kit with you. I actually have two and will share the other one tomorrow. 

    This kit includes 10 pre-cut cards (2 each of 5 cards), 1/2 pkg. Nature's Harvest designer paper (6" X 12"), Metallic adhesive gems & Linen Thread.  It's a fabulous value as the product is worth $20 (without tax & shipping) and the cost is just $28 and the tutorial is free! The PDF tutorial includes photos, step by step directions, measurements to make more and a supplies list. 

    8 of these 10 cards are fancy folds and with the tutorial you'll have measurements to make more using other products.  


    You will need your own stamps, ink, adhesive and a paper trimmer to cut your new designer paper using the measurements provided in the tutorial.  Everything else is cut & prepped for you. 

    *I make sure to use only greetings in my kits to go so you can substitute what you already own.  I used Sunny Sentiments, Biggest Wishes, Create with Friends sets here.  *Inks are Misty Moonlight, Night of Navy, Bumblebee, Calypso Coral, Soft Succulent & Versamark. 

    *Be sure to order by September 19th to get this kit!  

    This PDF tutorial will be sent to you via email immediately after payment. The kit is mailed out at the end of September, barring any back-orders. 

    Go here to order the pre-cut kit to go. $28 (See the 2nd September kit option here. Choose both kits here!)

    Click here to get the PDF tutorial. $15

    ~~~

    September Specials

    Host code: ASETFASJ or T7VSZQ64

    *click here to order

    All online orders will receive a free PDF tutorial filled with projects featuring

    the Painted Christmas Suite!

    Get a pkg. of Holiday Rhinestones with a $50 online order from me in September! 

    Order here

    BEST DEAL!

    Get a Free Bundle  from the Holiday Catalog when you choose the Starter kit!  Pick out $125 in product of your choice for just $99 and shipping is free!  

    Leave a Reply

    Your email address will not be published. Required fields are marked *

  • Poppin’ Pastels Technique with Delicate Dahlia


    If you've been a stamper for awhile you've likely played with chalks and the Poppin' Pastel technique.  If not, check this out!  

    You'll need just a few supplies – Chalks, Versamark ink and sponge daubers. Well, card stock too! 

    Tip – choose a solid image with a full surface.  Outline images won't work as well here. 

    Here's how it's done:

    1. Ink your image in Versamark ink and stamp on card stock. 
    2. Dab your sponge dauber in chalk (if it's firm like our new Soft Pastels you may need to scrape some off & use the dust *watch the video below).
    3. Dab over your stamped image repeatedly. Do not rub on the outer edges or it may show outside of your stamped area. 
    4. Blow or dust off excess chalk.  Done!  

    Here's the video:

    ~~~

    September Specials

    Host code: ASETFASJ or T7VSZQ64

    *click here to order

    All online orders will receive a free PDF tutorial filled with projects featuring

    the Painted Christmas Suite!

    Get a pkg. of Holiday Rhinestones with a $50 online order from me in September! 

    Order here

    BEST DEAL!

    Get a Free Bundle  from the Holiday Catalog when you choose the Starter kit!  Pick out $125 in product of your choice for just $99 and shipping is free!  


    Leave a Reply

    Your email address will not be published. Required fields are marked *

  • Easy Explosion card video tutorial with Penguin Playmates Designer Paper!


    On last Tuesday's FB Live I shared three unique fun fold cards featuring the Penguin Place bundle and the Penguin Palace designer paper.  *Follow me on Facebook here. 

    Today I'm focusing on the Explosion card. It sure looks complicated but it's just a few score lines on a 4 X 8" piece of DSP. 

    As you can see, it's not a Christmas card.  This bundle and designer paper works well for multiple occasions.  

    The colors are Fresh Freesia, Black, White & Balmy Blue which coordinate with the adorable Penguin Playmates DSP seen here.  This paper is free during our Sale-a-Bration promotion with any $50 order.

    See that cute penguin?  It's punched out with the Penguin punch; right from the designer paper!  

    DSP Explosion card

    • Card base 5 ½” X 8 ½”, scored at 2 1/8” from each side
    • White inside square 2 ½”, Balmy Blue layer 2 ¾”
    • DSP 4” X 8” score at 2”, 4” & 6”, then in two ‘X’s’ from midpoint score to the outside corners
    • Belly Band 1 ½” X 9”

    Here's the video; I actually show three unique fun fold cards!

    ~~~

    September Specials

    Host code: ASETFASJ or T7VSZQ64

    *click here to order

    All online orders will receive a free PDF tutorial filled with projects featuring

    the Painted Christmas Suite!

    Get a pkg. of Holiday Rhinestones with a $50 online order from me in September! 

    Order here

    BEST DEAL!

    Get a Free Bundle  from the Holiday Catalog when you choose the Starter kit!  Pick out $125 in product of your choice for just $99 and shipping is free!  

    Leave a Reply

    Your email address will not be published. Required fields are marked *


Notice: LeeAnn Greff, Independent Stampin’ Up! Demonstrator, Manager. The content of this website is my sole responsibility as an independent Stampin’ Up! demonstrator and the use of, and content of, the classes, services, or products offered on this website is not endorsed by Stampin’ Up! Copyright 2025