/


Latest Post

Season of Flowers cards kit to go; opt in by March 18th


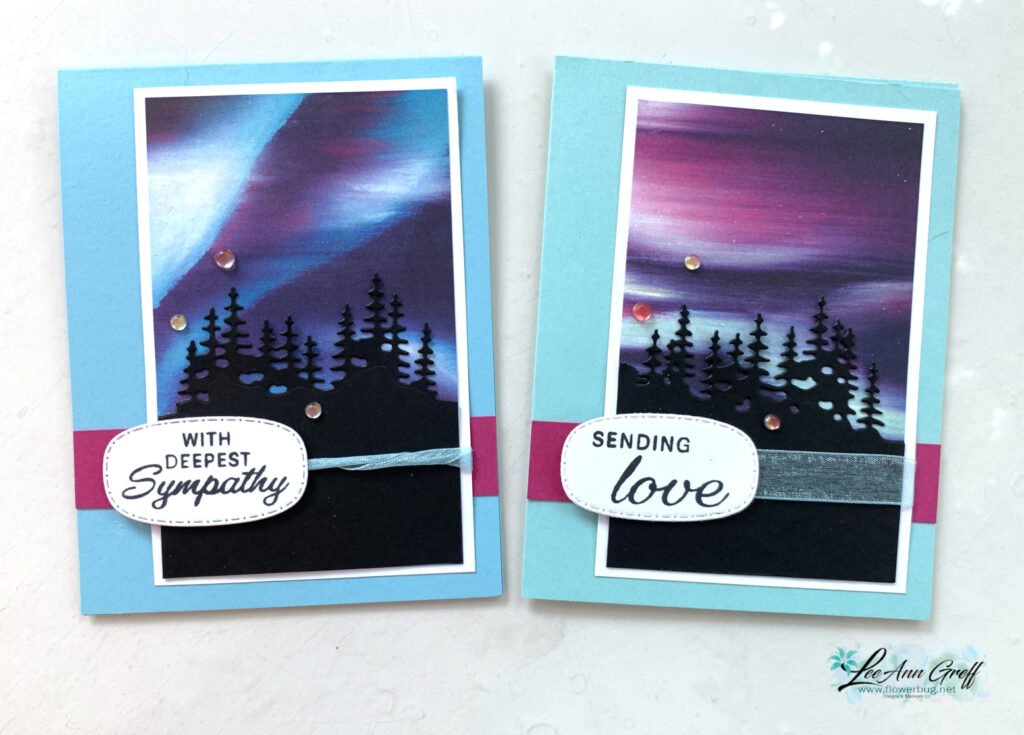
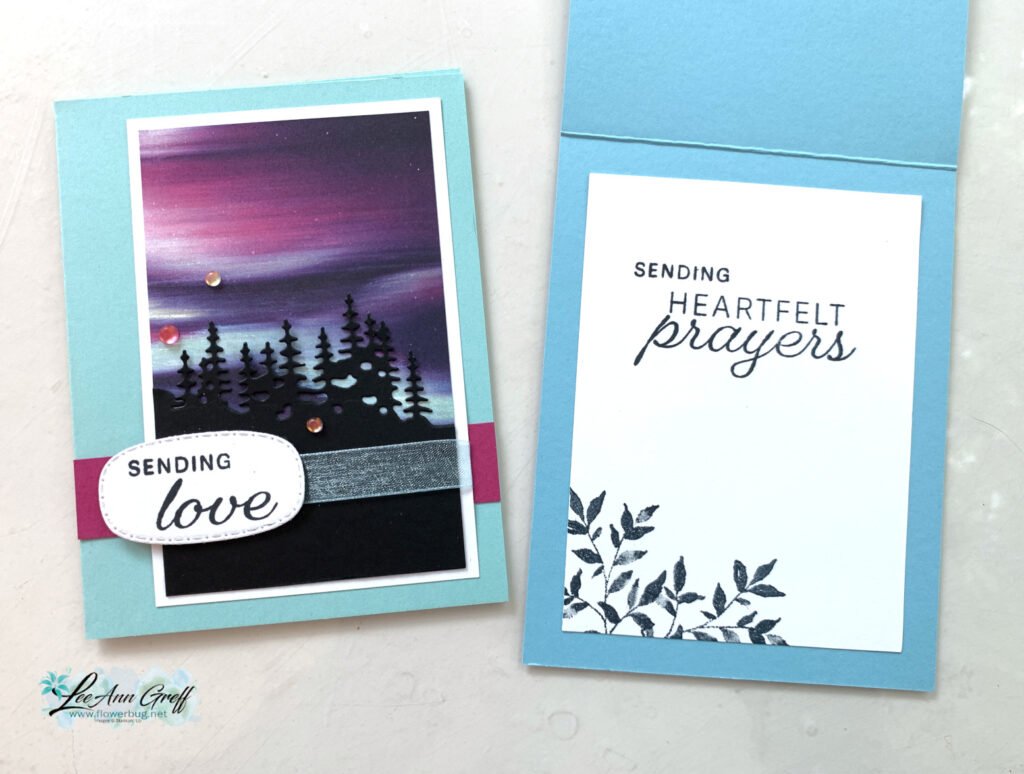
My 2nd card kit to go in March is full of seasonal flowers. These striking cards feature the Flowers for Every Season Memories & More cards and are some of the easiest cards you'll ever make! 

There is no stamping required!  It's truly a 'kit to go' since you only need adhesives & either scissors or a paper trimmer.

It's perfect for:

  • beginner stampers
  • creating on the fly, at a retreat, camping or anywhere!
  • a gift for your crafting friends 
  • cards you need quickly but are trying not to buy at the store….!

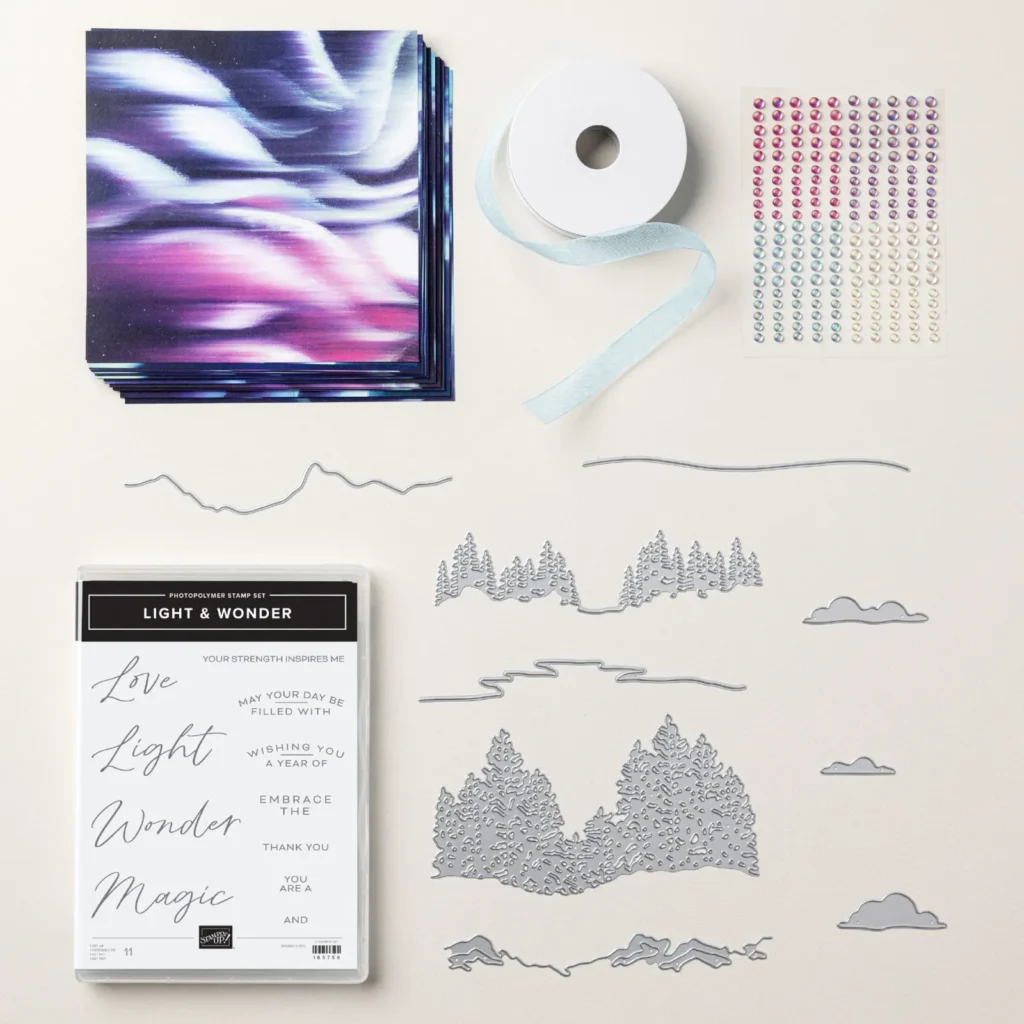
You'll receive the following in your kit:

  • Flowers for Every Season In Color cards (extra large 4 1/4" X 6 1/4") and matching envelopes
  • 1/2 pkg. of the Flowers for Every Season Memories & More cards with adhesive-backed pre-cut images
  • 1/2 pkg. clear Rhinestone gems 
  • the PDF tutorial with photos and step by step directions 

Go here to order yours by March 18th.  You can add on the other March kit featuring the Butterfly Bouquet products and save on shipping!  Go here to get the details. 

You'll receive the PDF instructions in an email immediately after payment.  The actual kit will be mailed to you via 1st Class Mail at the end of March (barring any back-orders).  *If you add any other kit shipping will revert to Priority. 


~~~

Current Host code is 39A9QQZP

Order online here

All online orders receive a free PDF of the new Butterfly Bouquet bundle

with 15 projects!


~~~

Get a free adhesive package from me with an online order over $50 using the host code above. 3 sheets of Dimensionals and 1 for die-cuts!

*If your order is over $150 do not use the code; you'll still receive a gift! 

Below are the Multipurpose Glue stands we're making. They're $6 each and available in my Shop here.  


All Posts

  • Floral Charm fun-fold card kit to go or choose the PDF tutorial option


    This is my second card kit to go I've created for July.  It features the new Floral Charm designer paper released in our newest Online Exclusives.  It's absolutely gorgeous designer paper!  

    My favorite thing about this pack of paper is that the reverse side of the pretty floral patterns have a coordinating solid print. So I created a batch of fancy fold cards to show them off!  

    The directions for these fun fold cards are included in the PDF tutorial plus there's a private video you'll get access to when you purchase either the kit or the PDF tutorial.  

    This kit to go includes the following products:

    • 1/2 pkg Floral Charm DSP (6" X 12")
    • a share of Peacock/Gold ribbon
    • a share of Shimmer dots
    • pre-cut or die-cut pieces for each of 10 cards
    • the PDF tutorial & video link 

    The kit to go is $31 and can be reserved here.  It is shipped out at the end of July. The PDF tutorial is $16 and can be seen here.  The tutorial is emailed to you immediately after purchase. 

    *You will need stamp greetings, inks, a paper trimmer (to cut your new designer paper) and adhesives to finish the cards. 

    See all of my available kits to go and tutorials here.  Opt in for more than one to save on shipping costs! 

    *If you'd like to subscribe to receive a kit automatically each month please use the button below.  My subscribers get a free surprise every few months along with the guarantee of a beautiful kit full of products too! 

    ~~~

    July Specials:

    New Online Exclusives are here!  

    ~~~

    Last Chance List has been updated!  see it all here. Don't miss out on the deals!

    ~~~

    Get my Turtle-y Cute PDF tutorial free with any online order in July!

    Leave a Reply

    Your email address will not be published. Required fields are marked *

  • Kintsugi Inspirations fun fold card kit to go or tutorial. Reserve yours now!


    I'm thrilled with the cards in the Kintsugi Inspiration kit this month!  I am featuring this unique, gold foil accented designer paper for one of my kits to go in July. (I add 2 new kits to my shop each month!)

     The gorgeous designer paper is definitely the star of these stunning cards. Each of the 10 cards are unique fun fold designs and the video will help you assemble each one.

    The directions for the cards are included in the PDF tutorial plus there's a private video you'll get access to when you purchase either the kit or the PDF tutorial.  

    This kit to go includes the following products:

    • 1/2 pkg Kintsugi Inspirations specialty DSP (6" X 12")
    • a share of Misty Moonlight 1/4" ribbon
    • a share of gold Flower Accent gems
    • pre-cut or die-cut pieces for each of 10 cards
    • the PDF tutorial & video link 

    The kit to go is $31 and can be reserved here.  It is shipped out at the end of July. The PDF tutorial is $16 and can be seen here.  The tutorial is emailed to you immediately after purchase. 

    *You will need stamp greetings, a paper trimmer (to cut your new designer paper), adhesives and inks to finish the cards. 

    See all of my available kits to go and tutorials here.  Opt in for more than one to save on shipping costs! 

    *If you'd like to subscribe to receive a kit automatically each month please use the button below.  My subscribers get a free surprise every few months along with the guarantee of a beautiful kit full of products too! 

    ~~~

    July Specials:

    New Online Exclusives are here!  

    ~~~

    Last Chance List has been updated!  see it all here. Don't miss out on the deals!

    ~~~

    Get my Turtle-y Cute PDF tutorial free with any online order in July!

    Leave a Reply

    Your email address will not be published. Required fields are marked *

  • How to add color to the Peaceful View stamp – video tutorial too!


    Today I'm sharing the second card I made during last week's live video.  Both featured the amazing and beautiful Peaceful View stamp set seen here.  

    I used Balmy Blue, Pecan Pie and White card stock.  Inks include Balmy blue, Old Olive, Granny Apple Green and Pecan Pie. I used a Blending Brush with Balmy Blue ink to lightly color the sky before stamping. 

    Notice the fence. If you look closely you'll see the woodgrain in the fence. This was done by using an Early Espresso Stampin' Write marker to add to the stamped fence directly on the cardstock. It was mostly Pecan Pie colored before.  

    How did I color the image?  I inked the trees with Old Olive ink first using the direct to stamp method. The I used Pecan Pie on the grass and fence.  I used a sponge dauber to remove ink from the plants on the bottom so I could add Green ink to them with a sponge dauber.  I used Pecan Pie ink and a sponge dauber to add color to the trunk as well.  I hope you'll watch the video below to watch this in action. 

    For the greetings I stamped the More Messages stamp a few times and used the coordinating die to cut them all out.  I had lots to choose from this way and can save them to use whenever I need it. Here I added Balmy Blue ink lightly to color the greeting.

    What I love about this new messages bundle is that the greetings and die-cuts are such a nice size; larger than ever before. See the bundle here. 

    Here's the free project sheet with measurements and supplies for you: Download Multi-colored Peaceful View

    Below is the video for this card and another where I show you how to use this stamp on pretty designer paper for a stunning background. I shared that yesterday here. 

    ~~~

    July Specials:

    New Online Exclusives are here!  

    ~~~

    Last Chance List has been updated!  see it all here. Don't miss out on the deals!

    ~~~

    Get my Turtle-y Cute PDF tutorial free with any online order in July!

    Leave a Reply

    Your email address will not be published. Required fields are marked *


Notice: LeeAnn Greff, Independent Stampin’ Up! Demonstrator, Manager. The content of this website is my sole responsibility as an independent Stampin’ Up! demonstrator and the use of, and content of, the classes, services, or products offered on this website is not endorsed by Stampin’ Up! Copyright 2025