/


Latest Post

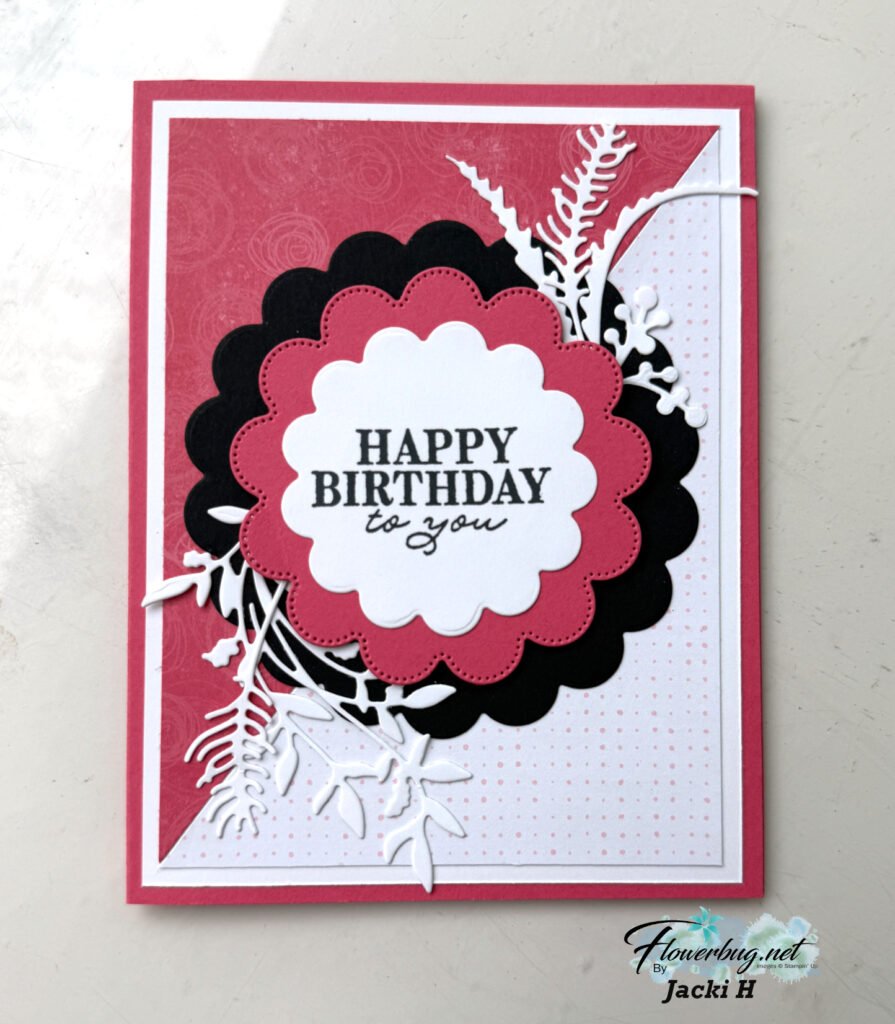
Retro style circles layout; super easy! Catch the Live video tonight!


Tonight at 7:30 pm Central Time I'm sharing how to make these retro style circle cards on Facebook Live.  Click here to join me.   You can also see this video below!

Basically you need three sizes of circle dies or punches for the start of this layout.  Cut them in half and layer together with the edges meeting on one side. Adhere and add a long greeting between the two. 

Watch how on my FB Live replay!

Measurements:

  • 5 1/2" X 8 1/2" card base
  • 3 1/2" X 4 3/4" Whisper White; the greeting strip is about 5" long and either 1/2" or 3/4" wide depending on your greeting image.
  • 1" X 5 1/2" horizontal strip
  • Circles from the Stitched Shapes dies are the largest three circles. 

You'll want ink, stamps and embellishments that coordinate with your Designer Paper.  Remember you could use card stock instead of DSP. 
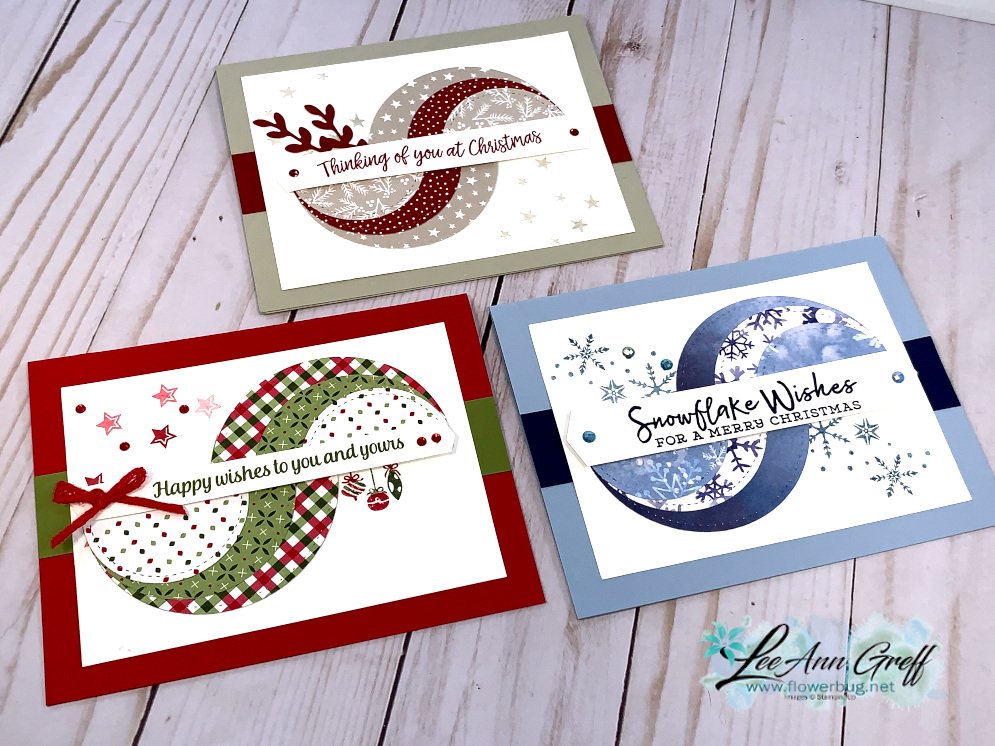

Products used:

  • Designer papers – Heartwarming Hugs, new Classic Christmas & Snowflake Splendor
  • Stamps – Tree Angle, Snowflake Wishes & Curvy Christmas
  • Colors – Real Red & Olive, Seaside Spray & Night of Navy, Sahara Sand & Cherry Cobbler  
  • Other: Stitched Shapes dies, Curvy Dies & Pick a Banner punch

~~~

November Specials!

Current Host code is GRC9VVUU


All online orders receive my FREE Curvy Celebrations 22 project PDF Tutorial! 

All Posts

  • More Specialty Paper Team swaps with measurements!


    Here are a few more team swaps featuring Stampin’ Up!’s specialty papers:

    First up today is Tracey’s card who used the fractured technique.

    This technique starts with a large piece of designer paper. Then add the diagonal square layer. Next you simply start adding the thin strips of DSP around the edges of the square piece; trimming off the excess on the outer edges. So easy!

    She chose the Lovely & Beautiful DSP for the main piece and the strips are the Season of Elegance specialty DSP found in the Annual Catalog.
    The greeting is from Blessed Beginnings stamp set. I love the thin layer of gold on the outer edge!

    Measurements:

    • Olive card base 5 1/2″ X 8 1/2″ score at 4 1/4″
    • Gold layer 5 1/8″ X 3 7/8″
    • DSP is 3 3/4″ X 5″, inside DSP 5 1/4″ X 4″
    • thin DSP strips are 1/4″ thick.
    • White square is1 7/8″, inside is 5″ X 3 3/4″

    The inside greeting is from Prayers & Promises, the flower and leaves are from the Simply Beautiful stamp set.

    Next is a pretty card made by Marla who also used the Season of Elegance DSP.

    The main circle dies are from the brand new Springtime Scenes bundle which is currently out of stock. The greeting circle is from the Spotlight on Nature dies.
    Her colors are Blackberry Bliss, Crushed Curry & Basic Beige.

    Card base is 8 1/2″ X 5 1/2″ scored at 4 1/4″. DSP is 4″ X 5 1/4″

    More swaps are coming tomorrow!

    ~~~

    March Specials!

    March Product of the Month is the Notes of Spring stamp set!

    It’s just $5 with a $75 purchase.

    Get my March PDF free with any Online purchase!

    NEW Online Exclusives are here!

    Get the retiring In Colors while you can; they’re already going fast!

    Leave a Reply

    Your email address will not be published. Required fields are marked *

  • Check out these Team Swaps featuring Specialty Paper – with measurements!


    Our card swap theme for February was to feature our beautiful specialty papers. Today I’m sharing three of them with you.

    First is a neat fun fold card by Karen. She chose the Lovely & Beautiful specialty DSP and her card shows off both sides wonderfully!

    She also used the Three Banner bundle for her greeting. Love that saying! See this punch bundle here.
    The stitched square die-cut from Stylish Shapes dies hides the inside panel perfectly.

    Measurements are as follows:

    • Card base 5 1/2″ X 4 1/4″
    • White 5 1/4″ X 4″, inside is 2 3/4″ square
    • DSP 5″ X 6″ score at 2″ on the 6″ side
    • Calypso Coral square die-cut 2 3/4″

    Next is Kim’s card who also chose to use the Lovely & Beautiful DSP. She heat embossed her greeting on Vellum!

    Notice the brand new embossing folder – it’s called Lazy Daisy and coordinates great with the DSP she chose.

    Measurements:

    • Card base 8 1/2″ X 5 1/2″ score at 4 1/4″, Olive layer 4 1/8″ X 5 3/8″
    • DSP 4″ X 2 1/4″
    • Fresh Freesia 4″ X 3″
    • Gold strip 4″ X 1/2″

    Next is a neat shaker card made by Joan. She used the Good Luck stamp set.

    Her colors are Shy Shamrock (of course!) and Shaded Spruce with Gold accents.

    Measurements:

    • Shy Shamrock card base 8 1/2″ X 5 1/2″ score at 4 1/4″, top layer is 3 3/4″ X 5″
    • Shaded Spruce 4″ X 5 1/4″
    • circle window is 2 3/4″
    • White inside 3 1/2″ X 4 3/4″

    I’ll share more Team swaps tomorrow.

    March Specials!

    March Product of the Month is the Notes of Spring stamp set!

    It’s just $5 with a $75 purchase.

    Get my March PDF free with any Online purchase!

    NEW Online Exclusives are here!

    Get the retiring In Colors while you can; they’re already going fast!

    Leave a Reply

    Your email address will not be published. Required fields are marked *

  • March Specials begin today!


    I’m super excited to share that the newest Online Exclusives are now available to customers! Us Demo’s have been able to pre-order them for over a month and there are sooo many you’re going to love! Go here to see them all.

    Below is one of my favorite suites; the Paradise Garden suite.

    I absolutely love this designer series paper! In fact it will be featured in one of my March kits to go.

    Click here to see all of the newest Online products.

    The new Product of the Month for March is the Notes of Spring stamp set. A sweet 2-step photopolymer set you can redeem for just $5 once your order reaches the $75 mark.

    They’ve also added three new kits in our Kit Collection. Go here to see them all.

    I’m featuring the Cute as a Bug designer paper in my free PDF for online orders in March. You’ll find lots of inspiration here!

    Just place an order here to receive it!

    Leave a Reply

    Your email address will not be published. Required fields are marked *


Notice: LeeAnn Greff, Independent Stampin’ Up! Demonstrator, Manager. The content of this website is my sole responsibility as an independent Stampin’ Up! demonstrator and the use of, and content of, the classes, services, or products offered on this website is not endorsed by Stampin’ Up! Copyright 2025