/


Latest Post

Ready for some fabulous ‘Cute Halloween’ projects?! Check out the video tutorial


Look at this adorable Halloween card I made on last week's FB Live.  Follow me on Facebook here so you don't miss my weekly videos!  There's on tonight at 7:30 pm CT and every Tuesday at 11 am CT. 

Product used:

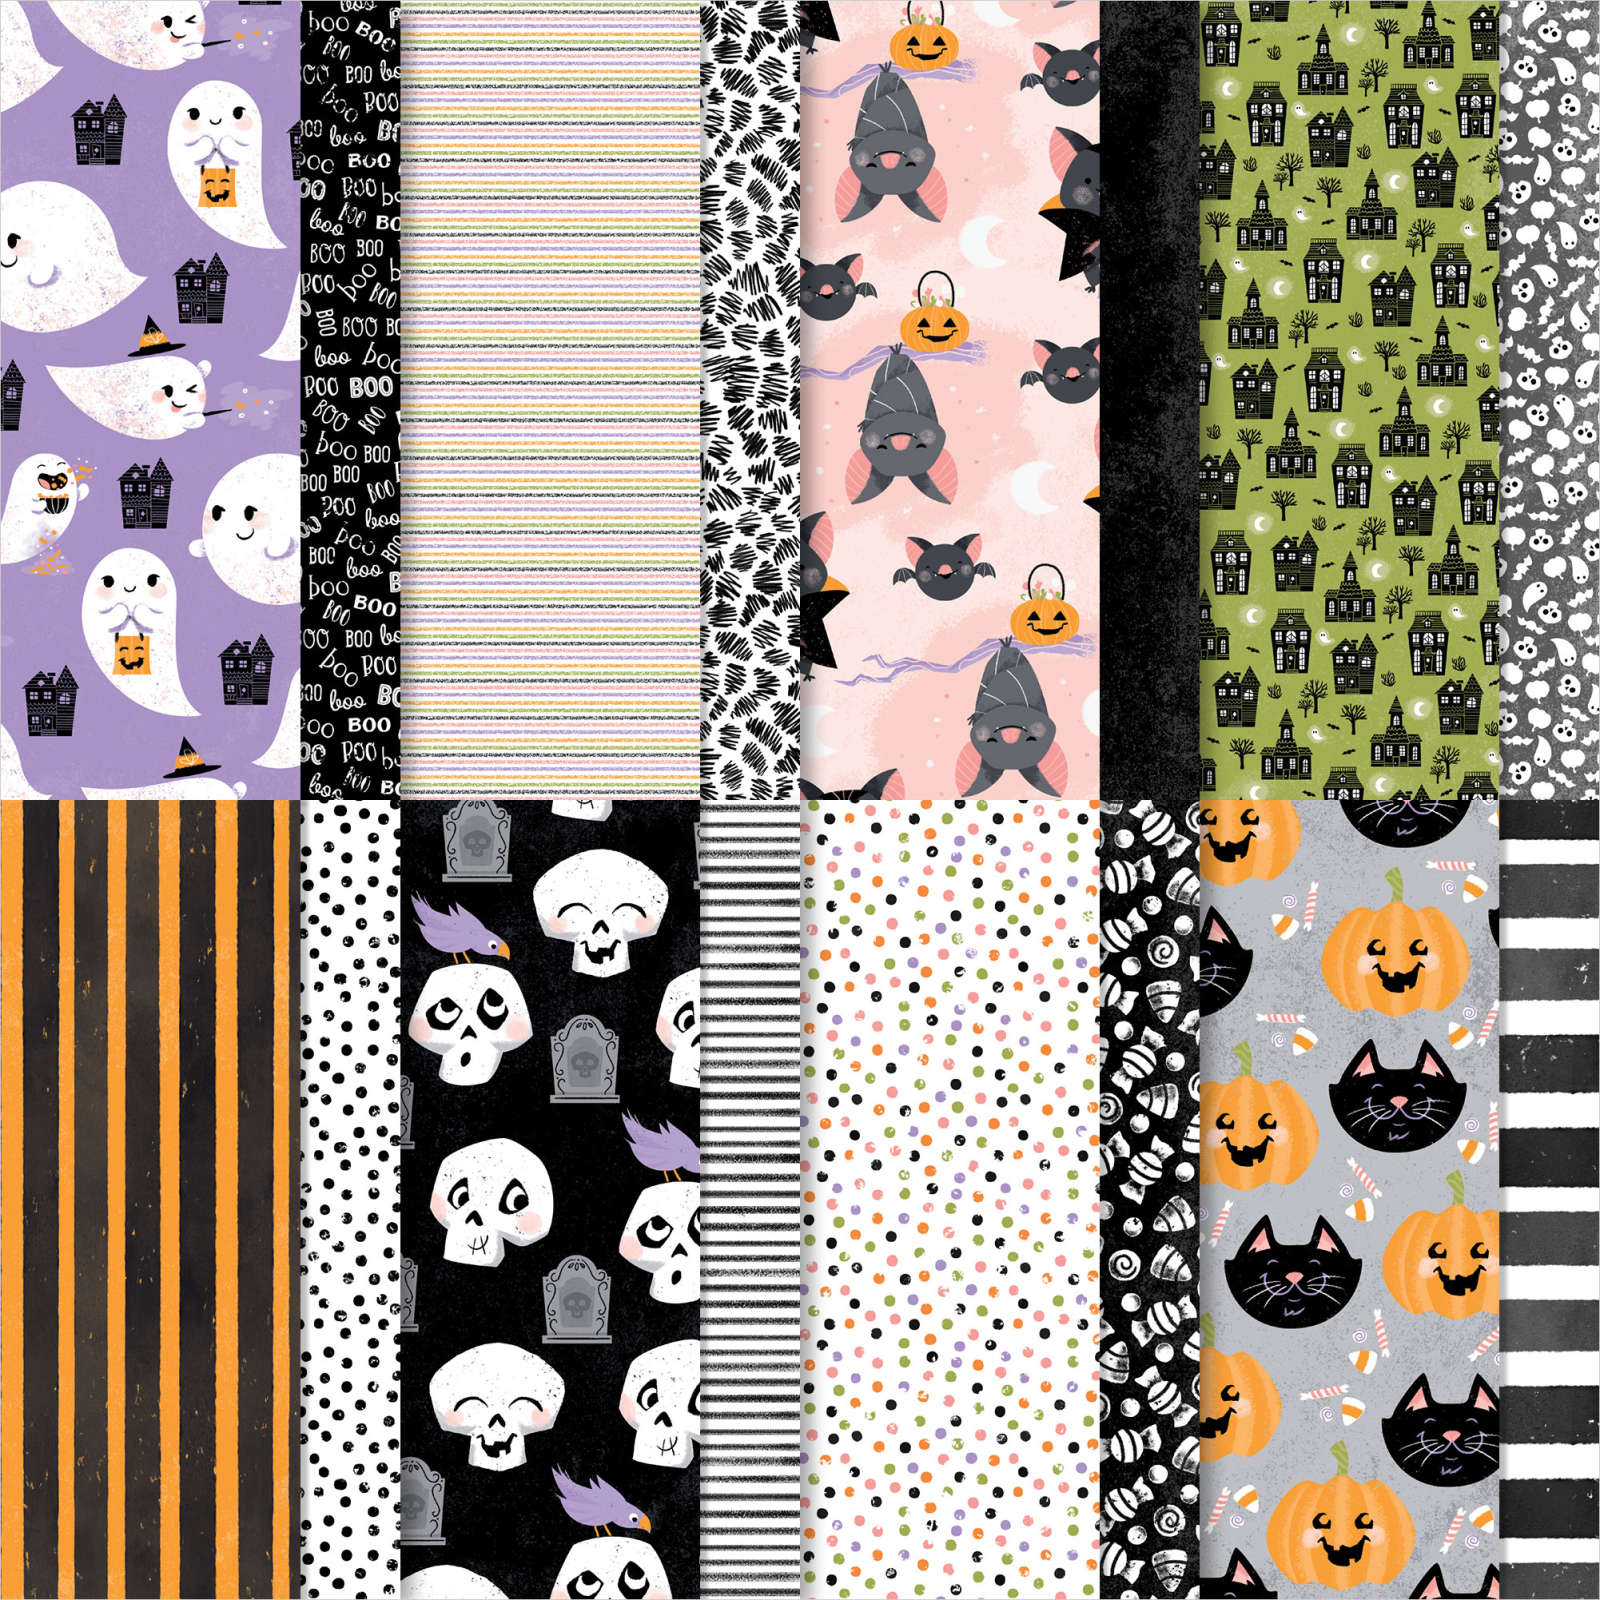
  •  the ghosts, pumpkin and striped trim are from the Cute Halloween designer paper in the Holiday catalog.  See it here. 
  • I punched one of the ghosts and the pumpkin with the Halloween punch. It's in a bundle with the Cutest Halloween set seen here or on page 51, which is where the greeting is from. *Sadly the Halloween punch is now on back-order until November!
  • the wreath & bats are die-cut with the Seasonal Swirl dies seen here & Black Glimmer paper in the annual catalog; seen here
  • the ombre background is actually Fresh Freesia CS, with Misty Moonlight & Night of Navy added with our Blending Brushes *watch the video below
  • Cute Stars Adhesive-backed sequins are also added to the wreath

Check out the ghostly treat box in the photo above.  It's so simple to make with the Pretty Pillow box dies!

The stitched tag is also in the Pretty Pillow Box dies.  Look how it latches – the scalloped front slips in behind the tag in front.  I love that I don't need a special way to keep it closed; the tag does it for me! 

Check out the other version I made with the fun skeletons on the right?  I fussy cut them from the Cute Halloween paper. 

Measurements:

  • White 4 ¼” X 11” scored at 5 ½”, cut 1 ¾” from the right
  • Black 5 ½” X 8 ½” scored at 4 ¼”,
  • White & Fresh Freesia 3 ¾” X 4 ¾”, Black ½” X 4” strip for greeting
  • Cute Halloween DSP ½” strips

I haven't shared this for awhile so here it is; my favorite cutting template especially for inside a card.  Get 5 pieces from one 8 1/2" X 11" sheet of card stock. If you're making multiples this can save you a lot! 

Below is the video.  I make another project using Sparkle of the Season before this one. Fast forward to about 22 minutes in to see this neat Halloween card. 

~~~

September Specials

Host code: ASETFASJ or T7VSZQ64

*click here to order

All online orders will receive a free PDF tutorial filled with projects featuring

the Painted Christmas Suite!

Get a pkg. of Holiday Rhinestones with a $50 online order from me in September! 

Order here

BEST DEAL!

Get a Free Bundle  from the Holiday Catalog when you choose the Starter kit!  Pick out $125 in product of your choice for just $99 and shipping is free!  

All Posts

  • Magical Meadow & Winter Meadow fun fold cards


    Today I'm sharing two gorgeous cards made with the Magical Meadow bundle and the Winter Meadow designer paper.  Judith created multiple projects using this suite as the Artist of the Month on my Flowerbug's Team for November.

    First is a window card using the Deckled Circle dies: 

    Her colors include Gray Granite & Whisper White. The die-cut greeting is from the Autumn Leaves dies. I've always liked the ribbon tied around the window like this; a unique touch! 

    Measurements:

    • Card back is 4 1/4" X 5 1/2"
    • Designer paper 8" X 5 1/4" score at 4", window die-cut is 2 1/2"

    The designer paper is carrying over but sadly the Magical Meadow bundle is retiring soon; it's still available while supplies last. 

    This next card is a fabulous way to feature your double sided designer paper.  

    Start with a 11" X 4 1/4" layer. Score the left side at 1" and the center at 5 1/2". Fold back the 1" score line and secure closed. She used the Deckled Circle dies and the Silver & White ribbon on her greeting layer; both from the 2023 Holiday catalog. 

    Add a layer inside or just a simple greeting like she did. 

    The Winter Meadow designer paper is gorgeous as you can see. Beautiful water-colored scenes make your design work easy! I'm so glad it's carrying over for a few more months.  See it here. 

    I'll share more projects tomorrow!

    ~~~

    November Specials: 

    *current host codes:  4D2ZDS6Q or 77277NNH

    Click on the image below to see the Holiday Last Chance items 


    Leave a Reply

    Your email address will not be published. Required fields are marked *

  • Wishes all Around Christmas card with video & free project sheet


    I hope you all enjoyed your Thanksgiving holiday weekend. We sure did!  We spent it with our kids – playing games, making puzzles and of course enjoying wonderful food.

    ~~~

    Have you noticed the Wishes All Around bundle in the 2023 Holiday catalog?  

    I've always loved wreaths.  In fact I used to collect them and put them up at Christmas time on a big wall in my dining room. 

    I thought this Wishes All Around stamp bundle seen here had a wide variety of pretty stamps and wonderful dies. 

    I heat embossed the tree wreath image in White embossing powder and die-cut it with the coordinating dies. I added it onto three cut panels from the Brushed Gold Cards & envelopes; each one cut at 1 5/8" X 4" and added to my Navy card base. These panels are textured with the Snowflake Sky 3D embossing folder.

    I love the fact that you can cut the Brushed Gold cards & envelopes into two card fronts; more bang for your buck! 

    Below is a photo of all of the card swaps I made.  I truly love these Brushed Gold cards & envelopes. I've found them quite versatile and easy to use. 

    Here's a photo of this sweet bundle. As you can see it has three die-cut wreaths, snowflakes, trees and stems/berries. All meant to coordinate with the stamp set. 

    I made a second version in the video last week. Which do you prefer?

    Bow on top or on the bottom of the wreath?  Gold or white embossed greeting?


    Below is the video where I shared this pretty card.  Unfortunately this video has some blurry spots; I hope you can bear with me! 

    ~~~

    November Specials: 

    *current host code:  4D2ZDS6Q

    Click on the image below to see the Holiday Last Chance items 


    Leave a Reply

    Your email address will not be published. Required fields are marked *

  • Sending Cheer Diamond Flap card – free project sheet & video


    We made this adorable cards at my November card clubs.  They could choose between Christmas & birthday. I love it when products are this versatile!

    The Sending Cheer stamp set and dies are on the Last Chance list now and both are reduced in price!  Originally this bundle was $53 but now it's just $38.40! The stamp set is $14.40 and the dies are $21; they do have to be purchased separately to get the discounted price. 

    I'll start with the Christmas version.  The colors are Poppy Parade, White & Shaded Spruce. Isn't the Santa hat adorable?! 

    This fun fold might look difficult but if you watch the video here you'll find it's quite easy.  It involves a bit of scoring and trimming. The diagonal square layer is separate from the card base.  The designer paper is the Merry, Bold & Bright seen here.  I'm featuring it in one of my pre-cut card kits to go this month; click here to see it. 

    The inside layer is textured with the Christmas Tidings embossing folder seen here.  It's retiring and discounted. 

    The inside greeting is from the Beary Cute stamp set. I sure love this fold!

    Here is the birthday version using the same Merry, Bold & Bright designer paper seen here.  It's so versatile! 

    The colors here are Blueberry Bushel, White & Lemon Lime Twist. We fussy cut the gift and added that neat ribbon die-cut over it.  

    Products used:

    • Basics 3D (dots – Online Exclusive) & Merry Melody embossing folders
    • Tailored Tags dies
    • Adhesive-Backed Iridescent discs
    • In Color Baker's Twine
    • stamps – Enjoy the Rhythm 

    *click here to download or print the free project sheet for these cards.  Download Nov '23 Sending Cheer Diamond flap card

    See how this card is made with this video seen here; or click below. 

    ~~~

    November Specials: 

    *current host code:  4D2ZDS6Q

    Click on the image below to see the Holiday Last Chance items 


    Leave a Reply

    Your email address will not be published. Required fields are marked *


Notice: LeeAnn Greff, Independent Stampin’ Up! Demonstrator, Manager. The content of this website is my sole responsibility as an independent Stampin’ Up! demonstrator and the use of, and content of, the classes, services, or products offered on this website is not endorsed by Stampin’ Up! Copyright 2025