/


Latest Post

Quick Card template & cute Christmas treats & snowman tags


I shared a ton of Holiday projects on this week's FB Live.  You can see the video below but here are the projects:

I used the Brightly Gleaming Specialty DSP here along with Very Vanilla, Navy, Brass foil and Peacock CS.  This pretty paper is on sale at 50% off!  See it here.

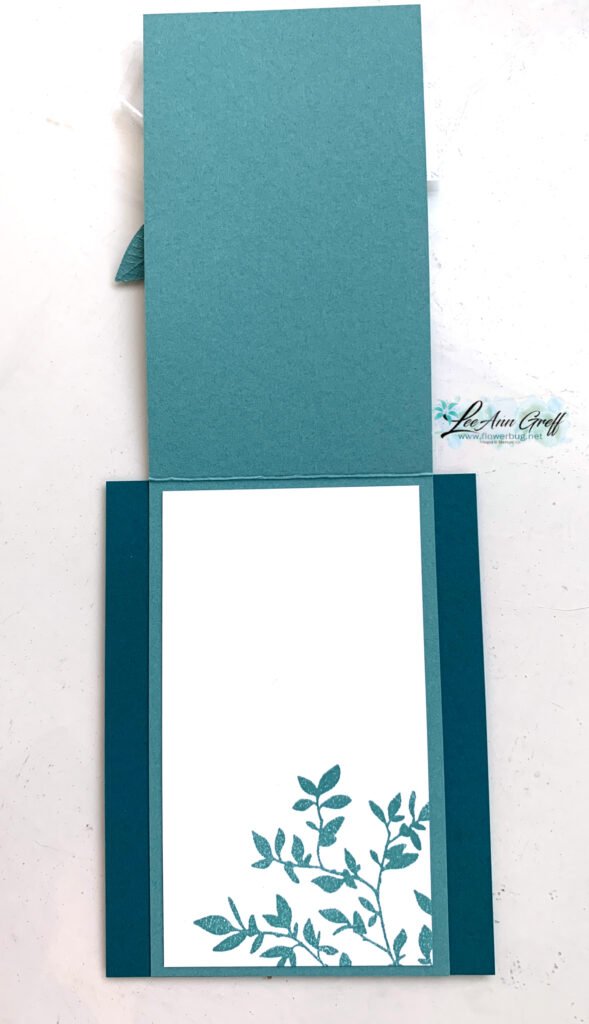
This is one of the easiest layouts you can make that still has some layers to it.  I like the card below best since you can stamp directly on the single layer and do not need a second greeting piece to stamp on like the cards on the left & right above.  Measurements below: 


Easy Christmas card

  • Main card – 8 ½” X 5 ½” or 4 ¼” X 11”, DSP – 3” square
  • CS – 4 ¼” X 3 ¼”, Vanilla greeting layer is 7/8" X 3", Foil strip – ½” X 4”

Next I have a super cute candy box treat made by my friend Marilyn.  She used the Celebration Label dies; they're 50% off now while supplies last!  See them here. 

Celebration Labels Treat box

  • Use the largest 2 dies.  Center the CS die-cut at 6”; score at 5 3/8” and 6 5/8”
  • Box is 2 3/8” X 5 1/8” scored at ½” on each edge

Next is a fun candy bar pull up treat.  I love making these since they're so quick & easy. 

Santa Pull Up Treat
Red CS 6 1/2" X 7" score at 3/8", 3/4", 3 1/2" and 3 7/8".
Black glitter belt 1" X 7"

This candy bar is in a thin card board box so I had to score it.  Usually I just wrap the card stock around the candy bar and glue the edge overlapping each other.  That one is a lot quicker. 

Lastly is a sweet snowman tag. 


It's a piece of Snowflake Splendor DSP and White CS both measuring 4 1/2" X 2" and tied together at the top.  I used the Delightful Tag Topper & 2" circle punches here. The stitched nose is made with the Triangle dies.  I drew Black 'stones' with a marker for his smile. 

Below you can get the tips on putting these projects together.  Don't forget to subscribe to my YouTube channel here. 

~~~


December Ordering Special: 

Current Host code is AHJNPWNB

Order online here

All online orders will receive my 16 Christmas cards class PDF!

Get a free package of 220 Red Rhinestones from me with an online order over $50 using the host code above.

Below are the Multipurpose Glue stands we're making. They're $6 each and available in my Shop here.  

All Posts

  • New Nature’s Symphony top fold card with free project sheet & video tutorial


    I hope you had a very Merry Christmas last week. We sure did but we missed our youngest son & his wife. They were hit with the flu the day they were going to drive up here. It wasn’t the same without them! But we still had our Appetizer Showdown competition and played lots of games including our annual Minute to Win It games. Always lots of laughs! I highly recommend doing these with family or friends. It’s one of our highlights of the time we spend together.

    I shared this easy fun fold card on last week’s Live video. It features new product from the upcoming 2026 Spring catalog.

    I featured the Nature’s Symphony bundle and the new Nature’s Walk DSP. I cannot share links to these products because they’re not available for customers quite yet. Tomorrow on my week’s Live video I’ll share all of my new products from both the Spring catalog and the newest Online products – both coming out in early January. Join me here.

    My colors include Pretty Peacock, Lost Lagoon and Old Olive with White. Besides the Nature’s Symphony bundle I added a die-cut for the greeting from the Textured Notes dies seen here.

    This card is an easy fun fold layout. The back is simply 4 1/4″ X 5 1/2″ and the center is a full 3 1/4″ X 11″ scored at 5 1/2″. It gives you a large area to add your patterned paper on the front. I made many of these cards for a long distance swap I joined in.

    I created a free project sheet for this card Click here to download or print it. There’s also a video tutorial below as well.

    The Nature’s Walk designer paper is filled with textured patterns. I love the colors in it; the blues & greens are just my style.

    Here’s the video tutorial for you. I also share another pretty card idea featuring this beautiful bundle.

    *You’ll receive a PDF with multiple projects featuring this product
    after the 20th of the month.
    ~~~

    The Last Chance list has been updated!
    Click here to shop.

    Get a free PDF tutorial with any online order from me in December!

    Leave a Reply

    Your email address will not be published. Required fields are marked *

  • Merry Christmas to you!


    Merry Christmas! I hope you are able to spend it with loved ones.

    It’s my favorite time for our family! Our kids are coming as usual and we have a good time playing games, making puzzles, lots of sweet treats and good meals too. We also play Minute to Win It games and have an appetizer showdown too!

    Leave a Reply

    Your email address will not be published. Required fields are marked *

  • Pretty Bridge fold card with Snowflake Kisses with free project sheet & video tutorial


    I shared this pretty card on last week’s Live video. It features the Elegant Pine Snowflake designer paper and the Snowflake Kisses bundle.

    My colors include Pretty Peacock, White & Lost Lagoon above. The Elegant Pine Snowflake designer paper is beautiful and can be seen here.

    I created a second card with Secret Sea as the card base instead of Pretty Peacock. Which do you prefer?

    This card is a bridge fun fold layout. It starts out with a 5 1/2″ X 8 1/2″ card base but requires two extra cuts from the center score line down 1 1/8″ from each edge. It’s easy with our Paper Trimmer. Watch the video below to see how it’s done.

    I created a free project sheet for you with photos and measurements. Click here to print or download it.

    I hope you try one. If you haven’t made one before please watch the video below. They are quite fun to make & open!

    The photo below shows the card closed, the main panel lifted and the inside! Tip: We used a handmade stencil to sponge snowflakes on the inside. *cut snowflakes from a piece of card stock and sponge or blend ink through the windows.

    Below is the video tutorial which includes a second card with this bundle. I hope you watch it! Don’t forget to subscribe to my YouTube channel here.

    *You’ll receive a PDF with multiple projects featuring this product
    after the 20th of the month.
    ~~~

    The Last Chance list has been updated!
    Click here to shop.

    Get a free PDF tutorial with any online order from me in December!

    Leave a Reply

    Your email address will not be published. Required fields are marked *


Notice: LeeAnn Greff, Independent Stampin’ Up! Demonstrator, Manager. The content of this website is my sole responsibility as an independent Stampin’ Up! demonstrator and the use of, and content of, the classes, services, or products offered on this website is not endorsed by Stampin’ Up! Copyright 2025