/


Latest Post

Quadrangle Cards Technique; a great use of your 6 X 6″ Designer Paper!


Check out this great template where you cut a 6 X 6" piece of Designer Paper into 4 pieces for 4 cards.  I also layered it with a 6 1/2" piece of card stock for easy borders!  Look!

I created the above cards with a sheet of the beautiful Plaid Tidings 6" DSP from the 2020 Stampin' Up! Holiday Catalog.  I also used the Celebrate Sunflowers bundle and the two Daisy punches in the annual catalog.  Super easy cards! 

The colors are Mango Melody, Rich Razzleberry and Whisper White.  

Then I used a different sheet of the Plaid Tidings DSP on Facebook Live last week.  I LOVE Black & White with a pop of color so I added Magenta Madness and used the Zany Zebras stamp set seen here.  

Aren't they fun?!  I wasn't sure if I wanted to add any pink to the zebras but I ended up loving it! I colored just a bit on the zebras with the Magenta Madness Blends marker.   

If you're wondering just where this stamp set is, you can find it in the Beginner's Brochure or click here to see it online. 

Below is my template for the Designer Paper. 
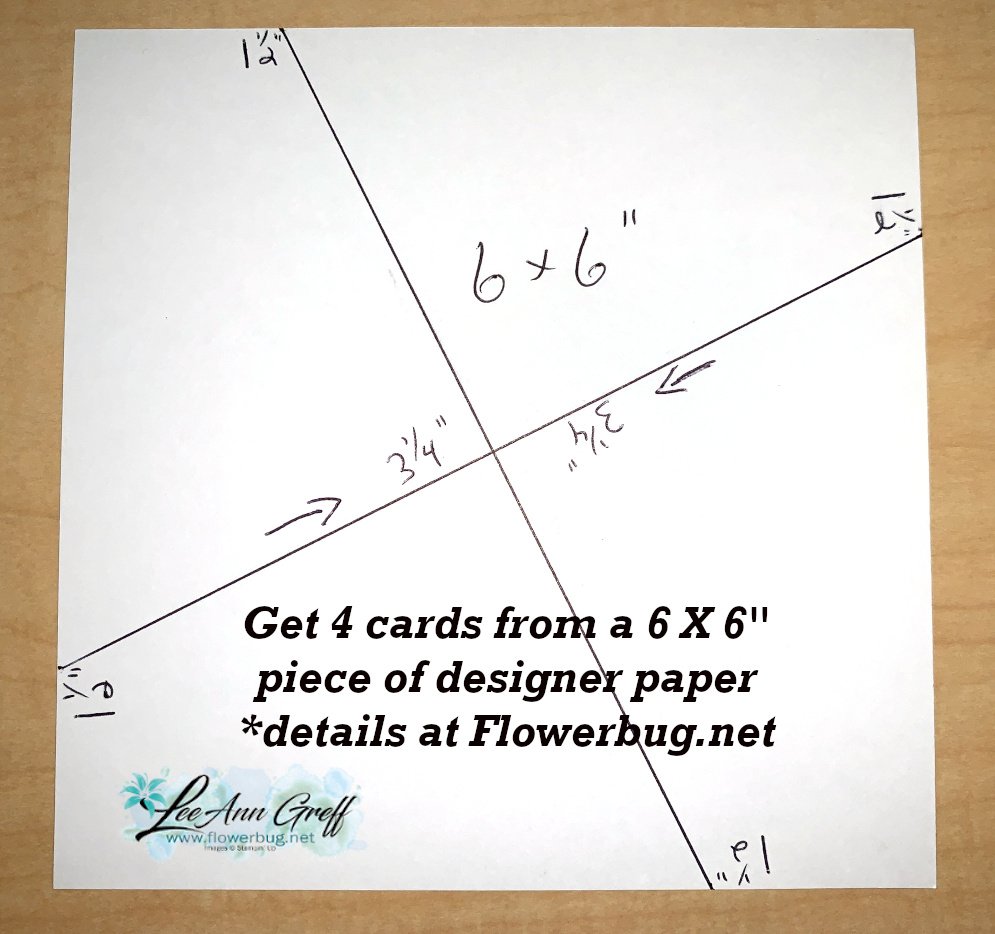
Next you'll see how you can place the DSP pieces onto a piece of 6 1/2" square piece of card stock and get nice layers. 

You can see how I did it in the video below.  Remember I host 6 FB Live's a week.  Every Tuesday at 11 am CT and the 2nd & 4th Monday's at 7:30 pm.  Check them out here.   Just click on 'more' and then 'videos'. 

Tip: If you have trouble measuring things I suggest that once you have a template for both the Designer Paper and the layered card stock piece you save one to reuse over and over again.

I hope you like these cards!  Be sure to watch the video below to catch the tips & tricks on using this template. 

Here's the FB Live replay for you.  Enjoy!

~~~

Current Host code is 7VPEDARH

Get a free package of All the Trimming embellishments in September with an

online order over $55.  But remember if your order is over $99 you can choose to get the Starter kit instead!  

Order online here

 Get my Beautiful Autumn pdf tutorial free with any online order in September!


It includes directions, photos and measurements for 13 cards!


All Posts

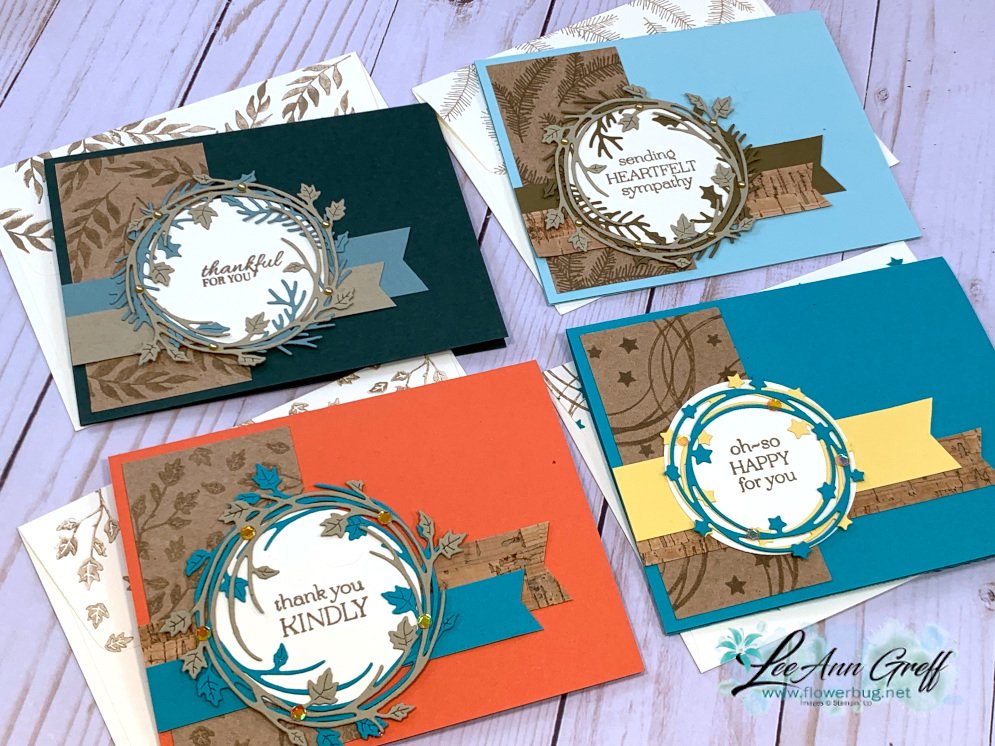
  • Sparkle of the Season cards & box; it would make a wonderful gift!


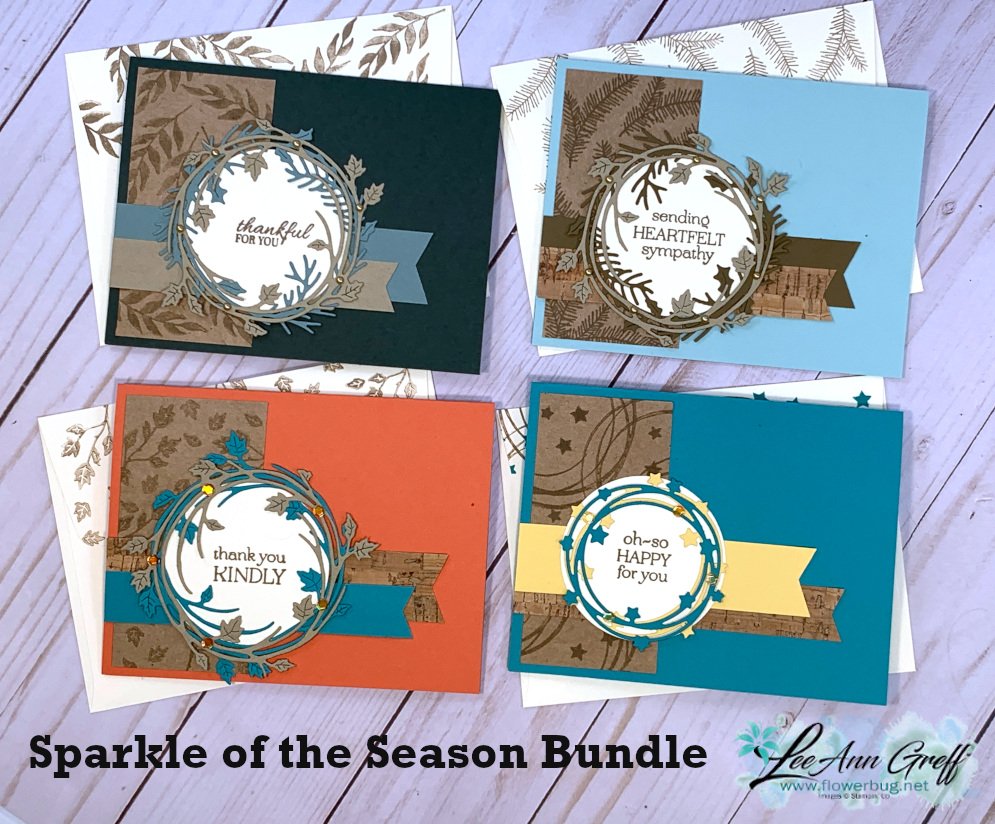
    I had to get the Sparkle of the Season bundle right away.  It is perfect for many, many occasions and these wreath dies were one of the options I gave Stampin' Up! for one of my Million Dollar stamp set ideas. You can see it on page 58 of the Holiday catalog; or click here to see it online.

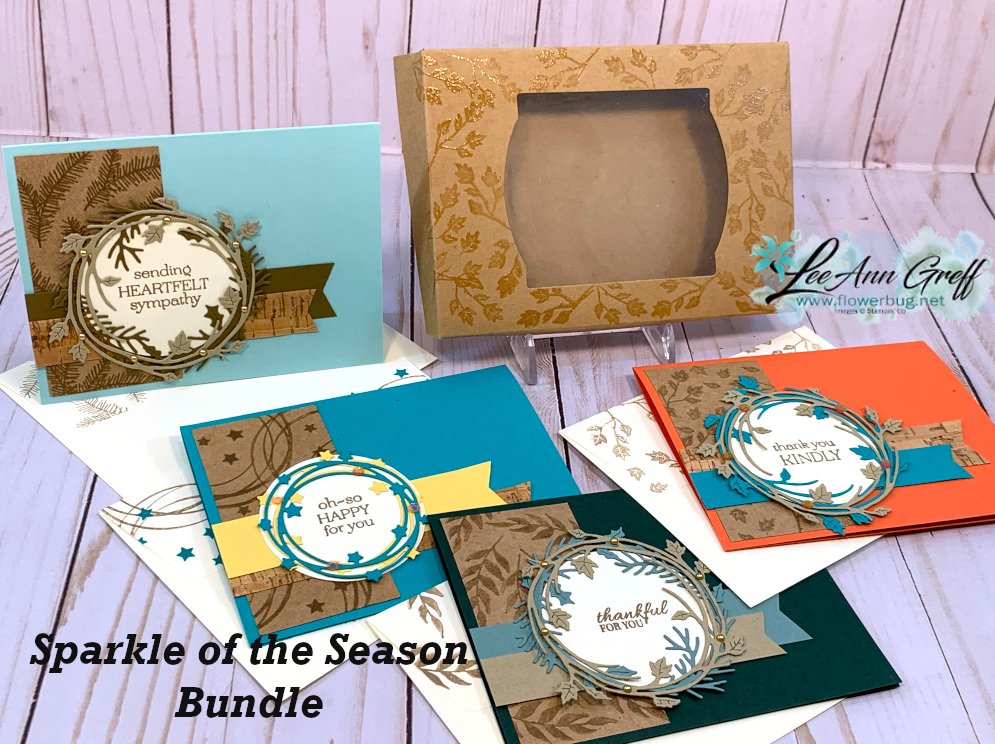
    The 4 cards & envelopes fit in the Kraft Gift Box perfectly.  Details on this box below; or click here. 

    I used the Delicate Dahlias stamp set for a few of the greetings here.  Other products used were: 

    • Cork & Kraft paper in the Holiday catalog
    • Calypso Coral, Bermuda Bay, Pool Party, Crumb Cake, Soft Suede, So Saffron, Soft Succulent, Vanilla & Evening Evergreen CS
    • Inks – Versamark, Crumb Cake
    • Metallic pearls & Artistry Sequins, Banners Pick a Punch, Vanilla envelopes, Circles Collection dies
    • clear embossing powder & Heat Tool

    Isn't Pool Party beautiful with Crumb Cake & Soft Suede?  And our new Cork paper is amazing; thin but with beautiful texture.

    Here's a picture of everything you get in the Sparkle of the Season bundle.  See it here or on page 58 of the Holiday catalog. 

    I bet you're wondering where this card box is from.  It's quite hidden in the Holiday catalog in my opinion.  See it here or on page 11 or 75.  There are 10 in a package and they already have adhesives on the flaps! They fit our A2 cards & envelopes perfectly!  Get 10 for $10. I heat embossed leaves on it for added texture.  Check out the video below for my tip on masking the window. 

    Here's a link to the video; it's the first project featuring the Sparkle of the Season dies. The photo shows my Halloween cards but it is the correct video! 

    ~~~

    September Specials

    Host code: ASETFASJ or T7VSZQ64

    *click here to order

    All online orders will receive a free PDF tutorial filled with projects featuring

    the Painted Christmas Suite!

    Get a pkg. of Holiday Rhinestones with a $50 online order from me in September! 

    Order here

    BEST DEAL!

    Get a Free Bundle  from the Holiday Catalog when you choose the Starter kit!  Pick out $125 in product of your choice for just $99 and shipping is free!  

    Leave a Reply

    Your email address will not be published. Required fields are marked *

  • Ready for some fabulous ‘Cute Halloween’ projects?! Check out the video tutorial


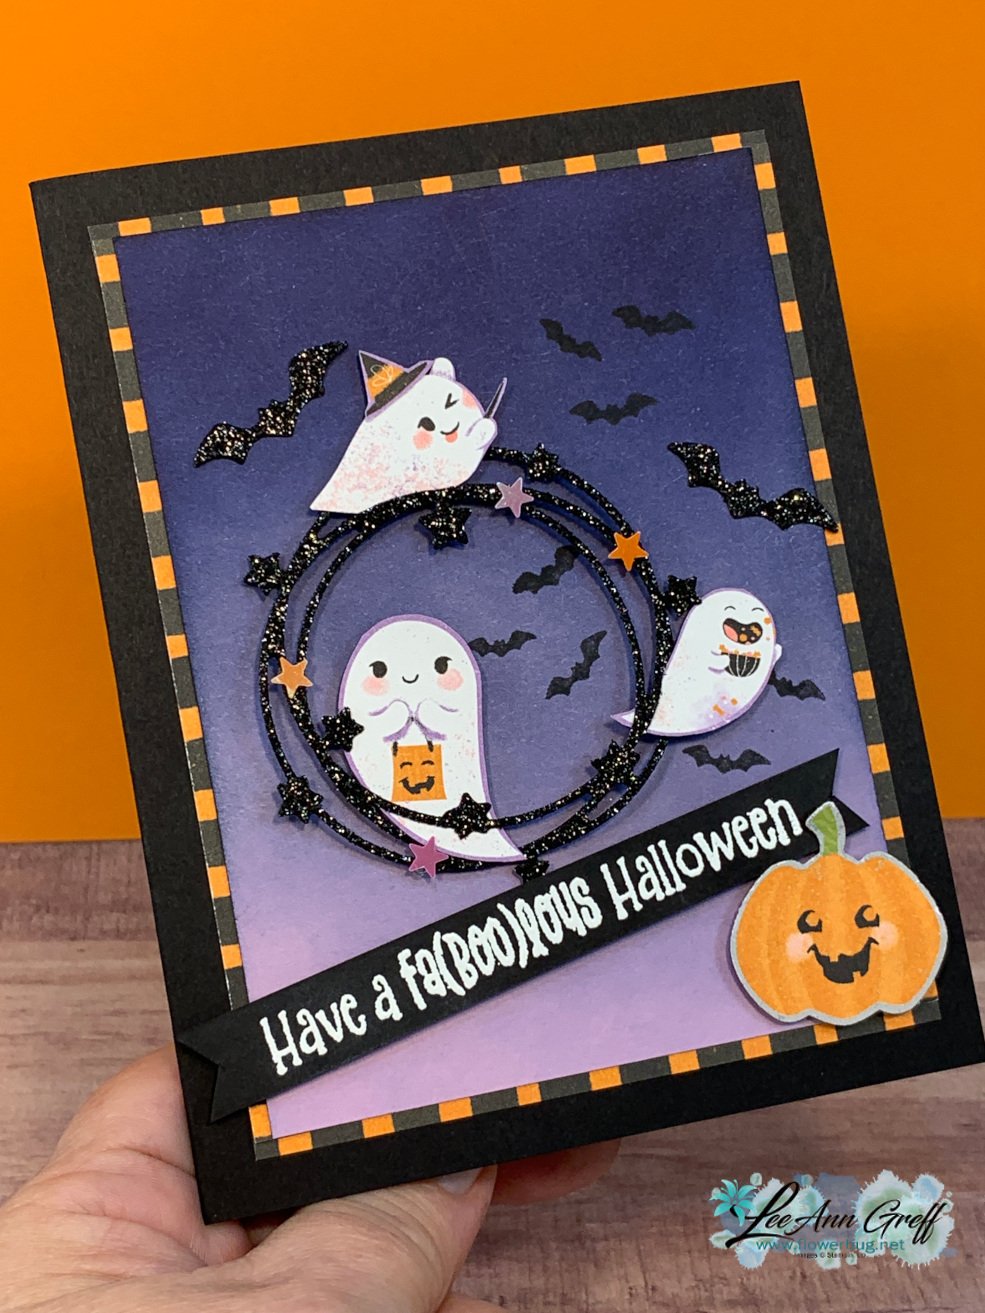
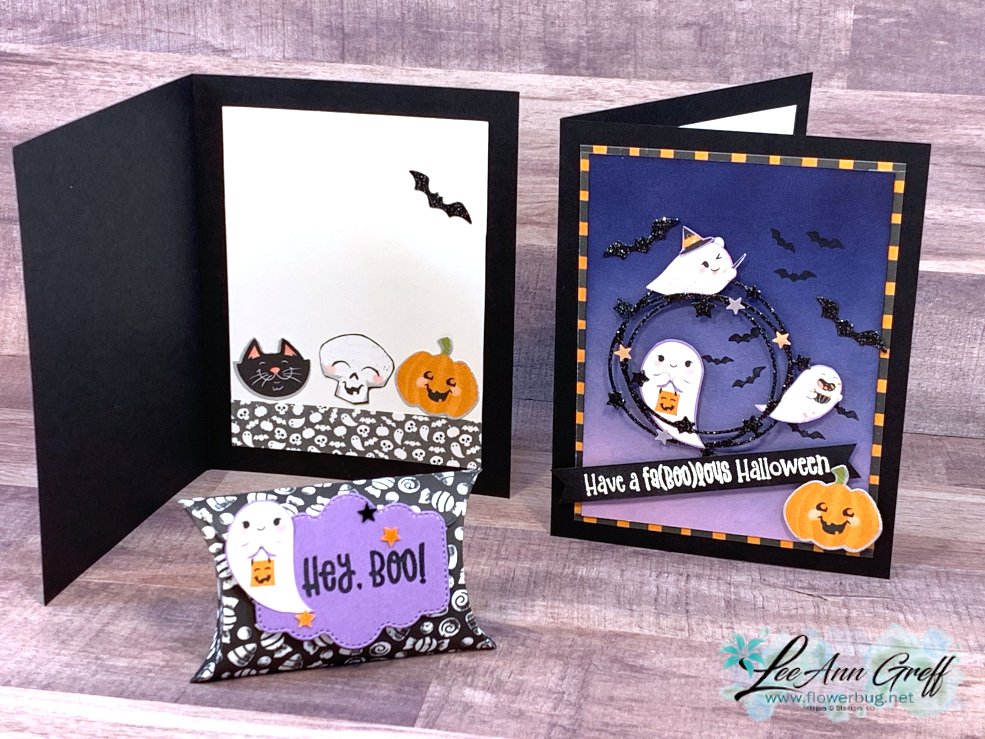
    Look at this adorable Halloween card I made on last week's FB Live.  Follow me on Facebook here so you don't miss my weekly videos!  There's on tonight at 7:30 pm CT and every Tuesday at 11 am CT. 

    Product used:

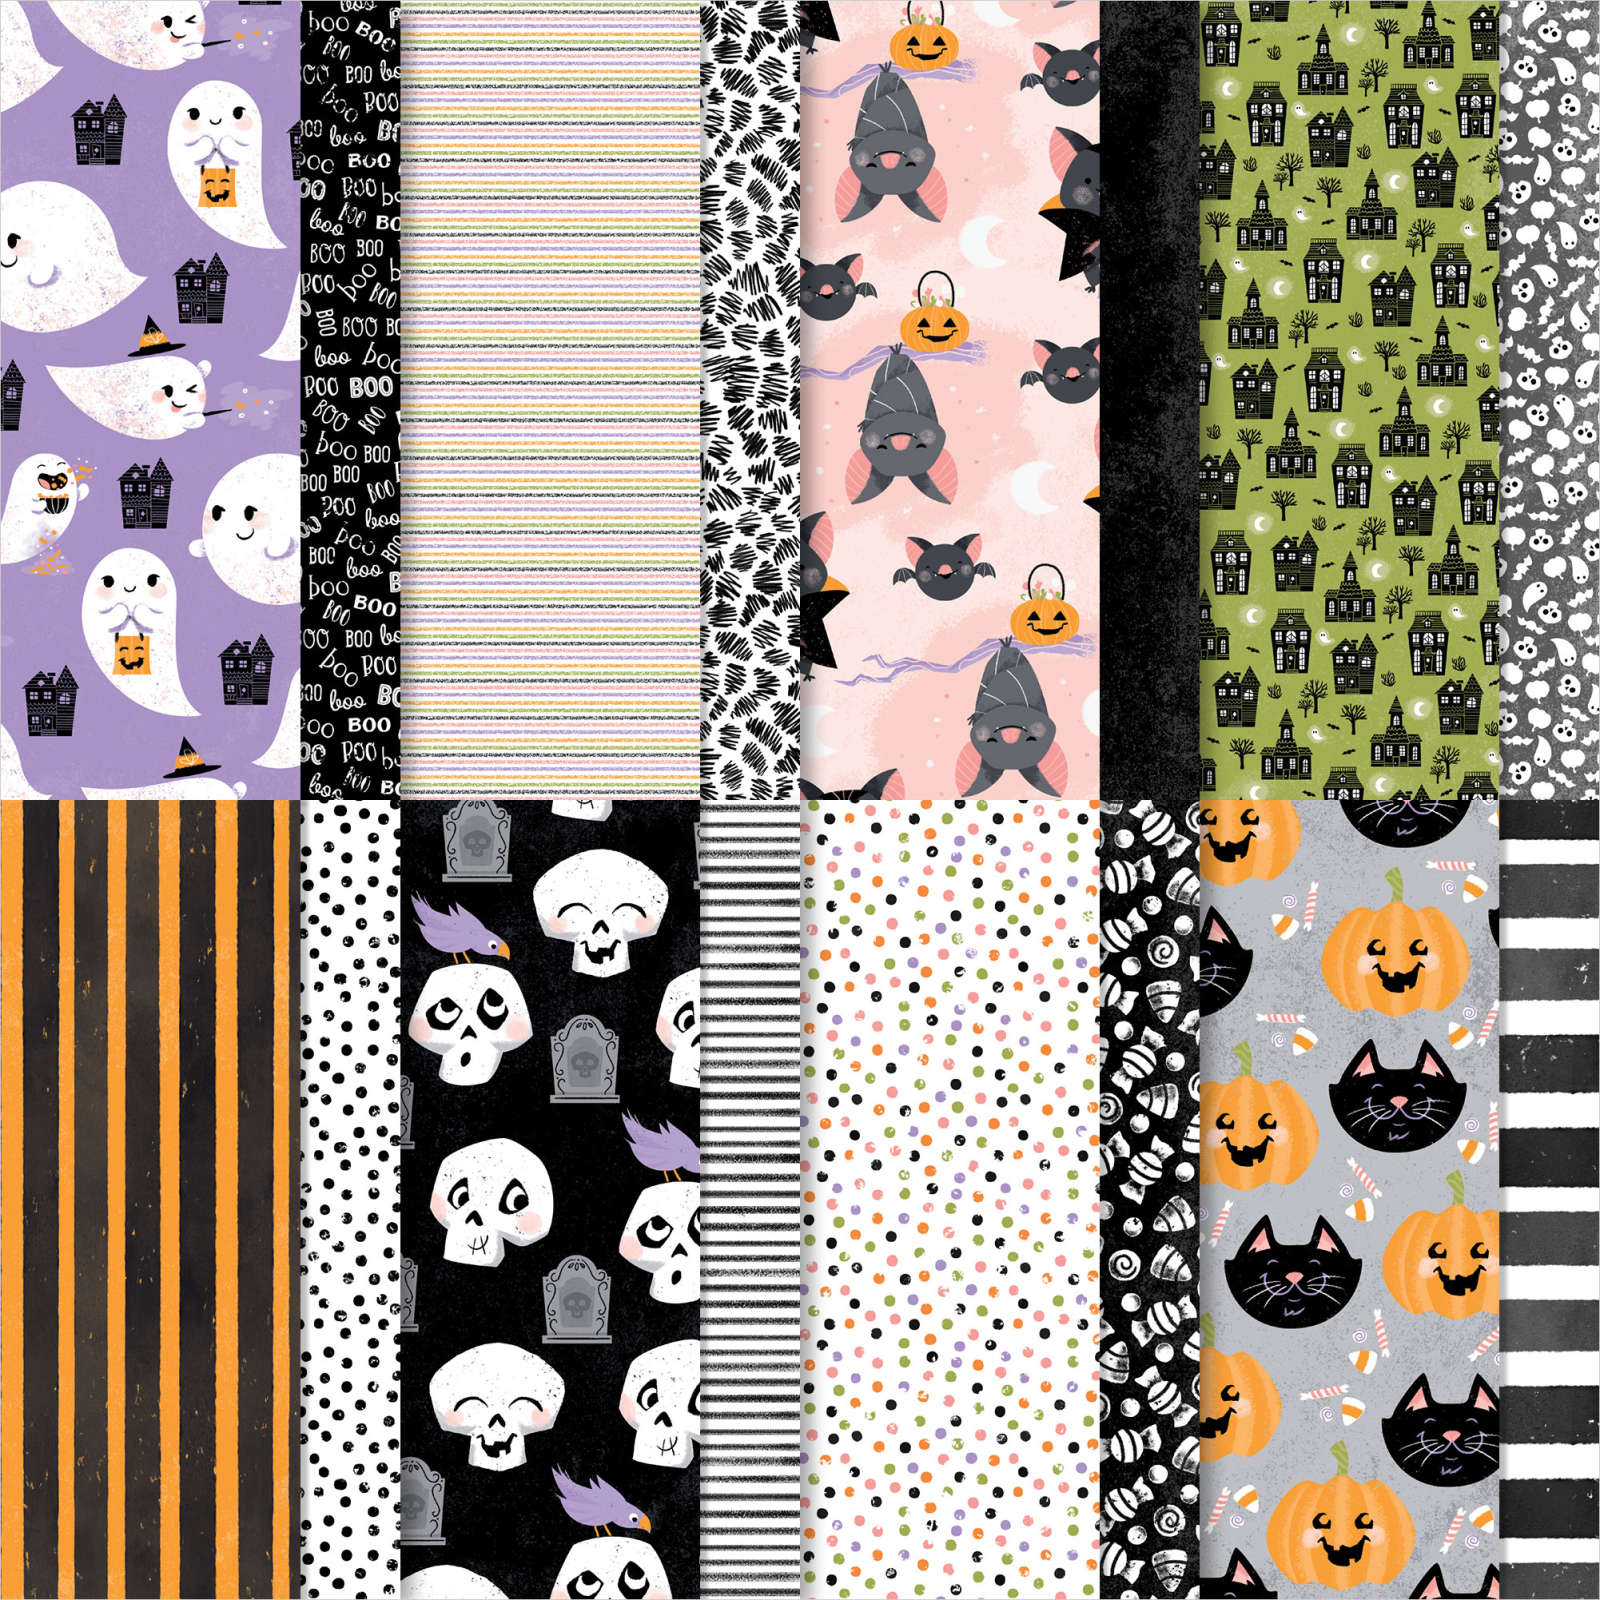
    •  the ghosts, pumpkin and striped trim are from the Cute Halloween designer paper in the Holiday catalog.  See it here. 
    • I punched one of the ghosts and the pumpkin with the Halloween punch. It's in a bundle with the Cutest Halloween set seen here or on page 51, which is where the greeting is from. *Sadly the Halloween punch is now on back-order until November!
    • the wreath & bats are die-cut with the Seasonal Swirl dies seen here & Black Glimmer paper in the annual catalog; seen here
    • the ombre background is actually Fresh Freesia CS, with Misty Moonlight & Night of Navy added with our Blending Brushes *watch the video below
    • Cute Stars Adhesive-backed sequins are also added to the wreath

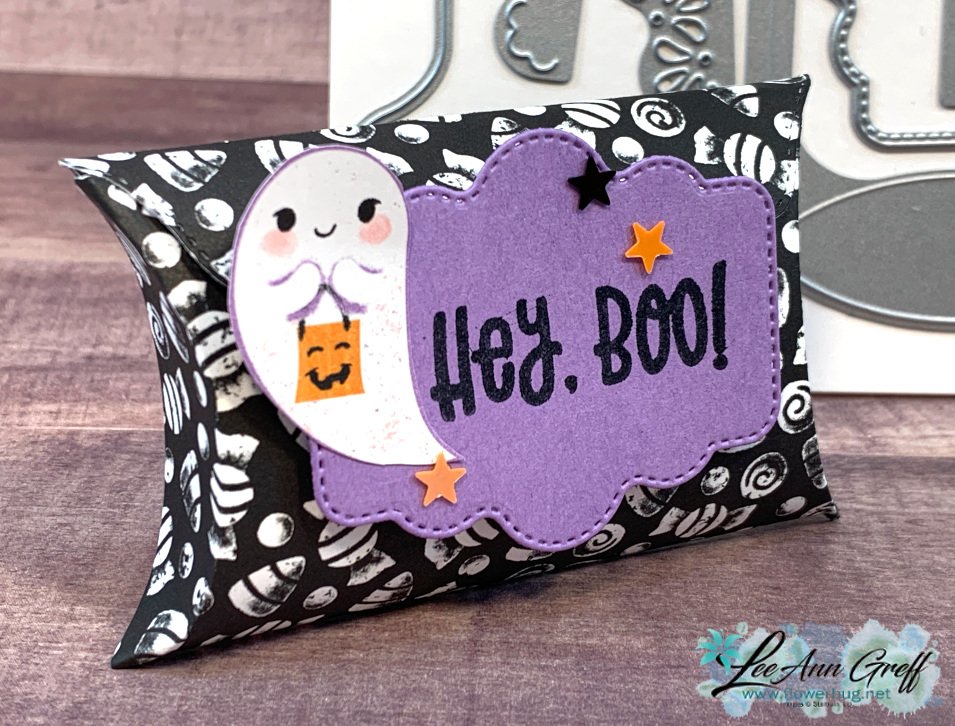
    Check out the ghostly treat box in the photo above.  It's so simple to make with the Pretty Pillow box dies!

    The stitched tag is also in the Pretty Pillow Box dies.  Look how it latches – the scalloped front slips in behind the tag in front.  I love that I don't need a special way to keep it closed; the tag does it for me! 

    Check out the other version I made with the fun skeletons on the right?  I fussy cut them from the Cute Halloween paper. 

    Measurements:

    • White 4 ¼” X 11” scored at 5 ½”, cut 1 ¾” from the right
    • Black 5 ½” X 8 ½” scored at 4 ¼”,
    • White & Fresh Freesia 3 ¾” X 4 ¾”, Black ½” X 4” strip for greeting
    • Cute Halloween DSP ½” strips

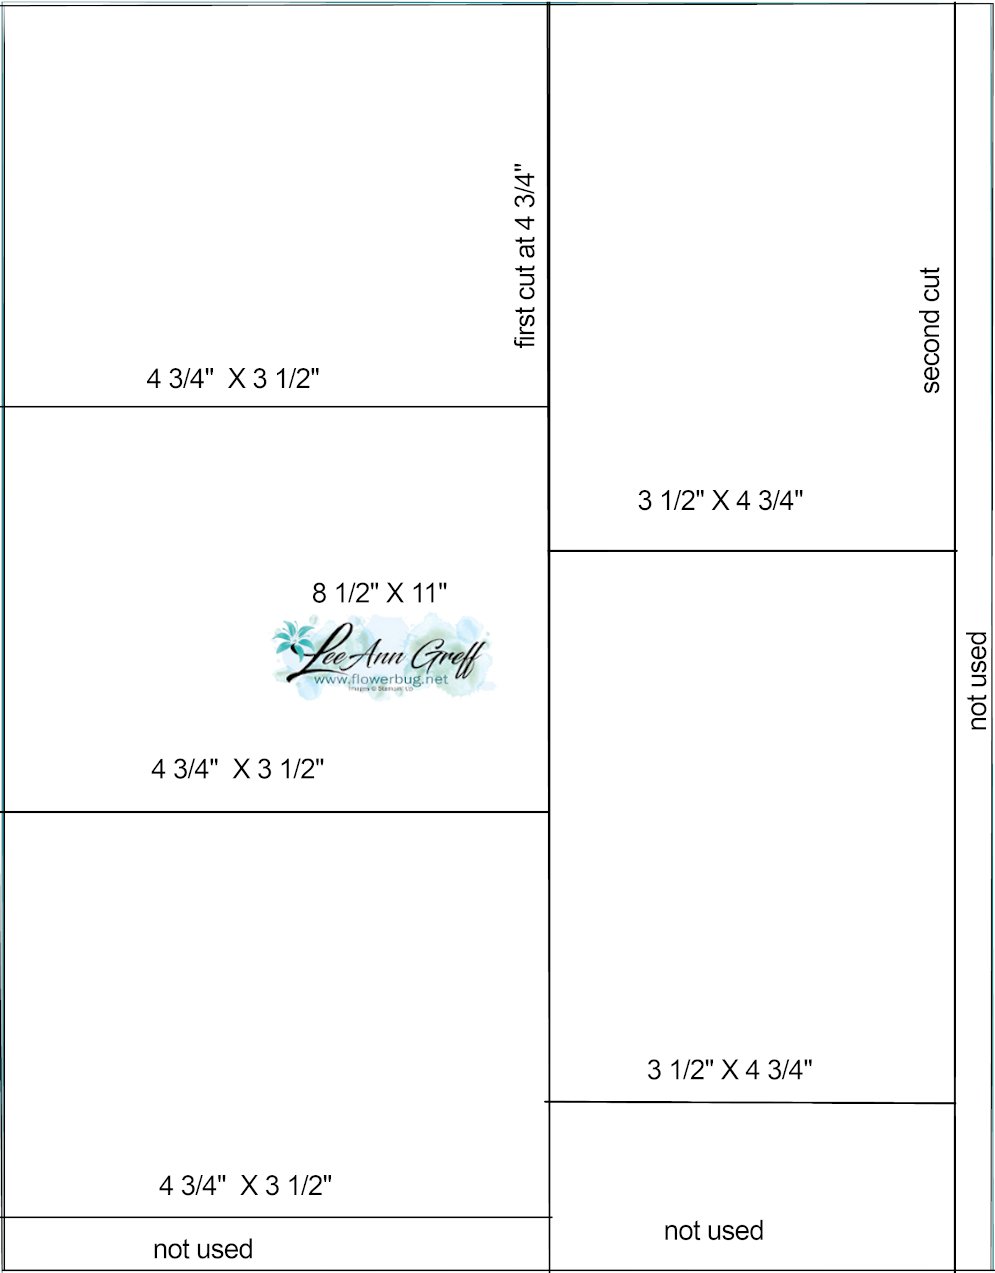
    I haven't shared this for awhile so here it is; my favorite cutting template especially for inside a card.  Get 5 pieces from one 8 1/2" X 11" sheet of card stock. If you're making multiples this can save you a lot! 

    Below is the video.  I make another project using Sparkle of the Season before this one. Fast forward to about 22 minutes in to see this neat Halloween card. 

    ~~~

    September Specials

    Host code: ASETFASJ or T7VSZQ64

    *click here to order

    All online orders will receive a free PDF tutorial filled with projects featuring

    the Painted Christmas Suite!

    Get a pkg. of Holiday Rhinestones with a $50 online order from me in September! 

    Order here

    BEST DEAL!

    Get a Free Bundle  from the Holiday Catalog when you choose the Starter kit!  Pick out $125 in product of your choice for just $99 and shipping is free!  

    Leave a Reply

    Your email address will not be published. Required fields are marked *

  • What a Year Kit to Go – Spectacular home decor banner & 10 cards too!


    When I create a kit to go I never quite know how the projects will turn out.  Of course I hope for fabulous every time and I'm usually quite happy with the results.  I was amazed at how much I love these What a Year projects!  They truly make me happy just to look at them! They're bright, happy & just plain delightful.

    The banner is my favorite.  I needed an update to the decor in my studio and this fit the bill beautifully.  It's nice and big, spanning almost 3 feet across!  It’s perfect for a craft space, office or even a kids room. 

    This kit includes the What a Year Memories & More pack, 10 White cards & envelopes, a sheet of Stampin' Dimensionals and ribbon for the banner.

    No stamps or ink are needed to finish these projects. However you will need adhesives, rhinestones or other gems, scissors, a hole punch and a paper trimmer. If you want to add texture to a few of the cards you will also need a die-cut machine & embossing folders.

    *Be sure to order by September 19th to get this kit!  

    This PDF tutorial will be sent to you via email immediately after payment. The kit is mailed out at the end of September, barring any back-orders. 

    Go here to order the pre-cut kit to go. $28 (See the 2nd September kit option here. Choose both kits here!)

    Click here to get the PDF tutorial. $15

    ~~~

    September Specials

    Host code: ASETFASJ or T7VSZQ64

    *click here to order

    All online orders will receive a free PDF tutorial filled with projects featuring

    the Painted Christmas Suite!

    Get a pkg. of Holiday Rhinestones with a $50 online order from me in September! 

    Order here

    BEST DEAL!

    Get a Free Bundle  from the Holiday Catalog when you choose the Starter kit!  Pick out $125 in product of your choice for just $99 and shipping is free!  

    Leave a Reply

    Your email address will not be published. Required fields are marked *


Notice: LeeAnn Greff, Independent Stampin’ Up! Demonstrator, Manager. The content of this website is my sole responsibility as an independent Stampin’ Up! demonstrator and the use of, and content of, the classes, services, or products offered on this website is not endorsed by Stampin’ Up! Copyright 2025