Peaceful Poppies cards kit to go; RSVP by March 19th!
The cards kit to go features the Peaceful Poppies designer paper. It's full of hand painted blooms accented by watercolor effects all inspired by fields of poppies.
This kit to go includes $20 in actual product (before tax & shipping). You're getting the 10 cards pre-cut kit for just $5! See those beautiful die-cuts and trim pieces? They are included in my kits! I do the time consuming work for you so you can enjoy the fun of just stamping and assembly.
*If you like pre-cut card kits you will LOVE my monthly kits to go! Here are some comments from my subscribers:
– I made all the cards, and had a great time. I loved all the different folds and color choices. Thanks for making my week!
– Your directions are always so easy to follow and your projects are unique.
– I just received the January card kit and love it!
– I loved these cards; they were so fun to make.
Here's one of the fun-fold cards in this month's kit. It has a pocket for your greeting and/or a gift card if you'd like to add one.
I did use the poppy image from the Painted Poppies set in the card above.
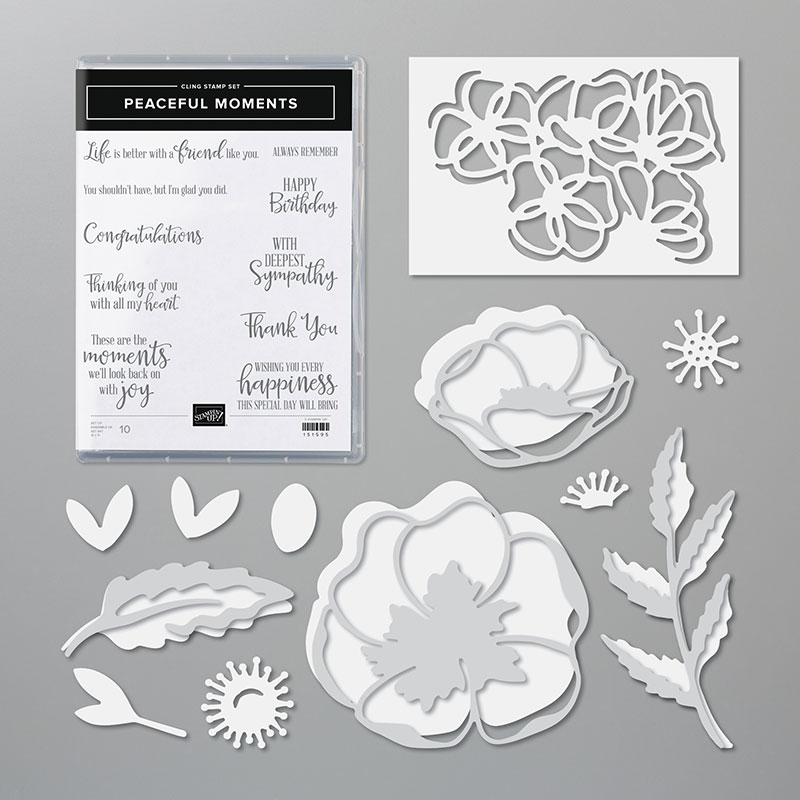
For my greetings I used the Peaceful Moments stamp set seen below. If you add it on you will get a free Sale-a-Bration choice with your kit. Or choose thePeaceful Moments bundle and earn you a free SAB choice. See your free choices here.
The Painted Poppies bundle is not available right now but should be back mid April! Both of these bundles coordinate together beautifully and are part of the Peaceful Poppies suite on pages 24-27 in the mini catalog.
– a pre-cut cards kit for 10 cards; including die-cuts and many punched pieces
– Free pdf instructions with photos, measurements (to make more), step by step instructions and a supplies list
– 1/2 package of the 12 X 12" Peaceful Poppies Designer Series Paper
– 1 full package of the Peaceful Poppies sequins
– 3 spools of colored Baker's twine in Poppy Parade, Black and Garden Green
**You have through March 19th to RSVP for this kit. It's $28 for locals and $36 for long distance and includes Priority Shipping.
If you'd like to add on the Peaceful Moments stamp set or the bundle (seen above) please let me know. If you do add it on, (or anything else of $30 or more) I will combine shipping AND you get a free Sale-a-Bration choice!See the free items here.
***Be sure to RSVP by the 19th to get your kit!
It's just $28 for locals and $36 for long distance people with Priority Shipping. Kits should be mailed out at the end of March and the pdf tutorial is emailed.
*You are subscribing to my monthly card kits but can cancel at any time.
*I can also send you a PayPal invoice for this month's kit. Email me at lagreff60@gmail.com
All Posts
Casing my friend with Caring Leaves & video
Last week I was out of town to see my son get married in the beautiful Grand Tetons National Park in Wyoming.
The photographer was incredible; I have to share some of her early shots with you. It was a quick trip but we were blessed to be there for the small ceremony. We had a wonderful time driving through the stunning park with the photographer scouting out photo opportunities. We're thrilled to add Katrina to our family!
~~~
Today I'm sharing the swap card I made for our Team card swap this month:
When I was planning my card for the swap I came across the card on the left below. It's one my friend Susie Wood made awhile ago. I loved the layout and cased it using the Caring Leaves set.
Casing a favorite card or layout is my go to when designing a new project. It's fun to switch up colors and products while using the same design.
I created a video that's posted below. I stamped the outline leaves on the large Pretty Peacock layer before embossing it with the Forever Plaid 3D embossing folder. I also stamped an extra leaf to fussy cut and add under the tag. See the measurements below.
Her colors include Granny Apple Green, Pumpkin Pie, Crushed Curry and Cherry Cobbler. She added tons of leaves from the Changing Leaves dies. The embossing folder is the Leaf Fall 3D seen here.
The White background is stamped with a few small images, then ink is added lightly with a Blending Brush before it's textured. The cat, broom and stack of books are adorable!
She used the bubbles image to make her own background. The oozing slime and bubble die-cuts are the Old Olive glimmer paper. I love the White Deckled Circle die-cut behind the cauldron. It looks like a moon.
Notice: LeeAnn Greff, Independent Stampin’ Up! Demonstrator, Manager. The content of this website is my sole responsibility as an independent Stampin’ Up! demonstrator and the use of, and content of, the classes, services, or products offered on this website is not endorsed by Stampin’ Up! Copyright 2025


Leave a Reply