Peaceful Poppies cards kit to go; RSVP by March 19th!
The cards kit to go features the Peaceful Poppies designer paper. It's full of hand painted blooms accented by watercolor effects all inspired by fields of poppies.
This kit to go includes $20 in actual product (before tax & shipping). You're getting the 10 cards pre-cut kit for just $5! See those beautiful die-cuts and trim pieces? They are included in my kits! I do the time consuming work for you so you can enjoy the fun of just stamping and assembly.
*If you like pre-cut card kits you will LOVE my monthly kits to go! Here are some comments from my subscribers:
– I made all the cards, and had a great time. I loved all the different folds and color choices. Thanks for making my week!
– Your directions are always so easy to follow and your projects are unique.
– I just received the January card kit and love it!
– I loved these cards; they were so fun to make.
Here's one of the fun-fold cards in this month's kit. It has a pocket for your greeting and/or a gift card if you'd like to add one.
I did use the poppy image from the Painted Poppies set in the card above.
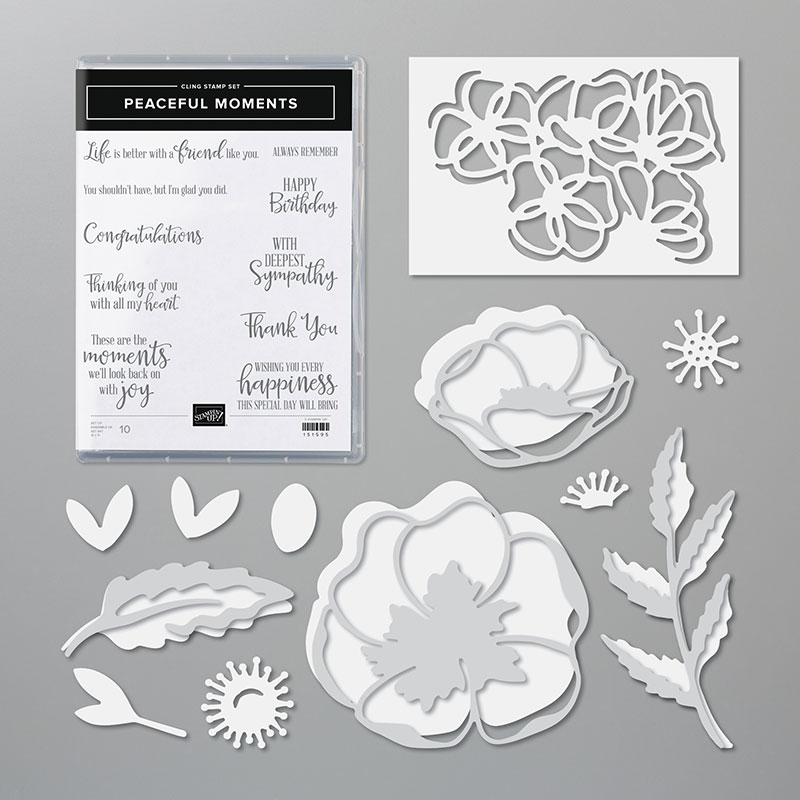
For my greetings I used the Peaceful Moments stamp set seen below. If you add it on you will get a free Sale-a-Bration choice with your kit. Or choose thePeaceful Moments bundle and earn you a free SAB choice. See your free choices here.
The Painted Poppies bundle is not available right now but should be back mid April! Both of these bundles coordinate together beautifully and are part of the Peaceful Poppies suite on pages 24-27 in the mini catalog.
– a pre-cut cards kit for 10 cards; including die-cuts and many punched pieces
– Free pdf instructions with photos, measurements (to make more), step by step instructions and a supplies list
– 1/2 package of the 12 X 12" Peaceful Poppies Designer Series Paper
– 1 full package of the Peaceful Poppies sequins
– 3 spools of colored Baker's twine in Poppy Parade, Black and Garden Green
**You have through March 19th to RSVP for this kit. It's $28 for locals and $36 for long distance and includes Priority Shipping.
If you'd like to add on the Peaceful Moments stamp set or the bundle (seen above) please let me know. If you do add it on, (or anything else of $30 or more) I will combine shipping AND you get a free Sale-a-Bration choice!See the free items here.
***Be sure to RSVP by the 19th to get your kit!
It's just $28 for locals and $36 for long distance people with Priority Shipping. Kits should be mailed out at the end of March and the pdf tutorial is emailed.
*You are subscribing to my monthly card kits but can cancel at any time.
*I can also send you a PayPal invoice for this month's kit. Email me at lagreff60@gmail.com
All Posts
Free Shipping Thursday!! And a quick & pretty card with Fragrant Forest
Stampin' Up! announced that Thursday, December 14th is a day of FREE shipping!
All orders over $75 will have no added cost of shipping.
On last week's Live video I featured the Fragrant Forest stamp set. Trees are one of my 'go to' choices for card making; I like most botanical images though. I find them comforting and versatile and this large background stamp is truly beautiful.
I kept my colors to White & Pretty Peacock. If you ever struggle with color combos try just one with White or Vanilla; they're usually quite beautiful.
Dies used here include the Countryside Corner dies (2023-24 annual catalog) & Forever Forest dies (2023 Holiday catalog) for the die-cut mountains on the bottom of the card . The greeting die-cut is from the Stylish Shapes dies; a definite must have! See the Fragrant Forest stamp set here.
Cutting your stamps can make them so much more versatile! And they fit right back together on your block if you do want to use the entire stamp. Try it!
Today's card also features the Beary Cute stamp set & punch. It was available in a bundle but unfortunately the punch has sold out now. But the stamp set is still available.
I used Night of Navy with Mossy Meadow here. I stamped the entire White layer with the background stamp (watch the video with tips on getting even coverage with a background stamp) then cut the circle using the new Deckled Circle dies. I added it to a larger Navy Deckled circle die-cut which covered up the die-cut line from the first circle cut.
The bears were stamped in Balmy Blue ink but in hindsight I'd like them in a dark gray ink on White. The lower strip for the greeting is torn.
I created a free project sheet for this card; click on this link to see it.Download Fragrant Forest & Beary Cute card *subscribe to my blog so you don't miss a thing and can access all of my project sheets in one place!
I was trying to mask the stamp but it has lots of little pine needles between the tree layers. It wasn't working so I thought, 'why aren't I trimming the stamp?'. I have no problem doing it; it just isn't my first thought. It works like a gem and makes it so much easier to use this pretty stamp set!
Do you cut your stamps apart? I tend to do it with images that have a greeting with it. Or if I like part of a greeting and want to use it separately. Honestly they fit right back together when put onto your block. It just makes sense! I encourage you to try it.
Click here or on the photo below to watch my video. Please subscribe to my YouTube channel too!
~~~
December Specials:
Get a free embellishment from the 2023 Holiday catalog with an
Notice: LeeAnn Greff, Independent Stampin’ Up! Demonstrator, Manager. The content of this website is my sole responsibility as an independent Stampin’ Up! demonstrator and the use of, and content of, the classes, services, or products offered on this website is not endorsed by Stampin’ Up! Copyright 2025


Leave a Reply