/


Latest Post

New Nature’s Symphony top fold card with free project sheet & video tutorial


I hope you had a very Merry Christmas last week. We sure did but we missed our youngest son & his wife. They were hit with the flu the day they were going to drive up here. It wasn’t the same without them! But we still had our Appetizer Showdown competition and played lots of games including our annual Minute to Win It games. Always lots of laughs! I highly recommend doing these with family or friends. It’s one of our highlights of the time we spend together.

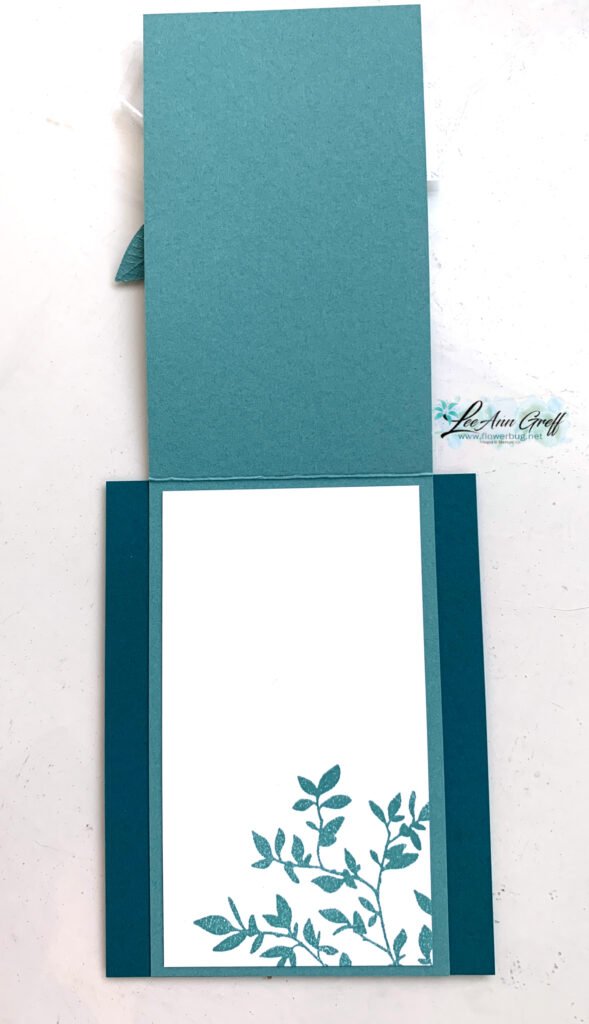
I shared this easy fun fold card on last week’s Live video. It features new product from the upcoming 2026 Spring catalog.

I featured the Nature’s Symphony bundle and the new Nature’s Walk DSP. I cannot share links to these products because they’re not available for customers quite yet. Tomorrow on my week’s Live video I’ll share all of my new products from both the Spring catalog and the newest Online products – both coming out in early January. Join me here.

My colors include Pretty Peacock, Lost Lagoon and Old Olive with White. Besides the Nature’s Symphony bundle I added a die-cut for the greeting from the Textured Notes dies seen here.

This card is an easy fun fold layout. The back is simply 4 1/4″ X 5 1/2″ and the center is a full 3 1/4″ X 11″ scored at 5 1/2″. It gives you a large area to add your patterned paper on the front. I made many of these cards for a long distance swap I joined in.

I created a free project sheet for this card Click here to download or print it. There’s also a video tutorial below as well.

The Nature’s Walk designer paper is filled with textured patterns. I love the colors in it; the blues & greens are just my style.

Here’s the video tutorial for you. I also share another pretty card idea featuring this beautiful bundle.

*You’ll receive a PDF with multiple projects featuring this product
after the 20th of the month.
~~~

The Last Chance list has been updated!
Click here to shop.

Get a free PDF tutorial with any online order from me in December!

All Posts

  • 4-Card Wonder – free PDF tutorial, template, measurements & video!


    Before we get to the projects today I want to share the sale Stampin' Up! just announced:


    Check over your wish list and see how many stamp sets are on it.  Might be a good time to place an order. With the Bonus Days happening you can double dip!

    Plus the Trucking Along bundle is back in stock!  See it here; get it while you can.  

    I'm extremely excited & proud to share this project with you.  If you know me well, you know I love to create one sheet wonders. I've made quite a few over the last 10 years or so.  I'm so lucky that my husband is willing to create the templates for me; I'm not sure I'd love them as much without his help!  

    I'm calling this project a 4-Card Wonder because it creates 4 cards.  I originally made this for a Team meeting project. I wanted it to be quick, create multiple cards and of course be easy and cute!  

    I shared this project & template on my weekly Live video but did record it and it's now on my YouTube channel as well. Scroll down to see the video.  

    Here's the template – it's meant for a 1/2 sheet of card stock – 8 1/2" X 5 1/2".  

    Grab your favorite colors of ink and stamp your own background.  Then cut it up using the measurements above!  It's so fun to create your own stamped paper. It's a bit addictive!  

    *Tip – choose stamps that include large & small images. When stamping your paper start with the largest stamps first and finish with the smallest; filling in any empty areas. 

    I chose the Beautiful Balloons bundle.  My colors include Bubble Bath, Berry Burst, Pool Party & Parakeet Party. 


    I kept the cards quite simple but you could sure jazz them up a bit more.  Make the cards like mine or this can be a starting point for your creative process.  

    You can watch the video on this project here.  It's the first project. Or click on the photo down below to watch it below.  *Remember to follow me on either my FB page here (Tuesday Live videos) or my YouTube channel here. 

    Here's the full PDF tutorial for you.  Download it here.

    ~~~

    July Specials: 

    Bonus Days!

    Get a $5 coupon for each $50 order you place in July.  Redeem in August!


    Clearance Rack update!

    See all items available here

     NEW Online Exclusives will be available

    See them all here

    ~~~

    Get a free card kit & a new Beautifully Happy stamp set 

    with online orders over $65; must use a host code.

     *current host code: MY4YDGEM

    Leave a Reply

    Your email address will not be published. Required fields are marked *

  • Birthday ‘Tackle’ Treat box with video tutorial & measurements!


    I was so inspired by the 'Tackle' box Candace created for her 'Artist of the Month' projects I had to try making one.  She made hers with the Gone Fishing suite.  And she made this project up herself – she's incredible with box designs!  I decided to recreate it on a video and share it with you.  

    Isn't it amazing? I thought it would be really challenging to make, but with her box as my starting point it wasn't bad at all. And the Gone Fishing dies make the 'window' front a breeze. 

    I chose to use Berry Burst as my box color because I wanted it to be bright and happy for a Birthday gift.  I went to the dollar store and found some fun candy treats to add. I put the loose candies in small baggies I had on hand. 

    The box is quite easy to put together. After scoring the box lid, be sure to die-cut the 'window' using the Gone Fishing die.  Then you adhere it to a window sheet and add to the inside front of the box lid. 

    I notched the tabs before adhering. 

    • top of box 6 1/4 X 7 1/2" score 1" on all sides
    • bottom of box 6 1/8" X 7 3/8" score at 1" on all sides
    • window sheet 4 1/8" X 5 1/4" 
    • left inside divider (two compartments) is 1 7/8" X 6 3/4" score at 2 3/4", 3 1/2" & 4 1/4" 
    • right inside divider (three compartments) is 2 1/8" X  8 1/4" scored at 2", 2 3/4", 3 1/2", 5 1/8", 5 7/8" & 6 5/8" 
    • inside bottom – add under the two divided sections; 5 1/4" X 5 5/8" score at 1 7/8", 2 5/8" & 3 3/8".  (It's shown vertically in the photo below)

    Watch the video to see how these sections go together.   

    You can see the Gone Fishing bundle here.  *They're currently out of stock but should be back in late August. 

    I chose the Circle Sayings bundle for my greeting tag. *see it here It's quite a versatile set and pairing it with the coordinating 2 2/8" circle punch was so smart of Stampin' Up!  *I added a die-cut stitched Lemon Lime Twist circle from the Stylish Shapes dies.


    You can watch the video on this project here.  It's the last project. Or click on the photo below to watch it below.  *Remember to follow me on either my FB page here (Tuesday Live videos) or my YouTube channel here. 

    ~~~

    July Specials: 

    Bonus Days!

    Get a $5 coupon for each $50 order you place in July.  Use the coupon in August!


    Clearance Rack update!

    See all items available here

     NEW Online Exclusives will be available

    See them all here

    ~~~

    Plus my monthly special for online orders:

    Get a free card kit & a new Beautifully Happy stamp set 

    with online orders over $65; must use a host code.

     *current host code: MY4YDGEM

    Leave a Reply

    Your email address will not be published. Required fields are marked *

  • Tomorrow is the last day – Inventory Reduction Sale; get a free stamp set in your package!


    There are just 2 days left of my Inventory reduction sale! 

    I have excess of 5 previous card kits to go so I'm offering a special through tomorrow, Sunday, July 16th.

     I'll add a free stamp set (retired but new) to your package with the purchase

    of any 2 or more pre-cut kits in my Shop. 

    *see them all here

    Leave a Reply

    Your email address will not be published. Required fields are marked *


Notice: LeeAnn Greff, Independent Stampin’ Up! Demonstrator, Manager. The content of this website is my sole responsibility as an independent Stampin’ Up! demonstrator and the use of, and content of, the classes, services, or products offered on this website is not endorsed by Stampin’ Up! Copyright 2025