/


Latest Post

Leaves of Holly card with a gift card option & video


We made this pretty Christmas card at my November Card Clubs.  It features the Leaves of Holly bundle seen here. 

I chose these colors – Evening Evergreen, Real Red, White & Soft Succulent.  I sure love the dies in this set; the greeting label with the attached holly leaves is special. 

*Unfortunately the Holly Berry dies are unavailable right now; they expect they'll be back in stock around December 19th.  

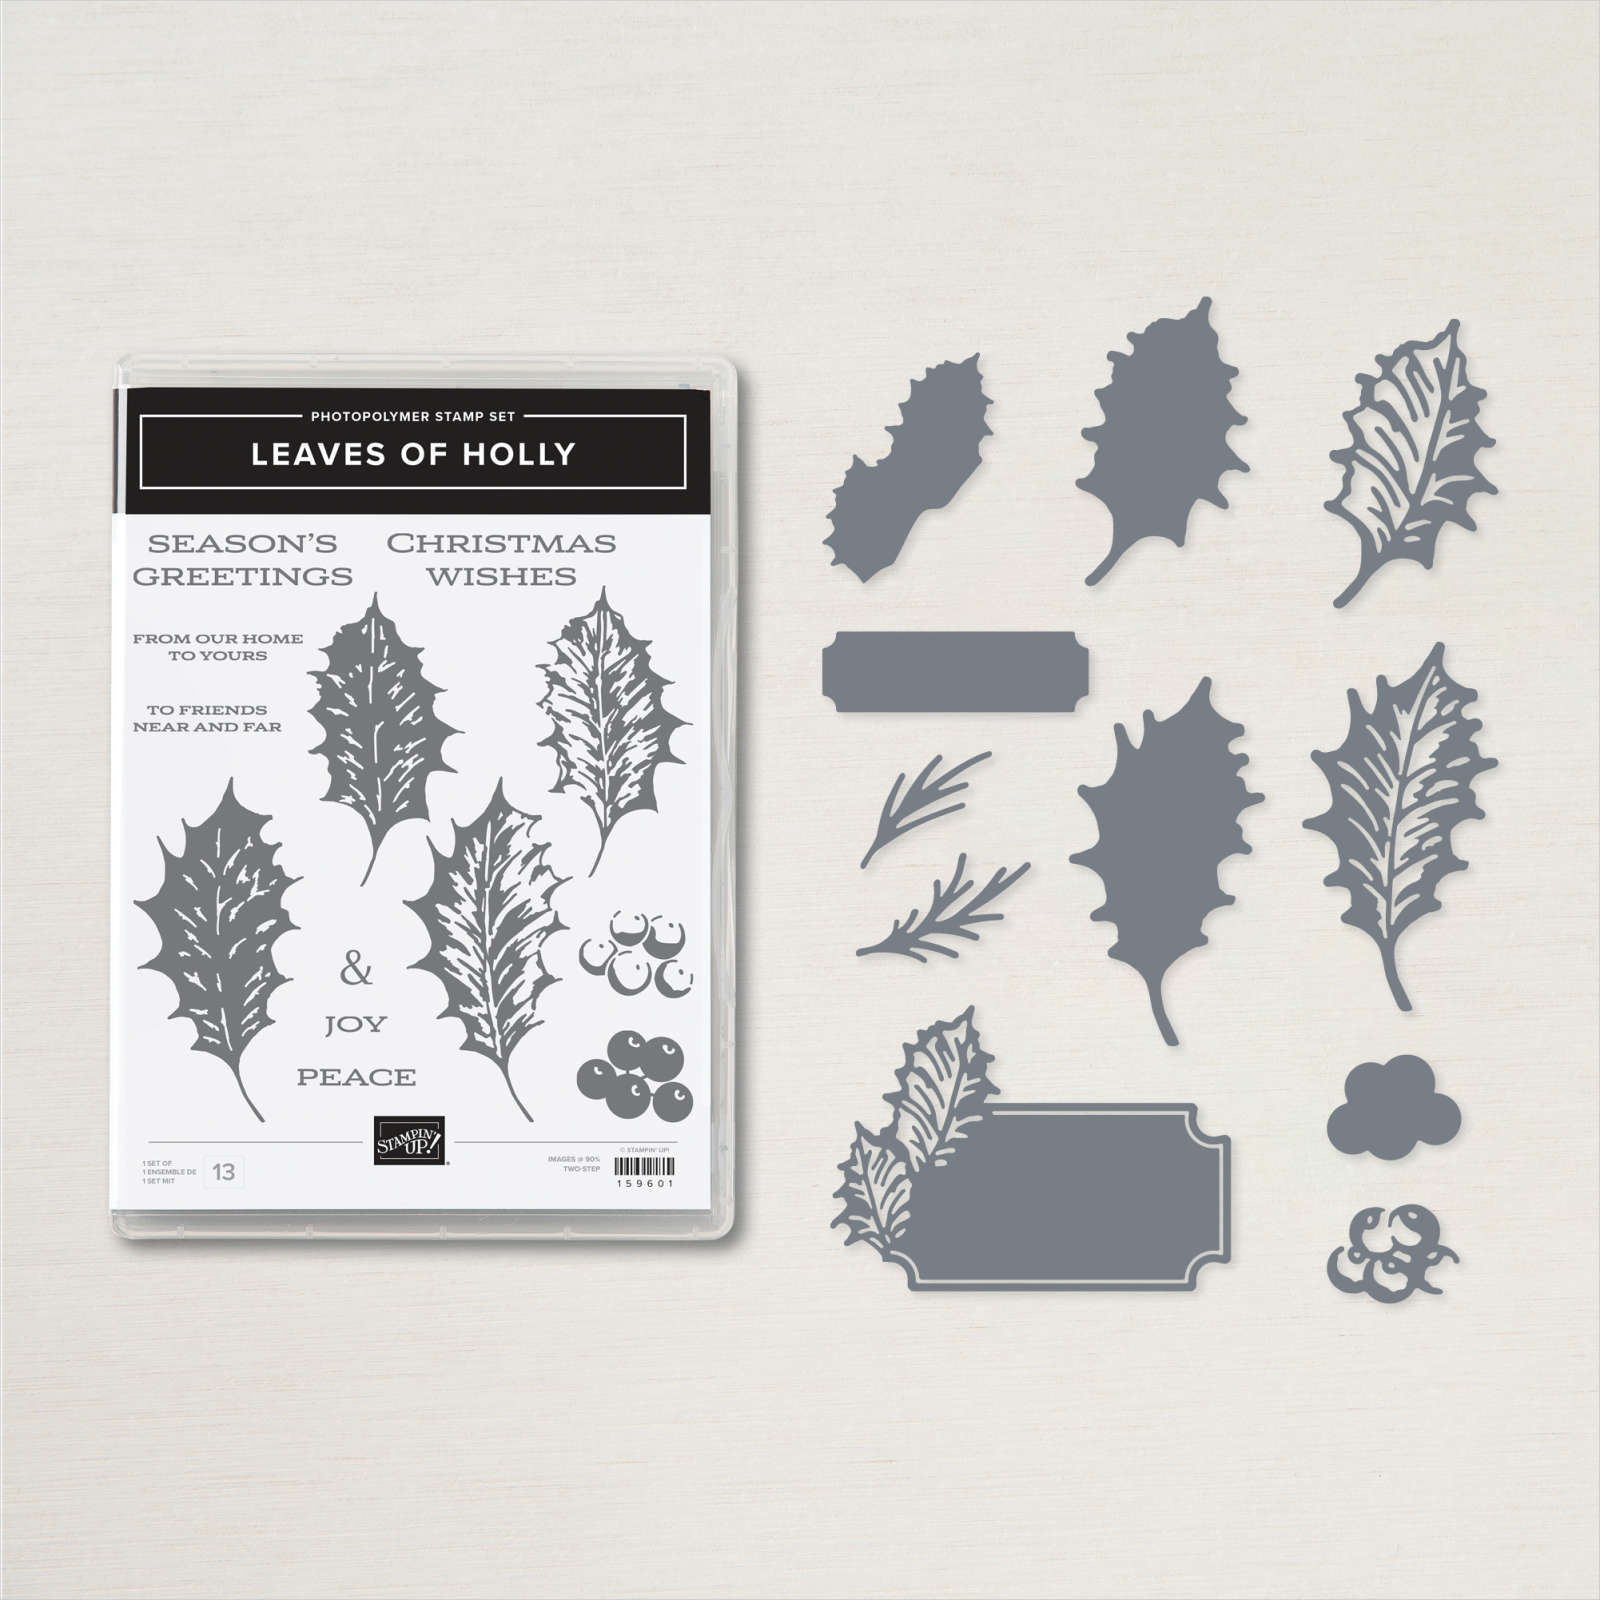
I think this is a classic Christmas bundle you'd find yourself using often.  It's retiring on December 1st and while supplies last. 

I gave my gals a choice of 'berry' options.  On the left card below we added two die-cuts from the bundle.  On the right card we added a Textural Element that is colored with Blends markers.  It was almost a tie on which option they chose.  

I stamped the two more open leave images 2-3 times each in the two green colors and added the greeting element over them.  You can see how in the video below.  It's actually an easy card to make. 

If you want to add an easy gift card option to any card simply add a strip of DSP across the bottom of the inside. Punch the center with any circle or decorative punch and aAttach it with glue on the outer and lower edges only.  


Click here to watch it or on the photo below.  There's a special wiper fun fold card shown too!  

~~~

Order online here

Host code link: KA9ZYZB6

November Specials: 

Check out the Last Chance items from the Holiday Catalog; it starts December 1st

1. Get a pack of mini Stampin' Dimensionals from me with online orders over $55!


2. All orders in November will receive a big project tutorial – a collection of 12 cards featuring this new collection of products.

Earn free products with my loyalty rewards! 

Click here to download yours and earn a $50 shopping spree!

All Posts

  • Waves of Inspiration Sunset


    Here's another card that's included in this month's Waves of Inspiration kit to go.  The colors are gorgeous! 

    This card was inspired by another Demonstrator but I cannot find the name to give credit now.  It's Balmy Blue with touches of Mango Melody.  I used a Blending Brush to achieve that smooth shaded layer of Mango Melody & Balmy Blue.  

    Like I mentioned, this card is included in both the Kit go Go and the PDF tutorial and exclusive videos this month.  The last day to get in on the pre-cut kit is tomorrow, March 17th.  Get the details here.  

    The Kit to Go includes the Waves of Inspiration stamp set & dies, the 6 cards kit and videos & PDF tutorial for 11 cards for $74. Message me here to opt in for it; and I'll send you an invoice via PayPal. 


    Or if you order the Waves of the Ocean collection seen here from me you automatically receive the PDF tutorial and videos.  Make note that the Waves of Inspiration bundle will be in the upcoming Annual catalog but the papers & gems will not.    

    Here is a photo of more of the cards included:

    ~~~

    March Specials: 

    Host codes: FS239K9C

     *click here to order 

    If your order is over $50 you'll receive a free embellishment

    from the Jan-June catalog in your thank you card.

    Email me to opt in for my Waves card kit to go here; it includes the Waves bundle!

    Or the Flowering Fields kit seen here. 


    Don't forget about my loyalty rewards! 

    Click here to download yours and earn a $50 shopping spree!  

    Leave a Reply

    Your email address will not be published. Required fields are marked *

  • Free-form waves using the Floating Technique


    We made this gorgeous 'wave' card at a Team meeting last month.  I used the Waves of Inspiration bundle and a Blending Brush for the sky. 

    The colors are Bermuda Bay, Pacific Point and White.  See those gorgeous gems?  They're called Rhinestone Waves Basic Jewels and there are 168 in a package for just $6.50!  See them here. 

    I had a bunch of curvy foil pieces left over after die-cutting a bunch of these waves from the two blue colors in the Blue Foil paper seen here.  I challenged myself to use them and came up with a free-form wave using the Floating Technique.  

    I adhered various die-cut foil pieces to a Window Sheet using Multipurpose liquid glue and added them to the card with Stampin' Dimensionals.  This take a bit of patience as you can imagine!    

    Here are some tips to achieve this:

    • It's best if you start at the bottom and add just a few pieces. Let it set to dry. 
    • Adding a weight over them while they dry helps keep them flat. The foil likes to curl up.
    • Next form the top of the wave.  I used one of the long curved pieces for this.  
    • Add just a few pieces at a time and let them dry.  They slide easily!
    • Fill in the center of the wave a few at a time. Again, add weight over it all to set & dry.  
    • Trim off the sides of the Window sheet at 4" to fit the White layer. I fussy cut the top to match the foil wave.  
    • I adhered it to the textured 'Bark 3D' White 4" X 5 1/4" piece of CS with mini dimensionals.  

    This card is part of my Waves of Inspiration tutorial and video with 11 projects!  This is available to anyone who purchases the Waves of the Ocean Collection from me or purchases my Waves of Inspiration kit to go. 

    Click here for the details.  Be sure to opt in for the kit by March 17th. 

    ~~~

    March Specials: 

    Host codes: EU76H4H7

     *click here to order 

    If your order is over $50 you'll receive a free embellishment

    from the Jan-June catalog in your thank you card.

    Email me to opt in for my Waves card kit to go here; it includes the Waves bundle!

    Or the Flowering Fields kit seen here. 


    Don't forget about my loyalty rewards! 

    Click here to download yours and earn a $50 shopping spree!  

    Leave a Reply

    Your email address will not be published. Required fields are marked *

  • Fun 4-Way Split Angled card idea; Live video tonight!


    We're making these fun but easy cards on tonight's Facebook Live.  It's at 7:30 pm CT here.  I hope you can join me!  If not it will be added to my YouTube channel here as well.  *Be sure to follow me on FB so you won't miss these lives! 

    Every 2nd & 4th Monday night's I host a 'Stamp with Me' live on Facebook where we create striking cards using Designer Paper or a fun technique.  If you're new to stamping you'll become more comfortable and efficient at it.  If you're a seasoned stamper you'll still enjoy it and get new ideas to create. 

    Tonight I'll share a version of this card; I'm calling it a 4-way Split Angled card. 

    The card above features the Abstract Beauty specialty designer paper in the 2022 January-June catalog by Stampin' Up!  It has splashes of color along with gold highlights.  See it here.  

    If you want to make one of these you'll need card bases, DSP or stamps & ink and a greeting or die-cut like I used here. 

    • card base 4 1/4" X 11" scored in half at 5 1/2"
    • Colored layer 4" X 5 1/4"
    • DSP or stamped layer 3 3/4" X 5" (for a wider split use 3 1/2" X 4 3/4") 

    The Amazing Thanks dies have quickly become a favorite of mine.  See those here. 

    The next example uses the Flowing Flowers stamp set in Calypso Coral, Pear Pizzazz and Daffodil Delight.  I stamped the images before I cut them in 4 pieces. 

    You might wonder – 'how do you cut these into 4 angled pieces?'  Honestly I cut from the top to the bottom first, just estimating my angled cut. Then I held the two pieces back together and cut from the bottom left to the right side. 

    It does not have to be perfect!  Honestly; just wing it; I dare you to do this without measuring.  

    ~~~

    March Specials: 

    Host codes: EU76H4H7

     *click here to order 

    If your order is over $50 you'll receive a free embellishment

    from the Jan-June catalog in your thank you card.

    Email me to opt in for my Waves card kit to go here; it includes the Waves bundle!

    Or the Flowering Fields kit seen here. 


    Don't forget about my loyalty rewards! 

    Click here to download yours and earn a $50 shopping spree!  

    Leave a Reply

    Your email address will not be published. Required fields are marked *


Notice: LeeAnn Greff, Independent Stampin’ Up! Demonstrator, Manager. The content of this website is my sole responsibility as an independent Stampin’ Up! demonstrator and the use of, and content of, the classes, services, or products offered on this website is not endorsed by Stampin’ Up! Copyright 2025