/


Latest Post

Just a few days left to get over $200 in Stampin’ Up! products for just $99


Friday is the last day to get the Starter Kit deal of over $200 in products for just $99!  Crazy & amazing special offer! I'd love to have you join my Flowerbug's Team! 

Here's how it works:

Start your list of $125 in products of your choice.  Then click on this link.  You'll add your products to the order and you'll also receive the following items absolutely free!

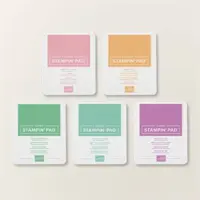
  • 5 new Classic In Color ink pads
  • 1 pkg of 8 1/2" X 11" In Color assorted card stock (20 sheets)
  • 1 pkg. of 6 X 6" In Color designer paper (40 sheets)
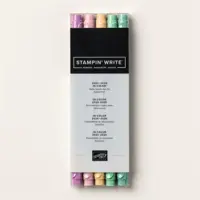
  • 1 set of 5 In Color Stampin' Write markers
 More information:

****Remember that most Demonstrators are 'happy shoppers' – in it mostly for the discount and fun!  

Benefits of the Starter Kit: 

  • New demonstrators can select any Stampin’ Up! products up to the $125 in value for just $99.
  • New team members who join Stampin’ Up! get to be a part of our amazing community of Stampin' Up! crafters with exclusive FB groups including my Flowerbug's Team! Plus, they get to enjoy sharing simple and fun crafting experiences with others, early access to products, and exclusive access to training events.
  • The Starter Kit includes business resources like catalogues, brochures and postcards.
  • My Flowerbug's Team is incredible, generous, talented and kind. 
  • My Team members get all of my current and past tutorials FREE!   
  • We have optional swaps, monthly challenges, lots of sharing and Prize Patrol too!
  • You can be any kind of Demo you want; there's no need to run a business.  You're in charge and can simply enjoy the discount or hold events and earn an income. I'm happy to support you either way! 
  • Email me here with any questions you have.  

Click here to get your Starter Kit deal and join my Team! 

~~~

May Specials: 

*current host code link:  9AWSF9T9 or FERX3EKC

~~~

Get over $200 in products for just $99 in May & free shipping too! 

You'll get tons of new In Color products plus choose $125 in products of your choice! 

~~~

All online orders in May will receive a free project tutorial and if your order is over $50 I'll also send you a pre-cut card kit!

All Posts

  • Retro style circles layout; super easy! Catch the Live video tonight!


    Tonight at 7:30 pm Central Time I'm sharing how to make these retro style circle cards on Facebook Live.  Click here to join me.   You can also see this video below!

    Basically you need three sizes of circle dies or punches for the start of this layout.  Cut them in half and layer together with the edges meeting on one side. Adhere and add a long greeting between the two. 

    Watch how on my FB Live replay!

    Measurements:

    • 5 1/2" X 8 1/2" card base
    • 3 1/2" X 4 3/4" Whisper White; the greeting strip is about 5" long and either 1/2" or 3/4" wide depending on your greeting image.
    • 1" X 5 1/2" horizontal strip
    • Circles from the Stitched Shapes dies are the largest three circles. 

    You'll want ink, stamps and embellishments that coordinate with your Designer Paper.  Remember you could use card stock instead of DSP. 


    Products used:

    • Designer papers – Heartwarming Hugs, new Classic Christmas & Snowflake Splendor
    • Stamps – Tree Angle, Snowflake Wishes & Curvy Christmas
    • Colors – Real Red & Olive, Seaside Spray & Night of Navy, Sahara Sand & Cherry Cobbler  
    • Other: Stitched Shapes dies, Curvy Dies & Pick a Banner punch

    ~~~

    November Specials!

    Current Host code is GRC9VVUU


    All online orders receive my FREE Curvy Celebrations 22 project PDF Tutorial! 

    Leave a Reply

    Your email address will not be published. Required fields are marked *

  • Curvy Christmas & the Postage Punch


    Check out this easy card using the new Curvy Christmas stamp set and the Postage Punch!  

    It's super simple! Here's how I made it:

    1. Stamp the curvy trees image on the White CS using Shaded Spruce ink.  Color the trees with a Light Shaded Spruce Blends marker.  Add a tiny star using Cherry Cobbler ink on one tree. Adhere it to the Cherry Cobbler layer and to the main card.
    2. Punch out three pieces of Classic Christmas designer paper with the Postage Punch seen here.  Adhere to the White CS. 
    3. Stamp the greeting in Cherry Cobbler ink on a 1/2" strip of White CS.  Punch the ends with the Banners Pick a Punch. Add it to the card with mini dimensionals. 
    4. Finish with a few Holiday rhinestones. 

    You can see this stamp set here; it's only available through January 4th.  And the Classic Christmas Designer Paper is here while supplies last. 

    Remember that everyone who orders any of these products or places an online order with me in November will receive a free 22 project PDF tutorial featuring the Curvy Celebration products! 


    ~~~

    November Specials!

    Current Host code is GRC9VVUU


    All online orders receive my FREE Curvy Celebrations 22 project PDF Tutorial! 

    Leave a Reply

    Your email address will not be published. Required fields are marked *

  • Gift Wrapped Box Fold Card with video


    Check out this cute Christmas card we made at my October Card Clubs!  It's a box fold card; a super cute but easy fun fold. 

    The colors are Real Red with Granny Apple Green & White. The dies on the front are the Stitched Shapes and Hippos & Friends.

    It even folds flat for mailing!  As you can see the back is similar to the front; leaving some space to write or sign the card.  

    I used the Gift Wrapped punch bundle from the Holiday catalog.  You can see it here. 

    Check out the video and measurements below. 

    Here's the video: 


    Measurements:

    Real Red 4 1/4" X 11" scored at 5 1/2", 7", 9" and 10 1/2"
    Granny Apple Green 3 5/8" X 4 7/8" (2 pieces) plus scrap for die-cut
    Whisper White 3 1/2" X 4 3/4" (2 pieces) plus scrap for circle die-cut and bow

    ~~~

    November Specials!

    Current Host code is GRC9VVUU


    All online orders receive my FREE Curvy Celebrations 22 project PDF Tutorial! 

    Leave a Reply

    Your email address will not be published. Required fields are marked *


Notice: LeeAnn Greff, Independent Stampin’ Up! Demonstrator, Manager. The content of this website is my sole responsibility as an independent Stampin’ Up! demonstrator and the use of, and content of, the classes, services, or products offered on this website is not endorsed by Stampin’ Up! Copyright 2025