/


Latest Post

How to achieve the Floating Technique? Lots of examples!


Our current Team creative challenge for my Flowerbug's group is to make a card using the Floating Technique.  It's a fun technique that uses a window sheet or transparency.  

Here are some of mine I shared on a recent Facebook Live video you can see here. 

This first one features Black & White with a 'pop' of color – Magenta Madness in this case. Magenta Madness is retiring next week!   
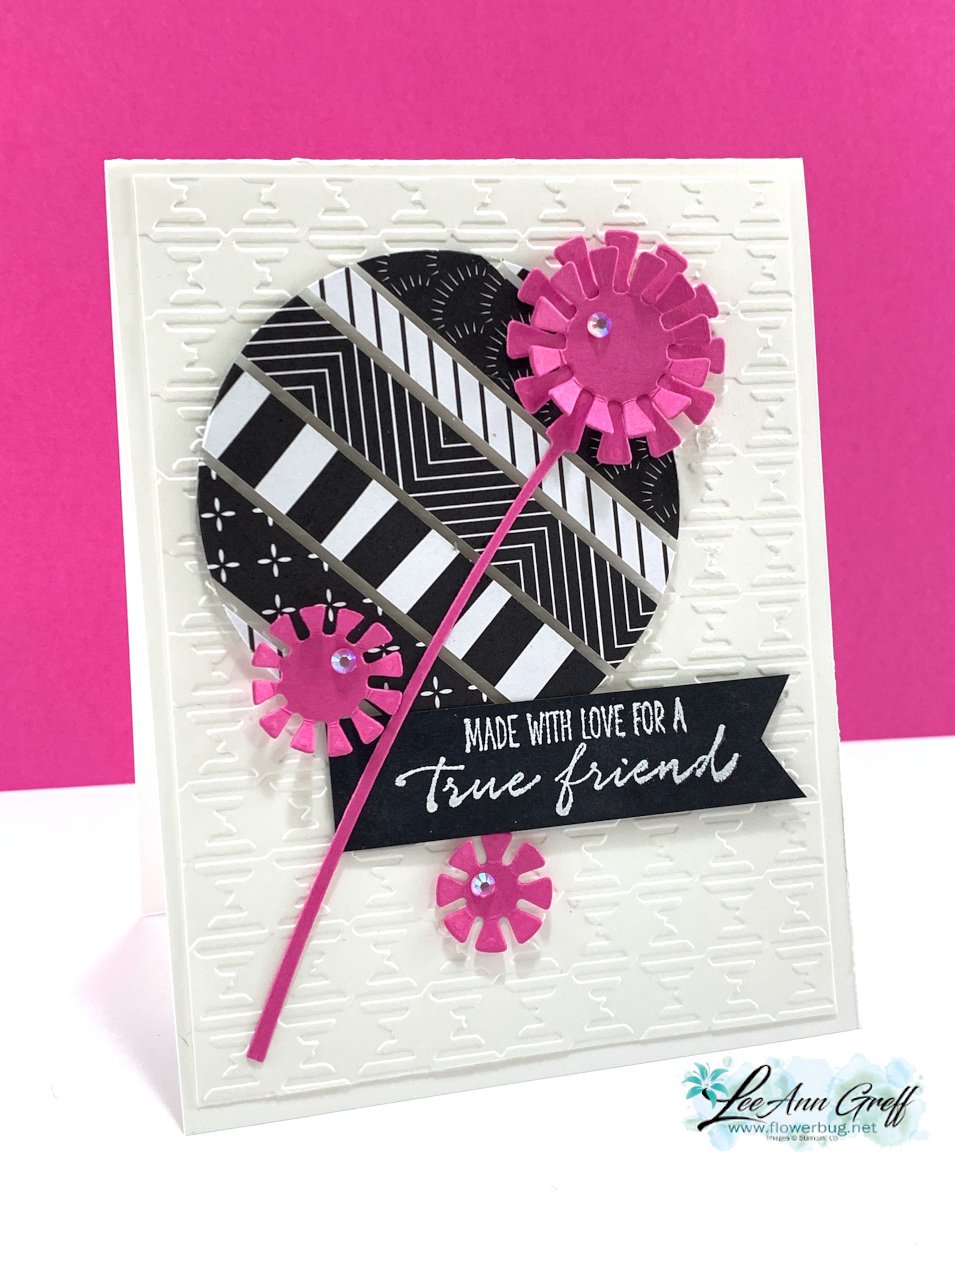
I used the Dandy Wishes dies and the Layering Circles dies here.  I adhered a bunch of strips of the All Together designer paper to a window sheet, leaving space between them.  I cut it out with the largest circle in the set and popped it up on a Gingham textured White layer. 

I added die-cuts from the neat Dandy Wishes dies and a heat embossed image from the Garden Wishes stamp set. This set is in a bundle with the Dandy Wishes dies and on sale in March!  See it here. 

This next card features Misty Moonlight and the Abstract Beauty DSP.  I cut the feathers from this pretty DSP that has touches of Gold on it using the Iconic dies seen here.  
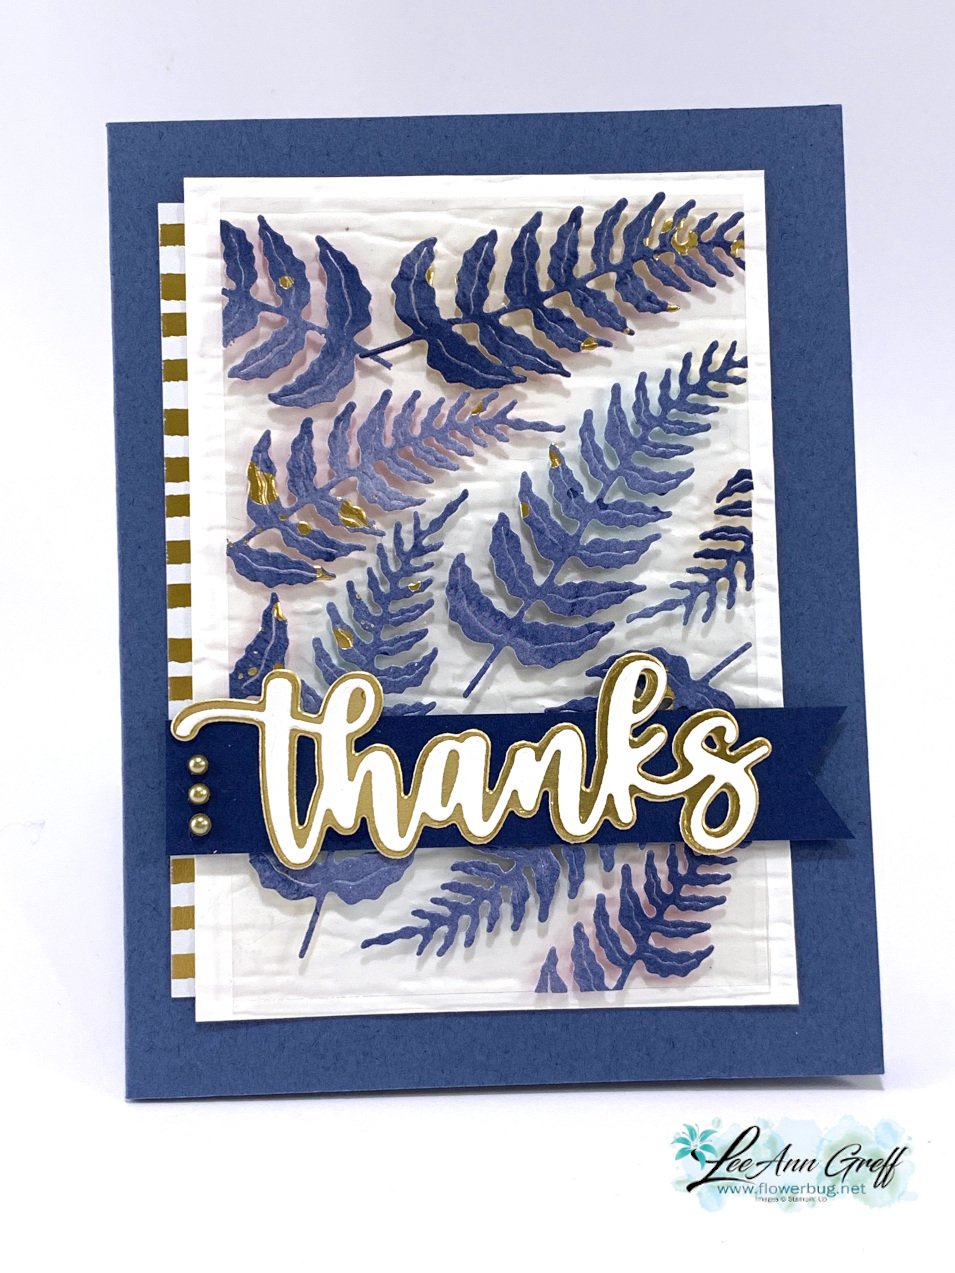
For this card the window sheet is a simple rectangle.  After adding the feathers I trimmed off the excess and added it to the card with mini dimensionals.  

Other details: 

  • the greeting die-cuts are the Amazing Thanks dies seen here.
  • The textured White layer is done with the Bark 3D embossing folder.
  • That strip of gold & white strips is also from the Abstract Beauty DSP. 
  • Colors are Gold, White, Misty Moonlight and Night of Navy

Next is a card done in purples – Fresh Freesia, Highland Heather & Gorgeous Grape.  
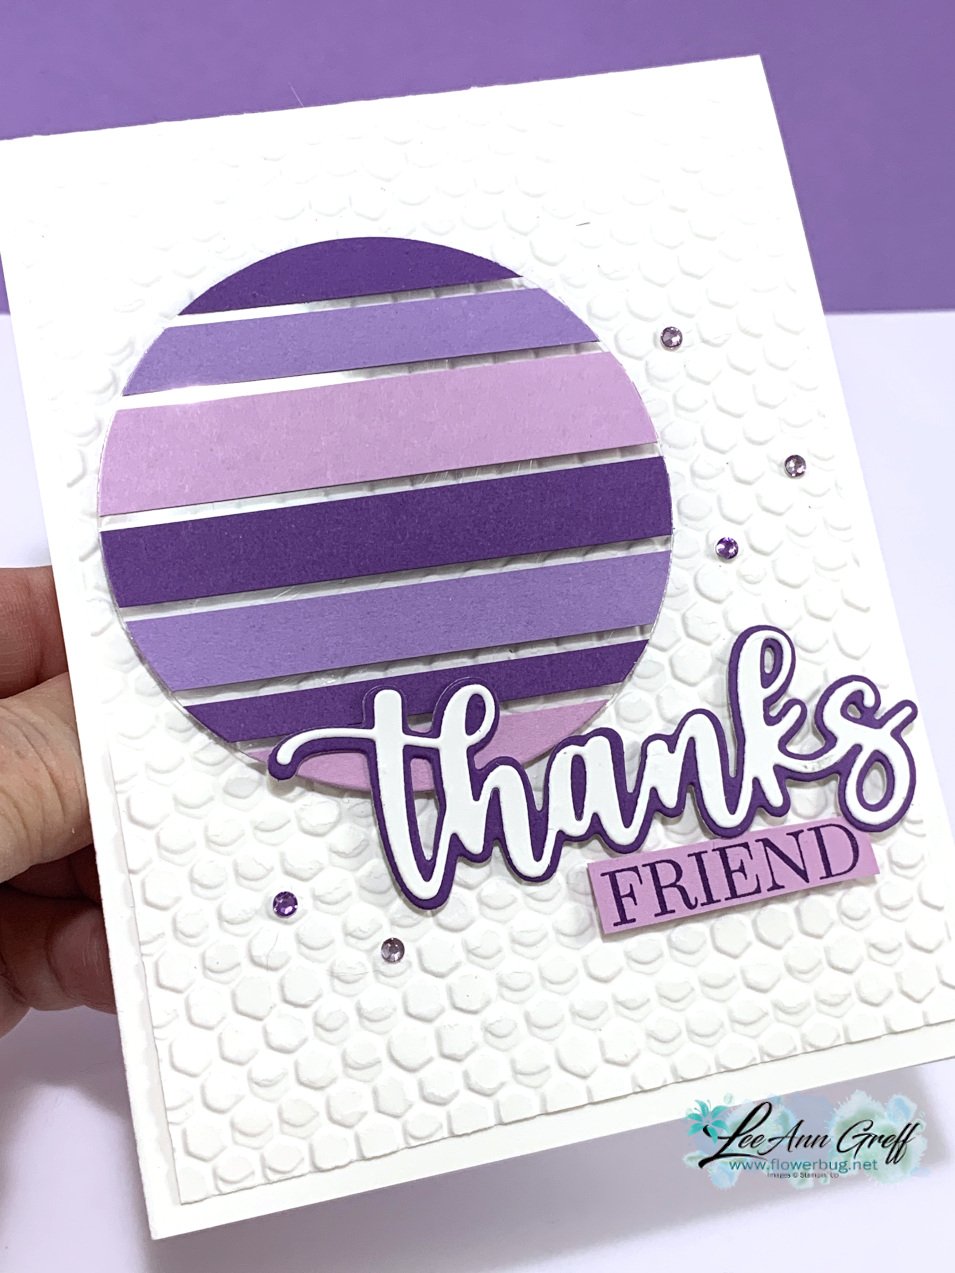
Details:

  • Layering Circle & Amazing Thanks dies
  • Greeting stamped from Special Moments SAB set
  • Texture is Hive 3D folder seen here 
  • Basic Rhinestone jewels were colored purple with Blends markers 

This next sample features the Artistic dies along with the SAB Simply Marbelous DSP. 

Colors are Basic Gray, White & Black; very monochromatic.  The greeting is from Friendly Hello SAB set, heat embossed.  

Tip; to adhere the finely cut die-cut pieces I used our Adhesive Sheets seen here.  They're the best solution for these types of die-cuts. 

You can see how I achieved these cards on the link below; just click on the photo to watch. 

~~~

March Specials: 

Host codes: FS239K9C

 *click here to order 

If your order is over $50 you'll receive a free embellishment

from the Jan-June catalog in your thank you card.

Annual Catalog Retiring List is out March 23rd!  Deep discounts coming! 

Don't forget about my loyalty rewards! 

Click here to download yours and earn a $50 shopping spree!  
All Posts

  • Lovely & Beautiful fancy fold card swap with measurements


    Kim made this amazing card for our April Team swap:

    She combined new and current products for this beautiful card cased from Karen Hadler. That beautiful textured flower is from an upcoming bundle called Opulent Oasis. It includes a new die that textures; it’s called Textured Impression dies. I’ll share more details on this new product soon. It will be released on May 5th in the 2026 May-August catalog.

    The designer paper is called Lovely & Beautiful and can be seen here. The pretty leaf die-cut is from the Nature’s Symphony dies.
    Here’s how it looks once opened:

    So many layers!! The card stock colors include Old Olive, Petal Pink and Fresh Freesia.

    Measurements:

    – Olive card base 11″ X 4 1/4″ score at 2 3/4″ & 5 1/2″, second piece – 9″ X 3 34″ scored at 3″ & 6″
    – Petal Pink layers 2 1/2″ X 4″ and 5 1/4″ X 4″ on the large piece. 3 pieces at 2 3/4″ X 3 1/2″ on the shorter piece
    – DSP 1 1/4″ X 3 3/4″ and 5″ X 3 3/4″ on the large piece. 2 pieces at 2 1/2″ X 3 1/4″ on the shorter piece
    – Fresh Freesia 2 1/2″ X 3 1/4″

    I hope you enjoyed seeing her gorgeous card. More swaps soon!

    April Specials:

    Check out the Last Chance list here; these items go fast!

    Product of the Month is the Eyelet Blooms dies

    *Get a free 12 project tutorial when you redeem this POM from me!

    ~~~

    Free PDF tutorial featuring the Delicate Whispers suite!

    Leave a Reply

    Your email address will not be published. Required fields are marked *

  • Three pretty swap cards with great layouts


    Our Team swap theme was nature or animals this month. I’m sharing three pretty cards I think you’ll want to case.

    First is a card made by Jonna who is featuring the Nature’s Symphony suite.

    She used the Nature’s Symphony stamp set and the Nature’s Walk designer paper here. I love the layout so much! Adding your greeting strip across the front is a fantastic way to break up the large layers.
    Her colors include Pretty Peacock and White.

    Measurements are as follows:

    – Cloud Cover card base 8 1/2″ X 5 1/2″ score at 4 1/4″
    – Pretty Peacock large layer 5 3/8″ X 4 3/8″, small layer 3″ X 4 1/4″, strip 4 1/8″ X 1″, inside is 4 1/8″ X 5 3/8″
    – White 2 3/4″ X 4″, inside 4″ X 5 1/4″
    – DSP 4″ X 5 1/4″

    Inks used: Pretty Peacock and White Craft ink.

    The next card is made by Tracey who used a new to me’ tearing technique on her pretty card:

    She used the Floral Charm designer paper. Actually it’s just one sheet and measured 3″ X 4″ before she tore it. The technique she used is called ‘Rip & Flip’. You tear the lower half off and flip it to reveal the other side. Slide the torn piece under the upper portion to hide the ‘cut’ side. So cool!

    Look at the ribbon above the greeting circle. She formed loops of Berry Burst 1/4″ shiny ribbon and adhered it underneath the flowers and greeting. So smart and unique!
    The colored and die-cut flowers are from the Extraordinary Flora bundle seen here.

    Measurements:

    – Pretty Peacock card base 5 1/2″ X 8 1/2″ score at 4 1/4″
    – Berry Burst 4 1/4″ X 3 1/4″
    – DSP 4″ X 3″
    – White circle die-cut

    Lastly is Candy’s card featuring the Nature’s Symphony stamp set with a neat technique:

    She cased this technique from Kim Quade. She created a window with the Stylish Shapes dies and another piece of paper. She used Blending Brushes inside the window for the soft, multicolored look and stamped the leaves before removing her mask.

    Her ink colors include Balmy Blue, Daffodil Delight and Fresh Freesia. She stamped the images with Secret Sea. Beautifully done!

    I’ll share more swap cards tomorrow.

    April Specials:

    Check out the Last Chance list here; these items go fast!

    Product of the Month is the Eyelet Blooms dies

    *Get a free 12 project tutorial when you redeem this POM from me!

    ~~~

    Free PDF tutorial featuring the Delicate Whispers suite!

    Leave a Reply

    Your email address will not be published. Required fields are marked *

  • New Catalog Open House & BOGO is Saturday! NEW product shares are up!


    I hold an Open House event with each new catalog release by Stampin’ Up! It’s a wonderful time to gather my friends and customers together and to get the new catalog in their hands. They’re always excited about these because I make a BIG DEAL over the event.

    I love to show off our new products with displays and samples. I gather door prizes, free cards to give with orders, door prizes and an array of yummy food.

    It’s Saturday at my home studio from 11:30 – 1:30 pm and will include a BOGO this time.

    It shocks most people when they hear this, but I do not keep any of my Stampin’ Up! products from year to year. I just don’t have time to use it. So I price my retired products and put them in my garage for the sale. For each dollar you spend on my retired products you can pick out NEW items for free! Basically they are getting either one for FREE. It’s a wonderful deal for them and I can clear out my stash to make room for more. Win, win!!

    If you’re near me in Minot, ND I hope you’ll come to the event. Even though I hold multiple card clubs each month I have lots of customers I only see a few times a year. It’s so neat to watch my gals gather together & catch up. I love it!

    I’m also offering my Designer Paper and Embellishment shares to locals and long distance customers!

    I know many who like to get a sampling of everything so they know what they want to order more of. It’s a great way to go. There’s nothing like seeing the new products in person!

    Reserve your DSP share here. It includes 65 sheets of 12 different papers from the 2026 May-August catalog; all in 6 X 6″ size. You can double your share and get all but one in 6″ X 12″ size. Click here to reserve a double share.

    Details:

    – This share includes all NEW papers in the summer catalog; not any Online Exclusives.
    – The shares will be ordered and filled in order of purchase. It may take up to 2 or more weeks to receive them.
    – if products become unavailable I may wait to ship the share until all are available.
    – This share includes a printed list of card stock/paper colors in each designer paper.
    – it does include 6 specialty papers. It does not include the Luxe White or Everyday Essentials Mix & Match DSP.

    Here are the details on my new Embellishment share:

    There are 8 different gems included in this share. You’ll receive a portion of each with a total of 186 different embellishments! All are shown above except the Loose Anchor trinkets. There will be 3 of those included in the share.
    *You can double this share if you’d like.

    The cost is $15 for locals (add $4 for shipping). No additional shipping is needed if you add this on to your DSP share above; I’ll combine shipping.

    Reserve your embellishment share here.

    Get both! You can opt in and get both shares here.

    Leave a Reply

    Your email address will not be published. Required fields are marked *


Notice: LeeAnn Greff, Independent Stampin’ Up! Demonstrator, Manager. The content of this website is my sole responsibility as an independent Stampin’ Up! demonstrator and the use of, and content of, the classes, services, or products offered on this website is not endorsed by Stampin’ Up! Copyright 2025