/


Latest Post

3 FUN ways to use Window Sheets – check out these Team swaps!


Our swap theme for our Flowerbug's Team was to feature either Window Sheets or Vellum on their cards.  The cards were amazing; as usual! 

Today we're focusing on Window Sheets. 

First is a special card made by Lori.  She used the Window Sheet as her card base!  I'm not sure I've ever seen that before…

She used the Cup of Tea bundle and the newest In Colors on her card.  Orchid Oasis, Parakeet Party & Sweet Sorbet.  

She used the Stitched Rectangle dies for her front 'frame'. It measures 3" X 4 3/8" at the largest. She made two frames; one for the front and one for the inside. The die-cut tea cup is also positioned on the front and the back of the front.  

She added a folded White layer inside that opens up.  It's 3 3/8" X 4" folded in half.  

Then on the very back she added a piece of the Tea Boutique DSP that measures 3" X 4 1/4".  Such a unique card!  

~~~

This next card was made by Ginny.  She used the Dandy Designs DSP for her card front.  It's almost monochromatic but there is a bit of Pear Pizzazz and Black too. So pretty!!


She added a window sheet to bridge the upper and lower layers of the card front.  You can see the greeting through the window sheet.  Her greeting and the pretty floral die-cut is from the Framed Florets bundle.  

Measurements:

  • Card base 4 1/4" X 6 3/4" scored at 5 1/2". Lower card stock layer is 4 1/4" X 3".
  • DSP is 4" X 1" and 4" X 2 3/4"
  • Window sheet is 4" X 2 1/4"

~~~

This next card was made by Paula.  She created a window from her DSP layer, adding Window Sheet behind it and a die-cut flower from the Framed Florets bundle in front. 

The Designer Paper is called Design a Daydream; it's in the annual catalog and is a big 48 pack for just $18.  You can earn it once your order is over $150 with host benefits. 

I love her wrap of linen thread with a tiny little bow as accent. 

Measurements:

  • Soft Sea Foam card base 4 1/4" X 11" scored at 5 1/2"
  • Pear Pizzazz 4" X 5 1/4"
  • DSP 3 3/4" X 5"
  • Window sheet 3" for the circle opening which is 2 1/2" 

~~~

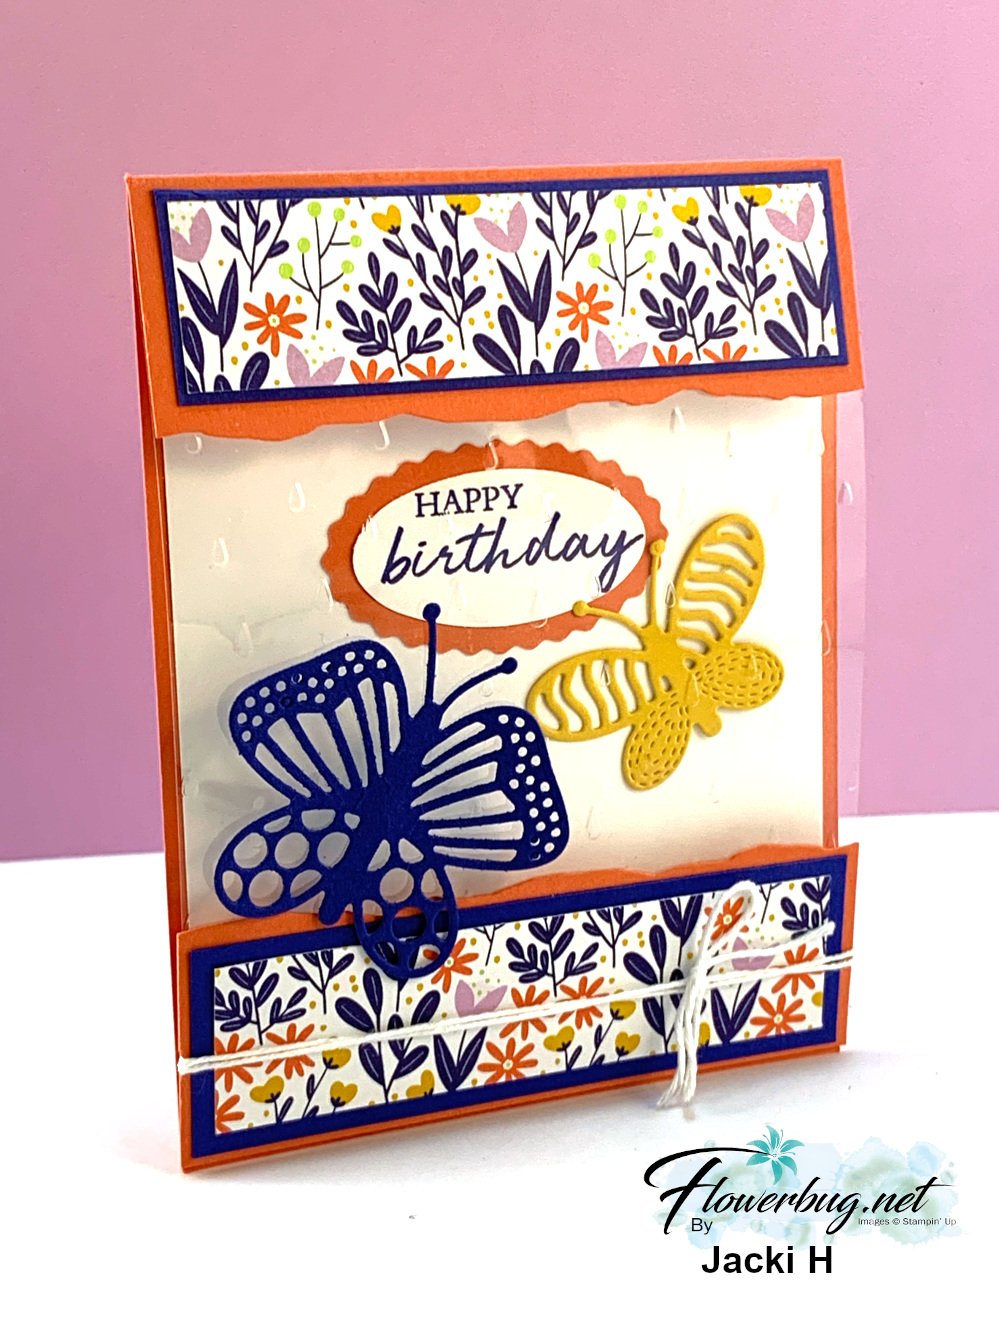
Next is a cute & colorful card that really shows off our Window Sheets! 

Jackie made a type of bridge card where the window sheet allows you to see the inside layer from the front.  

She is featuring the Butterfly Kisses suite here – the Butterfly Kisses 6" DSP and the Build a Butterfly dies

Her window sheet is 4 1/4" X 5 1/2" and she textured it with the Raindrops embossing folder from the Spring Catalog.  The lower layers are added to the base. 

Her colors include Calypso Coral, Starry Sky & Crushed Curry. The curvy borders are done with the Seaside Bay dies. Neat effect!  

She added the greeting inside the card with the Double Oval punch seen here; it's a big favorite of mine that I had wished for.  

Measurements:

  • Card base 4 1/4" X 7", scored at 5 1/2".  Second Calypso Coral layer for the bottom front is 4 1/4" X 1 1/2"
  • DSP layers are 3 7/8" X 1"
  • Starry Night layers are 4 1/8" X 1 1/4" 

Stay tuned for more swaps soon! 

~~~

February specials:

February Host code links:

  CNV2VCBT or 7EUM6NB9 

Get free Pastel Sequins with online orders over $55 when using the host code above!

 Earn free products with my loyalty rewards! 

Click here to download yours and earn a $50 shopping spree!

~~~

Best Deal Ever on the Starter kit here!

Choose $175 in products for just $129 plus the new mini machine!

Or choose $175 for $99 without a new Mini.  AMAZING!

All Posts

  • Ornate Thanks & Ornate Borders with a clever fun fold idea


    I shared these two pretty cards on my Facebook Live last Tuesday. (Click here to see my page.)  I made another version using the Best Dressed designer paper.  I'll share those tomorrow. 

    They are made from a standard 5 1/2" X 8 1/2" piece of card stock but you add a second score to it.  It's scored on the long side at 1 1/2" and 4 1/4".

    The best part of this fun fold card is how it makes the most of your designer paper!  Each card uses one piece measuring 5 1/4" X 6".  Cut it into three pieces; the first (left) piece at 2 3/4" wide X 5 1/4" tall, the middle piece at 1 1/8" wide and the right (inside) piece at 2 1/8" X 5 1/4".

    Those three pieces add up to 6" across!  What a great way to use your designer paper! You can make 4 cards from a 12" sheet! 

    The white layer inside the card (for writing or stamping onto) is 5 1/4" X 1 3/4".  I used the To a Wild Rose stamp set for the greeting. The leaves and greeting die-cut are from the popular Painted Labels dies (now available again!!!) 

    Here's a close up view of the greeting.  It looks like I heat embossed it right?  

    I didn't but it is sparkly!  I used the Wink of Stella pen!  It's fun to trace the stamped greeting; it's large enough that it was easy to do. 

    You can find this pretty Ornate Garden specialty paper and the entire Ornate Garden suite of products here.  

    This card base is Terracotta Tile; one of our 2019-21 In Colors.  I paired it with Mint Macaron card stock.  

    I added an extra Ornate Border trim on the inside of the card too.  You might be able to spot more Wink of Stella on the designer paper and I added it to the die-cuts too.  See that pretty Terracotta Tile ribbon?  It's part of the Ornate Garden ribbon combo pack with Old Olive.  Gorgeous soft 1/4" ribbons! 

    The label and leafy die-cuts here are from the To a Wild Rose bundle seen here. 

    ~~~~

    April ordering specials:

    All online orders in April will receive my tutorial of the month; with 16 cards

    featuring the Ornate Garden products seen here.

    **Order either Ornate bundle from me and get a free 3 cards pre-cut kit! Order both and get a 6 cards kit with pdf tutorial! 

    Orders between $55 and $99 will receive a free Simple Shammy! If your order is over $150 please don't use the host code; you'll earn your own host benefits but still get a free Shammy. 

    Use this host code for April: MMM4SXSB  

    Leave a Reply

    Your email address will not be published. Required fields are marked *

  • Two days left and they’ll be gone!


    The retiring list is coming out this week Wednesday and these bright and vibrant In Colors will be gone within hours!  They're the 2018-20 In Colors seen on page 164 of the Annual Catalog. Click here to see everything available in these colors; there's a lot! 

    Be sure to order by Wednesday before they're gone!  

    I created 5 cute cards; one in each color using the Daisy Lane & Sweetly Swirled stamp sets.  These cards are going out to my family this week.  

    I used Black ink for the greetings and swirls and the In Color inks for the daisy. The Medium Daisy punch is part of a bundle with the Daisy Lane stamp set seen here. Remember that it will not be available as a bundle after May, 2020. Even if both items return in the next catalog, bundles always retire from one catalog to the next. 

    Here's the Lovely Lipstick version: 

    Details:
    Main cards 5 1/2" X 8 1/2"
    Black 3 1/2" X 4 1/2"
    White 3 1/4" square plus 3/4" strips for greetings
    In Color DSP 1" X 3 1/4"


    Products used:

    Sweetly Swirled & Daisy Lane stamp sets, Retiring 2018-20 In colors plus Black ink, Daisy punch, Faceted gems, In Color ribbons & In Color enamel dots

    See the Retiring In Color items here while supplies last! 

    ~~~~

    April ordering specials:

    All online orders in April will receive my tutorial of the month; with 16 cards

    featuring the Ornate Garden products seen here.

    **Order either Ornate bundle from me and get a free 3 cards pre-cut kit! Order both and get a 6 cards kit with pdf tutorial! 

    Orders over $55 will receive a free Simple Shammy!

    Use this host code for April if your order is under $150.  If it's over you'll get host benefits!

     MMM4SXSB  

    Leave a Reply

    Your email address will not be published. Required fields are marked *

  • Best Dressed FB Live cards


    I made these 3 pretty cards during my weekly 'Stamp with Me' Facebook Live last night.  

    Each Thursday at 8 pm CT we'll finish 3 cards together in about 30 minutes.   Prep your pieces ahead of time using the measurements I provide and you'll be surprised how quickly you can make your cards!  Join me here: 

    I used the Best Dressed Designer paper seen here but you can substitute other paper, colors, stamps and punches. The stamped greetings are from the Peaceful Moments set here. I use this stamp set so much; the sentiments are wonderful.

    After the video many people share their finished cards. It's so fun to see what products everyone uses and how similar (or not) they are to mine. 

    Here are the details and close up views of these three cards: 

    Old Olive 5 1/2" X 8 1/2", Best Dressed DSP is 4" X 3", Lovely Lipstick is 4 1/4" X 3 1/4", White strip is 3/4" X 4 1/4".  A fast, easy card. 

    Purple Posy 4 1/4" X 8 1/2" scored at 5 1/2", Mint Macaron 3 1/4" X 8 1/2" scored at 4 1/4", yellow DSP is 4" X 2 3/4", floral DSP is 3" X 4", Stitched So Sweetly die-cut in White, 2 1/4" Mint circle, punched butterflies , Mint 1/8" ribbon

    • Purple Posy 4 1/4" X 9 3/4" scored at 5 1/2", DSP is 4" square, Detailed Band die-cut (see it here) in Purple Posy (Or use a border and any punch or die-cut)

    ~~~~

    April ordering specials:

    ~~~

    All online orders in April will receive my tutorial of the month; with 16 cards

    featuring the Ornate Garden products seen here.

    **Order either Ornate bundle from me and get a free 3 cards pre-cut kit! Order both and get a 6 cards kit with pdf tutorial! 


    Leave a Reply

    Your email address will not be published. Required fields are marked *


Notice: LeeAnn Greff, Independent Stampin’ Up! Demonstrator, Manager. The content of this website is my sole responsibility as an independent Stampin’ Up! demonstrator and the use of, and content of, the classes, services, or products offered on this website is not endorsed by Stampin’ Up! Copyright 2025