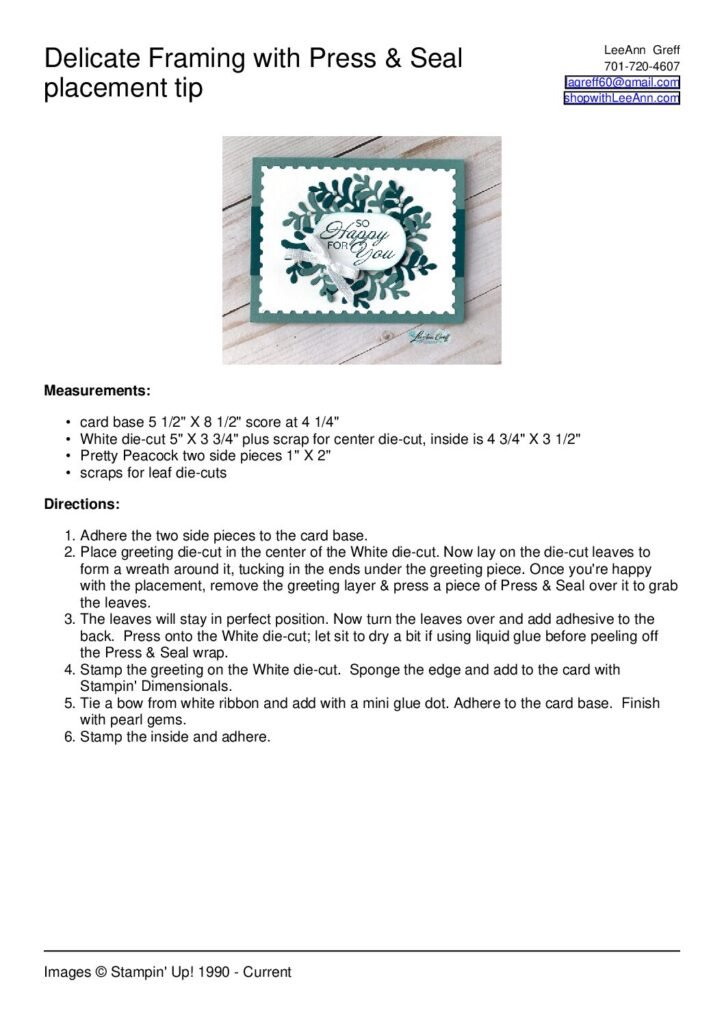
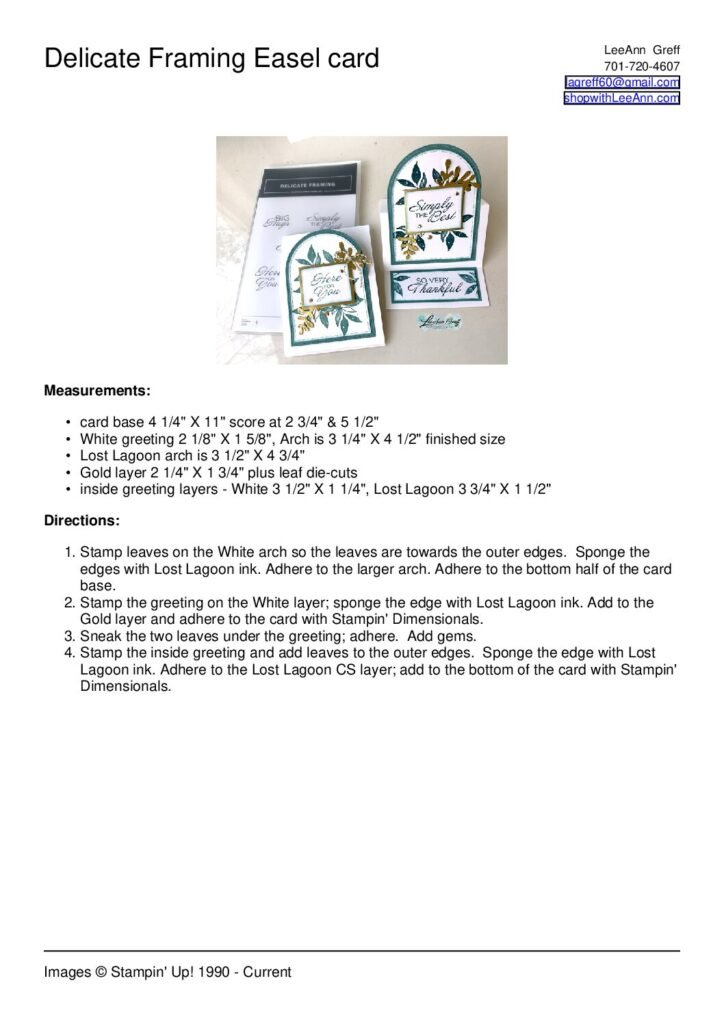
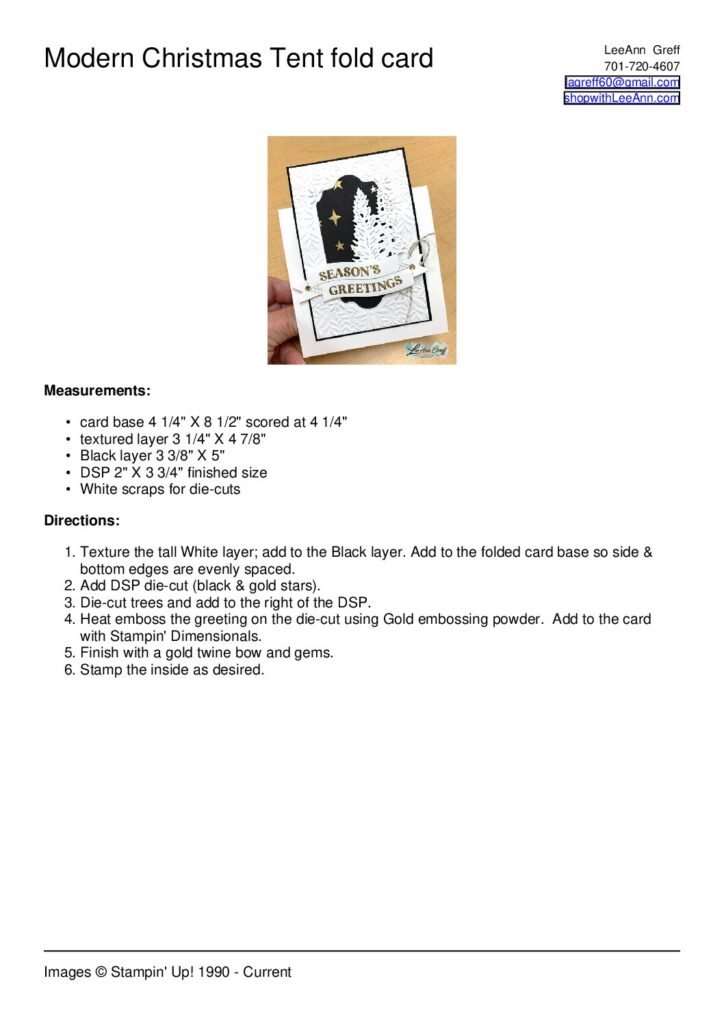
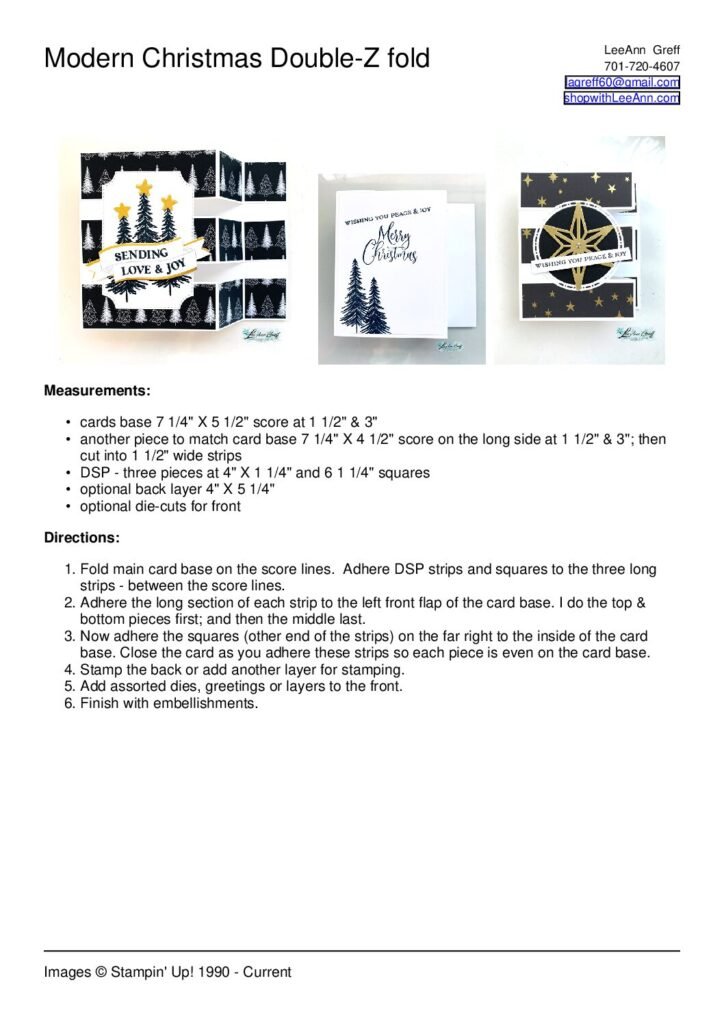
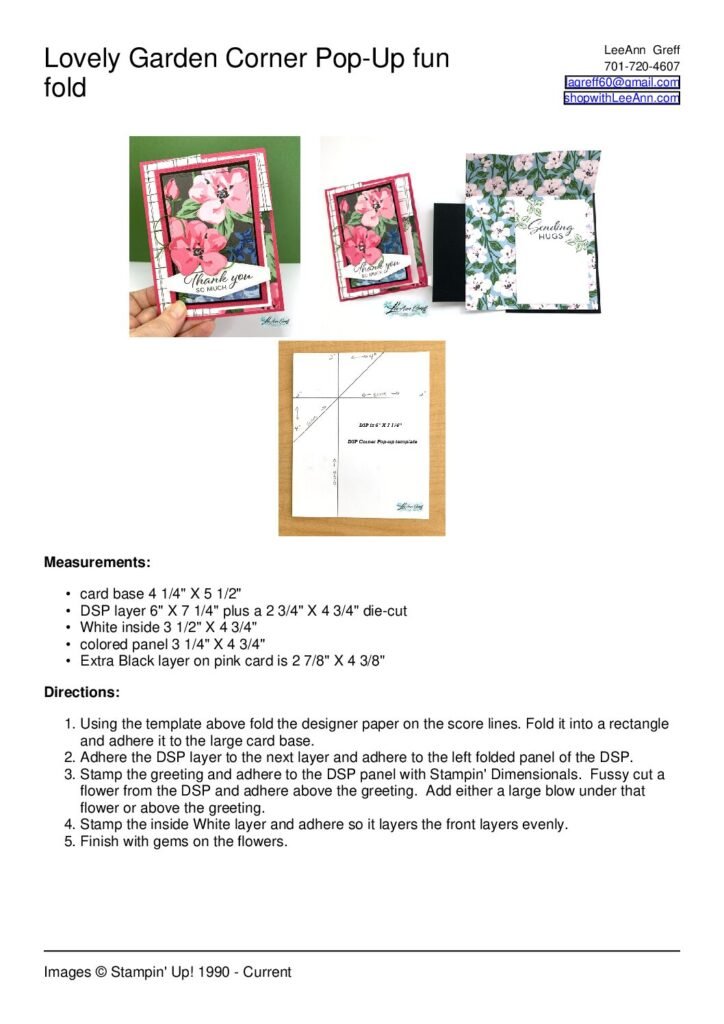
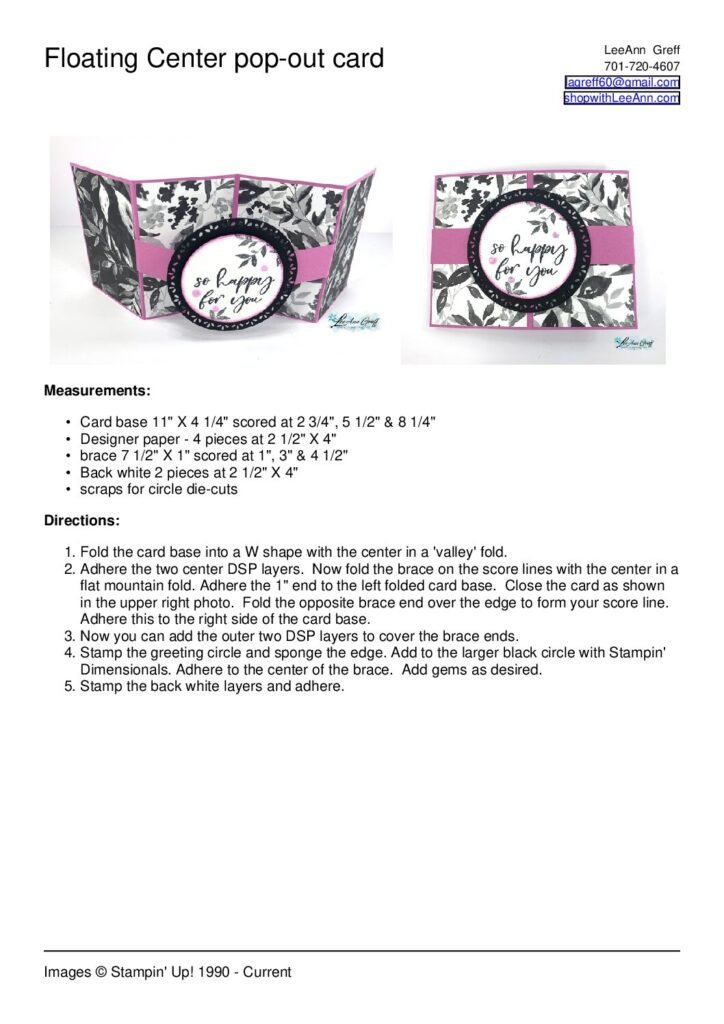
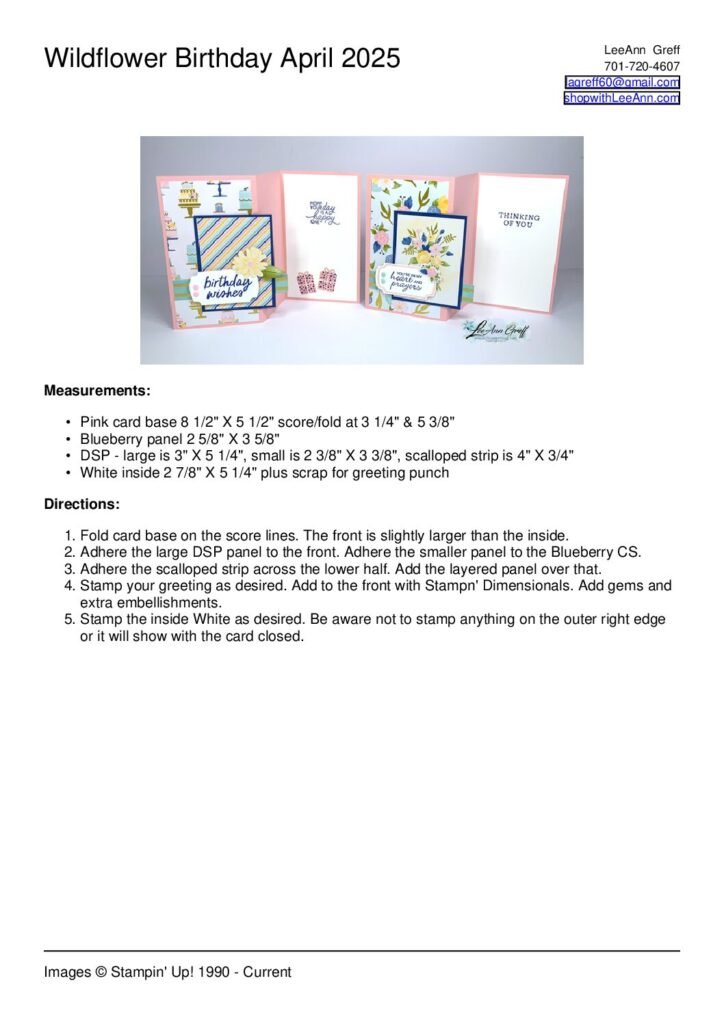
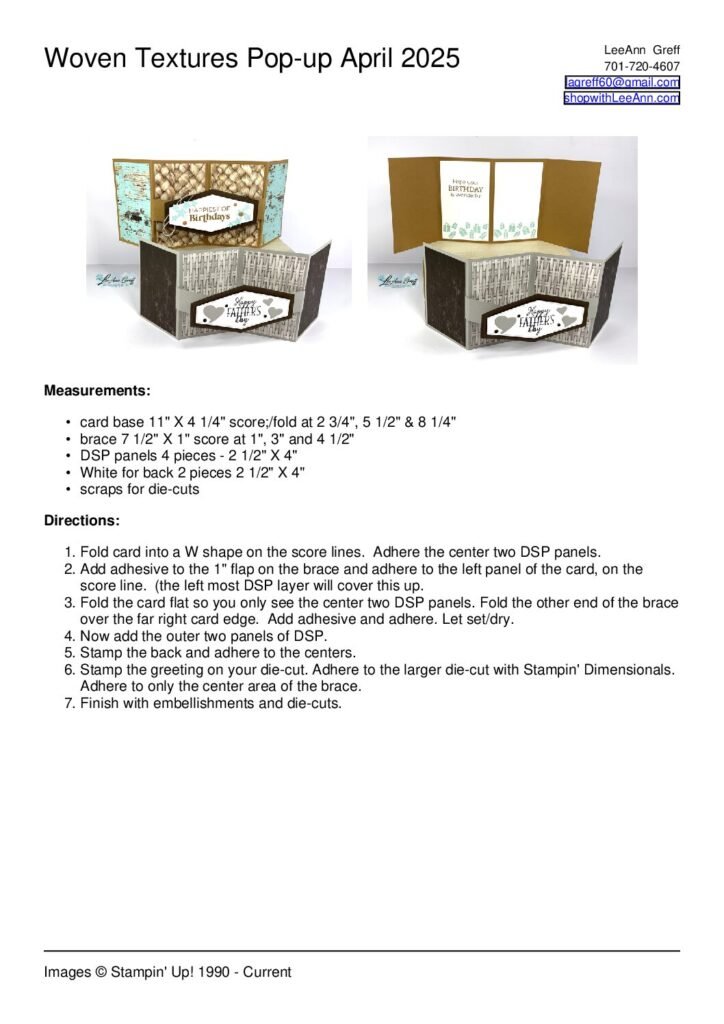
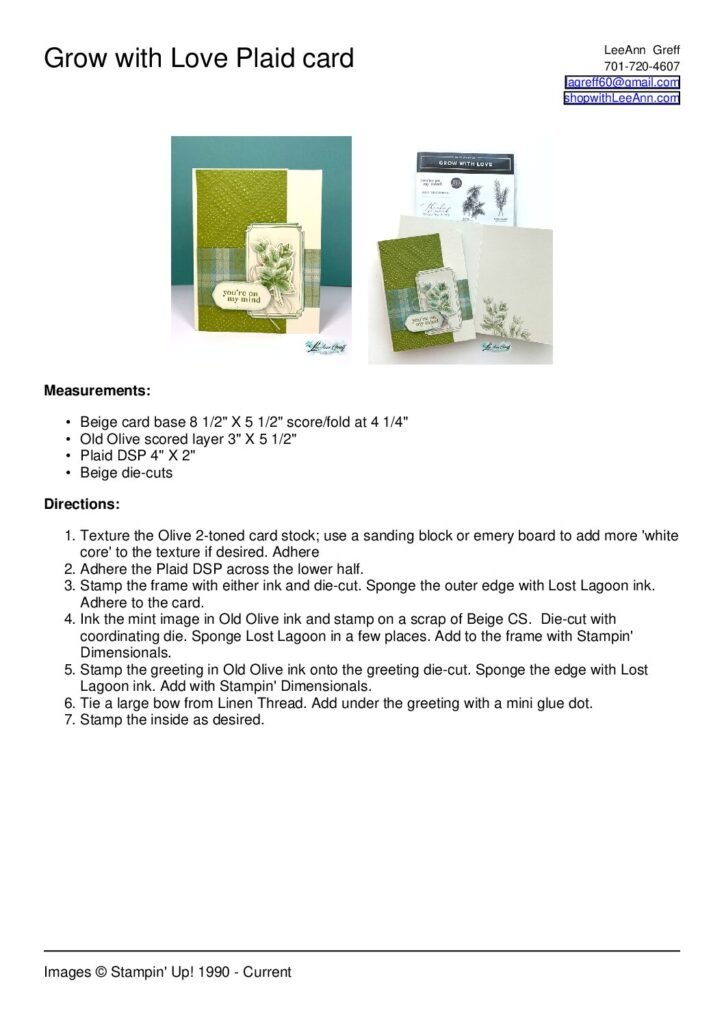
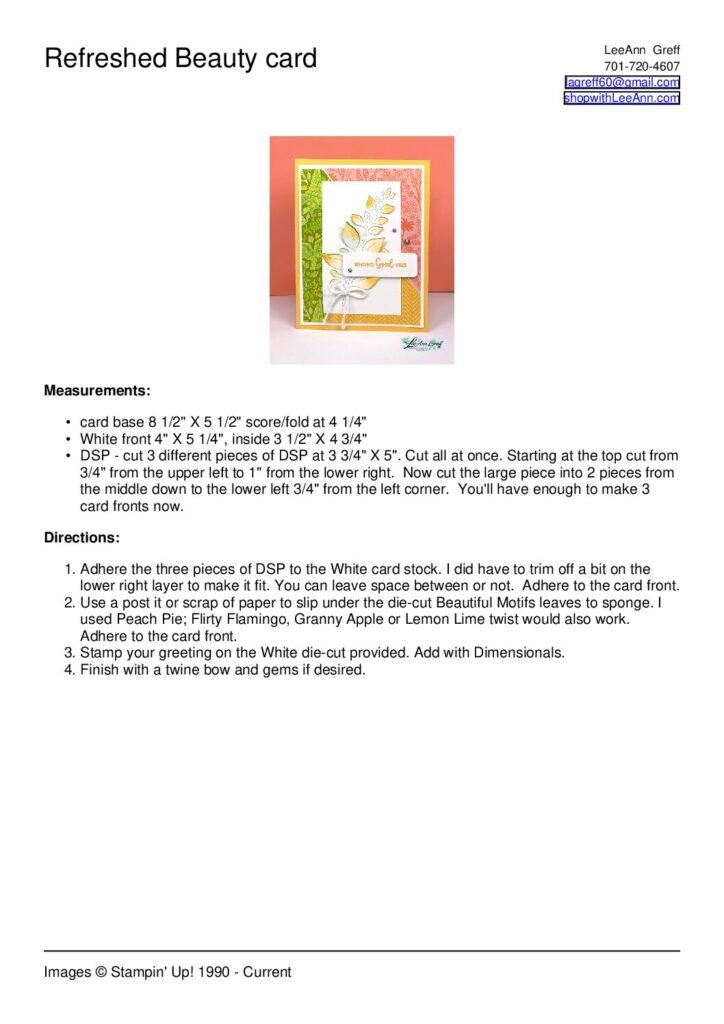
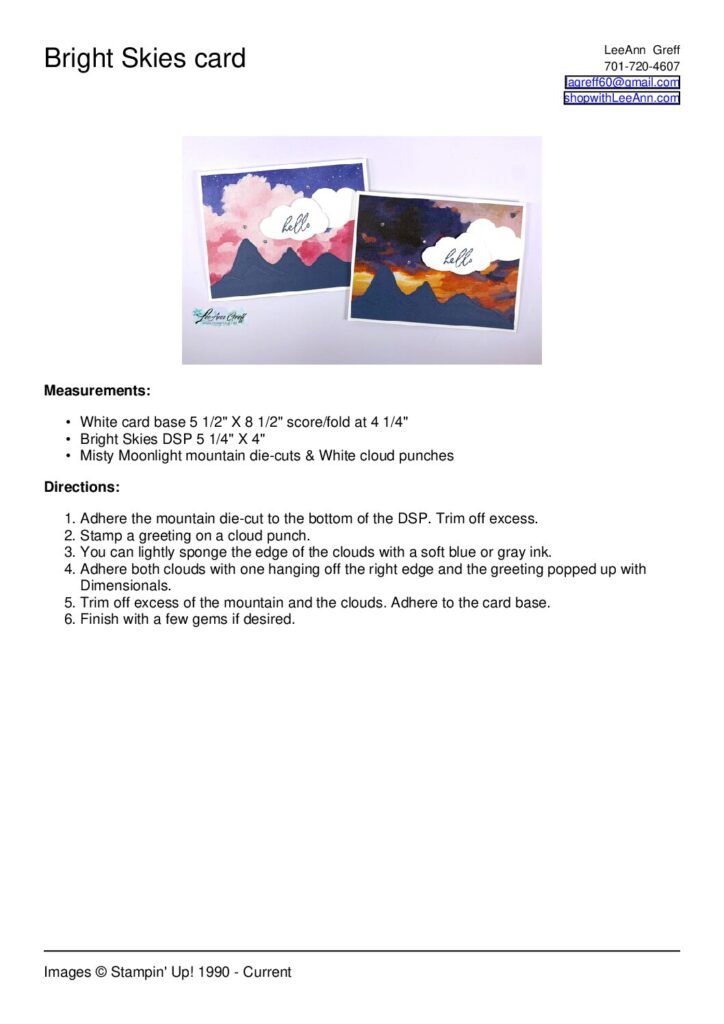
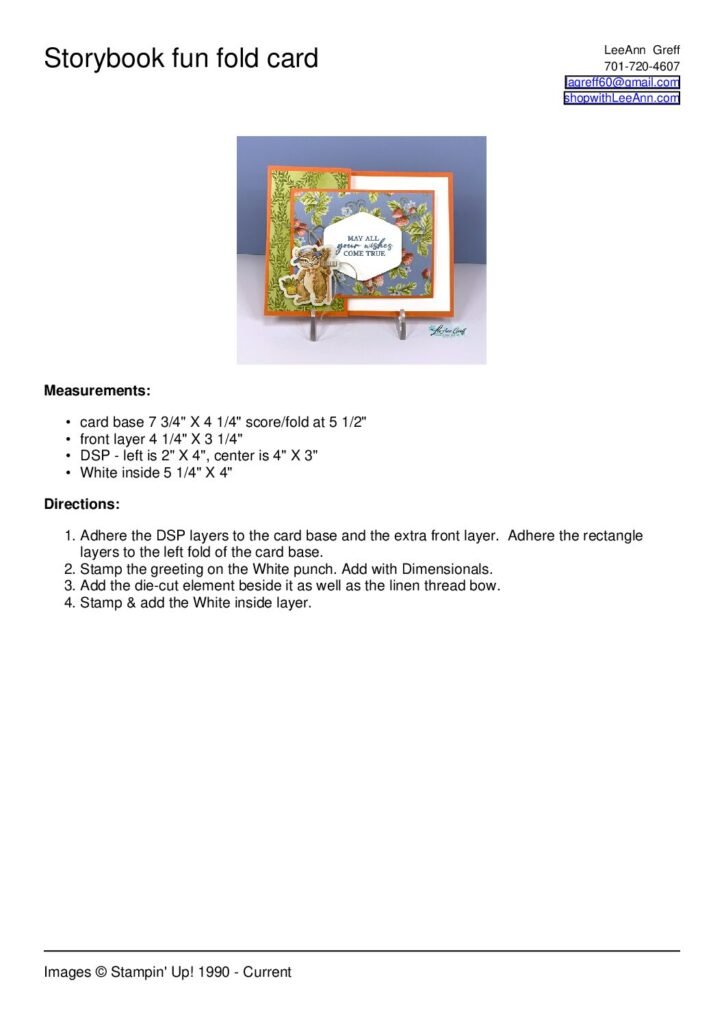
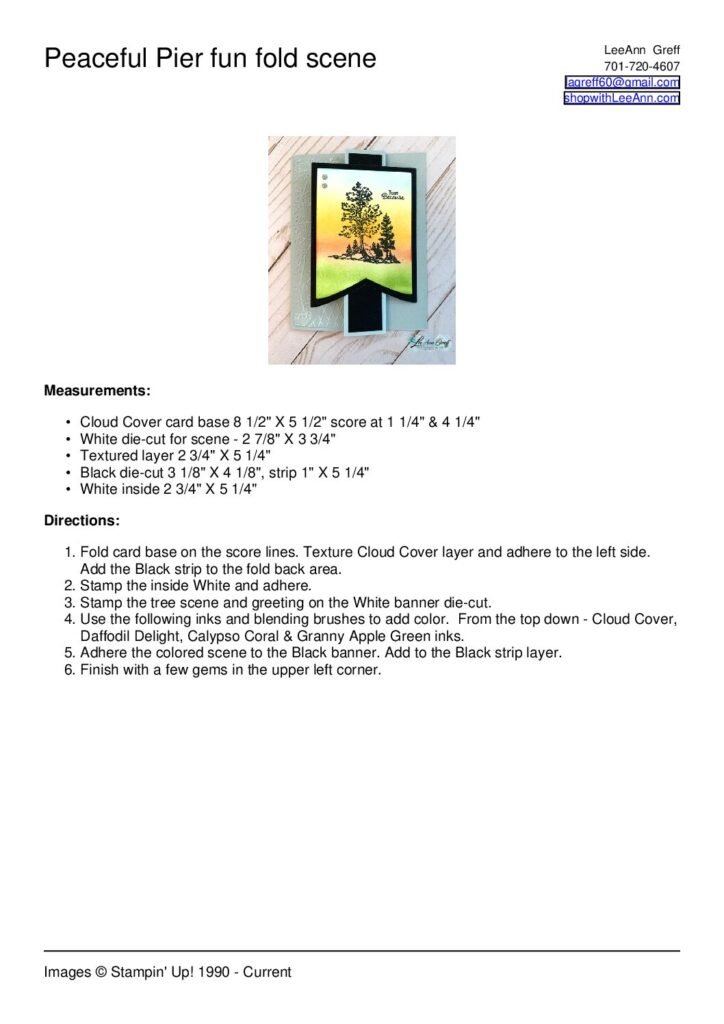
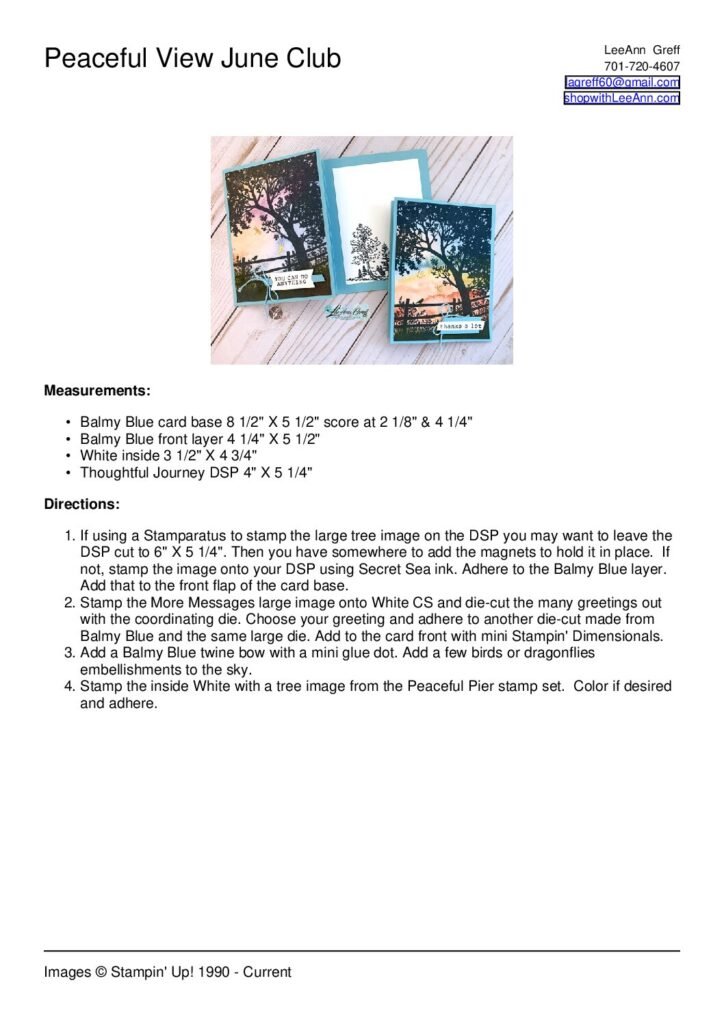
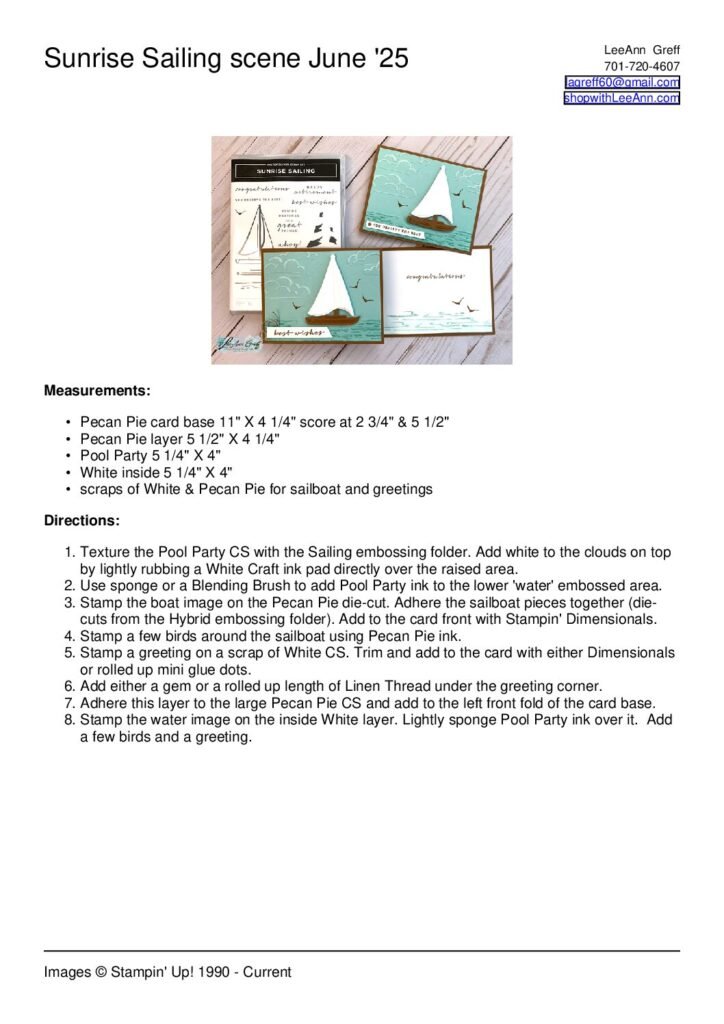
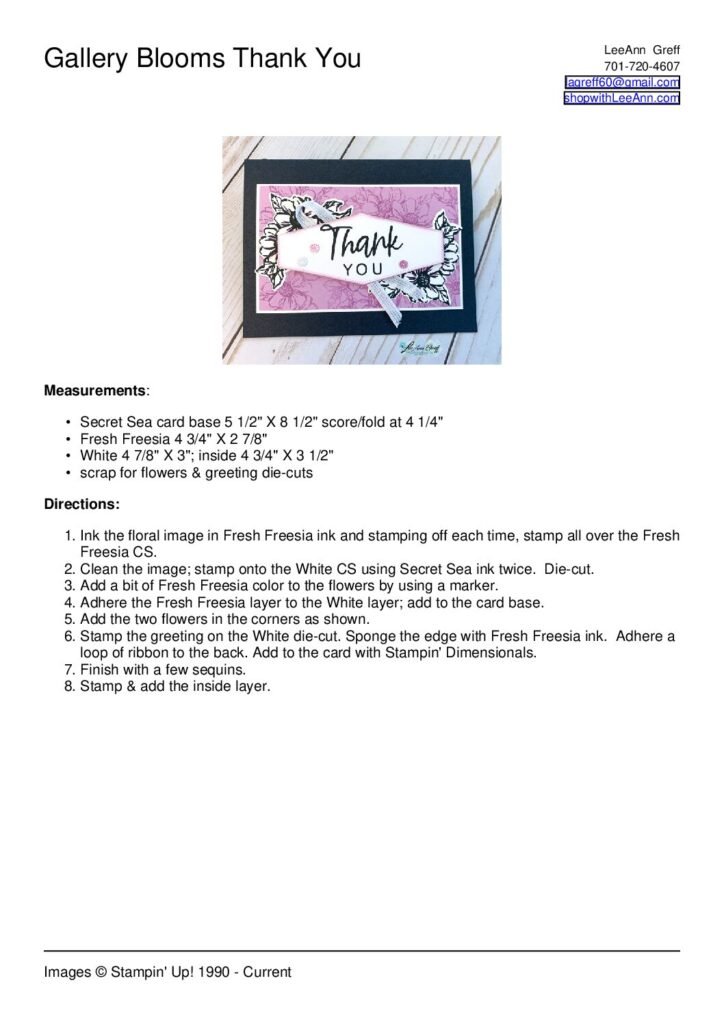
![]() CatFolders
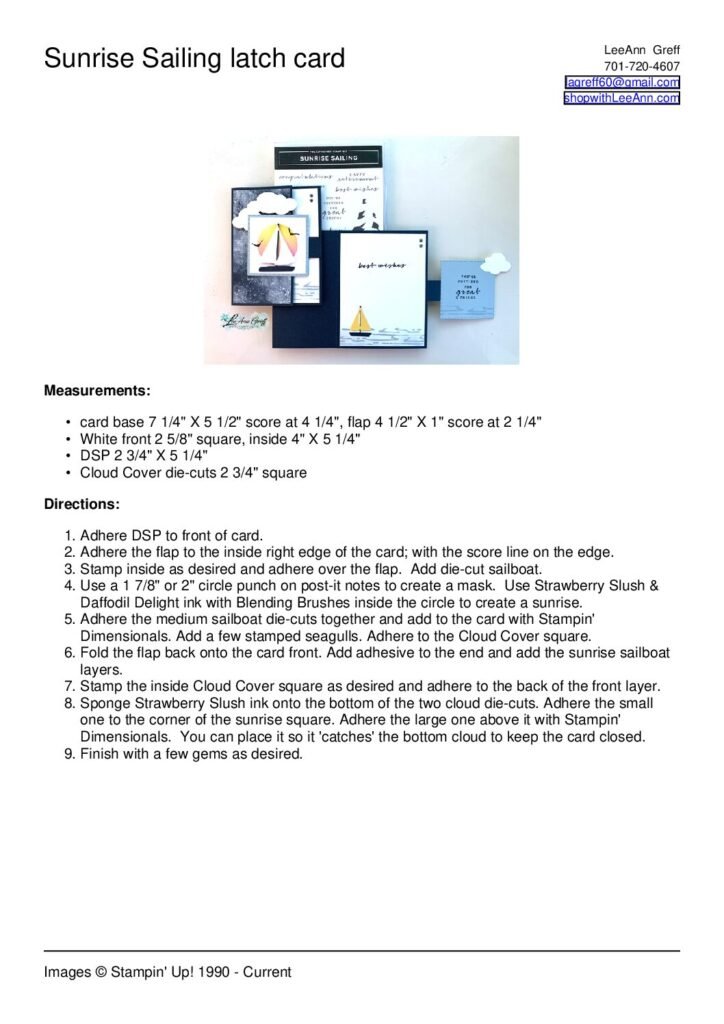
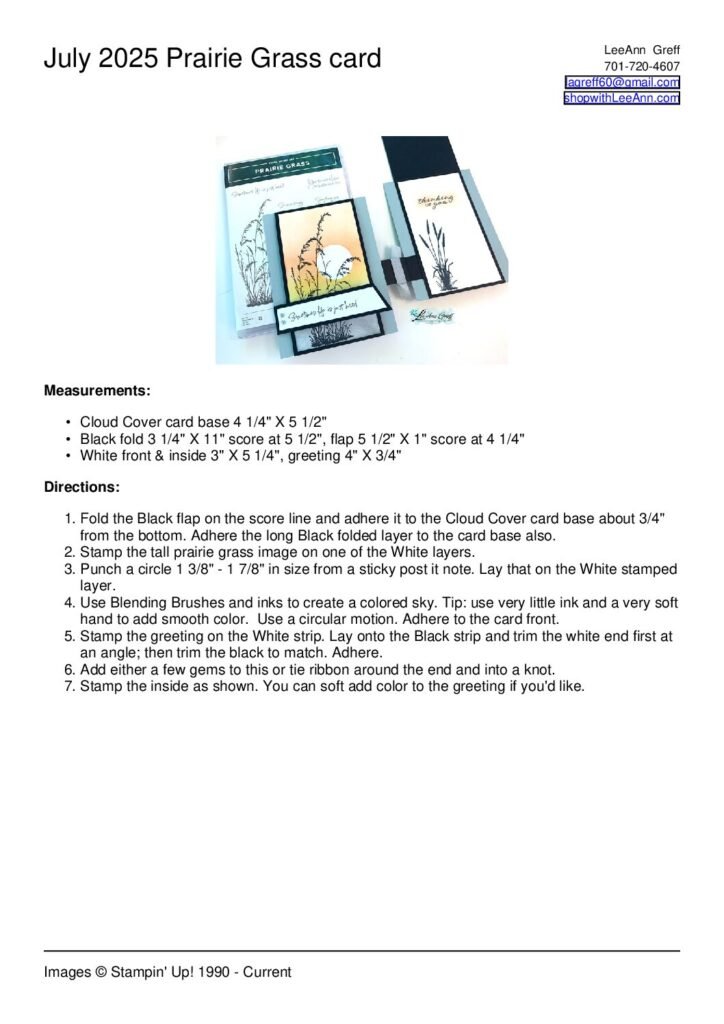
CatFolders
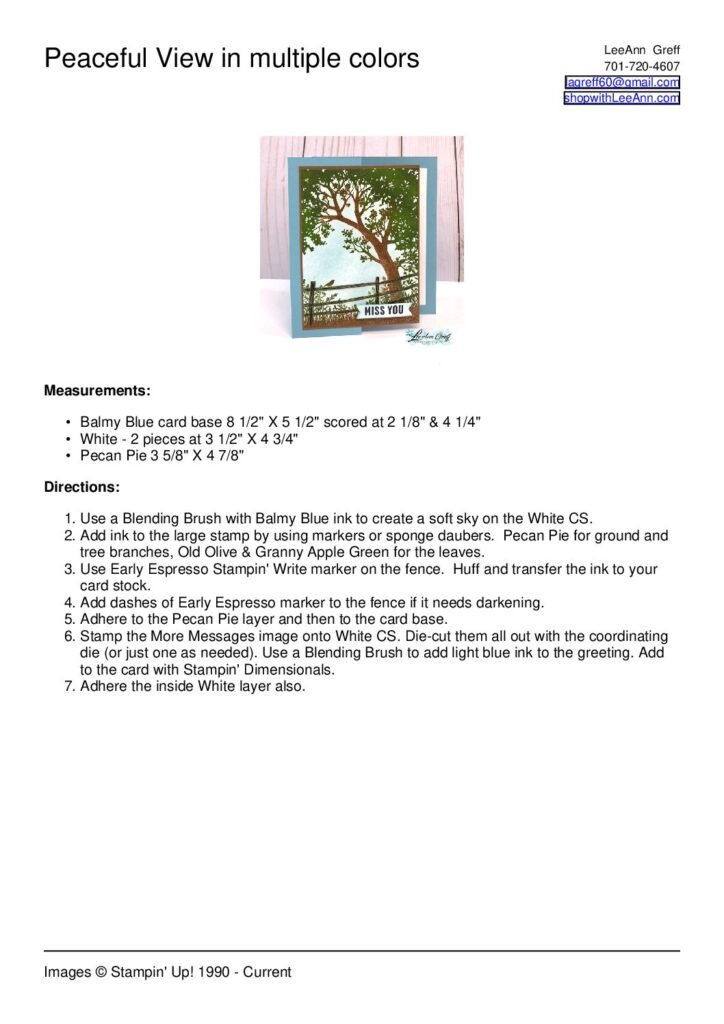
| Image | Title | Updated |
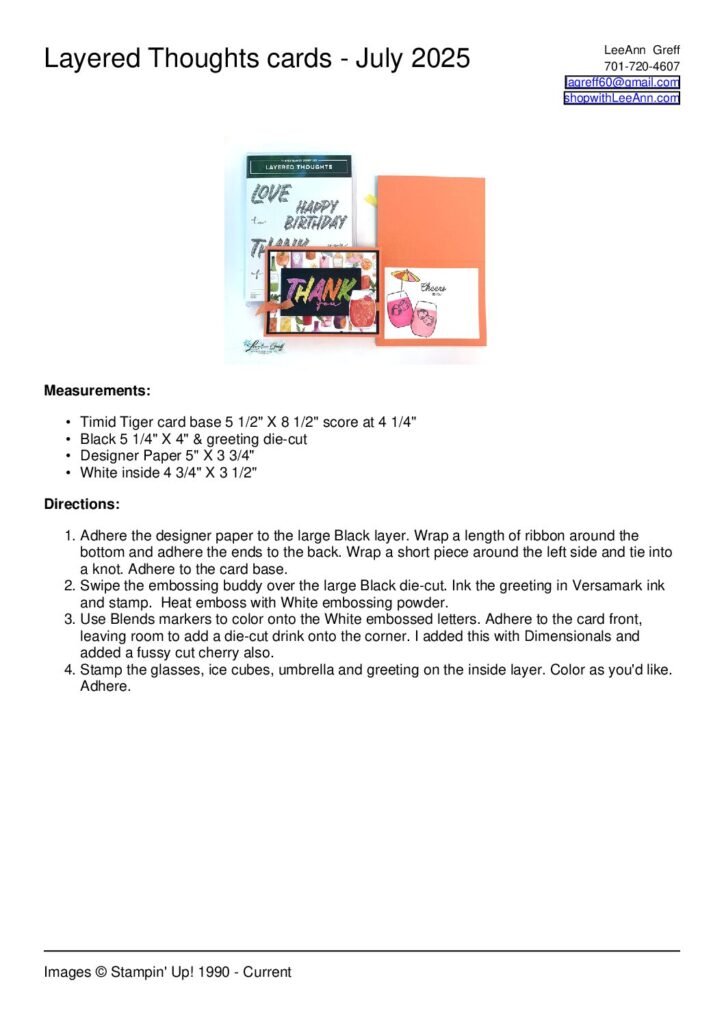
|---|---|---|
|
|
Dec 07, 2025 |
|
|
|
Dec 07, 2025 |
|
|
|
Nov 23, 2025 |
|
|
|
Nov 23, 2025 |
|
|
|
Nov 23, 2025 |
|
|
|
Nov 23, 2025 |
|
|
|
Nov 16, 2025 |
|
|
|
Nov 16, 2025 |
|
|
|
Nov 09, 2025 |
|
|
|
Nov 09, 2025 |
|
|
|
Nov 02, 2025 |
|
|
|
Nov 02, 2025 |
|
|
|
Oct 26, 2025 |
|
|
|
Oct 26, 2025 |
|
|
|
Oct 26, 2025 |
|
|
|
Oct 12, 2025 |
|
|
|
Oct 12, 2025 |
|
|
|
Oct 12, 2025 |
|
|
|
Oct 12, 2025 |
|
|
|
Oct 12, 2025 |
|
|
|
Oct 01, 2025 |
|
|
|
Oct 01, 2025 |
|
|
|
Sep 28, 2025 |
|
|
|
Sep 28, 2025 |
|
|
|
Sep 28, 2025 |
|
|
|
Sep 28, 2025 |
|
|
|
Sep 17, 2025 |
|
|
|
Sep 14, 2025 |
|
|
|
Sep 14, 2025 |
|
|
|
Sep 14, 2025 |
|
|
|
Sep 14, 2025 |
|
|
|
Sep 14, 2025 |
|
|
|
Sep 14, 2025 |
|
|
|
Sep 14, 2025 |
|
|
|
Sep 14, 2025 |
|
|
|
Sep 14, 2025 |
|
|
|
Sep 14, 2025 |
|
|
|
Sep 14, 2025 |
|
|
|
Sep 14, 2025 |
|
|
|
Sep 14, 2025 |
|
|
|
Sep 14, 2025 |
|
|
|
Sep 14, 2025 |
|
|
|
Sep 14, 2025 |
|
|
|
Sep 14, 2025 |
|
|
|
Sep 14, 2025 |
|
|
|
Sep 14, 2025 |
|
|
|
Sep 14, 2025 |
|
|
|
Sep 14, 2025 |
|
|
|
Sep 14, 2025 |
|
|
|
Sep 14, 2025 |
|
|
|
Sep 14, 2025 |
|
|
|
Sep 14, 2025 |
|
|
|
Sep 14, 2025 |
|
|
|
Sep 14, 2025 |
|
|
|
Sep 14, 2025 |
|
|
|
Sep 14, 2025 |
|
|
|
Sep 14, 2025 |
|
|
|
Sep 14, 2025 |
|
|
|
Sep 14, 2025 |
|
|
|
Sep 14, 2025 |
|
|
|
Sep 14, 2025 |
|
|
|
Sep 14, 2025 |
|
|
|
Sep 14, 2025 |
|
|
|
Sep 14, 2025 |
|
|
|
Sep 14, 2025 |
|
|
|
Sep 14, 2025 |
|
|
|
Sep 14, 2025 |
|
|
|
Sep 14, 2025 |
|
|
|
Sep 14, 2025 |
|
|
|
Sep 14, 2025 |
|
|
|
Sep 14, 2025 |
|
|
|
Sep 14, 2025 |
|
|
|
Sep 14, 2025 |
|
|
|
Sep 14, 2025 |
|
|
|
Sep 14, 2025 |
|
|
|
Sep 14, 2025 |
|
|
|
Sep 14, 2025 |
|
|
|
Sep 14, 2025 |
|
|
|
Sep 14, 2025 |
|
|
|
Sep 14, 2025 |
|
|
|
Sep 14, 2025 |
|
|
|
Sep 14, 2025 |
|
|
|
Sep 14, 2025 |
|
|
|
Sep 14, 2025 |
|
|
|
Sep 14, 2025 |
|
|
|
Sep 14, 2025 |
|
|
|
Sep 14, 2025 |
|
|
|
Sep 18, 2025 |


Leave a Reply