/


Latest Post

Fast but fabulous Flowing Flowers card kit to go with my Easy 8 Card Wonder template


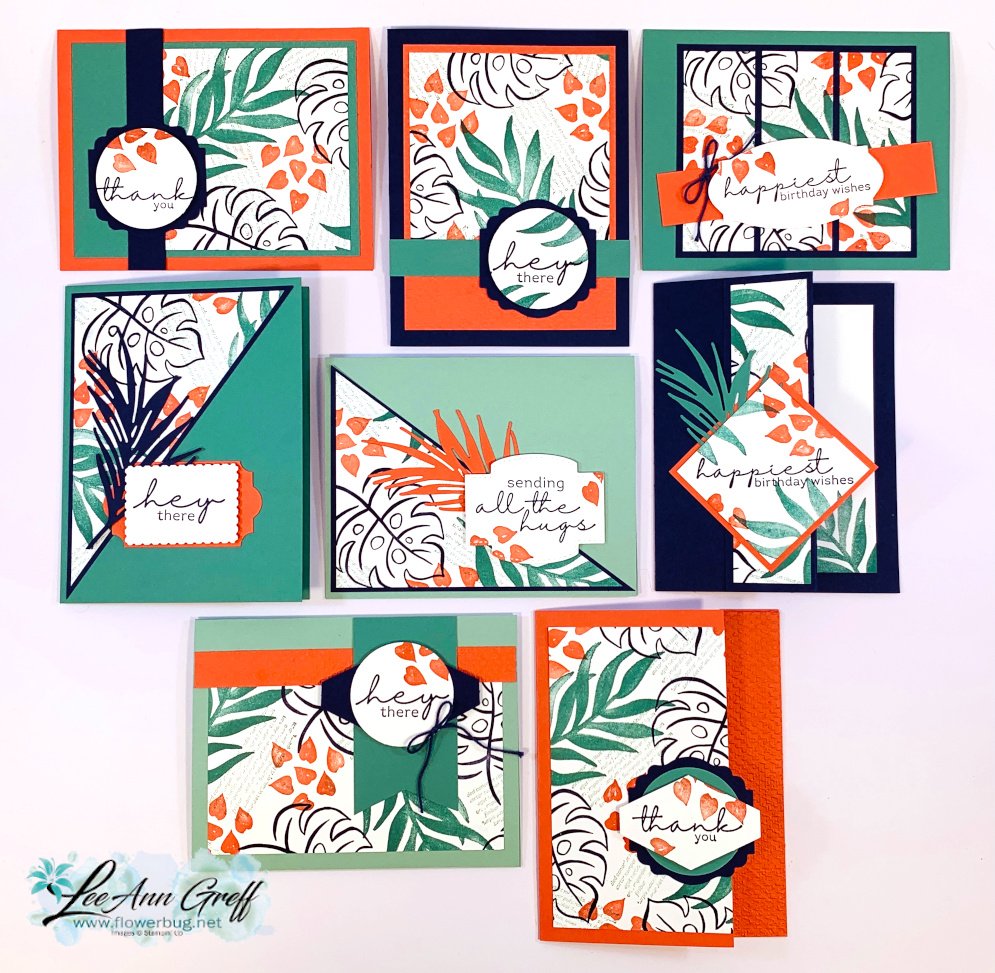
I created these pretty cards on last week's FB Live.  I used the Flowing Flowers stamp set in a unique set of colors.

This stamp set was one of my top picks in the Spring catalog.  Not just because it's flowers, but because of the Distinktive images and pretty greetings.  Look!

Here's a link to the live video where I made a totally different set of cards using the same OSW template. I created it a few years ago and love trying it with different stamp sets.  I find it's a fabulous way to get beautiful cards made quickly without a lot of measuring. 

**Did you know that my Team members get all of my tutorials free? They receive every single one I make – at least 3-5 a month! We met on Sunday night via Zoom and many of us used the Easy 8 Card Wonder to make our cards. So fun to visit while we stamped!!  Ask me about the Starter Kit deal & joining my Flowerbug's Team. 

Here is the 8 1/2" X 11" sheet of basic White card stock that I stamped using the images in the Flowing Flowers stamp set. 

I did do a little 'surgery' on one of the stamps (seen the flower in the first photo above).  I cut the leaves and the spatter part away from the main flower so I could stamp them in different colors.  I know I'll use this stamp so much more this way.  I used our Paper Snips to do it.  I encourage you to try this on your stamps; it's scary but so worth it! 

Here is one of the cards made with my template. *These three pieces were cut on the printed lines on the reverse side. No measuring!!  

You have a few choices if you want to make cards like these:

  • Get the template & PDF tutorial here in my Shop.  It's called the Easy 8 Card Wonder and includes directions for 4 different sets of cards & color combos.  $15 *Click here to see my other OSW's. Plus once you purchase it, you will get an email every time I update the tutorial with new color combos & stamp sets! 
  • Reserve a pre-cut kit to go by Feb 15th.  Contact me here.  I'll send you a PayPal invoice for it all. The kits are sent out at the end of February via Priority Mail. It's $46 with shipping.

The Kit to go includes:

  • the Flowing Flowers 9 piece stamp set
  • a printed template on 8 1/2" X 11" Basic White CS
  • pre-cut & punched pieces for all 8 cards
  • the free PDF tutorial sent in an email  
  • You will need your own ink (I used Navy, Daffodil, Bermuda Bay & Coastal Cabana), adhesives & gems. 

You can see the video here where I show how the template is used.  I created a different group of cards using this Easy 8 Card Wonder template. 

~~~

January Specials:

Purchase the Starter Kit during Sale-a-Bration

and choose ANY 2 stamp sets free plus FREE shipping too!

Click here to get yours.


Host codes:  T9YW6QCC or S9WGFH9Z

 *click here to order 

Use the host code above & get free Iridescent Rhinestones with

a $50 order in January, 2022! 

All Posts

  • One Day Only of FREE SHIPPING! Plus a special Hydrangea Hill Fun Fold Window card


    Tomorrow is St. Patrick's Day and both Stampin' Up! and I have an ordering special! 


    Plus I'm giving you 5 free cards with an online order over $30 through Sunday! 

    Win win; it's your lucky day!  Get your wish list together and place that order tomorrow on March 17th!  You'll get even more!  Scroll down to the bottom to see what else you'll receive! 

      Order online here. 

    ~~~

    And now I want to share Karen's amazing fun fold card featuring the Hydrangea Hill suite of products.  It's one more in a series of window cards from our Flowerbug's Team swap on Saturday. 

    Look!                                                                      

    Her colors are Gorgeous Grape & White along with the beautiful Hydrangea Hill designer paper and the Mercury Glass acetate.  See this suite of products here. 

    Other items she used here are the Stitched with Whimsy, Stitched Rectangle, Oval dies and the Lovely Labels Pick a Punch.

    She used the Hydrangea Haven stamp set to finish off the inside. Below are the measurements if you'd like to make a card like this beauty.

    Measurements:

    • White card base 5 1/2" X 8 1/2" scored at 4 1/4"
    • Inside White card stock 5 3/8" X 8 1/2". Score it at 2 1/8", 4 1/4" and 6 3/8". Die-cut a 2 1/2" X 3 1/2" oval from the center.
    • Gorgeous Grape CS 3 1/2" X 4 3/4"
    • Designer Paper front is 2 5/8" X 4" (stitched rectangle die) inside 1 7/8" X 5 1/4"
    • Oval Mercury Glass Acetate 2 1/8" X 3" 

    ~~~

    Lots of March Specials!


    Get 5 free cards with a $30 online order through March 20th!

    Current Host code is 39A9QQZP

    Order online here

    And if your order is over $50 you'll also receive a free adhesive package from me 3 sheets of Dimensionals and 1 for die-cuts!

    *If your order is over $150 do not use the code; you'll still receive the gifts! 

    All online orders receive a free PDF of the new Butterfly Bouquet bundle

    with 15 projects!

    Below are the Multipurpose Glue stands we're making. They're $6 each and available in my Shop here.  

    Leave a Reply

    Your email address will not be published. Required fields are marked *

  • A WOW fun fold card with Dragonfly Dreams!


    This weekend my Flowerbug's Team held our monthly card swap & Team gathering.  Our theme was window cards and I'll be sharing them all week long!

    Check out this special Z fold card Jacki made!  

    Her colors are Terracotta Tile, Black & White and the Dandy Garden Designer paper seen here.  Did you know that the Dragonfly Punch coordinates with this Designer Paper?  She punched her dragonflies directly out of the paper!  No stamping for these at all! See the Dragonfly Garden bundle here. 

    Check out the whole suite of products here. 

    This card features almost two full card bases with just a few score lines. It looks a lot harder than it is.  

    • Terracotta Tile – 5 1/2" X 8 1/2" scored at 4 1/4"
    • Whisper White – front is 4" X 5 1/4", inside fold is 5 1/4" X 8" scored on the long edge at 4" X 6". 
    • Designer paper – 1 3/4" X 5" 

    Her 'window' in the front is 2 3/8" and the black circle on the inside fold is the same.  The White greeting circle is 2 1/8".  All of these circles are cut with the Circle dies in the Annual Catalog. 

    Steps to assemble this card:

    • You'll adhere the White front to the main card base and then cut your window. 
    • Stamp on the inside White card before adhering to the inside of the main card.
    • Add the Designer paper to the inside fold.
    • Die-cut the greeting circles and adhere together. 
    • Fold the card closed and add the circle to the inside fold 'through' the front window.  Perfect placement!   

    More window cards posted tomorrow and all week long! 

    ~~~

    Current Host code is 39A9QQZP

    Order online here

    All online orders receive a free PDF of the new Butterfly Bouquet bundle

    with 15 projects!


    ~~~

    Get a free adhesive package from me with an online order over $50 using the host code above. 3 sheets of Dimensionals and 1 for die-cuts!

    *If your order is over $150 do not use the code; you'll still receive a gift! 

    Below are the Multipurpose Glue stands we're making. They're $6 each and available in my Shop here.  

    Leave a Reply

    Your email address will not be published. Required fields are marked *

  • Create gorgeous backgrounds with just a few common stamping items! Video tutorial!


    On Tuesday's FB live I shared a fun and easy technique for gorgeous backgrounds.  Once you create them you can use them to create stunning, beautiful cards like these:

    This was my first try at this technique this week.  Honestly it's not a new technique at all but I hadn't done it for years! The stamp set is called Soar Confidently (seen here) and I hadn't used it yet.  I think it works wonderfully with a pretty background. 

    I used Highland Heather, Gorgeous Grape, Bermuda Bay and Pacific Point Stampin' Write markers on an E block and spritzed with plain water.  Then 'stamp' on our Basic White CS and let dry with the block on it (this prevents warping).  Then stamp on it with any black ink.  

    Here are a few more samples I shared: 

    The left card above features the Dragonfly Garden stamp set and the right is the Floating & Fluttering set. 

    See what I mean?  And it's fun too!  Each time you do it they turn out differently so it's kind of addicting!  Watch the video below to see how easy it can be.  

    ~~~

    Current Host code is 39A9QQZP

    Order online here

    All online orders receive a free PDF of the new Butterfly Bouquet bundle

    with 15 projects!


    ~~~

    Get a free adhesive package from me with an online order over $50 using the host code above. 3 sheets of Dimensionals and 1 for die-cuts!

    *If your order is over $150 do not use the code; you'll still receive a gift! 

    Below are the Multipurpose Glue stands we're making. They're $6 each and available in my Shop here.  

    Leave a Reply

    Your email address will not be published. Required fields are marked *


Notice: LeeAnn Greff, Independent Stampin’ Up! Demonstrator, Manager. The content of this website is my sole responsibility as an independent Stampin’ Up! demonstrator and the use of, and content of, the classes, services, or products offered on this website is not endorsed by Stampin’ Up! Copyright 2025