Fancy Easel Fold card with the Arrange a Wreath bundle
We made this fancy fold card at October card clubs. The Easel really shows off the wreath from the Arrange a Wreath bundle in the Annual catalog. You can see it in the video below.
5 1/2" X 8 1/2" scored in half at 4 1/4" first. Then cut on one half of the card at 3/4" from each edge to the score line. Now score the large, center area for the easel in half at 2 1/8"
Very Vanilla 3 3/4" X 3 1/2"
Old Olive 4" X 3 3/4"
Cherry Cobbler & Old Olive 3 3/4" squares for the wreath die-cuts plus scraps for the greeting punches
Heartwarming Hugs Designer Paper 5/8" X 4" (2 pieces)
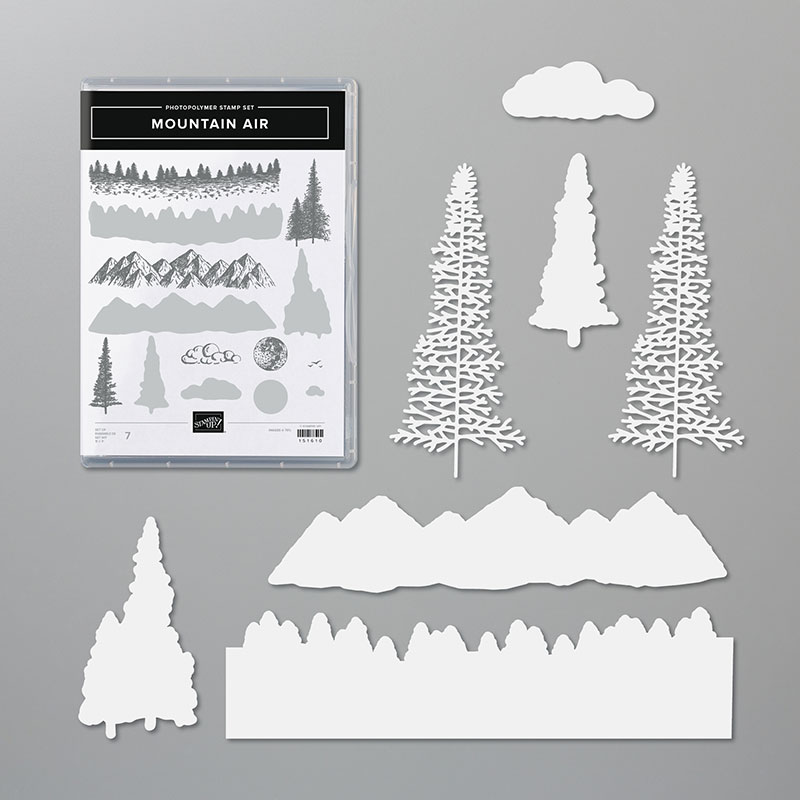
Here I stamped the mountains and trees in Black ink and sponged the pretty background. I punched out a 1 1/2" circle from post-it paper and adhered it to my White card stock before I sponged.
Details:
I used these inks: Black Memento, Crushed Curry, Calypso Coral, Melon Mambo, Cherry Cobbler
The greeting dies are from the Well Written set here
The black die-cut trees on the left are from the Majestic Mountain dies.
Everyone who orders this bundle from me will receive a FREE 10 cards tutorial! (see photo below) It's complete with directions, measurements, supplies and photos send in pdf format. You can orders yours here. And because it's over $50 you can choose a free Sale-a-Bration product at the same time! Double bang for your buck!
3. THE Best deal! Choose any FREE stamp set when you purchase the Starter kit during Sale-a-Bration; of any value! Plus you'll get a free paper trimmer and a 6 X 6 sampler of new Designer Paper! It's just $99 plus tax and you can choose $125 in products with free shipping! Be either a 'Happy Shopper' and enjoy the discount or make extra spending money.
Before I talk about today's project I have to let you know that they Golden Honey Designer Paper is no longer available. It was one of the free choices during Sale-a-Bration. Unfortunately these products are only available while supplies last. So don't delay on your orders!
This next card is a version of a card I'm sending to my new Team members who purchased the Starter kit this month. I chose to use Bermuda Bay with Black and White; you know the 'Black & White with a pop of color' theme. It's a classic and always works!
I started out with a 2" X 5" strip of the Flowering Foils specialty designer paper. It's gorgeous with silver and rose gold foil designs. You can see it here. It's a free choice with any $50 order while supplies last.
I inked a wedge of sponge in Bermuda Bay ink and lightly sponged from bottom up. I always start off of the card stock when I want a smooth look. Also sponge in a soft circular motion; almost like you are washing it. You can see me demo this in my FB Live video here.
3. THE Best deal! Choose any FREE stamp set when you purchase the Starter kit during Sale-a-Bration; of any value! Plus you'll get a free paper trimmer and a 6 X 6 sampler of new Designer Paper! It's just $99 plus tax and you can choose $125 in products with free shipping! Be either a 'Happy Shopper' and enjoy the discount or make extra spending money.
Click here to purchase the starter kit and join my awesome Flowerbug's Team!
4. Earn a ticket in the drawing for each $25 you order online in March for a free Little Ladybug stamp set! Congrats to Mary and Sharon who won a set for January and February!
Yesterday I shared 5 projects featuring the stunning Flowering Foils specialty designer paper on my weekly Facebook Live video. Every Tuesday at 11 am CT; tune in here:
This specialty paper is my top pick from the new 2nd Release Sale-a-Bration items. It's FREE with any $50 order! See it here.
Here are three of the cards I shared in the FB video. These photos do not do them justice! The colors are Silver, White, Petal Pink and Rose Gold. The greetings are all from the Rare Blessings stamp set seen here.
I made a pretty stitched frame with the Stitched Rectangles dies and Silver Foil paper. Added a greeting and a fussy cut flower from the Flowering Foils paper. I sponged it with Petal Pink ink for a bit of soft color.
Check out this 'One Sheet Box' made from one 12 X 12" sheet of Designer paper! It's a really nice size; big enough to hold quite a few cookies inside it.
Score the 12 x 12 paper at 3″ and 9 inches
Rotate paper and score at 1″, 3 1/2″, 6 1/2″ and 9 inches. You can watch the video below to see it made.
I made one with the Golden Honey specialty paper and the other with the Flowering Foils. Both are free right now with any $50 order! Click below to watch the video.
3. THE Best deal! Choose any FREE stamp set when you purchase the Starter kit during Sale-a-Bration; of any value! Plus you'll get a free paper trimmer and a 6 X 6 sampler of new Designer Paper! It's just $99 plus tax and you can choose $125 in products with free shipping! Be either a 'Happy Shopper' and enjoy the discount or make extra spending money.
Click here to purchase the starter kit and join my awesome Flowerbug's Team!
4. Earn a ticket in the drawing for each $25 you order online in March for a free Little Ladybug stamp set! Congrats to Mary and Sharon who won a set for January and February!
Notice: LeeAnn Greff, Independent Stampin’ Up! Demonstrator, Manager. The content of this website is my sole responsibility as an independent Stampin’ Up! demonstrator and the use of, and content of, the classes, services, or products offered on this website is not endorsed by Stampin’ Up! Copyright 2025


Leave a Reply