/


Latest Post

Beautiful swaps with NEW products!


We held out Team card swap Saturday and I want to share some of these awesome swaps they made. Our theme was to use new catalog products. This swap was ‘shoebox’ style so we made each other’s cards in person. I love shoebox swaps!

Tracey created this special card using the new Peaceful Pine in color. She paired it with Cloud Cover and Berry Burst here.
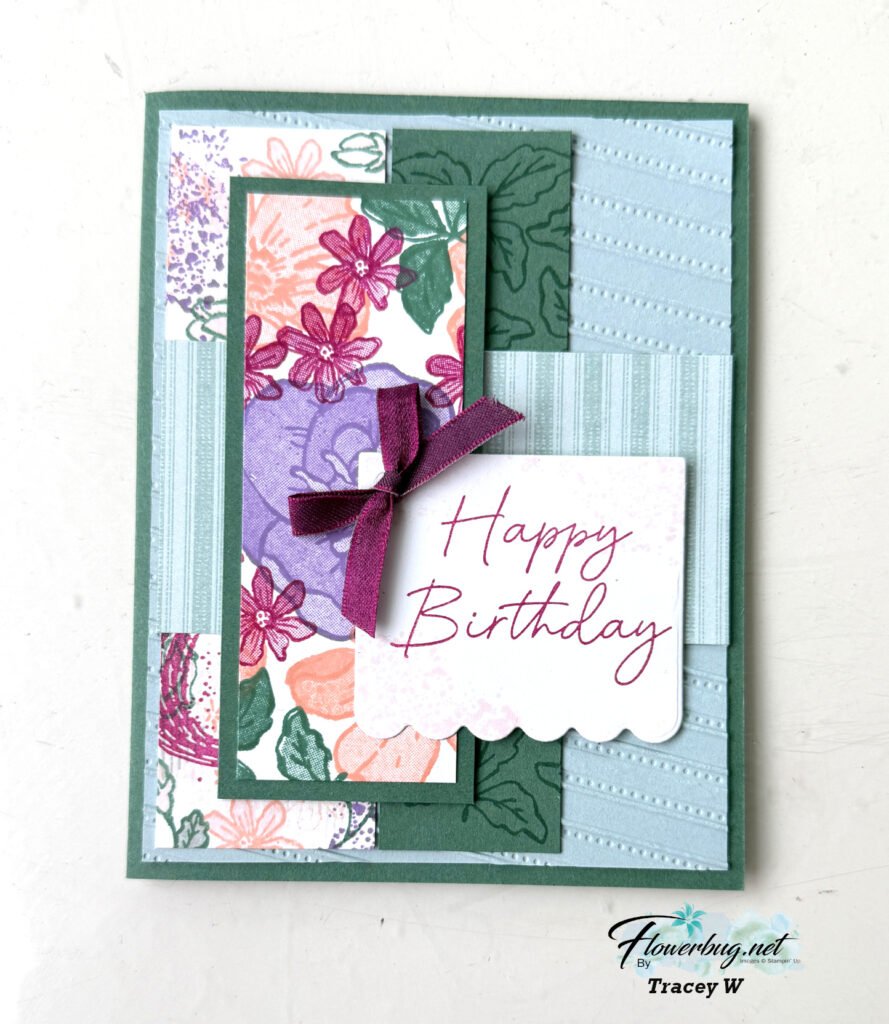
Look at that stamped panel; it is NOT designer paper! She stamped it because she loves to create with our stamps. And she finds it fun to create unique color combos too. She used the stamps from the Boutique Blossoms bundle seen here.
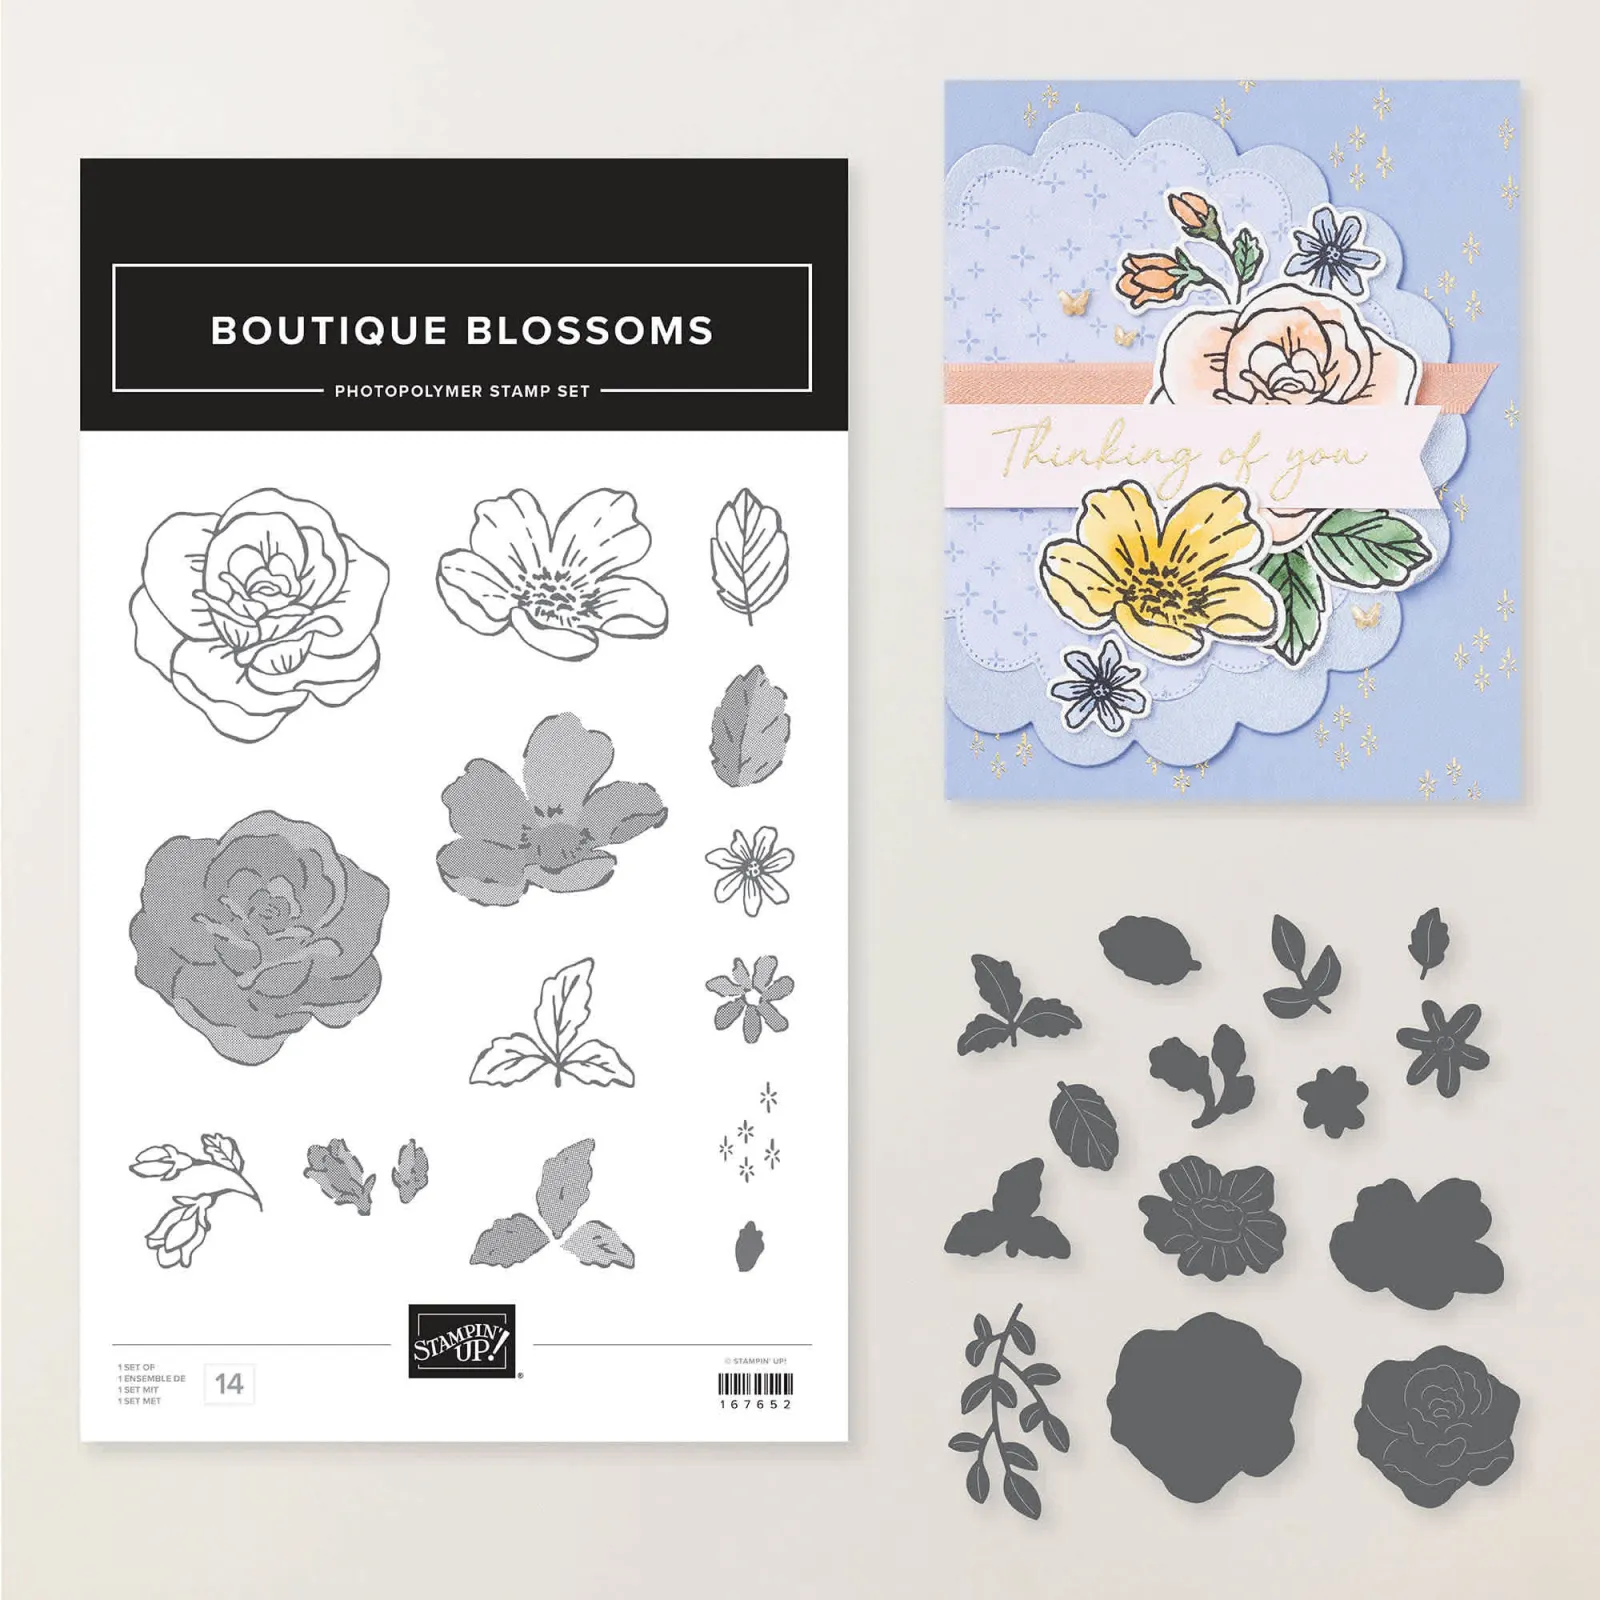
The Heirloom Boutique suite is one that Stampin’ Up! says will remain current for a year! I love knowing this; it helps when you join swaps and post projects for customers.
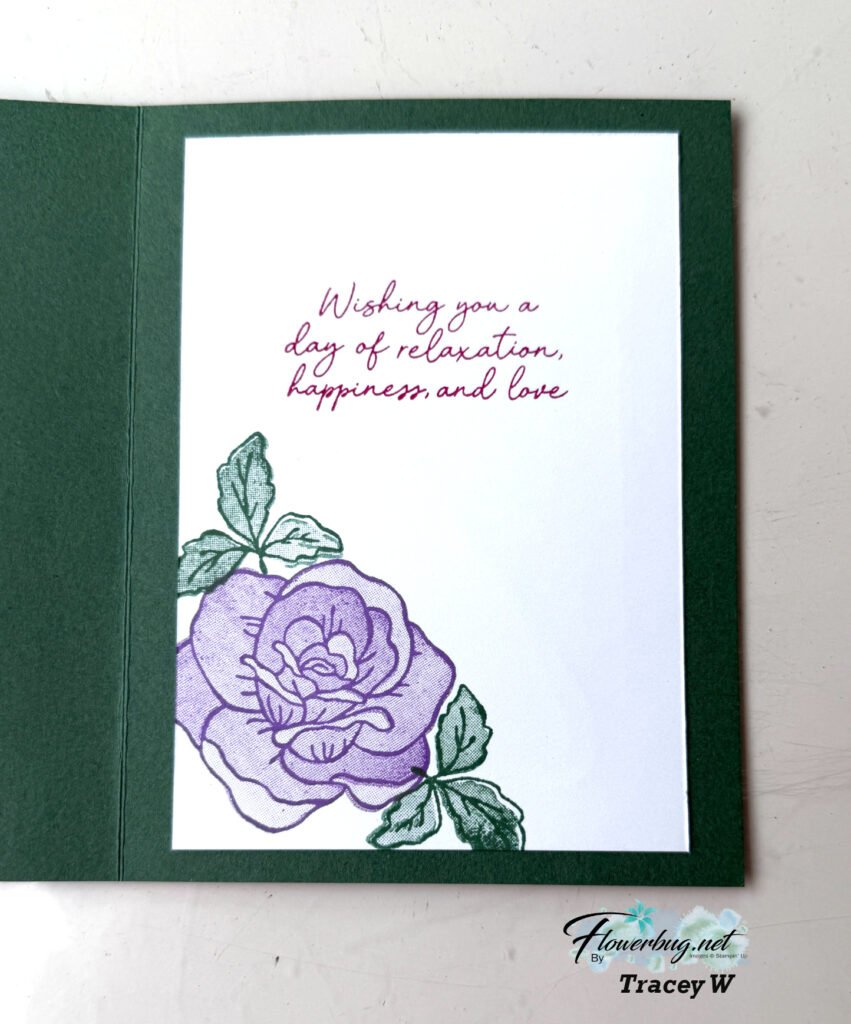
Here I stamped the outline image in 1st generation ink and the inside of the flower and leaves in 2nd generation ink. *that means stamped off once.

A fabulous card Tracey!

~~~~

And here is Lori’s neat pop-up fun fold card:
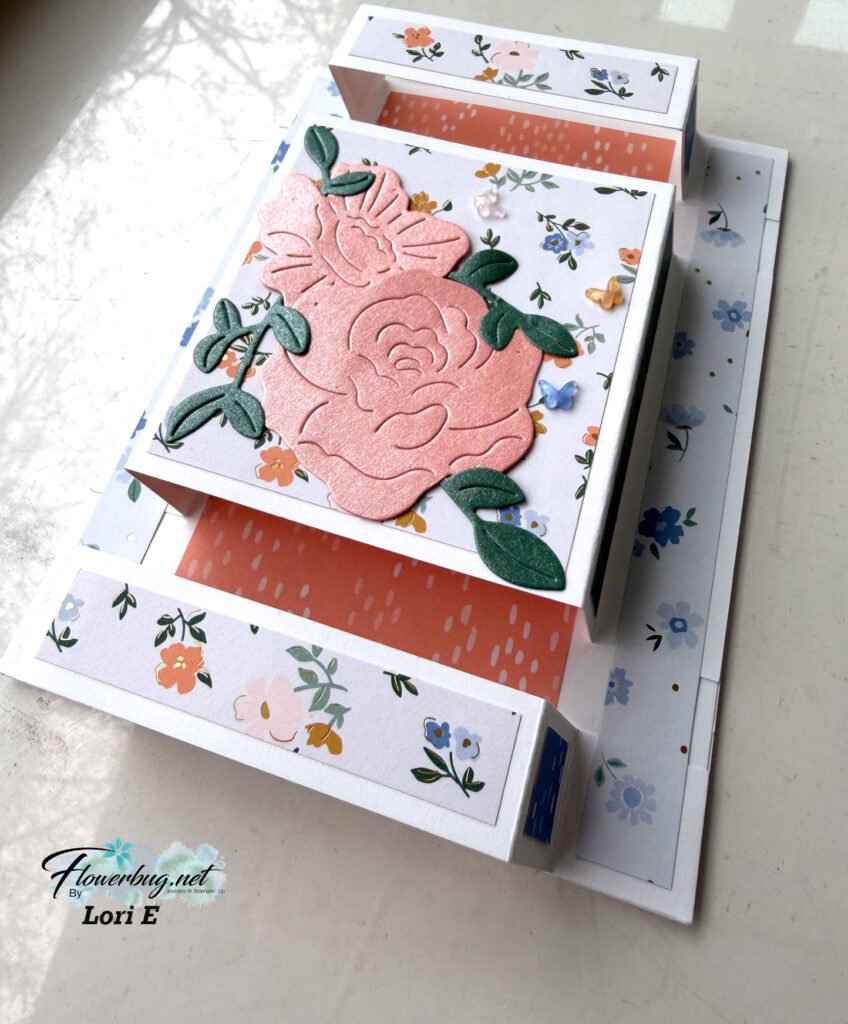
It had three layered panels that pop up from the card front. Very cool!
It also features the Bloom Boutique suite seen here. It was hard to get a good photo of this fun fold card that she cased from Susan Campfield. The die-cuts on the front are cut from the new 2026-28 In Color Pearlized Specialty paper seen here.

Here are the measurements:

Card Base 8 1/2″ X 5 1/2″ score at 4 1/4″
Flaps – center is 3″ X 5 3/4″ score at 3/4″, 1 1/2″, 4 1/4″, 5″
top & bottom flaps 3/4″ X 5 3/4″ score at 3/4″, 1 1/2″, 4 1/4″, 5″
Inside panel of DSP 2 1/2″ X 5 1/4″
DSP – middle is 2 3/4″ X 2 1/2″, top & bottom 1/2″ X 2 1/2″, left & right 1/2″ X 5 1/4″, sides 1/2″ X 2 3/4″, corners 1/2″ square
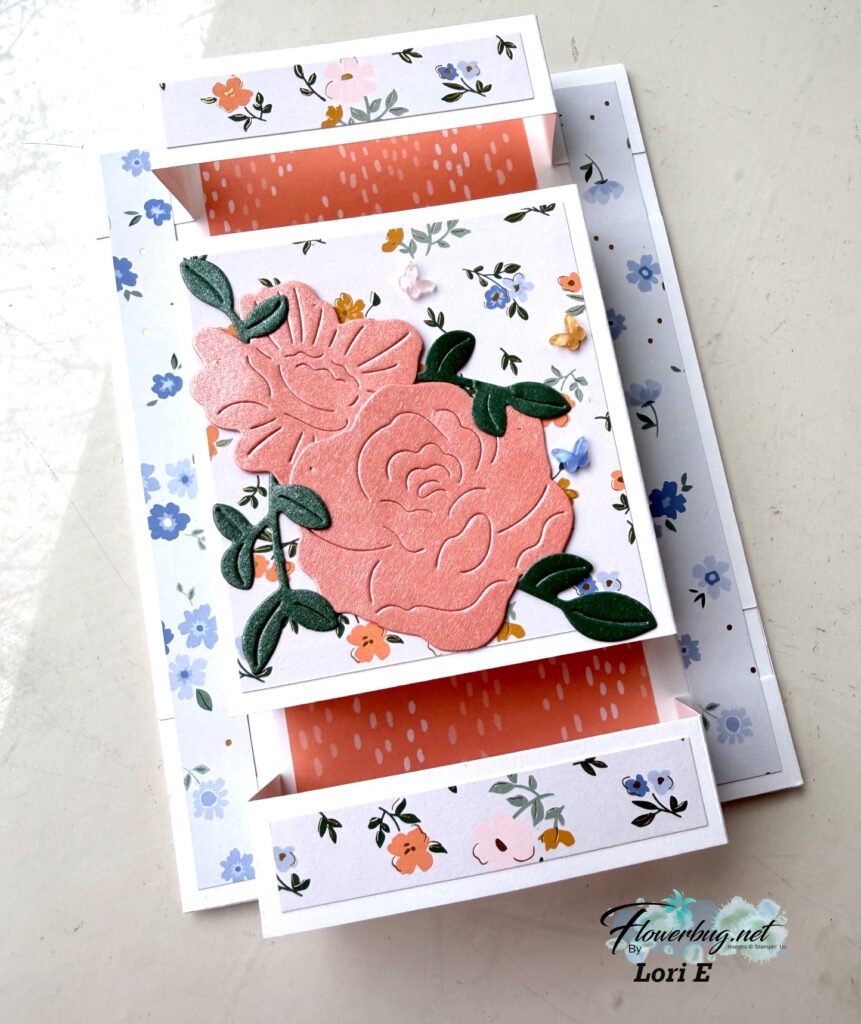
What a special card she made!

~~~~

Next is another special fancy fold card featuring the Bloom Boutique specialty designer paper; this one is created by Kim.
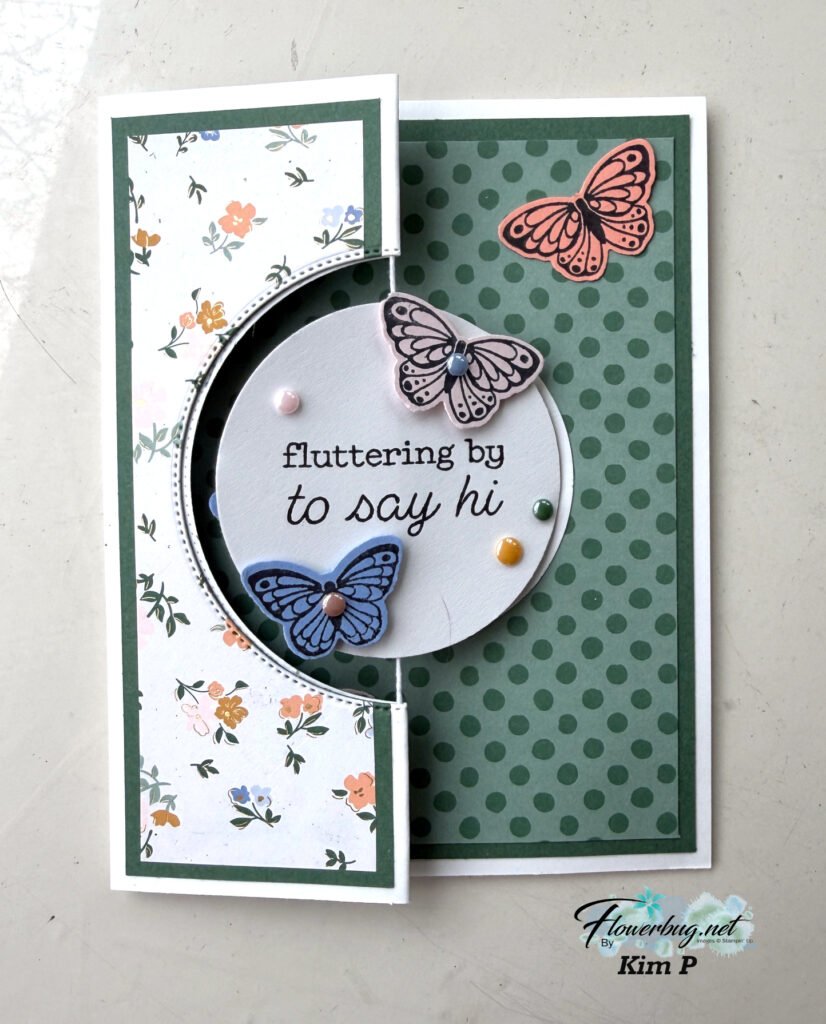
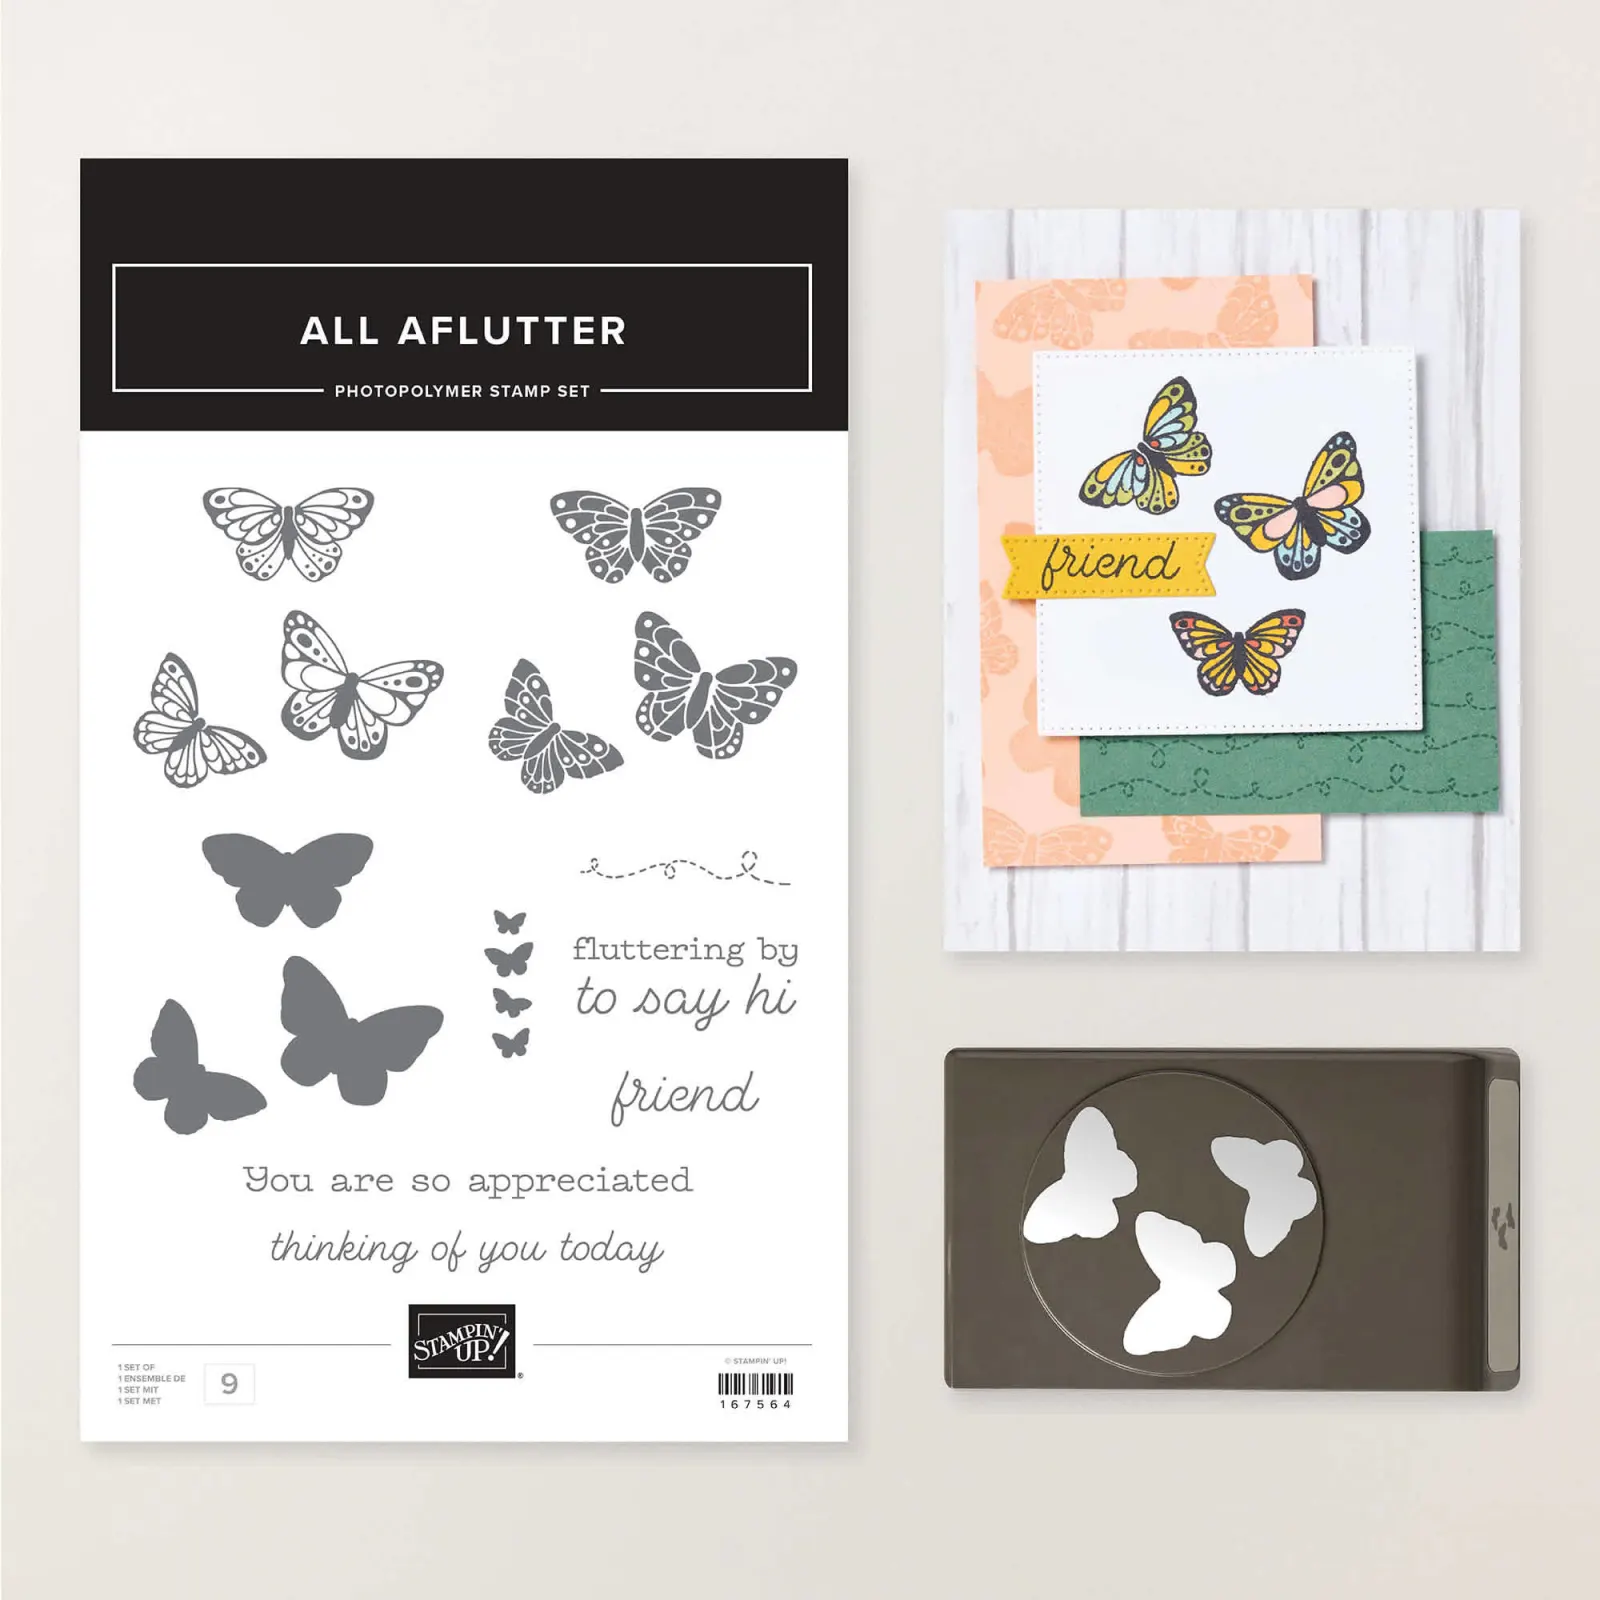
She featured the All Aflutter punch bundle seen here. I’m so happy we have a new butterfly punch again!
Her card is a spinner card using Baker’s Twine. It’s fun to set up a card like this so when the recipient removed the card from the envelope the circle spins. You simply wind it up before inserting it in your envelope. So cool!

We added stamped & punched butterflies all over this card; using the newest In Colors. The inside polka dot DSP panel is from the new Painted Patterns 12 X 12″ DSP seen here. It’s available in most of our color families!
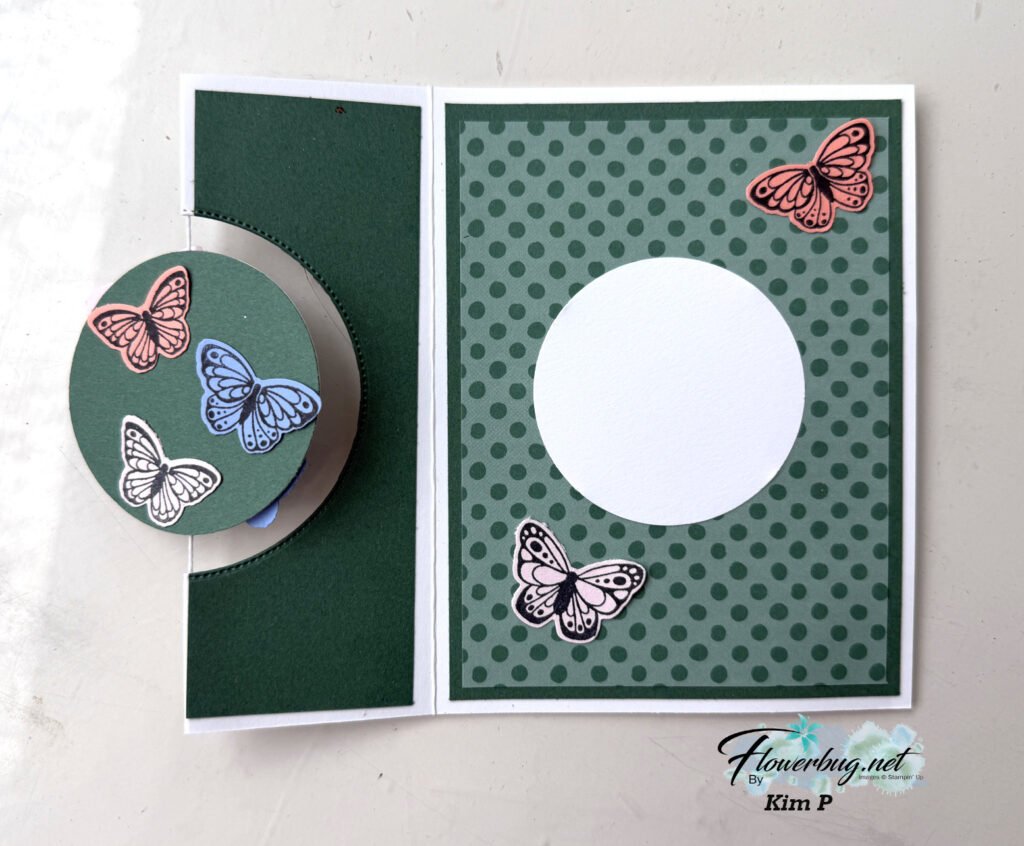
Before the string is added to the crease of the fold you’ll cut the larger circle from the front. She has so many layers on her card; it can be tricky to get the circle die-cut ‘cut’ through the layers. We ran it back and forth the Cut & Emboss machine but it did cut!

It’s an amazing card Kim!

~~~~~

Need a few new things from the Summer Catalog?
Be sure to tack on one of the Product of the Month choices for just $5 (once the order is over $75).

And if you’re already at $75 bump it up to $100 and earn a FREE Mystery Box from me! I have a few left and they’re stocked up with recently retired Stampin’ Up! products valued at over $200! Shop here.
All Posts

  • More incredible By the Bay card samples!


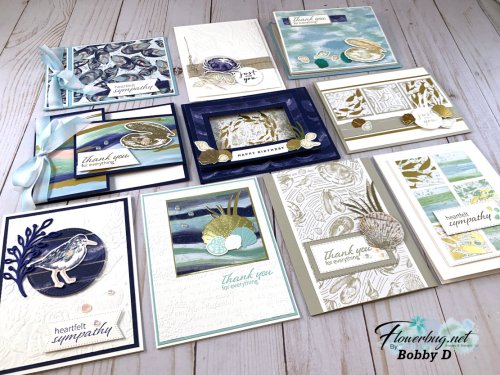
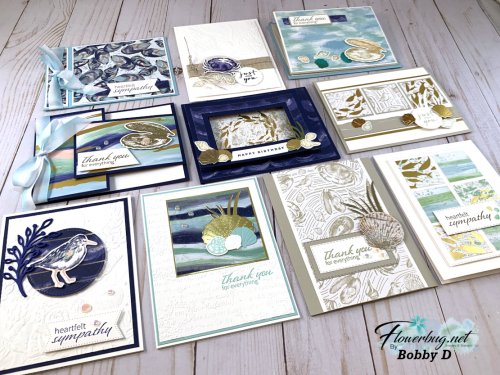
    Yesterday I shared 5 gorgeous cards my team member Bobby made with the By the Bay suite. See the entire suite here. 

    She is our Artist of the Month on my Flowerbug's Team and chose the Seaside Bay bundle for her projects.  She is a very talented stamper and a fabulous photographer too! 

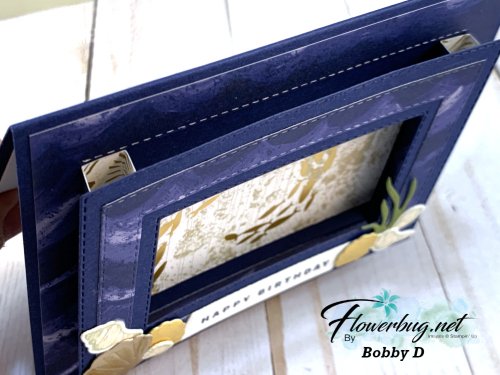
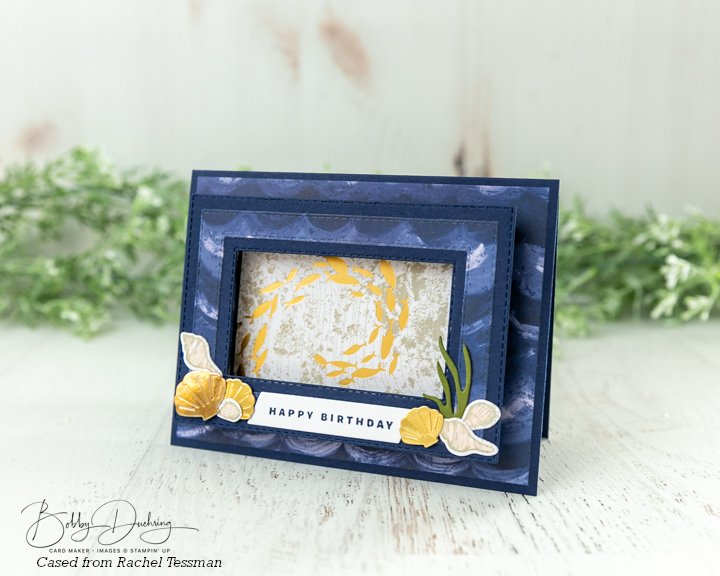
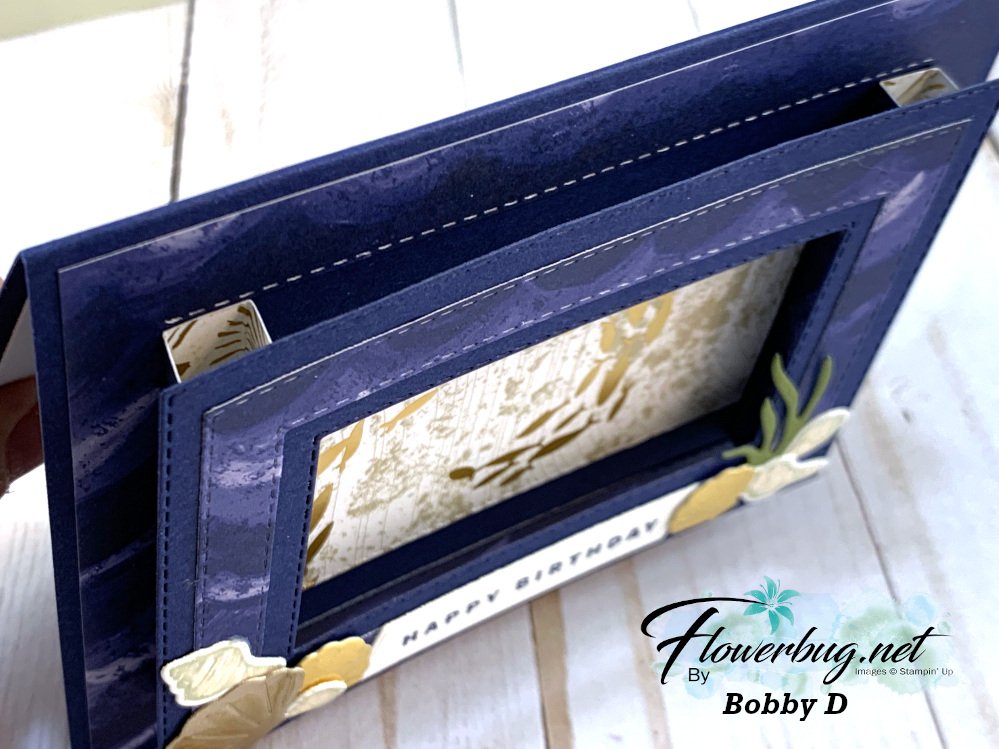
    This first card is unbelievable Pillar Pop-Up card and was cased from Rachel Tessman. 

    It's so cool!  This card truly shows off this suite and the stunning gold accents in the By the Bay designer paper.  

    Can you see the little DSP pillars in the photo below?  The entire upper panel is adhered to two little pillars and they fold flat for mailing too.  I had to make one myself and chose to use the Adorable Owls for my card.  You can see it here on my video.  Measurements too! 

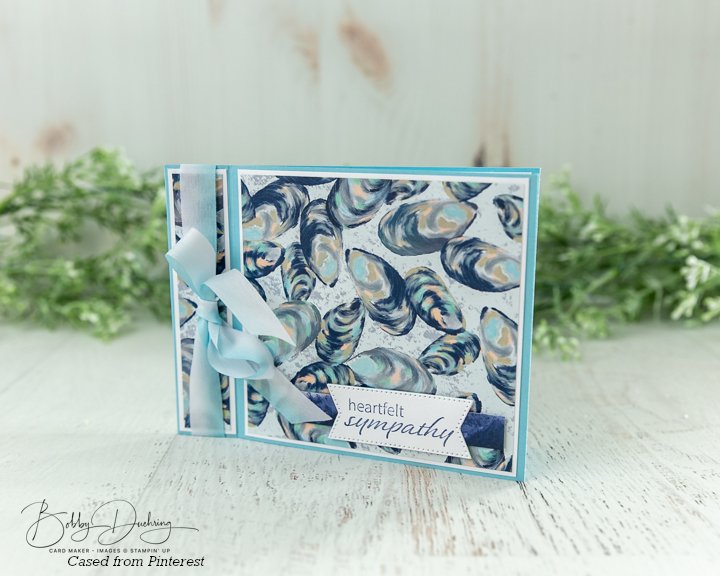
    This next card is a Book Binding fold. Her card base is Balmy blue and that pretty shell designer paper is adhered to narrow White layers. 

    It also shows off the soft Balmy Blue variegated ribbon that's new in our Spring catalog.  

    When making a book binding fold card you will adhere the front left edge to the back so only the large layer on the left opens.  Tip: If adding ribbon you may want to wrap it behind before you secure the scored edge together.  

    Measurements:

    • Balmy Blue 4 1/4" X 11" scored at 4 1/2" & 5 1/2"
    • White 4 1/8" X 7/8" and 4 1/8" square
    • DSP 3/4" X 4" and 4" square

    See the By the Bay 6 X 6" specialty designer paper here.  It's so beautiful I chose it for one of my January card kits to go.  I have just 3 left; see the kit or PDF here.  


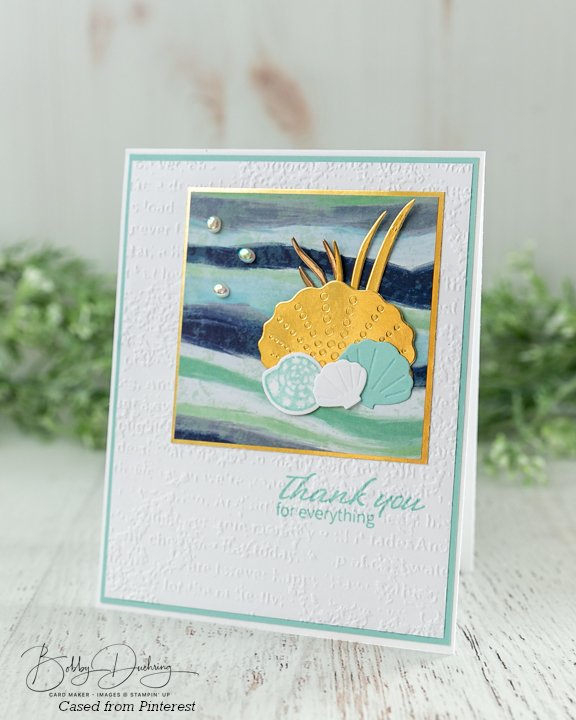
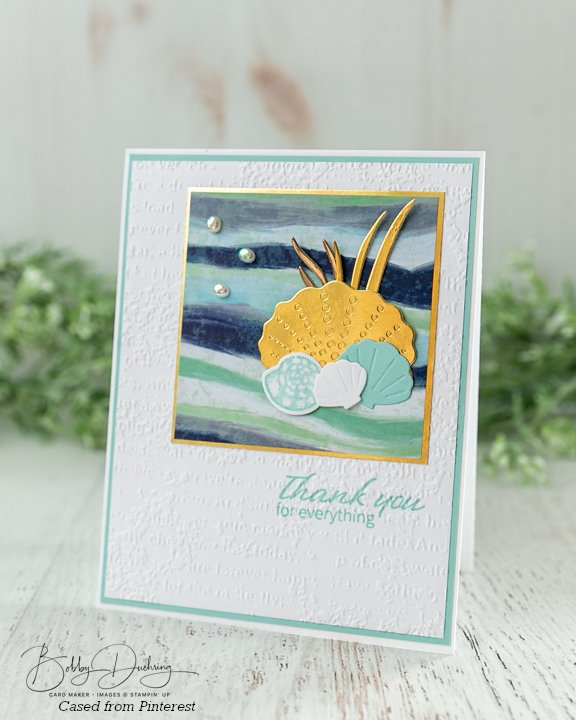
    Next is a simple but super pretty card with just a square of the By the Bay designer paper set onto a layer of Gold Foil.  The nice thing about doing this is you can die-cut your elements from the center of the Gold foil and no one can tell!  


    Cards with mostly White draw your eye to the main element as you can see here.  She stamped her greeting on the White layer before texturing it with the Timeworn Type embossing folder seen here.  Pool Party is her accent color.  



    Measurements:

    • The DSP is 2 7/8" square and the gold foil is 3" square. 
    • The white layer is 4" X 5 1/4" and Pool Party is 4 1/8" X 5 3/8" 

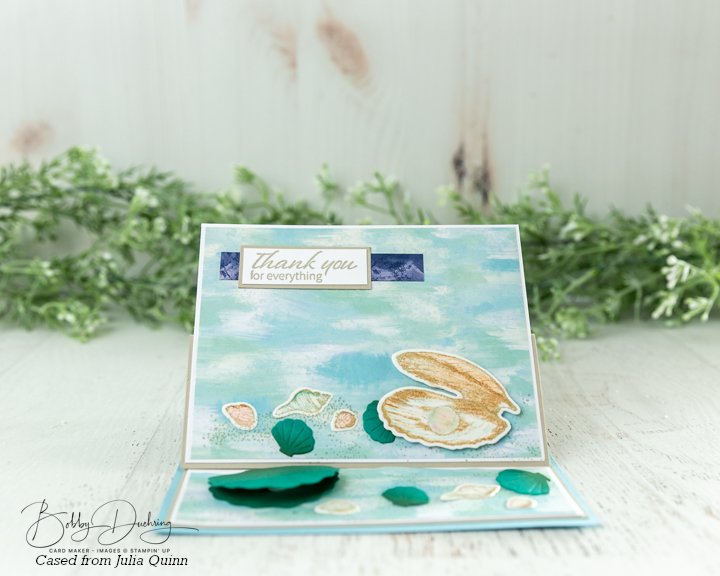
    Her next card is an easel card and it shows off the clam shell die in the Seaside Bay bundle.  It is scored and hinges open to reveal a pretty pearl gem inside.  

    She cased it from Julia Quinn.  That pretty clam shell and the designer paper layer is what holds the easel up.  So neat!  

    Measurements:

    • Balmy Blue 5 1/2" X 4 1/4"
    • Sahara Sand easel 5 1/4" X 8" scored at 4 and 6"
    • White – 2 pieces measuring 5 1/8" X 3 7/8"
    • DSP one at 5 X 3 3/4" and one at 5" X 1 1/2" 

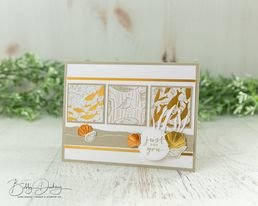
    Next and last is an exquisite card featuring just Sahara Sand, foils and white.  Love the soothing colors here!

    This pretty card was cased from Gail Ellis and shows off the textured die-cuts when done in foil. 

    Measurements:

    • White 5 1/4" X 4" and 5 1/4" X 2 3/4"
    • DSP squares 1 1/2"
    • Sahara Sand squares 1 5/8" squares & two strips for the torn edge on the shells area 
    • two gold strips 1/2" X 5 1/4"

    I hope you've enjoyed seeing the beautiful cards Bobby created to show off the Seaside Bay bundle. She sure did a fantastic job didn't she? 

    See the entire By the Bay suite here. 

    ~~~

    Sale-a-Bration & the Spring Catalog!


    Order online using the links below:

    January Host code links: FYRQ94HR or 69GXSA3B

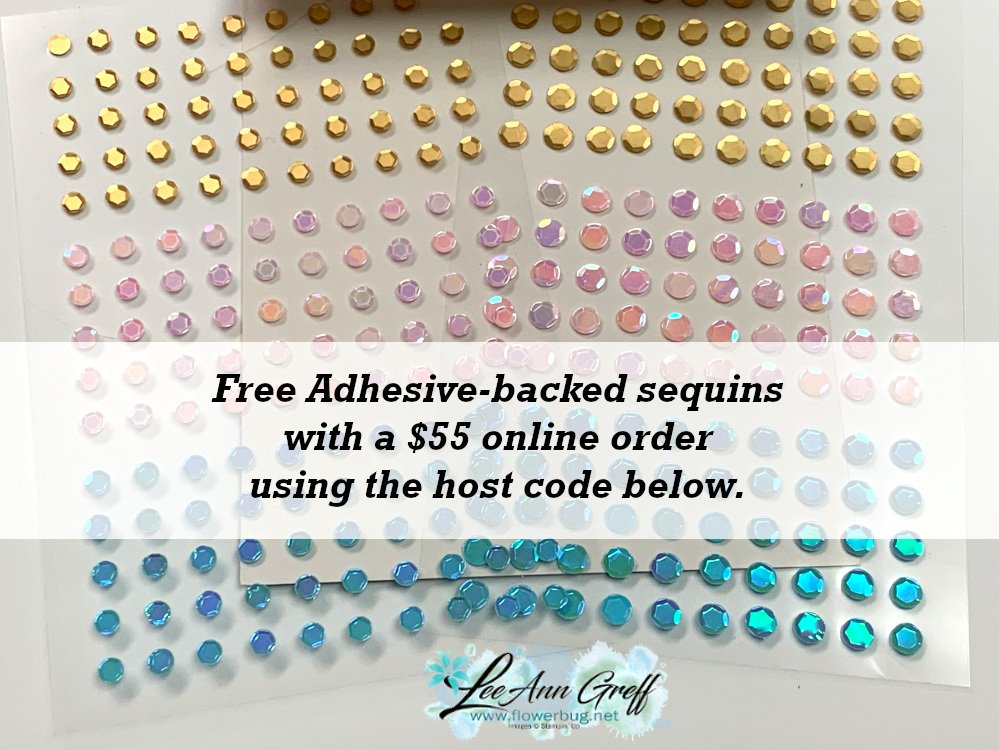
    Get free Pastel Sequins with online orders over $55 when using the host code above! 

    January Host code links: FYRQ94HR or 69GXSA3B

     Earn free products with my loyalty rewards! 

    Click here to download yours and earn a $50 shopping spree!

    ~~~

    Best Deal Ever on the Starter kit here!

    Choose $175 in products for just $129 plus the new mini machine!

    Or choose $175 for $99 without a new Mini.  AMAZING!

    Leave a Reply

    Your email address will not be published. Required fields are marked *

  • Incredible By the Bay suite projects by our Artist of the Month!


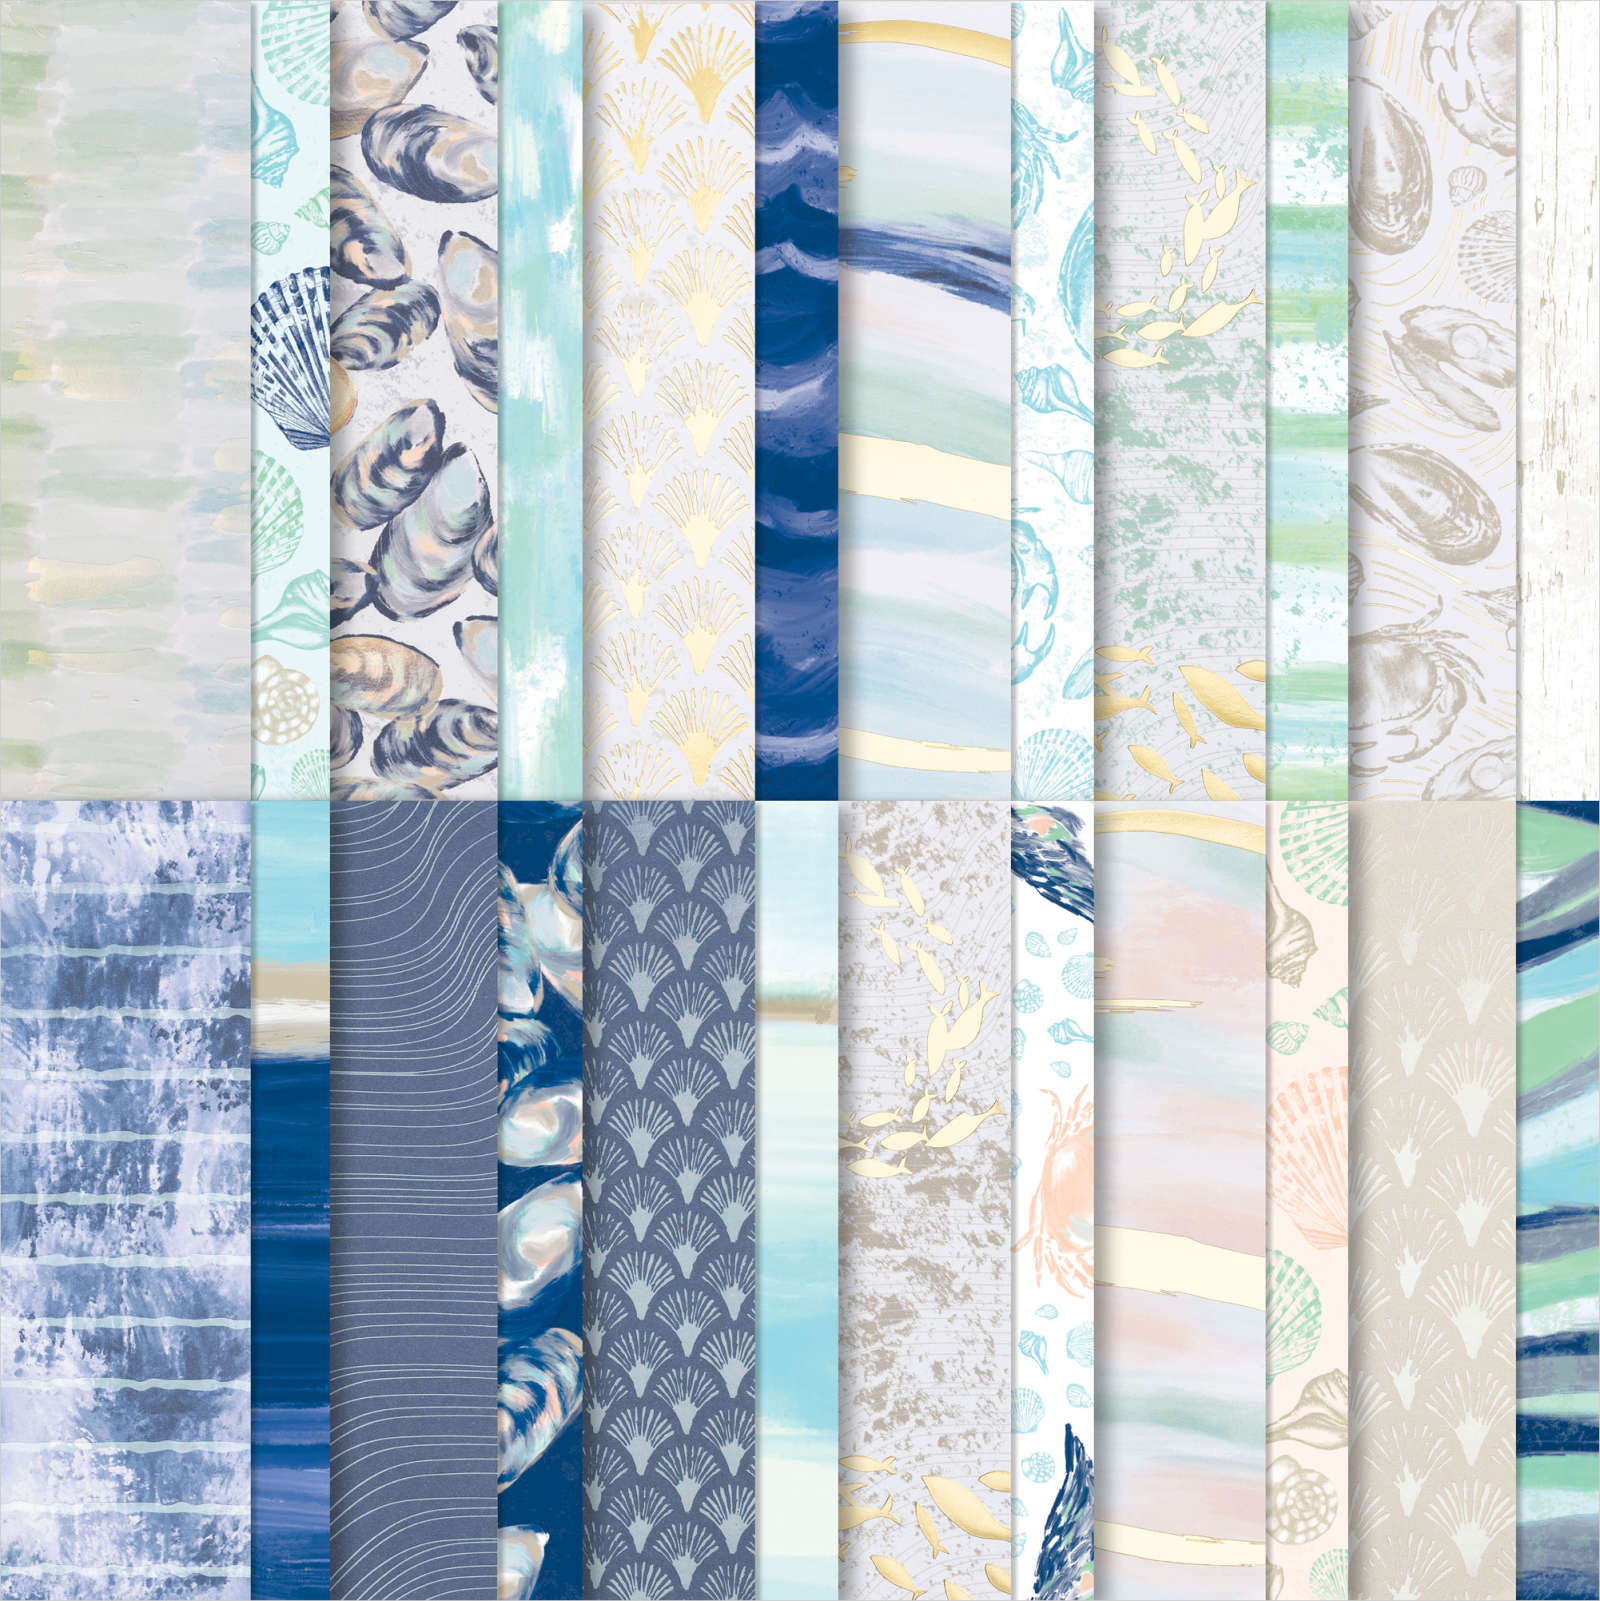
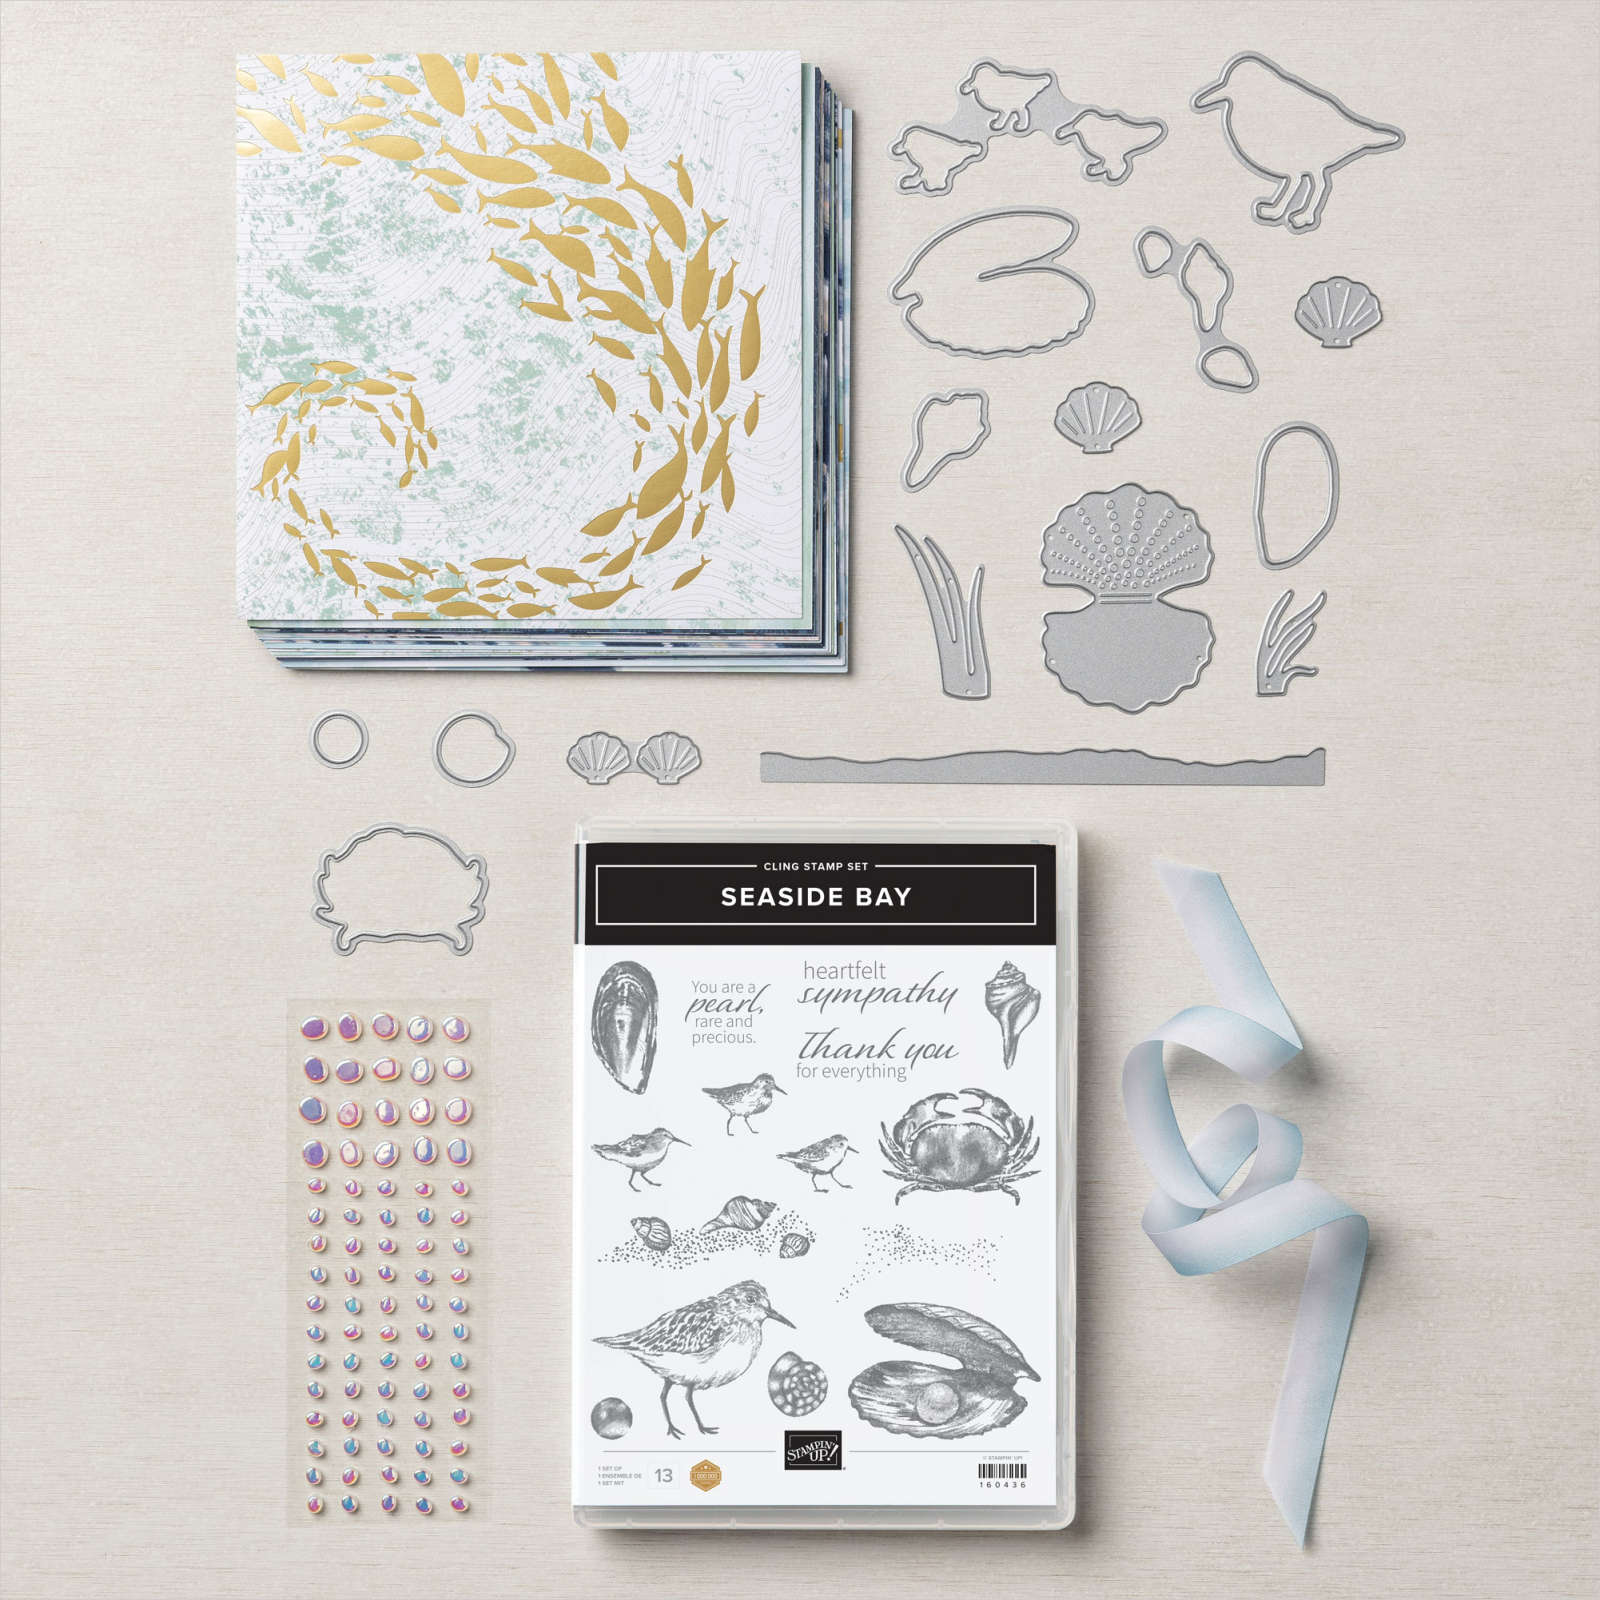
    Each month one of my Flowerbug's team is the 'Artist of the Month'.  This month Bobby is the featured Artist and she chose to use the Seaside Bay bundle with the By the Bay Suite seen here.  It's filled with beautiful fold & pearl foil specialty designer paper, Flat Adhesive-Backed pearls & blue & white variegated ribbon.  

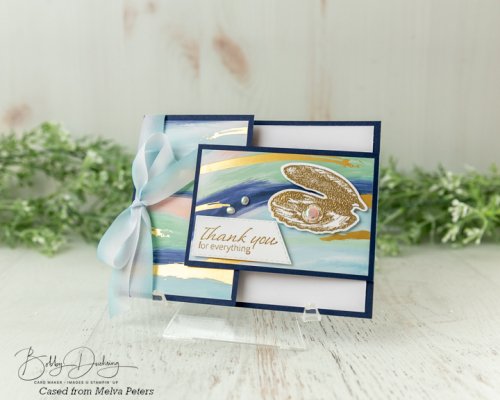
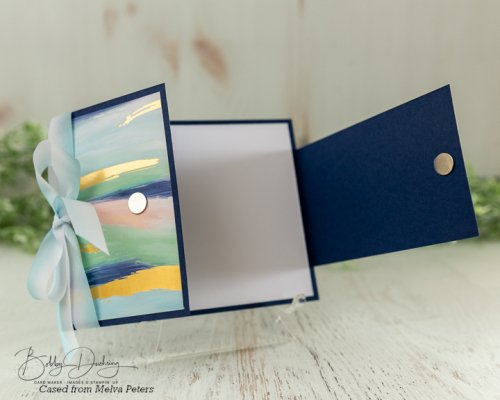
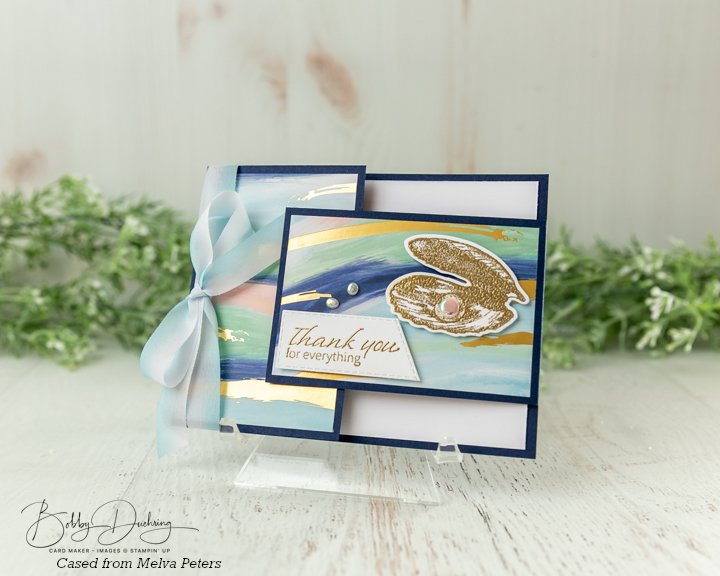
    This pretty fun fold card was cased from Melva Peters

    The Thank you sentiment is cut out with the Stitched Rectangular Framelit dies; she ran the long edge of the die over the sentiment at an angle to get the angled effect.  

    Measurements:

    • Navy Card base 8 1/4" X 4 1/4" scored at 5 1/2"; second piece is 4 1/2" X 2 3/4" scored at 4"
    • DSP 2 1/2" X 4" and 3 3/4" X 2 1/2"
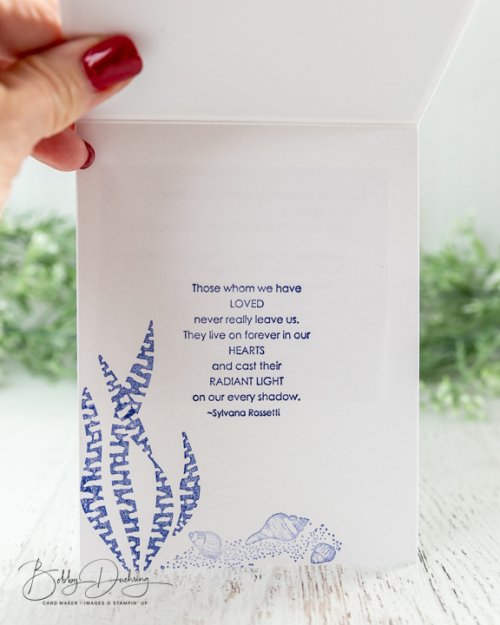
    • White inside is 5 1/4" X 4", scrap for greeting and clam shell die-cut

    Magnetic closures are used to secure the card closed.  

    Next is a pretty card cased from Leonie Stuart. 

    The pretty texture is done with the Seashells 3D embossing folder.  She also used a vellum circle, Night of Navy ink, Wink of Stella, the Natural Finish ribbon and linen thread.

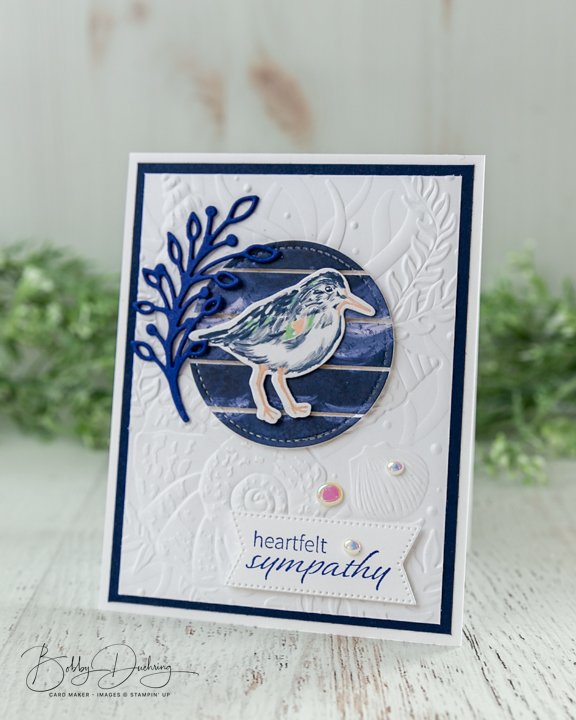
    This next card is her own creation; she did the floating technique with the By the Bay DSP seen here. 

    The floating technique is where you add strips of paper to a window sheet leaving spaces between.  Then die-cut it out and it looks like it's floating.  She used the Stylish Shapes dies for the circle.  

    More details:

    The bird is cut from the By the Bay Designer Series Paper. Leaf Sprig is from the Framed Florets and the embossing is from the Seashells 3D embossing folder in the annual catalog.  

    Here's the inside view – all done in Navy & Starry Sky inks.

    \

    Next is a gorgeous card cased from Gail Ellis.  

    She added 1 3/8" squares to a die-cut stitched rectangle measuring 3 3/8" X 4 3/4".  I love the white on white with that pop of gold and sea greens & blues!  The Faux Sea Glass shapes are added too.

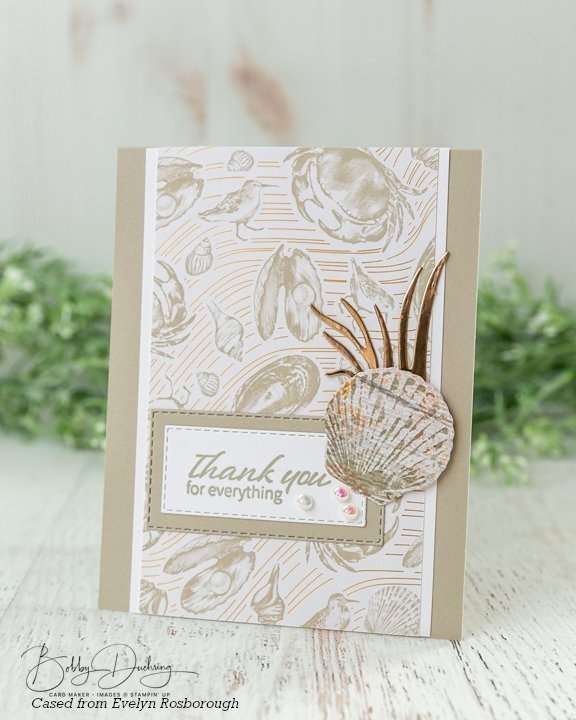
    Lastly for today is a card cased from Evelyn Rosborough. A beautiful monochromatic card – some of my favorites! 

    The DSP measures 3 1/4" X 5 1/2", the White layer is 3 1/2" X 5 1/2" on a Sahara Sand card base.  

    The seashell is cut from the Texture Chic DSP and the greetings are cut from the Stitched Rectangle dies.  Love that foil sea grass accent!  

    I'll share details on the other half of her cards tomorrow! 


    ~~~

    Sale-a-Bration & the Spring Catalog!


    Order online using the links below:

    January Host code links: FYRQ94HR or 69GXSA3B

    Get free Pastel Sequins with online orders over $55 when using the host code above! 

    January Host code links: FYRQ94HR or 69GXSA3B

     Earn free products with my loyalty rewards! 

    Click here to download yours and earn a $50 shopping spree!

    ~~~

    Best Deal Ever on the Starter kit here!

    Choose $175 in products for just $129 plus the new mini machine!

    Or choose $175 for $99 without a new Mini.  AMAZING!

    Leave a Reply

    Your email address will not be published. Required fields are marked *

  • Stack & Cut cards with Dandy Designs & Something Fancy with PDF project sheet & template download!


    I LOVE the cards I'm sharing with you today!!  So much!  

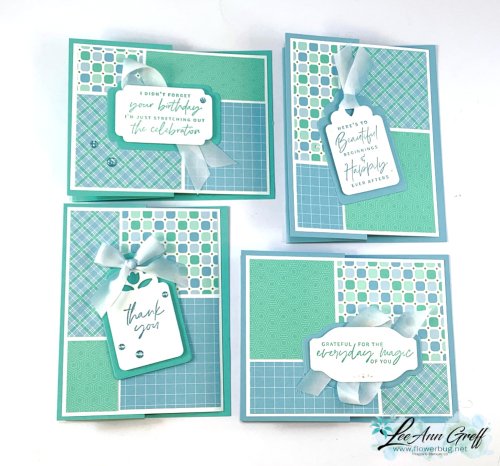
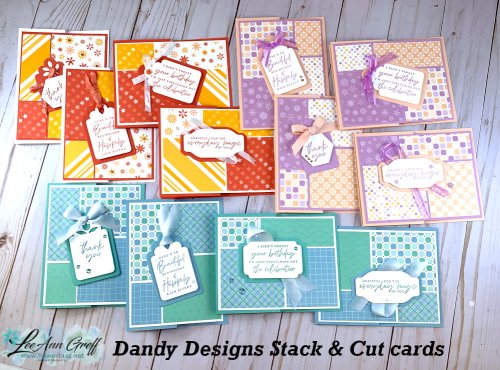
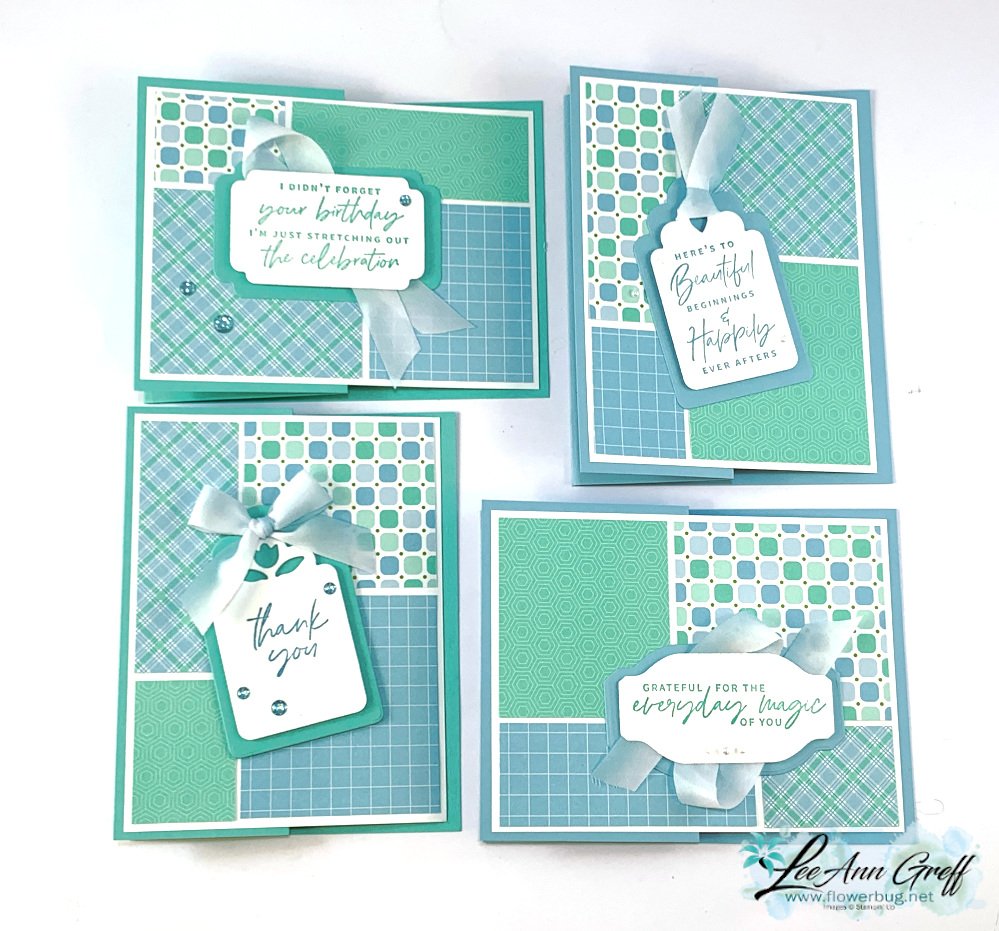
    They're 'Stack & Cut' cards using an easy template I'll share below.  I created these for last week's Facebook Live.  The Dandy Design SAB designer paper features gorgeous color combinations like this one: 

    Who would have thought Balmy Blue & Coastal Cabana would be so pretty together?!  I sure didn't.  But with the small prints and the addition of White & Pool Party it works beautifully. 

    Each set of cards feature this neat Dandy Designs designer paper seen here.  This huge pack of 48 12 X 12" sheets is free during Sale-a-Bration with any $100 purchase.  

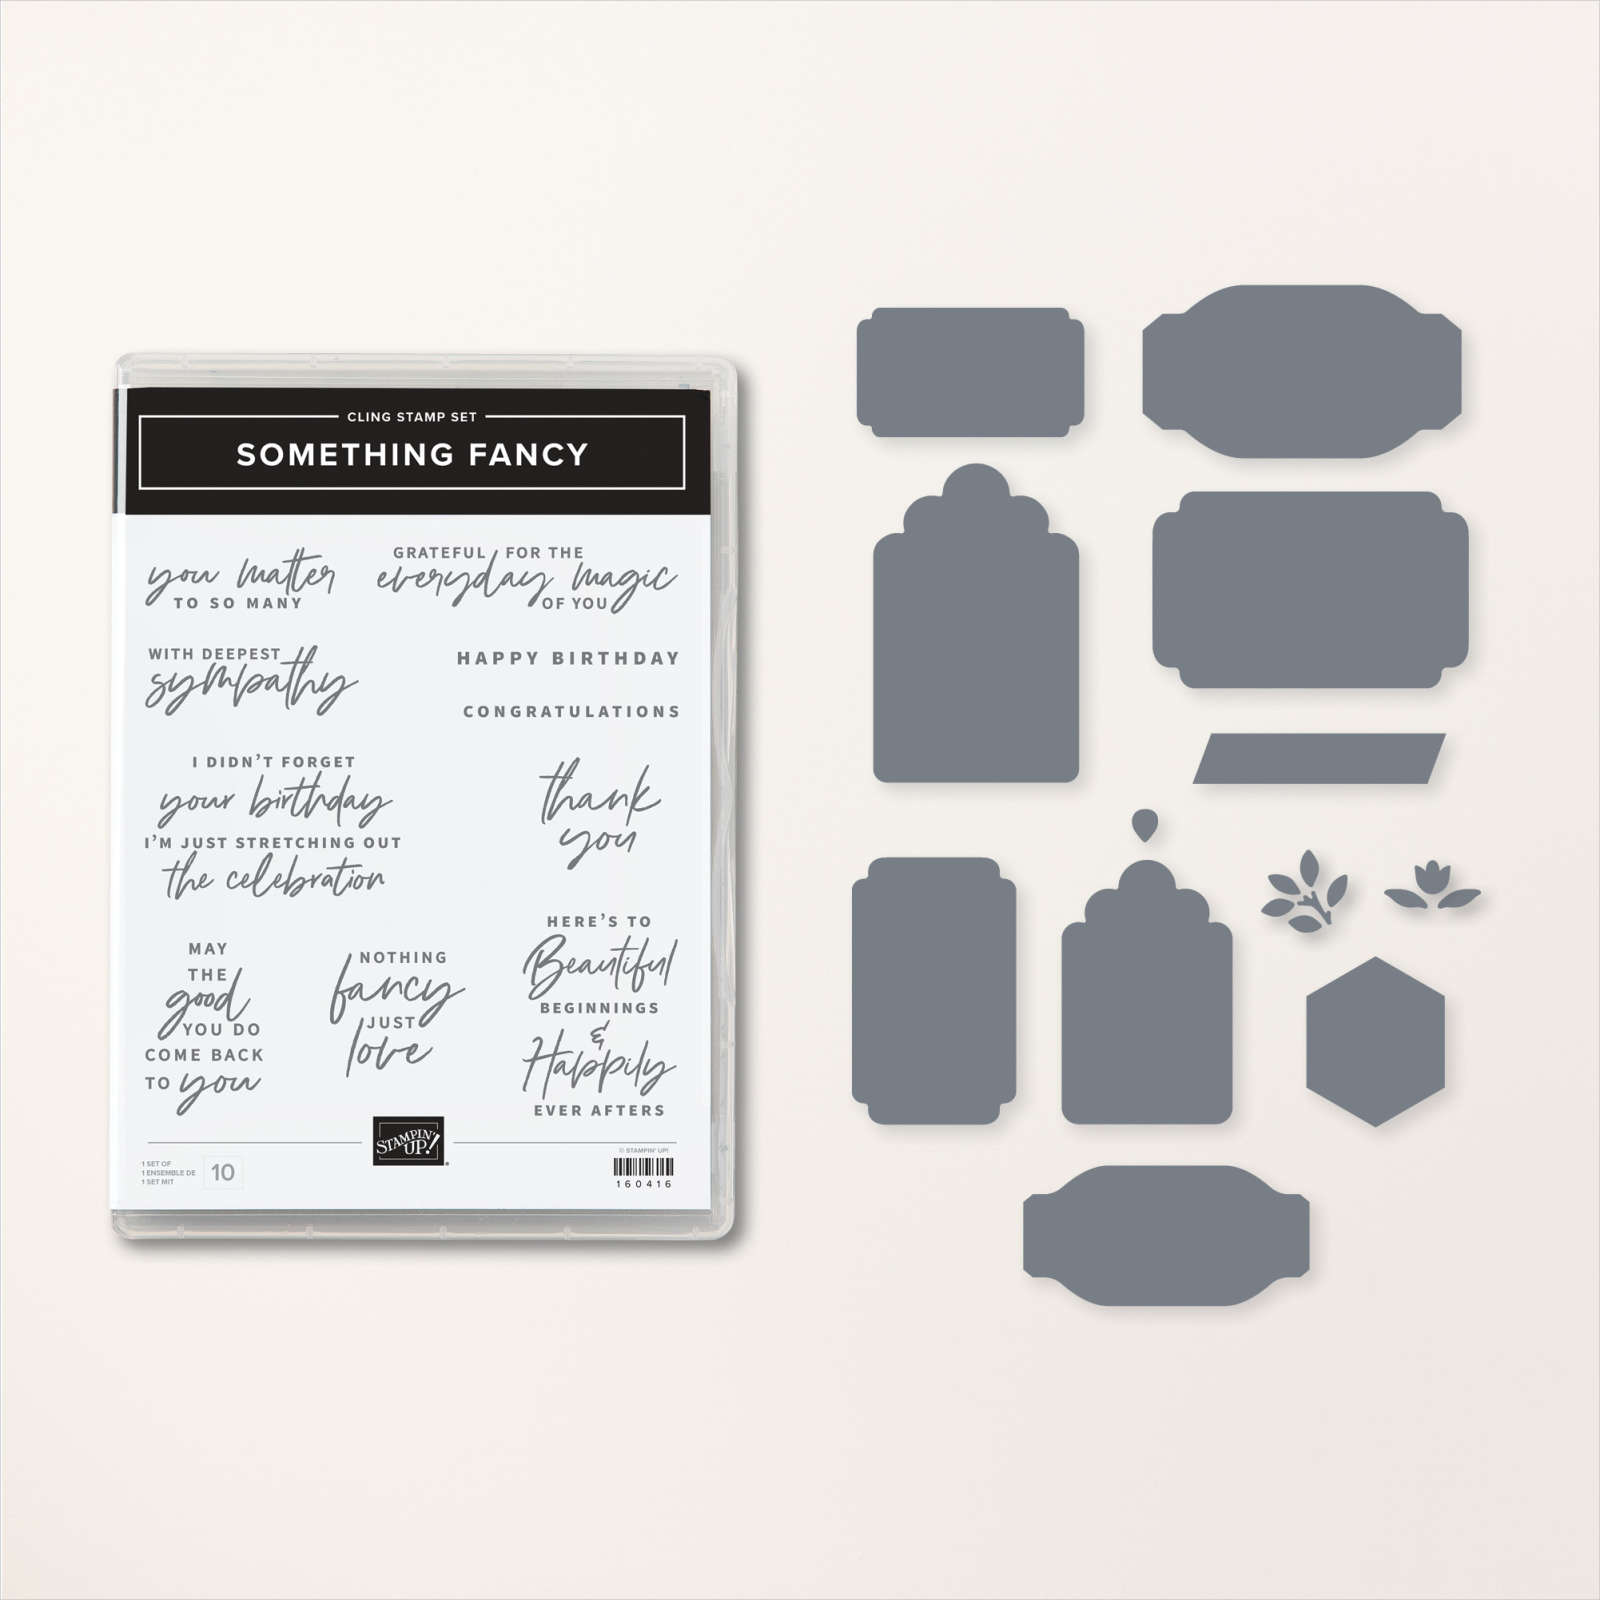
    For each of these sets of cards I also featured the Something Fancy bundle.  It's one of my top picks. See it here.  The greetings are great but the dies!  WOW; the tags and layers are perfect!  

    Add this bundle to your order and you're over half way towards getting the Dandy Designs paper pack free! All of these tags and greeting die-cuts are from these Something Fancy dies.  

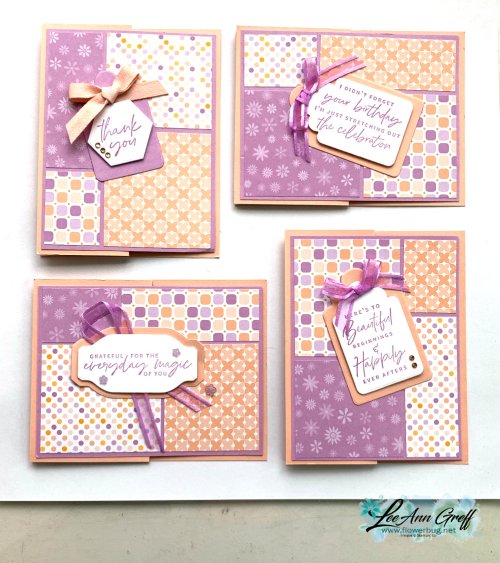
    This next set is all pastels in Fresh Freesia & Petal Pink; another color combo I would never have put together.  But it works!  

    You also might notice that each card is a fun fold.  Here are the measurements:

    • Horizontal cards – 4 1/4" X 11" card base, scored at 2 3/4" & 5 1/2"
    • Vertical cards 5 1/2" X 8 1/2" card base, scored at 2 1/8" & 4 1/4" 

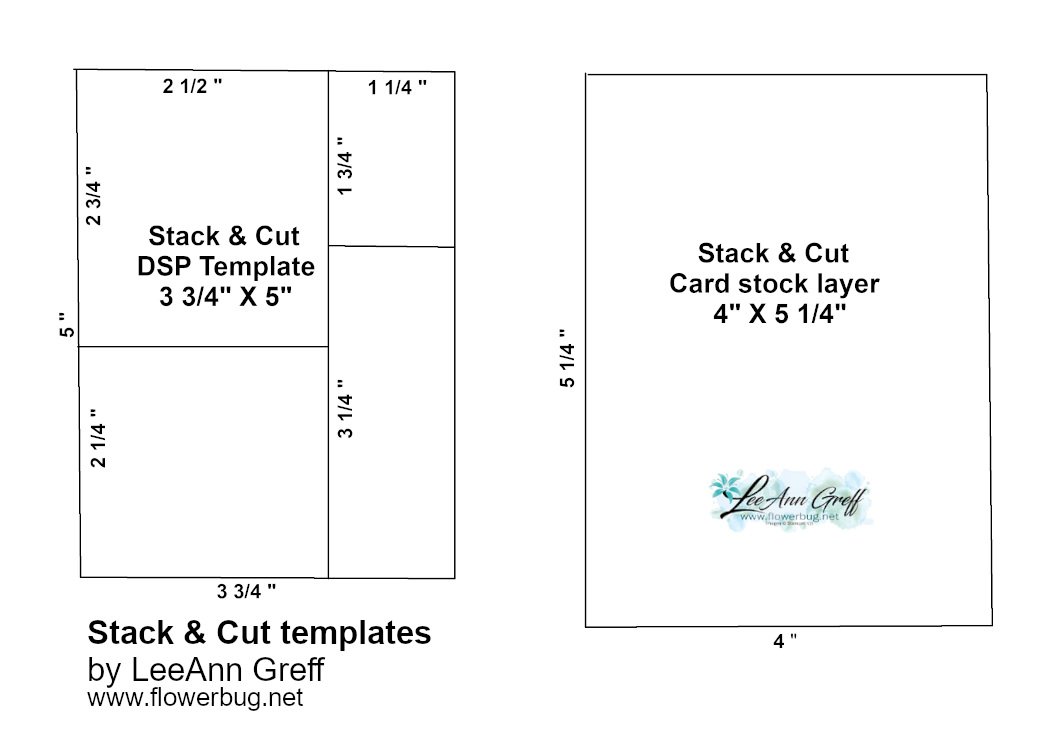
    Below is the template I used.  I started out with 4 pieces of designer paper measuring 3 3/4" X 5".  I cut two at a time using the measurements on the template.  Then I cut 4 pieces of card stock for the layer under the designer paper pieces.  It's so easy and a fabulous way to use up your designer paper AND get a bunch of cards done quickly.  

    *Save the photo or Download Stack & Cut cards & template here


    This last set features Calypso Coral with Mango Melody; a bright and fun combination.  

    You can see on the upper left and lower right a few of the optional die-cuts you can add to the tags.  The set actually features 3 options for details or a ribbon pull. 

    Here you can see all 12 of the cards I made with the Dandy Designs designer series paper and the Something Fancy bundle.  

    Click here to watch the video or click on the photo below. 

    Be sure to subscribe to my new YouTube channel here!  Unfortunately my previous channel was hijacked! 

    ~~~

    Sale-a-Bration & the Spring Catalog!


    Order online using the links below:

    January Host code links: FYRQ94HR or 69GXSA3B

    Get free Pastel Sequins with online orders over $55 when using the host code above! 

    January Host code links: FYRQ94HR or 69GXSA3B

     Earn free products with my loyalty rewards! 

    Click here to download yours and earn a $50 shopping spree!

    ~~~

    Best Deal Ever on the Starter kit here!

    Choose $175 in products for just $129 plus the new mini machine!

    Or choose $175 for $99 without a new Mini.  AMAZING!

    Leave a Reply

    Your email address will not be published. Required fields are marked *


Notice: LeeAnn Greff, Independent Stampin’ Up! Demonstrator, Manager. The content of this website is my sole responsibility as an independent Stampin’ Up! demonstrator and the use of, and content of, the classes, services, or products offered on this website is not endorsed by Stampin’ Up! Copyright 2025