/


Latest Post

Beautiful Embossed card swaps with foil accents


Our Team swap theme was to use foil or heat embossing on our cards. This was a fun theme that is especially easy around the holidays.

Today I’m sharing Jonna’s stunning card in Black, Silver & White:

It’s a ‘Wow’ card for sure! She textured the Basic Gray card layer with the Sunflower 3D embossing folder seen here first and then rubbed it with Versamark ink. Then she heat embossed it with Silver embossing powder. Just gorgeous!

Her measurements are as follows:
– Embossed layer 3 1/2″ square
– Black layer 3 3/4″ square, Black greeting layer 3 3/4″ X 1 1/4″
– White is 4″ X 5 1/4″, White greeting layer is 3 1/2″ X 1″

The greeting is from the Branching Out stamp set.

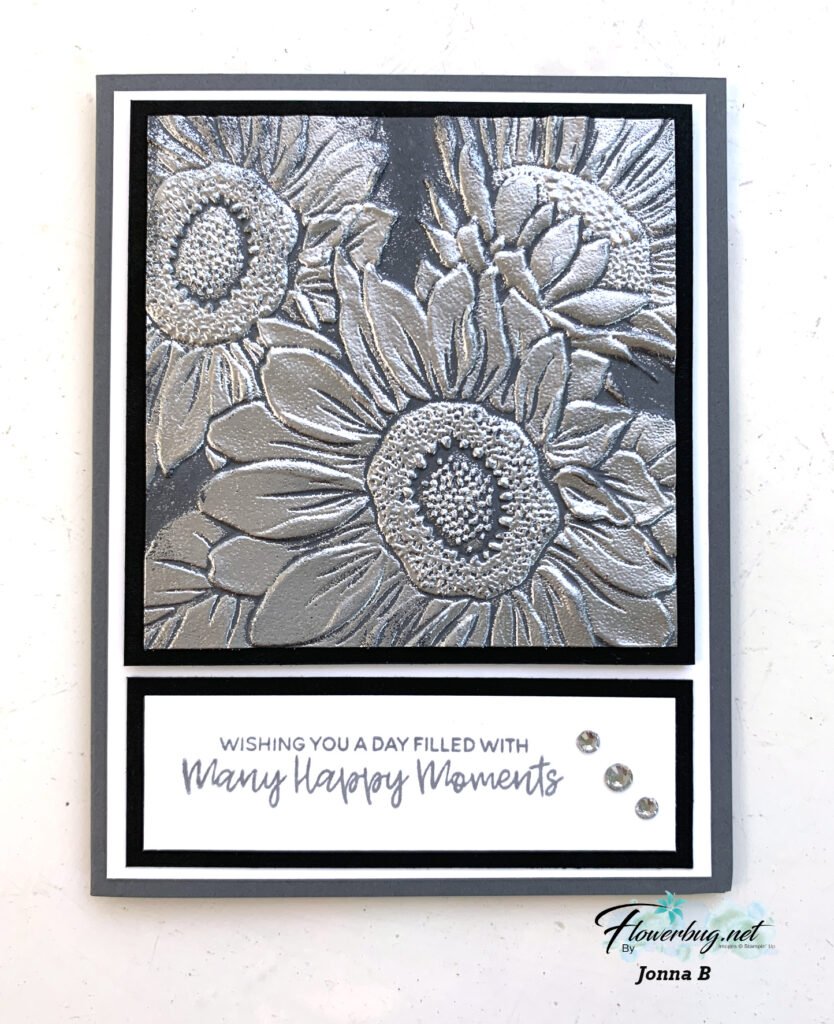
It’s a beautiful card Jonna!

~~~

The kits below will ship out this week so you have plenty of time to finish them by December. And they’re quick & easy too!

The Christmas Tags & More cards are easy because there isn’t any stamping. The greetings are from the gold foil ephemera pack included in the kit.

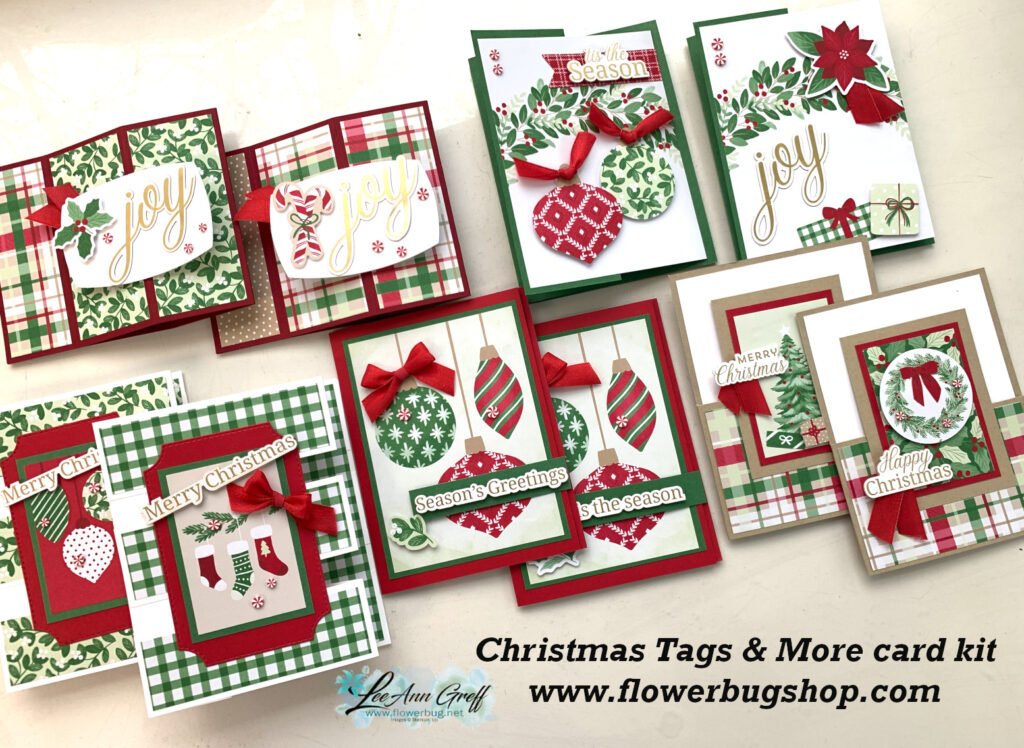
This kit to go includes a share of the festive designer paper, the ribbon, the peppermint gems, the ephemera greetings, the PDF tutorial and video too. Plus the pre-cut 10 cards that are all fun folds. All for $30 plus shipping. It’s a fabulous deal!

Don’t wait long; I have just a few left. Go here to get yours. *You will need to cut your new designer paper for the cards but my directions make that simple.

~~~

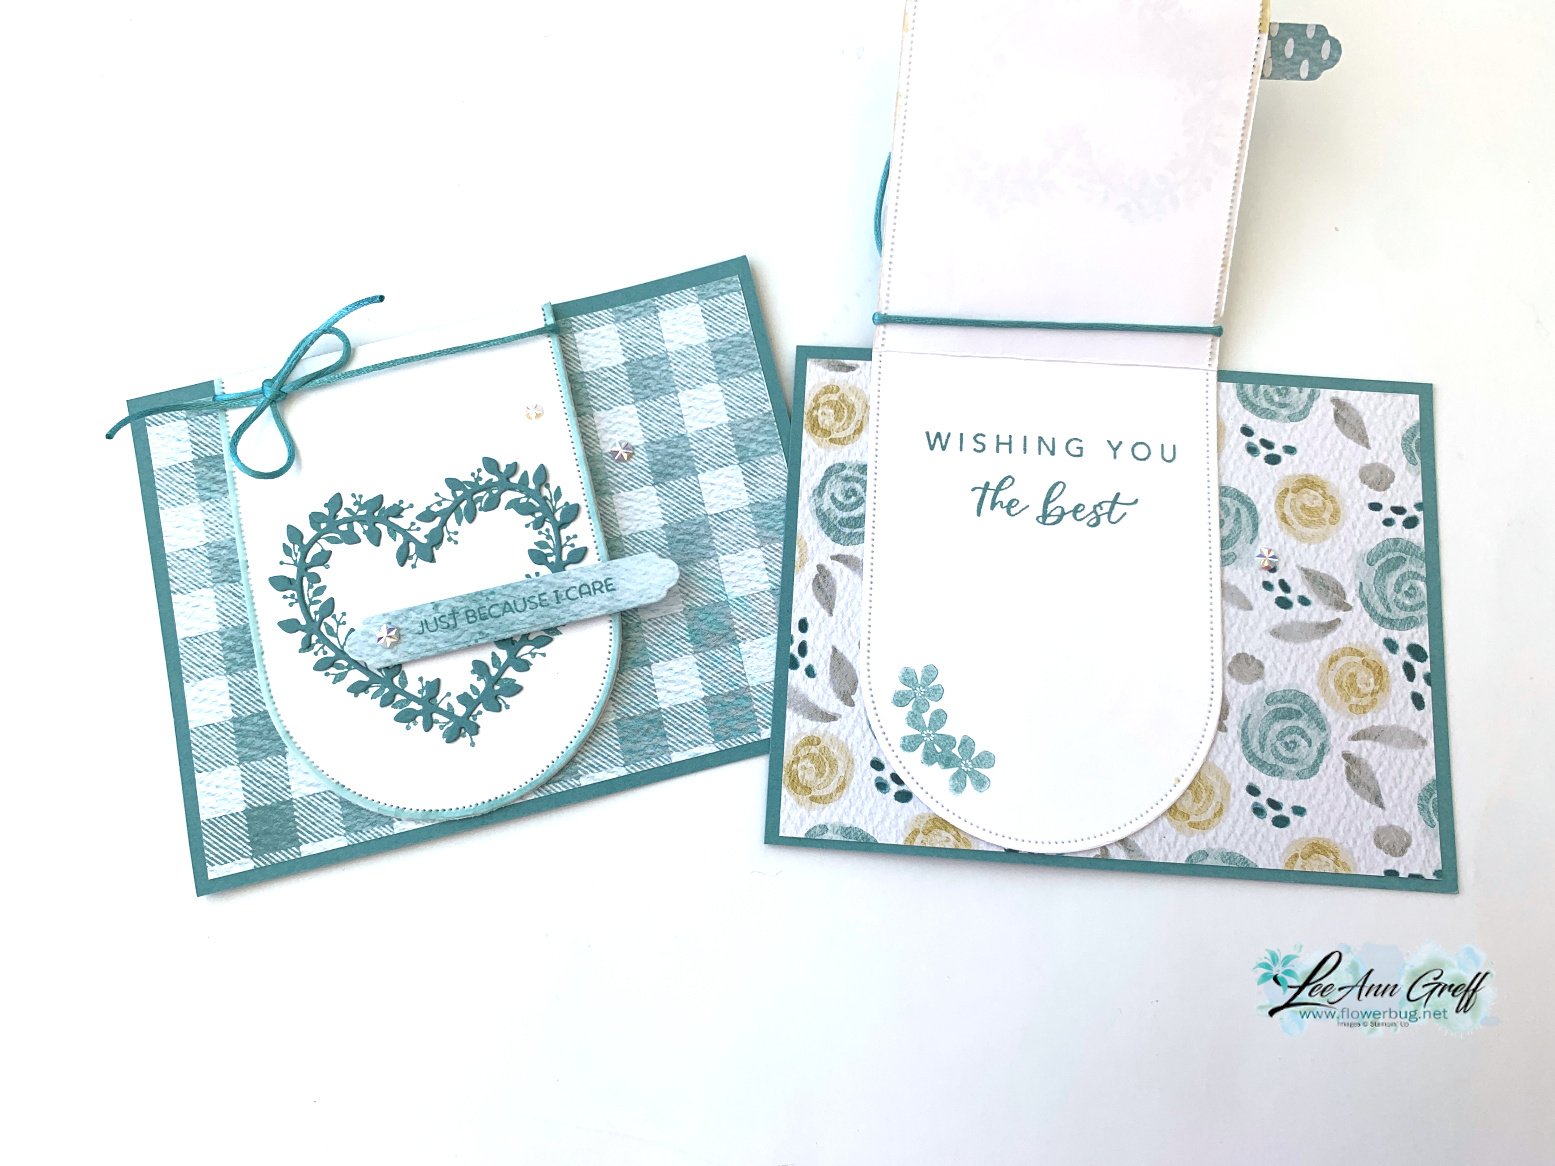
The other kit I created this month is also easy but does require stamped greetings. But there is very little prep & just a little trimming of the card bases to create these beautiful wintery cards:

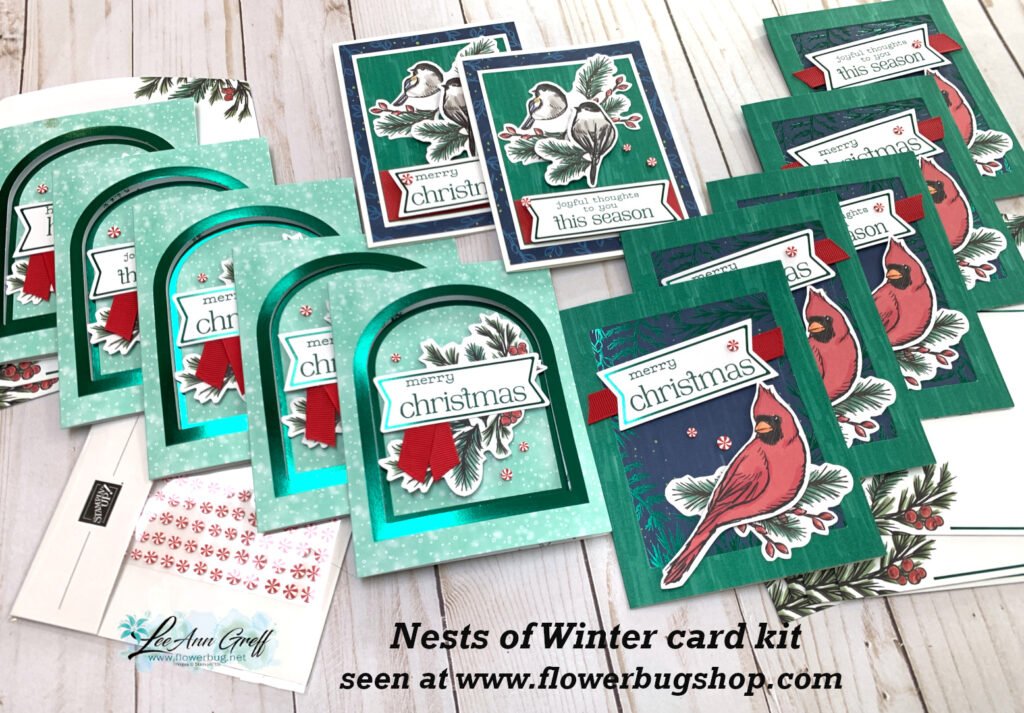
These cards could be winter or holiday; it’s your choice when you stamp the greetings.

This kit originated from a former Paper Pumpkin kit but I jazzed up the cards and added more to create 12 gorgeous cards. This kit includes 12 envelopes and a share of Peppermint gems plus the PDF tutorial.
I have a few left so grab yours soon. This kit is $29 and you can see it here.

**Remember to check out all of my kits to go and tutorials here at my shop; choosing more than one will save on shipping.

~~~

~~~

November Specials

New Online products are available on November 4th.
See them here.

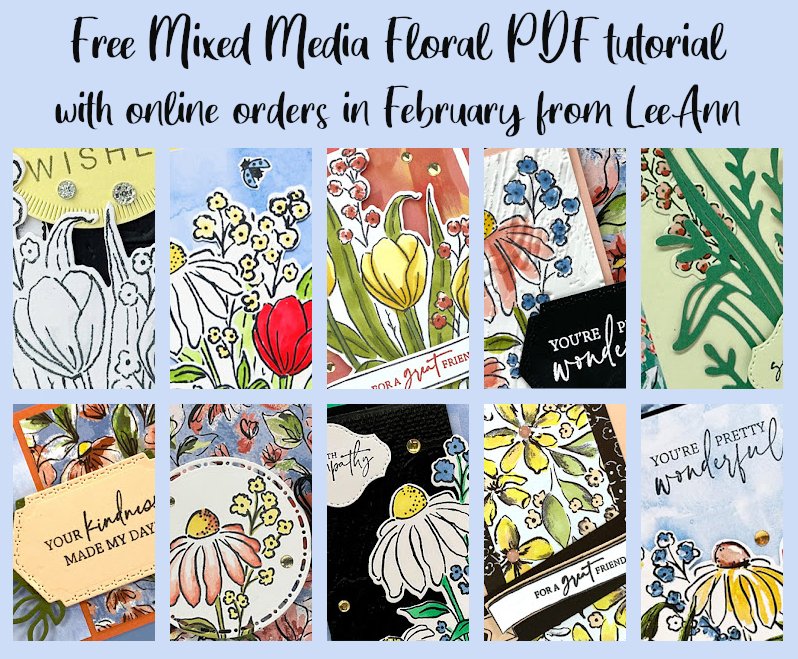
Get the Peaceful Garden suite tutorial FREE with any online order in November!

All Posts

  • A new Perpetual Calendar kit!


    There's a fabulous perpetual calendar out now in our Kits Collection.  What a wonderful gift this would make.  Or use it to keep track of your birthdays and special dates. 

    Use the Perpetual Beauty Calendar Kit to create the perfect 12-month calendar. Stamp out the months of the year using the included stamp set, then use the precut paper pieces and stickers to add some final touches and voilà—a calendar that fits your schedule!

    See it here.  It's just $25. 

    Kit includes:
    * Perpetual Beauty Calendar Photopolymer Stamp Set
    * Clear Stamp Block
    * Pretty Peacock Classic Stampin’ Spot
    * Precut pieces (No prep work! Get right to crafting)
    * Calendar size: 7" x 10-1/2" (17.8 x 26.7 cm)
    * Sticker sheets
    * Enough adhesive to complete projects

    It includes this awesome stamp set with each month of the year!  Think of how you could personalize your hand-made items. 

    These are the two new kits released earlier this month:

    ~~~

    December Specials:

    *current host code link:  

    P243X6VH

    3 new designer papers!

    ~~~

    Available December 3rd; while supplies last!

    ~~~

    ~~~

    Leave a Reply

    Your email address will not be published. Required fields are marked *

  • A few favorite craft storage tips


    I thought I'd share some of my favorite ways to store my stamping products.  Some people enjoy organizing more than creating! 

    First is how I store my stamp sets.  In a dresser drawer.  I purchased a few dressers from IKEA many years ago and they've held up very well despite multiple moves.  

    Here's a photo of my craft studio.  I am very, very lucky to have such a beautiful room in our home for my business and classes. 


    Here's how I store my 8 1/2" X 11" card stock and paper scraps.  In front of each color of card stock I keep a cello bag for the scraps in that color. I've used this method for years and it really helps me use my scraps.

    Next is how I store my 12 X 12" designer paper and scrapbook pages. 

    It's a shoe storage cabinet! My 12 X 12" paper fits like it was made just for it!  You can get two stacks side by side in it since it's about 30" wide.    Plus it has a divider to fit even more paper above it.  I love the way the doors hinge open.  There are three doors and it's only about a foot deep.

    Lastly here's how I store my inks, markers and ribbon. These are Stampin' Up! storage and they're fully customizable to fit what you need.  Click here to see the options. 

    I love that it fits right on my work area for easy reach. As you can see I organize my inks in rainbow order. I'm not sure why my Blends aren't but I know my granddaughter will love to do that for me this week while she's here.  

    ~~~

    December Specials:

    *current host code link:  

    P243X6VH

    3 new designer papers!

    ~~~

    Available December 3rd; while supplies last!

    ~~~

    ~~~

    Leave a Reply

    Your email address will not be published. Required fields are marked *

  • Merry Christmas!


    I hope you enjoy a beautiful Holiday with family & friends.  

    Leave a Reply

    Your email address will not be published. Required fields are marked *


Notice: LeeAnn Greff, Independent Stampin’ Up! Demonstrator, Manager. The content of this website is my sole responsibility as an independent Stampin’ Up! demonstrator and the use of, and content of, the classes, services, or products offered on this website is not endorsed by Stampin’ Up! Copyright 2025