/


Latest Post

New Home Decor kits are available!


This month the newest kits feature home decor items! They’re something different that might appeal to those who aren’t into card making.

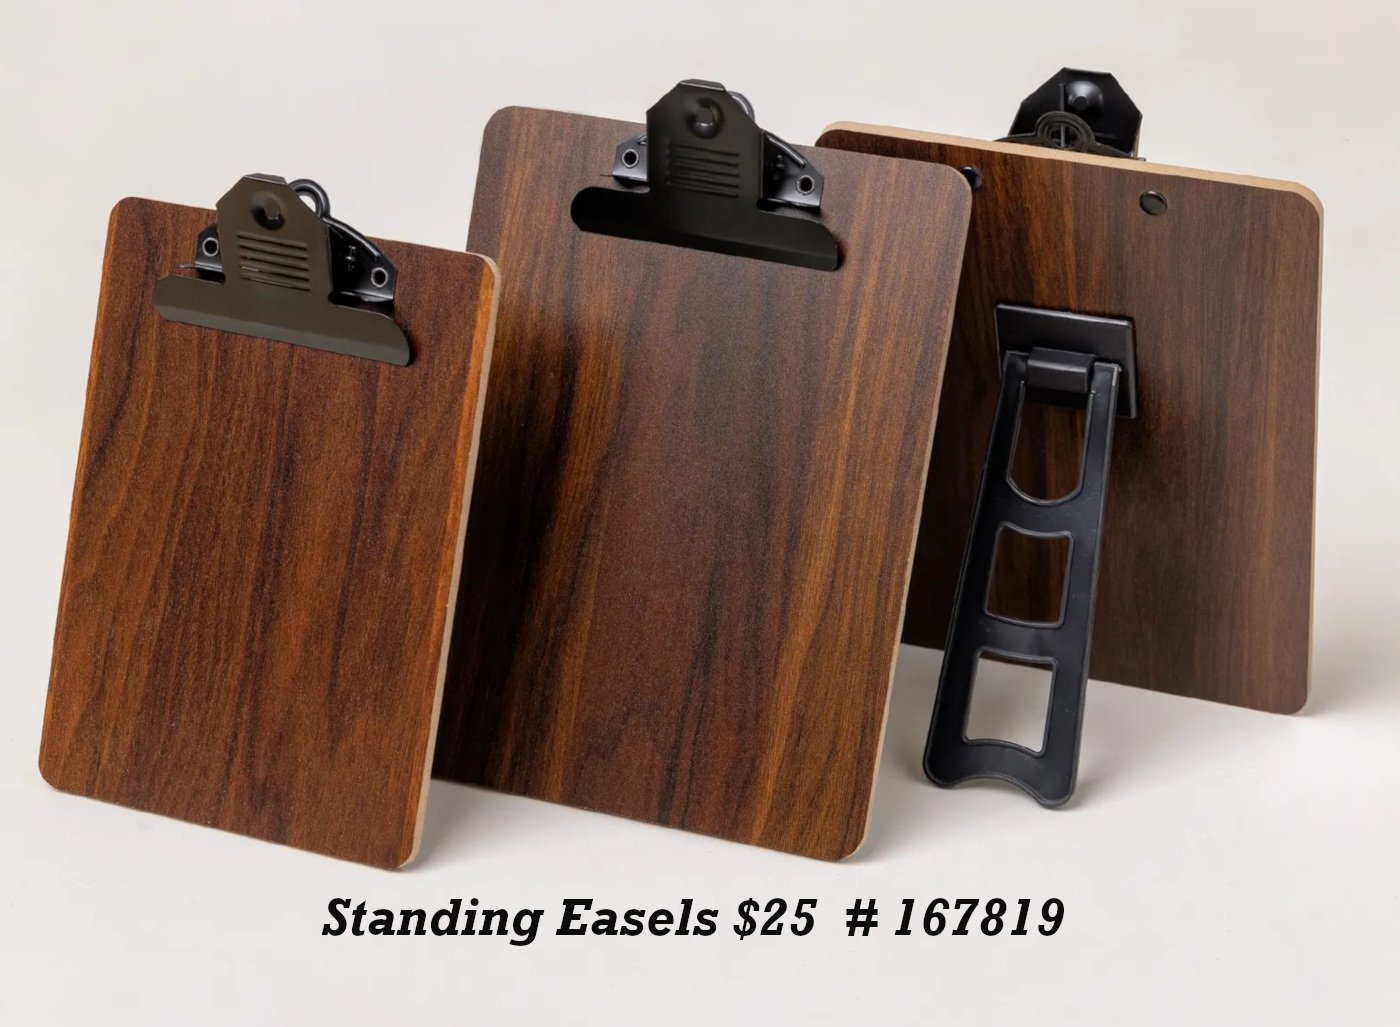
The Standing Easels seen here are made to showcase creations from the coordinating Radiant Reminders and Every Little Thing Kits (sold separately). These are also great for your handmade cards, photos, stamped art, and favorite quotes.

Details:

3 easel clipboards: 1 small and 2 large

  • Small clipboard: 4-3/4″ x 6-3/4″
  • Large clipboard: 6″ x 8″

Here are the other two kits that coordinate with the easels:

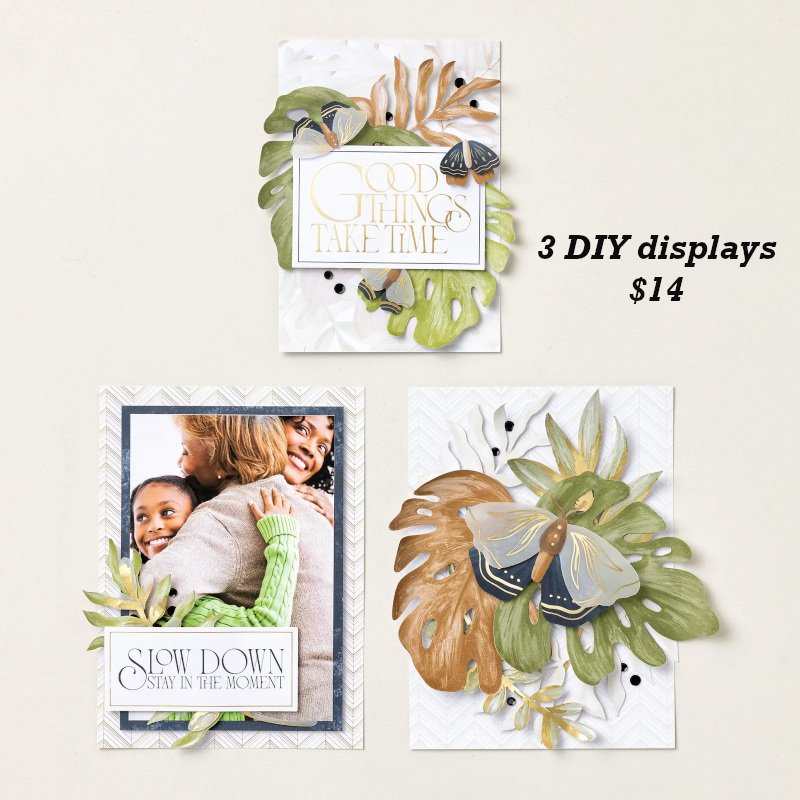
Create three DIY displays with the Radiant Reminders Kit seen here. Featuring monstera leaves, luna moths, and neutral patterns in beige, black, brown, green, and gold, these handmade home decor pieces let your creativity shine while adding natural, organic style to any room. It makes 3 displays.

Kit includes one of each item listed below.

  • Step-by-step instructions
  • Precut paper images
  • Printed labels
  • Includes gold foil
  • Adhesive

The last new home decor kit released this month is called The Every Little Thing kit and can be seen here.

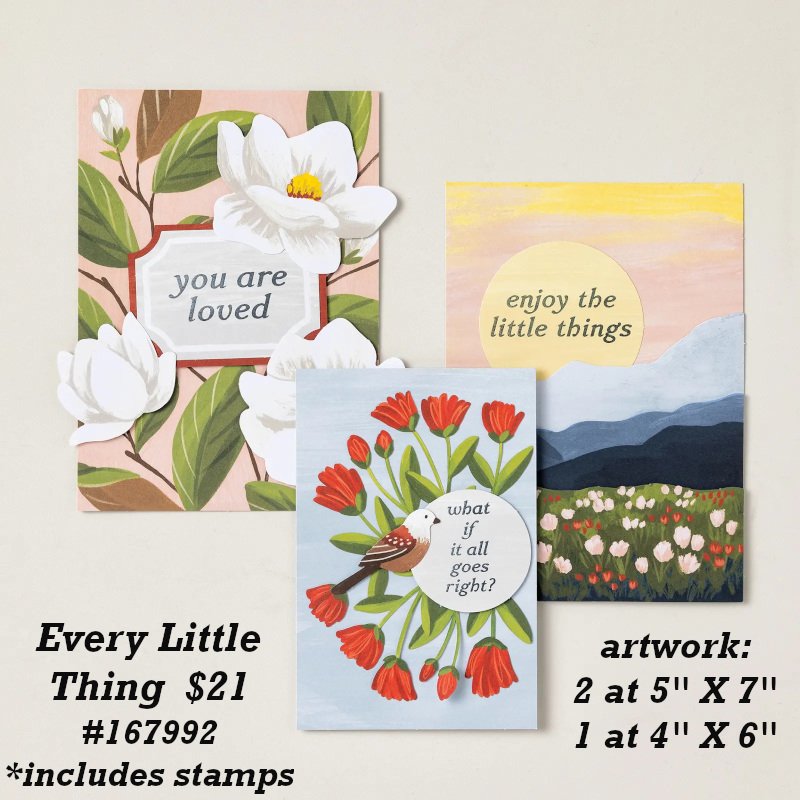
Create three DIY floral and nature-inspired paper artworks with the Every Little Thing Kit. Featuring magnolias, tulips, mountains, and a bird, each piece includes uplifting sentiment stamps to brighten your home. It makes 3 pieces of layered artwork.

Kit includes one of each item listed below.

  • Every Little Thing Stamp Set
  • Clear stamp block
  • Secret Sea Classic Stampin’ Spot
  • Step-by-step instructions
  • Precut paper pieces
  • Adhesive

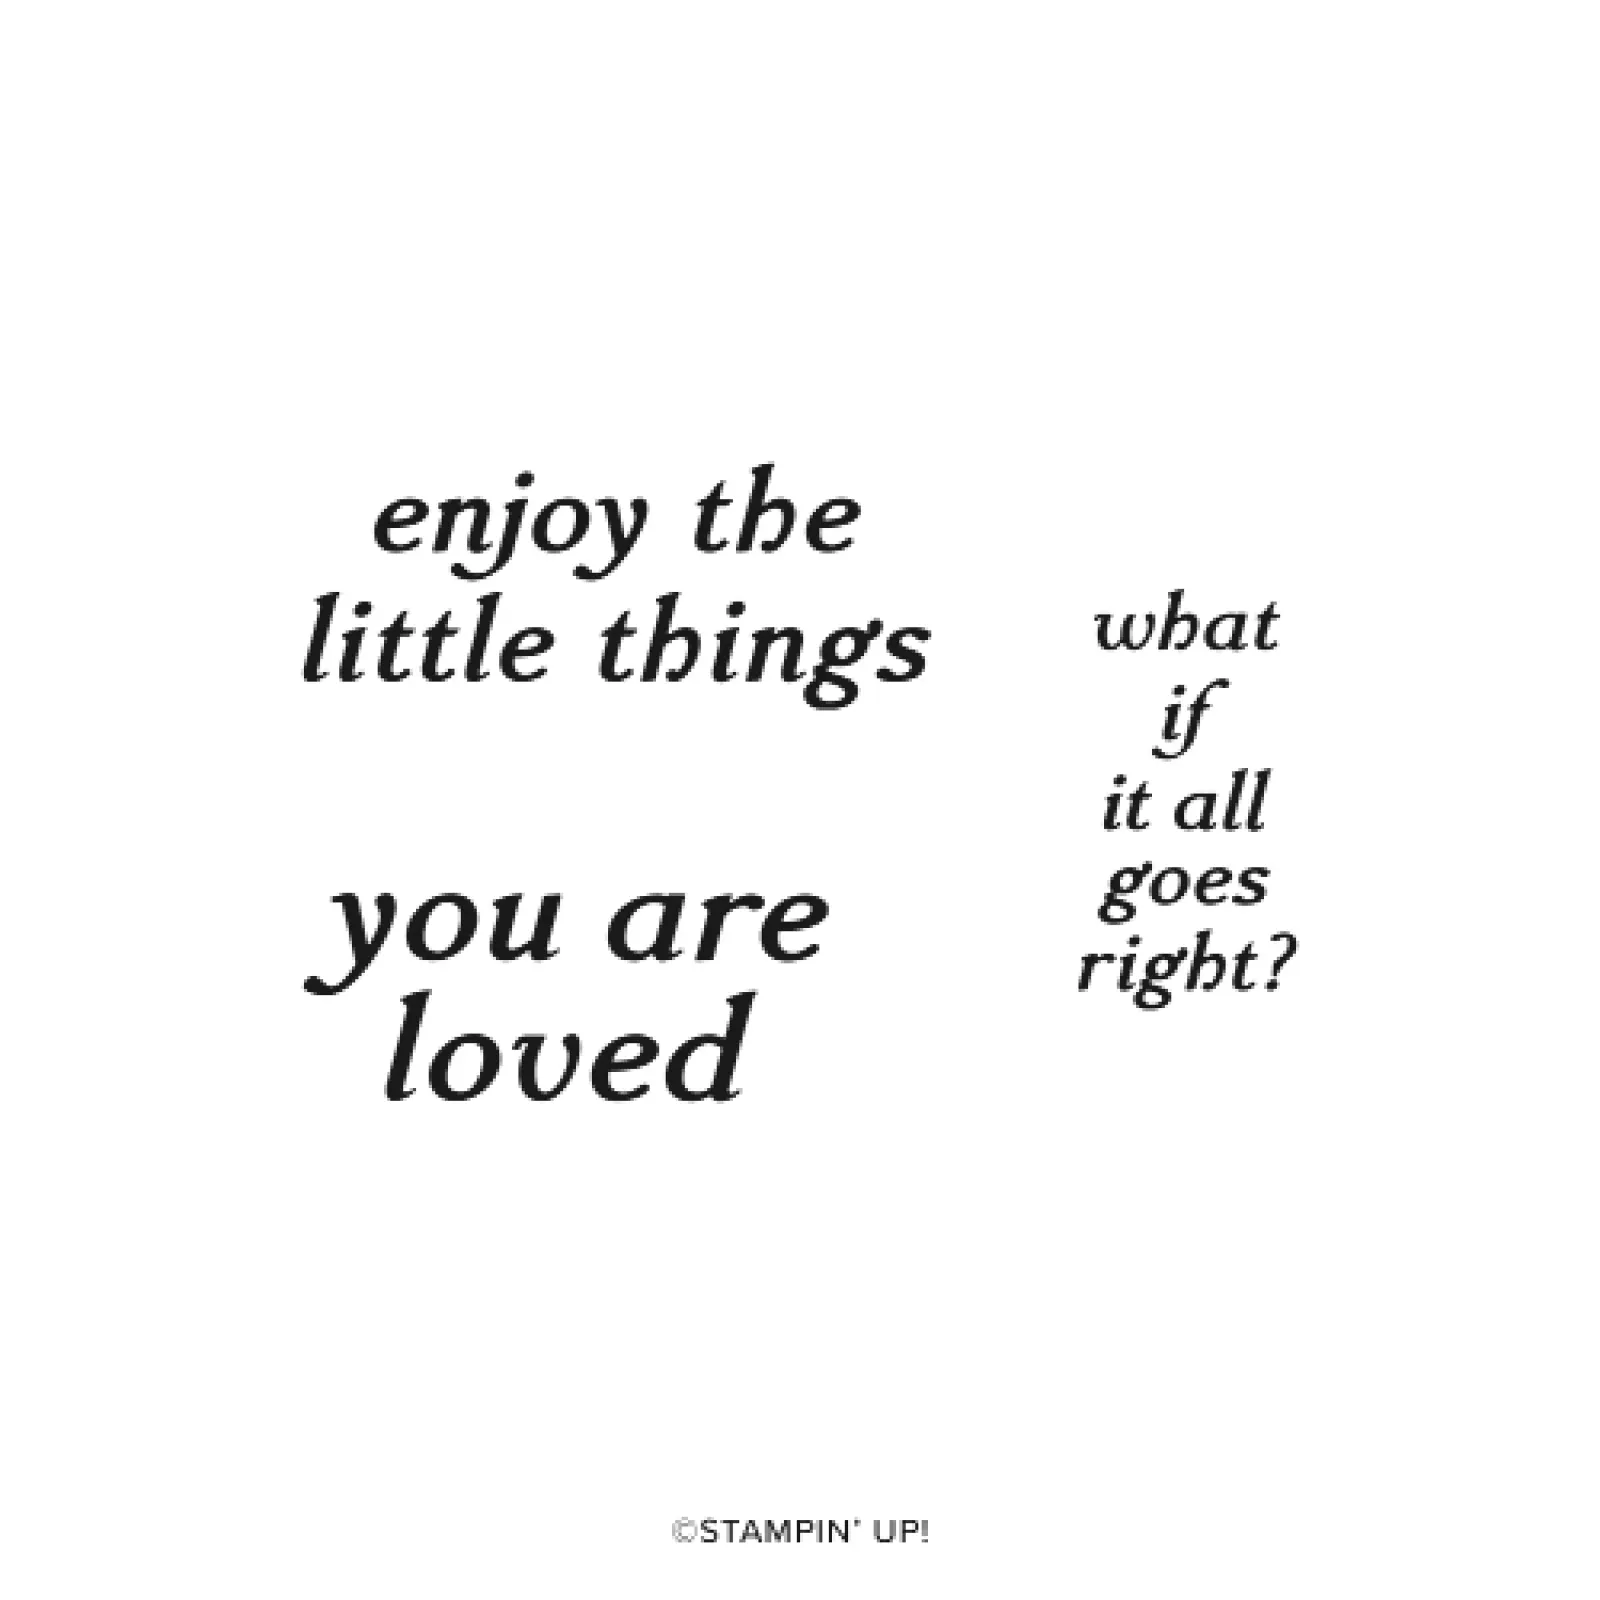
Here’s the stamp set included:


All Posts

  • A cute Spooky Halloween cards


    I created this special card using the Spooky Halloween suite. I absolutely love this scene!

    I used the largest circle die in the Spotlight on Nature dies to create the mask around the large moon. I blended Petunia Pop ink onto a piece of White card stock. Then added the yellow die-cut moon. Next I sponged Secret Sea ink on the upper portion of the card.
    Lastly I added a curvy hills (cut with a scissors) and the die-cut house and fence pieces from the bundle.

    Check out those sparkly stars and die-cut bat! I heat embossed the word ‘spooky’ with White embossing powder and then colored the embossing purple with a Blends marker.

    You can see this neat bundle here.

    ~~~

    October Specials

    3 new kits and a Starter Kit special! See the kits here.

    And get the Starter kit here. *Choose your deal – $35 or $99 plus $90 in free products including free shipping, free Paper Pumpkin kit & free catalogs/business supplies!

    ~~~

    All online orders from me will receive a beautiful PDF of projects featuring the Modern Christmas suite.

    Reasons to ShopwithLeeAnn.com

    • Get a free PDF project tutorial with any online order! (changes monthly)
    • An order of $55 or more earns you a free 3 card stamping kit with pre-cut layers; ready to stamp & assemble
    • Earn 10% host rewards on each order you place (over $20). Redeem on a future order.
    • Join my Flowerbug’s Team and get $90 in free product of your choice in October! Details here.
    • Be a Paper Pumpkin subscriber and enjoy the free bonus project PDF tutorial every month. Subscribe here. Refills here.

    Leave a Reply

    Your email address will not be published. Required fields are marked *

  • Get a beautiful PDF of Modern Christmas projects!


    Any online order in October placed through me will receive a gorgeous PDF of projects featuring the new Modern Christmas suite. This is a beautiful suite filled with Black, White & Gold foil accents.

    It includes 10 projects with photos, directions. a supply list and measurements for each project. You can see this suite here.

    I created a card I want to share with you. I think it’s beautiful!

    My colors are Black, White & Gold. I used multiple sheets of the Modern Christmas Designer paper. Notice that some of the trees are raised. I fussy cut a section from the designer paper and added it over a die-cut circle of another set of trees. I layered that onto a Black die-cut circle from the Spotlight on Nature dies. Finally I added one of the new gold hoops around it all. Tip: adhere the gold hoops with tiny dashes of Multipurpose Liquid Glue. Works great!

    I hope you like this card; it’s one of the free projects included in the free PDF tutorial for anyone who orders from me in October. Click here to order!

    ~~~

    October Specials

    3 new kits and a Starter Kit special! See the kits here.

    And get the Starter kit here. *Choose your deal – $35 or $99 plus $90 in free products including free shipping, free Paper Pumpkin kit & free catalogs/business supplies!

    ~~~

    All online orders from me will receive a beautiful PDF of projects featuring the Modern Christmas suite.

    Reasons to ShopwithLeeAnn.com

    • Get a free PDF project tutorial with any online order! (changes monthly)
    • An order of $55 or more earns you a free 3 card stamping kit with pre-cut layers; ready to stamp & assemble
    • Earn 10% host rewards on each order you place (over $20). Redeem on a future order.
    • Join my Flowerbug’s Team and get $90 in free product of your choice in October! Details here.
    • Be a Paper Pumpkin subscriber and enjoy the free bonus project PDF tutorial every month. Subscribe here. Refills here.

    Leave a Reply

    Your email address will not be published. Required fields are marked *

  • Easy box to gift or store cards in with free project sheet


    I’m thrilled to share this fabulous box to gift or store hand made cards in. It starts with a box from our Kit Collection. They’re sturdy and look what you can do with one!

    I shared how to make this on last week’s Live video. I know many of you have purchased kits from Stampin’ Up! and hopefully have a few of these saved. The inside organizing sections are made with the thin card board from our designer paper packs. Recycle!

    I created a free project sheet so you can replicate this at home. I truly hope you do! Click here to download or print this project sheet and also watch the video below to see how it’s made and see my tips for success too.

    The photo above shows the two sets of cards I made with the Gathering Moments stamp set – 2 sets of colors too! Which do you prefer?

    Here’s the other version of the box I shared:

    Below is the video where I shared how to make the 5 at a time cards shown in the box and the box itself.

    September free dimensionals

    ~~~

      To see all of the new Online items click here.  Or download & save the Download Online Exclusives flyer 

    Get a free project tutorial with any online order in September! 

    Gathering Together graphic

    Leave a Reply

    Your email address will not be published. Required fields are marked *


Notice: LeeAnn Greff, Independent Stampin’ Up! Demonstrator, Manager. The content of this website is my sole responsibility as an independent Stampin’ Up! demonstrator and the use of, and content of, the classes, services, or products offered on this website is not endorsed by Stampin’ Up! Copyright 2025