/


Latest Post

3 remarkable card ideas with the Mountain Air bundle


Continuing my Masculine swap share this week all of today's cards feature the Mountain Air stamp set seen here & Majestic Mountain dies seen here.  My Flowerbug's Team did an incredible job on their swaps; I hope you've been enjoying the ideas. 

First is a clever card made by Jacki.  She created quite the special camping scene! 

Her colors include Evening Evergreen, Crumb Cake, Early Espresso & black with a bit of yellow on the camper.

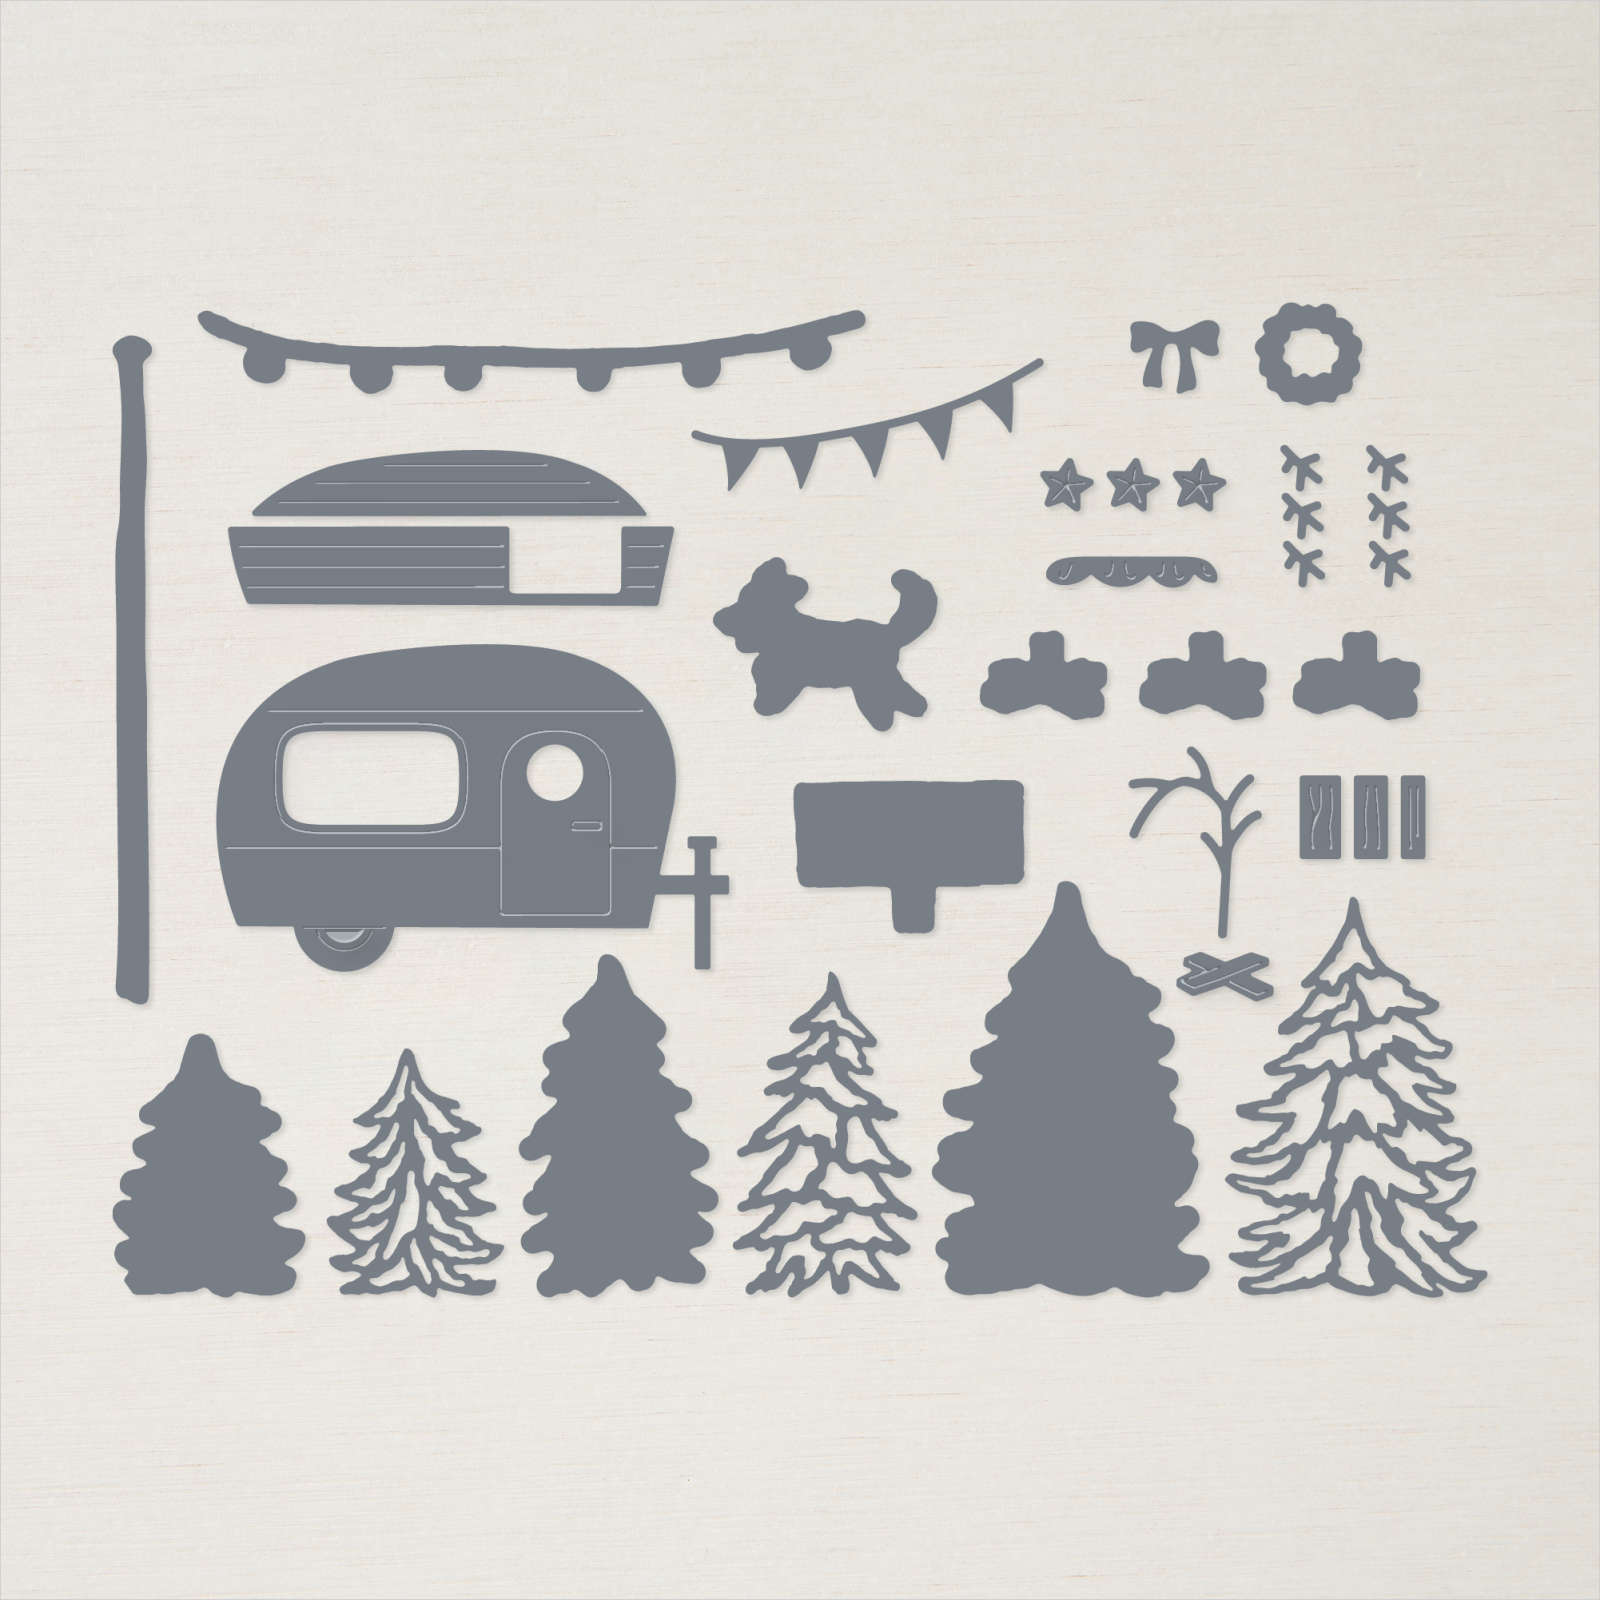
That adorable camper is from the Tree Lot dies – one of the Sale-a-Bration choices in July & August.  See it here.  It's free with any $100 Stampin' UP! order.  *Remember that our Sale-a-Bration items are while supplies last…..

She masked her mountains and blended on a pretty skyline in blue & purple.  

Did you catch the 'curtain' in the camper?  That's our Black & White gingham ribbon!!  And the hitch is done in Silver foil.  

~~~

Next is another special card made by Tracey.  I really like how she created a smaller scene than we usually do; almost like a picture in a frame.  Out of the box thinking!  

Her colors are Crumb Cake, Old Olive, Pacific Point & Early Espresso.  Stamping the greeting repeatedly on a strip is another unique way to add a greeting but not a separate greeting image.  

She colored her stamp with markers to get the blue water on the same stamp as the small trees.  She masked the trees and stamped a 2nd time to get more water.  So smart!  

~~~

Next is my card.  I wanted to do a 'Triptych' card – this is where you have three separate panels creating a scene.  

Details:

  • I stamped the mountain & trees images all on one piece of White CS using the Stamparatus. It measured 4 1/2" X 3 1/4" and after stamping they are cut to 1 1/2" wide.
  • I used Evening Evergreen, Soft Succulent & Gray Granite ink.  I stamped the same 'tree' image a second time in Soft Succulent, but I moved the card stock up and over a bit so it wasn't directly above the first set.  
  • I sponged Evening Evergreen on the bottom and Balmy blue on the top, masking the mountains a bit so they stayed white.  
  • The large White layer is 5 1/4" X 4" and is textured with the Timber 3D embossing folder. 

Here's the Mountain Air stamp set; as you can see it is a scene builder set which is a favorite type of set for me. This one is special because it's a reversible set which means one side features a silhouette and the other side is a detailed image. Fun & versatile!  

Cards for men can be hard for some of us to make so I hope you're enjoying the 'manly' cards I'm sharing all this week! 

~~~

July Specials

Get free items here in July & August during Sale-a-Bration! 


Host code: RMFKDE3G


Get a free card class in the mail with a $55 order from July 1-30th.

 *click here to order 

Earn free products with my loyalty rewards! 

Click here to download yours and earn a $50 shopping spree!

~~~

Get my Holiday Designer Paper share; contact me here  

All Posts

  • Triple Accordion fun fold card with Lights Aglow DSP; easy but WOW!


    I love this unique fun fold card; I'm calling it a triple accordion card.  I demonstrated it on this week's FB Live video.  See it here on my YouTube channel.  


    I featured the Lights Aglow specialty designer paper seen here.  It's so beautiful in Cherry Cobbler, Soft Succulent, Black, Evening Evergreen and pretty gold foil accents. Luckily it's back in stock right now. 


    Here's what the card looks like folded flat.  It shows off multiple sheets of the designer paper and fits in a standard A2 envelope, measuring 5 1/2" X 4 1/4". 

    I used a few other products here; especially gold themed items. 

    Gold foil and Gold Distressed paper, Elegant Metallic trim, Gold embossing powder & Festive Pearls.  I also used the Twinkling Lights and Layering Circle dies and the Brightest Glow stamp set.

    For variety I added some Evening Evergreen to the next card.  

    Measurements: 

    • Cherry Cobbler card base 4 ¼” X 11” scored at 2 ½”, 3 ¾”, 6 ¾” & 8 ¼”
    • DSP 2 pieces at 4” X 4”, the center Cherry square is 3". Vanilla 2 ½” X 4”

    Below you can see the gold tree & dotted die-cut snowflakes & garland from the Twinkling Lights dies here.  Again, the greetings are all from the Brightest Glow stamp set seen here. 

    The greeting die-cut for the 'joy' is from the Potted Succulents dies; a few loops of gold cord are added underneath it.  


    Which one do you prefer; the card with some Evergreen or the one all Cherry Cobbler?  


    Click on the photo below to watch this card tutorial demonstration.  

    ~~~

    October Specials

    Starter Kit special! Get $155 in product for just $99

    click here

    ~~~

    Order online here

    Host code links: GDCBRHF7 or SVBHWRCY

    Get a free embellishment from me with online orders over $50!


    Earn free products with my loyalty rewards! 

    Click here to download yours and earn a $50 shopping spree!

    Leave a Reply

    Your email address will not be published. Required fields are marked *

  • Look what you can do with the Charming Landscapes embossing folders


    I shared a fun way to use the Charming Landscapes embossing folders in this week's FB Live video.  Look! 

    After I textured White card stock with the folders I trimmed the excess off and adhered it over a piece of Lights Aglow designer paper and then onto my White card base.  So simple with just a little bit of fussy cutting.  See the Charming Landscapes embossing duo here. 

    The greeting is from the Brightest Glow stamp set, heat embossed with Gold embossing powder.  A few loops of gold cording is added to the back.  

    Here's another version; a bit more fussy cutting on this one though! 

    This one did take more time to trim….  I added light So Saffron Blends marker and Wink of Stella to the little village houses.

    What do you think?  I love the elegance of the Black, White & Gold colors.  


    Below is the video where I show these cards and a special fun fold card too.  All made with the beautiful Lights Aglow specialty designer paper seen here.  


    There are still a few spots left in my Lights Aglow Christmas card kit to go.  Click here to see it.  Or get the PDF tutorial here.  

    ~~~

    October Specials

    Starter Kit special! Get $155 in product for just $99

    click here

    ~~~

    Order online here

    Host code links: GDCBRHF7 or SVBHWRCY

    Get a free embellishment from me with online orders over $50!


    Earn free products with my loyalty rewards! 

    Click here to download yours and earn a $50 shopping spree!

    Leave a Reply

    Your email address will not be published. Required fields are marked *

  • Cute ideas for Santa Express bonus cards; included in the Kit to Go


    Before we get to today's cards; I have to make sure you know about the Clearance Rack refresh. So many great deals; but they're while supplies last.  Click here to see them. 


    ~~~

    This month one of my kits to go features the Santa Express Memories & More cards seen here.  I sincerely enjoy playing with these cards & the many extra elements included in them.  

    Besides the 10 cards & envelopes they'll make with the kit and PDF tutorial I've created some bonus cards they can make as well.  Here's a peek at them: 

    There's no stamping on any of these; all greetings and layered pieces are from the kit itself.  

    Notice the cursive words and the stars?  These are wooden elements included in the kit!  I colored them with Blends markers.  They're actually nice and thin; maybe around 1/16" in height.  

    Here's a link to this kit to go. It's while supplies last; so opt in soon! 

    ~~~

    October Specials

    Starter Kit special! Get $155 in product for just $99

    click here

    ~~~

    Order online here

    Host code links: GDCBRHF7 or SVBHWRCY

    Get a free embellishment from me with online orders over $50!


    Earn free products with my loyalty rewards! 

    Click here to download yours and earn a $50 shopping spree!

    Leave a Reply

    Your email address will not be published. Required fields are marked *


Notice: LeeAnn Greff, Independent Stampin’ Up! Demonstrator, Manager. The content of this website is my sole responsibility as an independent Stampin’ Up! demonstrator and the use of, and content of, the classes, services, or products offered on this website is not endorsed by Stampin’ Up! Copyright 2025