/


Latest Post

3 fun fold cards celebrating Strawberry Slush!


I have THREE neat fun fold cards from our June Team card swap.  My Flowerbug's did an incredible job on their fun fold cards!  

First up is Sharon's card featuring the Cheers & Sips bundle seen here. 

The top card base layer is scored to creates a box that pops up & supports the front panel. Super neat! 

She added Fine Tip Glue to her fussy cut drinks for some shine.  To do this you need to let it set awhile to dry. I'd recommend two layers.  If you don't want it to get a bit curvy from the liquid in the glue, add a layer of card stock under it.  

Her inside greeting is from the Unbounded Love set.  The gems are from the Holographic Resin dots.

Measurements:

  • Strawberry Slush card base 8 1/4" X 5 1/2" scored at 4 1/4", 5 3/4", 6 1/4", 7 3/4"
  • front CS panel 2 3/4" X 4"
  • DSP 2 pieces at 1 3/8" X 5 3/8", pieces under the greeting are 2 3/4" X 1 1/4", 2 3/4" X 1/4" and inside is 2 3/4" X 1 1/4" 
  • inside White panel 2 3/4" X 4"

~~~

Next is a neat Latch card made by Kathy who used the Sweet Jar bundle seen here. 

Her colors include Cloud Cover and Strawberry Slush. The Designer Paper is from the Florals in Bloom DSP seen here. 

The front flap opens up to reveal another panel that she stamped with coffee beans and the die-cut from the Paper Pumpkin add on dies (now retired).

And the front panel open up too!  

Measurements:

  • card base 7 1/4" X 5 1/2" scored at 4 1/4"
  • DSP 2 3/4" X 5 1/4"
  • White panels X 3 – 2 3/4" square; inside 4" X 5 1/4"
  • Strawberry Slush square 3"
  • 2 1/2" X 1" scored at 1 1/4" connecting piece

~~~

And now for the final card today. This one was made by Paula and was cased from Heidi Colins.  It's called a Buckle card:
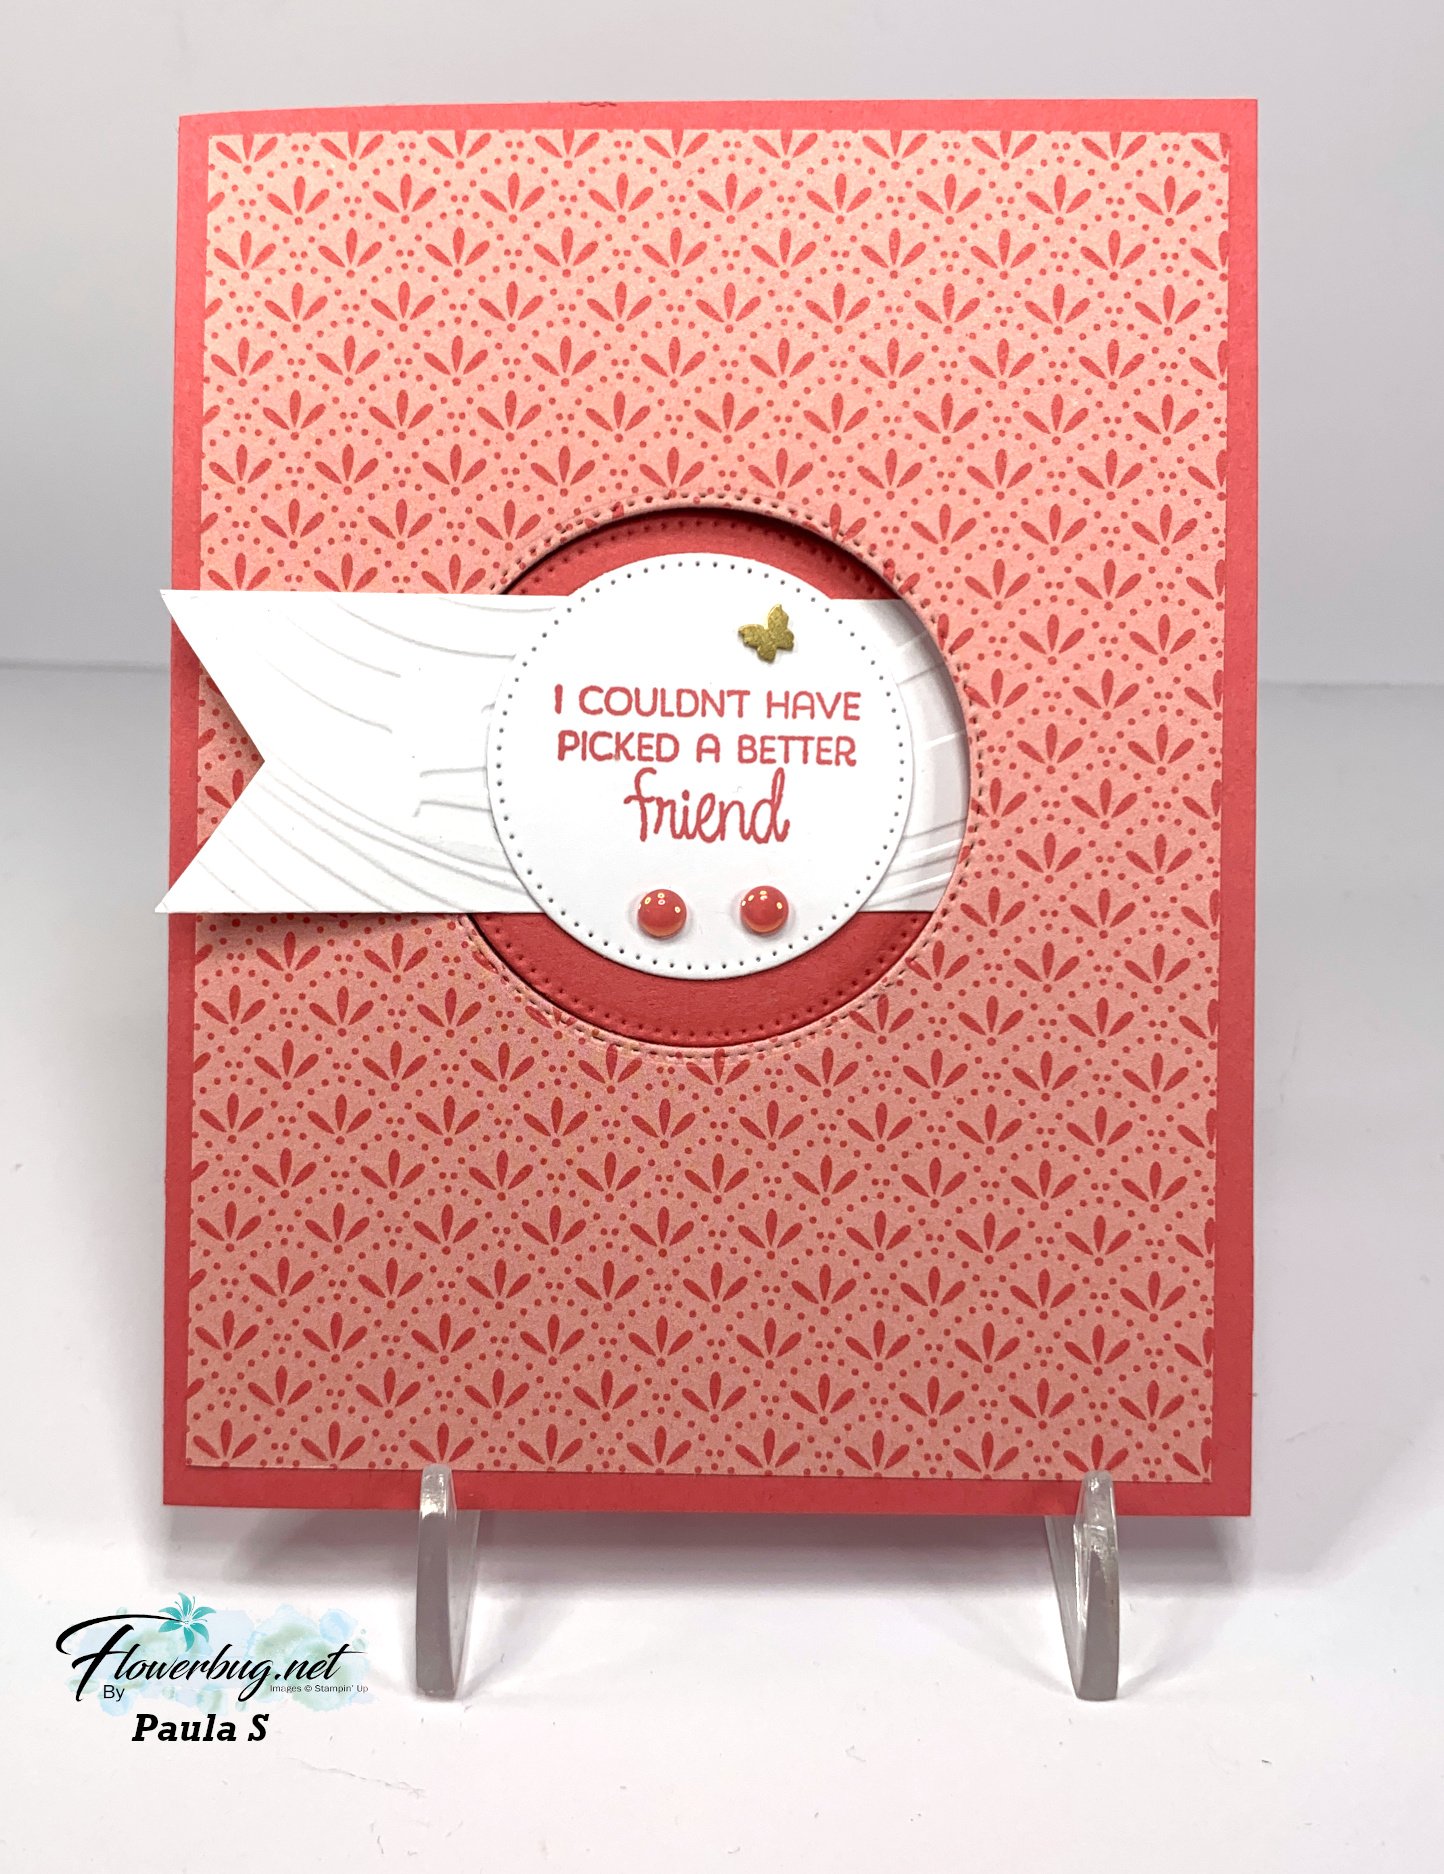
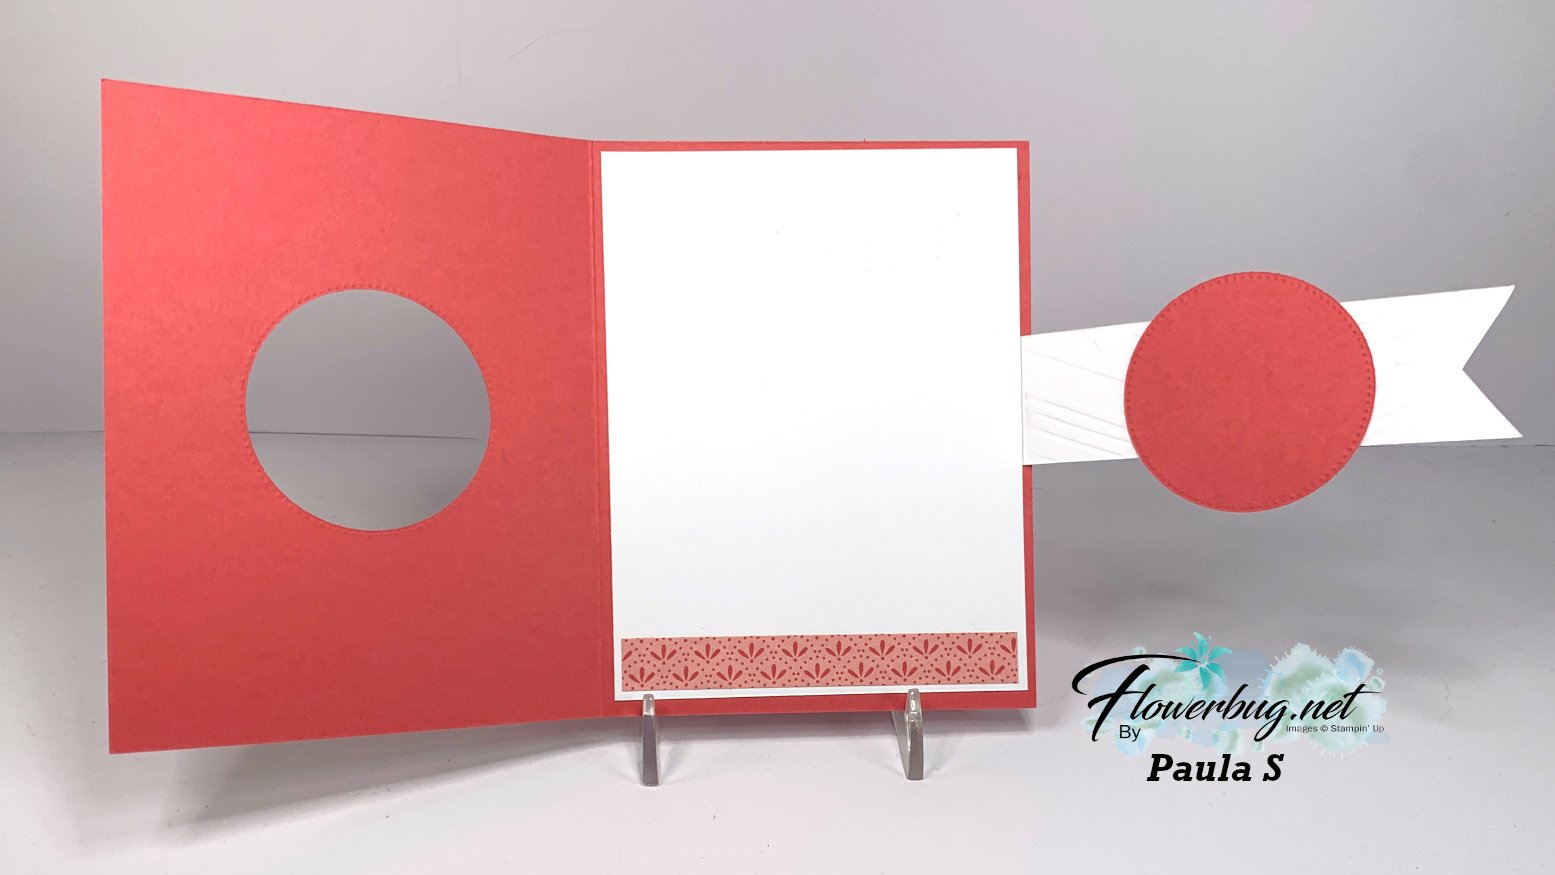
She used the Floral Impressions DSP on the front and cut a window in the front panels so the buckle could slip in.  

Products used include the Stylish Shapes dies, Swirly EF, In Color flat pearls, and Brass Butterflies.

Measurements:

  • Card base 8 1/2" X 5 1/2" scored at 4 1/4"
  • DSP 4" X 5 1/4", inside 3 3/4" X 1/2" 
  • buckle 4 1/2" X 1 1/4" scored at 1/2"
  • largest circle is 2 1/8" but Paula recommends slightly larger

Here's the final opening: 
~~~

June Specials:

The Suite Sale is on! 

Buy one get 50% the second item – on all available suite products. 

Shop here or see products below: 

~~~

Last Chance List has been updated!  see it all here. Don't miss out on the deals!

~~~

Earn free card kits in June with online orders! Get 4 kits with a $50 order and orders over $80 receive all 6 cards. All you need are greetings, gems and adhesives to assemble. 

Order here 

~~~

Get my Celebratory Sips PDF tutorial free with any online order in June!

All Posts

  • Live tonight! Show off your Designer Paper with this fun layout!


    We're making these cards tonight on Facebook Live here.  Every other Monday I host a 'Stamp with Me' Live where we use our Designer Paper in fun ways.  

    I love this layout!  It is perfect for small patterns of Designer Paper. Turning squares on the angle adds a lot of playful interest to your card and showcases one main image, die-cut or punch in the center. 

    I post the measurements a few days before the Live event so you have the time to prep your pieces so we can complete them together.  

    I chose to use the Heartwarming Hugs designer paper from the Holiday catalog. (see it here)  And the Perfectly Plaid stamp set & Pine Tree punch.  

    Card stock is Real Red, Mossy Meadow & Basic White; ink is Mossy Meadow. 

    Measurements:
    Card base 4 1/4" X 11" scored at 5 1/2" 
    White CS – 2" square, 2 7/8" square, 4" X 5 1/4" plus a scrap for the punched piece
    DSP (Heartwarming Hugs) – 2 1/4", two different patterns at 2 3/4"

    See all of my videos here on my YouTube channel. 

    You can see this one here; click on the photo below: 

    ~~~

    November Specials: 

    Host codes: Z2RQ7BB6

    *click here to order

    Online orders over $50 get a pre-cut card kit of 4 cards & PDF tutorial.
    *Orders over $80 will receive the card kit PLUS 24 Iridescent snowflakes!

    All online orders will receive my Eden's Garden PDF 22 project tutorial free! 

    Get the deal on the Starter kit here!  $125 in product for $75 plus free shipping!

    Get any of the tutorials or kits to go below in my Kit & Tutorial shop here:

    Peaceful Wishes Christmas – limited supply available; 20 cards!


    Christmas cards stamp a stack; limited supply! 

    Leave a Reply

    Your email address will not be published. Required fields are marked *

  • A treat bag from an envelope? Yes!


    I cannot believe what a nice size this treat bag is – all from an A2 size envelope!  

    Steps:

    1. First I stamped just the flap with snowflakes from the Snowflake Wishes stamp set using Coastal Cabana and Highland Heather inks.  Then I stamped the Highland Heather tag and heat embossed it with White embossing powder.  

    2. Next score 1" on the bottom and up both sides while the envelope is flat.  Fold on the score lines and press each fold well. 

    3. Open up the envelope into a box. Secure the bottom corners to the flat bottom. 

    4. Die-cut the flap using the Basic Border dies. Add a second layer of Coastal Cabana – also die-cut.  

    5. Fill the bag with treats, wrap the mesh ribbon around it and add the tag.  Tie it into a bow.  Done!

    And below is the video; it's the last project I share on this FB Live replay! 

    ~~~

    Host codes: RY3EDVMZ

    *click here to order

    Online orders over $50 get a pre-cut card class of 4 cards & PDF tutorial.
    *Orders over $80 will receive the card kit PLUS 24 Iridescent snowflakes!

    All online orders will receive my Eden's Garden PDF 22 project tutorial free! 

    Get any of the tutorials or kits to go below in my Kit & Tutorial shop here:

    Peaceful Wishes Christmas – limited supply available; 20 cards!


    Christmas cards stamp a stack; limited supply! 

    Leave a Reply

    Your email address will not be published. Required fields are marked *

  • CUTE package shaped fun fold card!


    The Seasonal Sale ends tonight; do not miss out on the discounts on Classic ink pads, card stock and dies! 

    ALL of the dies in the Annual Catalog are 20% off! Woo hoo! 

    Download the November Seasonal Sale here to see the list and prices. 

    Have you ever made one of these 'gift shaped' fun fold cards?  They're so unique & look just like a boxed gift!  You could do this card for birthday's, babies or weddings also.  

    Yesterday I focused on the Basic Border and Tailored Tags dies for this projects. See that neat zig zag trim?  I also used the Tidings of Christmas DSP and Tidings & Trimmings stamp set.  

    I show how to put this together on the video below.  You can also see it here on my YouTube channel. 

    The Basic Border and Tailor Made tags I used here are discounted through Thursday, November 18th.  

    • Basic Border dies seen here were $29 and are now $23.20
    • Tailor Made Tag dies seen here were $22 and are now just $17.60 

    The measurements are in the photo above but watch the video below to see how to assemble it.  There are a few tricks on this unique fun fold card! 

    And below is the video; it's the first project I share on this FB Live replay! 

    ~~~

    Host codes: RY3EDVMZ

    *click here to order

    Online orders over $50 get a pre-cut card kit of 4 cards & PDF tutorial.
    *Orders over $80 will receive the card kit PLUS 24 Iridescent snowflakes!

    All online orders will receive my Eden's Garden PDF 22 project tutorial free! 

    Get any of the tutorials or kits to go below in my Kit & Tutorial shop here:

    Peaceful Wishes Christmas – limited supply available; 20 cards!


    Christmas cards stamp a stack; limited supply! 

    There are a few Eden's Garden kits left here!

    Leave a Reply

    Your email address will not be published. Required fields are marked *


Notice: LeeAnn Greff, Independent Stampin’ Up! Demonstrator, Manager. The content of this website is my sole responsibility as an independent Stampin’ Up! demonstrator and the use of, and content of, the classes, services, or products offered on this website is not endorsed by Stampin’ Up! Copyright 2025