/


Latest Post

3 fun fold cards celebrating Strawberry Slush!


I have THREE neat fun fold cards from our June Team card swap.  My Flowerbug's did an incredible job on their fun fold cards!  

First up is Sharon's card featuring the Cheers & Sips bundle seen here. 

The top card base layer is scored to creates a box that pops up & supports the front panel. Super neat! 

She added Fine Tip Glue to her fussy cut drinks for some shine.  To do this you need to let it set awhile to dry. I'd recommend two layers.  If you don't want it to get a bit curvy from the liquid in the glue, add a layer of card stock under it.  

Her inside greeting is from the Unbounded Love set.  The gems are from the Holographic Resin dots.

Measurements:

  • Strawberry Slush card base 8 1/4" X 5 1/2" scored at 4 1/4", 5 3/4", 6 1/4", 7 3/4"
  • front CS panel 2 3/4" X 4"
  • DSP 2 pieces at 1 3/8" X 5 3/8", pieces under the greeting are 2 3/4" X 1 1/4", 2 3/4" X 1/4" and inside is 2 3/4" X 1 1/4" 
  • inside White panel 2 3/4" X 4"

~~~

Next is a neat Latch card made by Kathy who used the Sweet Jar bundle seen here. 

Her colors include Cloud Cover and Strawberry Slush. The Designer Paper is from the Florals in Bloom DSP seen here. 

The front flap opens up to reveal another panel that she stamped with coffee beans and the die-cut from the Paper Pumpkin add on dies (now retired).

And the front panel open up too!  

Measurements:

  • card base 7 1/4" X 5 1/2" scored at 4 1/4"
  • DSP 2 3/4" X 5 1/4"
  • White panels X 3 – 2 3/4" square; inside 4" X 5 1/4"
  • Strawberry Slush square 3"
  • 2 1/2" X 1" scored at 1 1/4" connecting piece

~~~

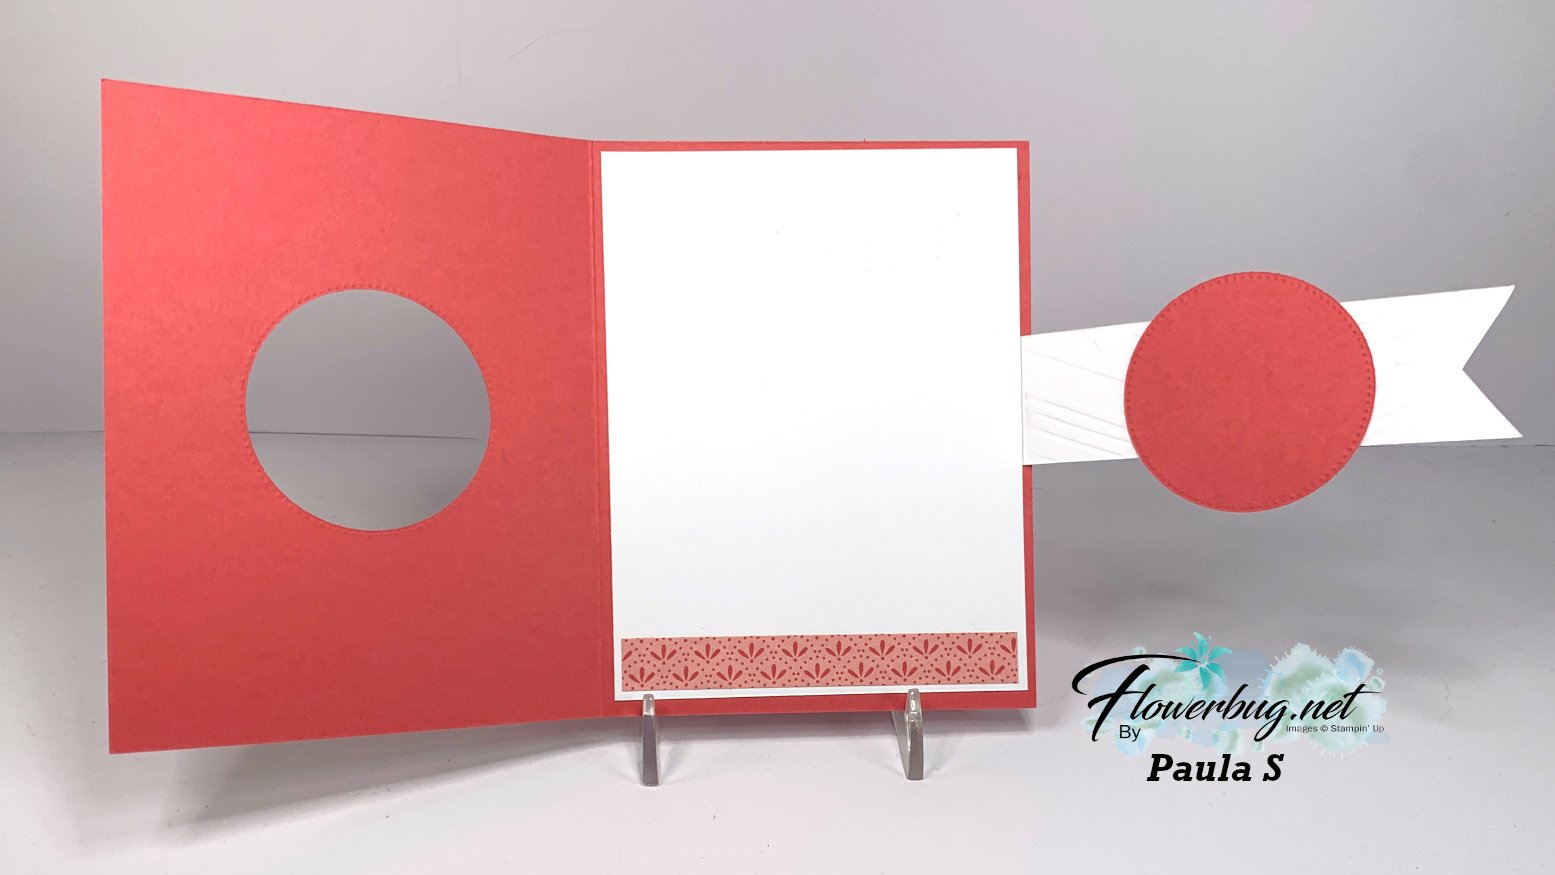
And now for the final card today. This one was made by Paula and was cased from Heidi Colins.  It's called a Buckle card:
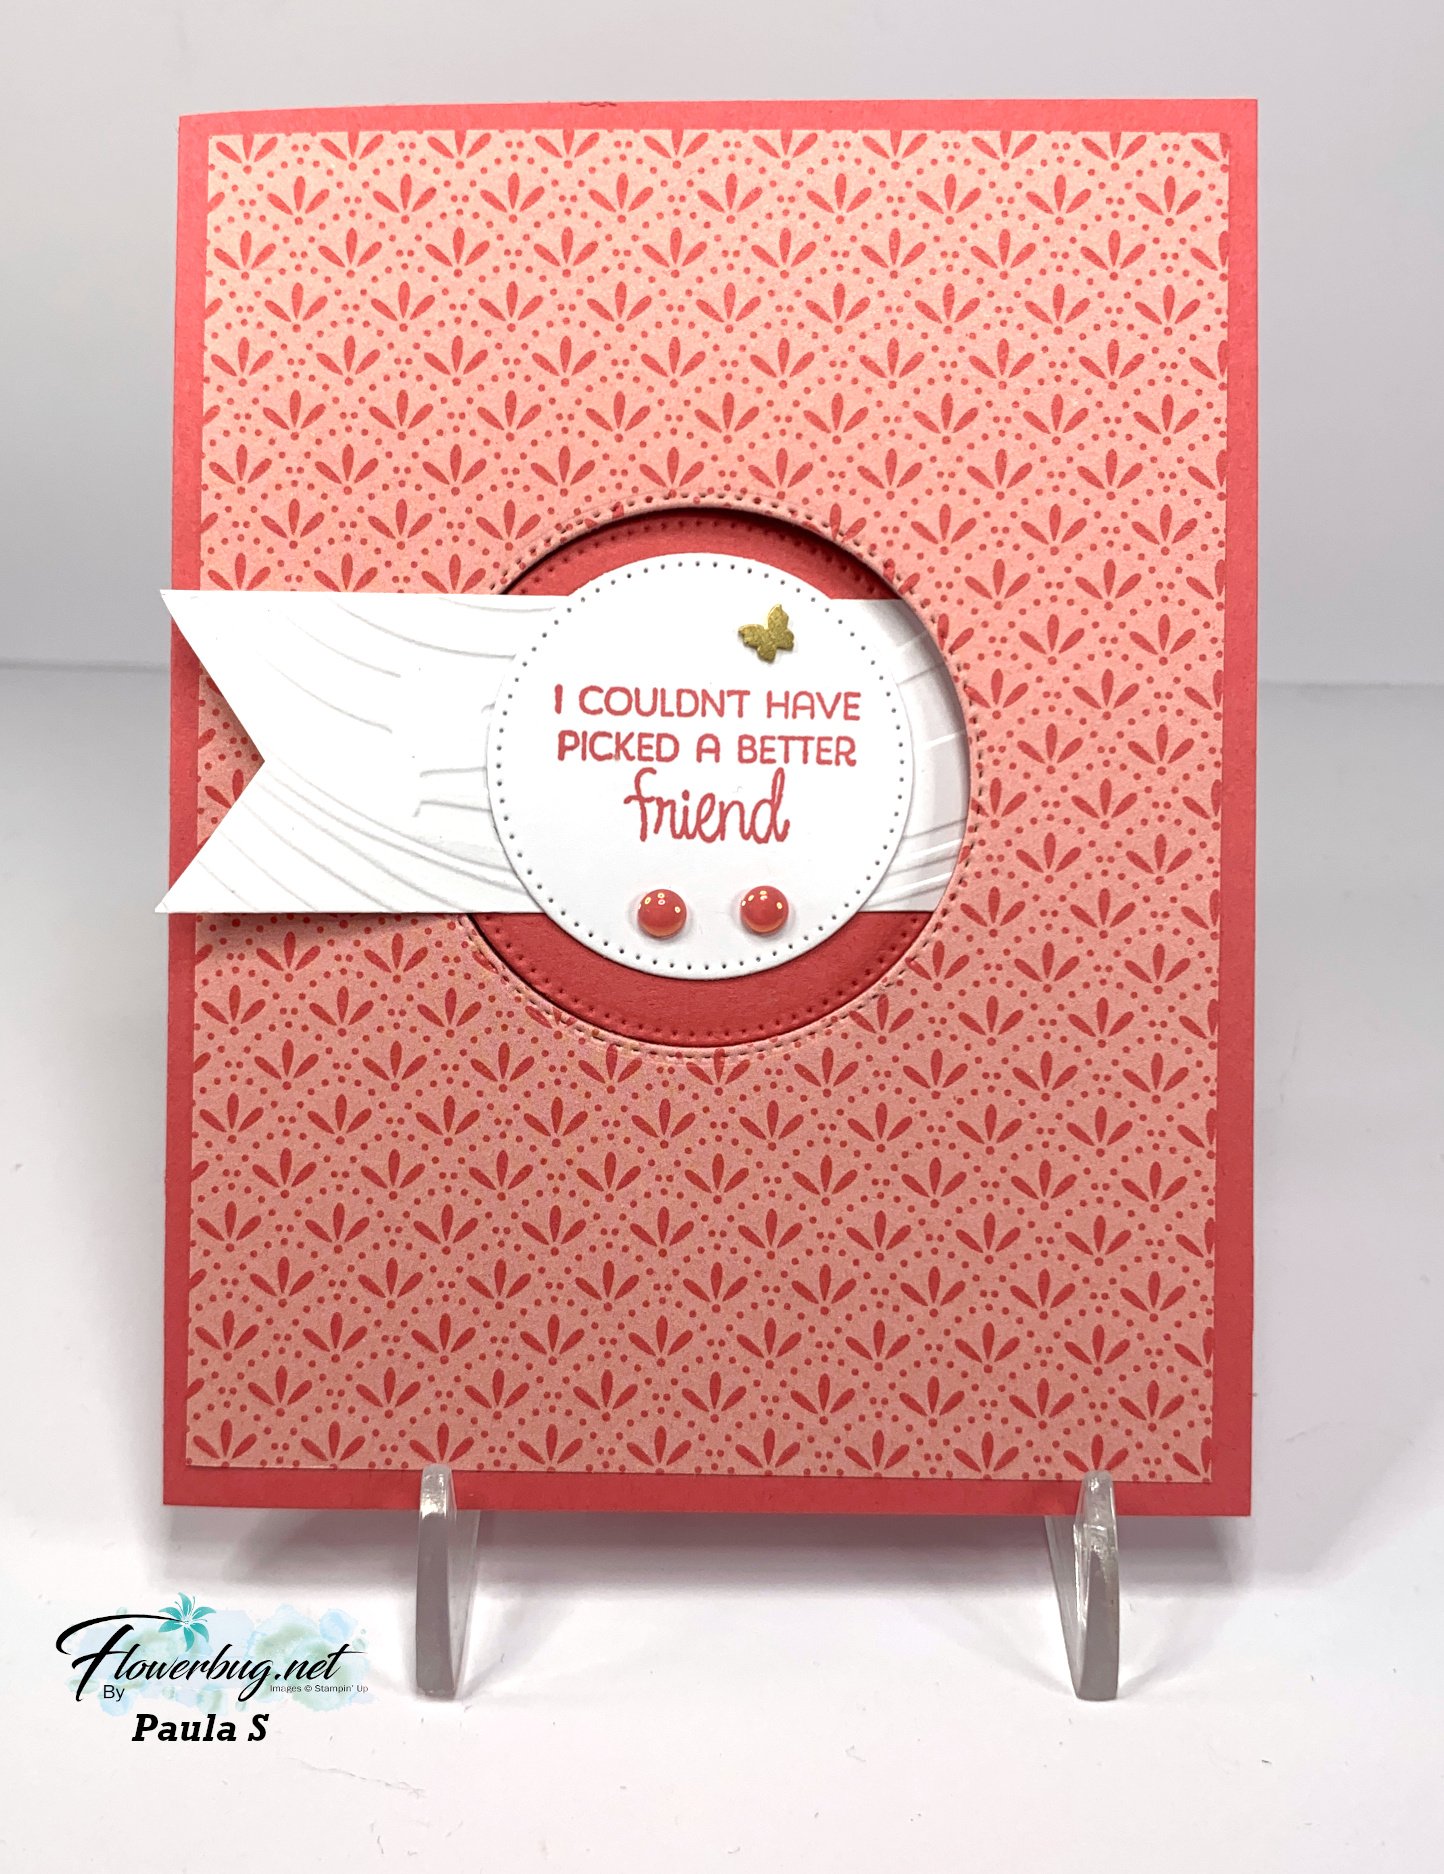
She used the Floral Impressions DSP on the front and cut a window in the front panels so the buckle could slip in.  

Products used include the Stylish Shapes dies, Swirly EF, In Color flat pearls, and Brass Butterflies.

Measurements:

  • Card base 8 1/2" X 5 1/2" scored at 4 1/4"
  • DSP 4" X 5 1/4", inside 3 3/4" X 1/2" 
  • buckle 4 1/2" X 1 1/4" scored at 1/2"
  • largest circle is 2 1/8" but Paula recommends slightly larger

Here's the final opening: 
~~~

June Specials:

The Suite Sale is on! 

Buy one get 50% the second item – on all available suite products. 

Shop here or see products below: 

~~~

Last Chance List has been updated!  see it all here. Don't miss out on the deals!

~~~

Earn free card kits in June with online orders! Get 4 kits with a $50 order and orders over $80 receive all 6 cards. All you need are greetings, gems and adhesives to assemble. 

Order here 

~~~

Get my Celebratory Sips PDF tutorial free with any online order in June!

All Posts

  • Easy but adorable Hello Ladybug Cards Kit to go


    My Flowerbug's and I held a Zoom meeting last week and we all made versions of my Easy 8 Card Wonder.  I chose to use the Hello Ladybug stamp set for mine.  

    My colors are Coastal Cabana, Granny Apple Green, Real Red & Black.  My Easy 8 Card Wonder template takes the guesswork our of creating.  

    Here is how I prepped for the Zoom.  I chose my colors, printed the template on White CS, grabbed my card stock & bags of scraps and stamped a few greeting tags.  

    I loved the cards so much I'm offering them as a kit to go in February.  One Sheet Wonders truly make it easy to create beautiful cards quickly. 

    This kit is $38 with shipping & includes the following:

    • the Hello Ladybug photopolymer stamp set
    • the printed OSW template on 8 1/2" X 11" White card stock (cut on the printed lines!)
    • all pre-cut & punched pieces for the 8 finished cards
    • the PDF tutorial ($15 value)

    It does not include stamped images or textured CS. You will need inks, adhesives, gems & a paper trimmer to finish them. 

    Optional add-ons:
    Add the Ladybug Punch to your kit and save 10% ($54 with punch). If you add on another $20 in product you can choose a free Sale-a-Bration choice!
    Or choose the PDF tutorial here.

    This tutorial includes the following:

    • Step by step directions 
    • photos
    • measurements and supplies for 4 different sets of cards! 
    • the 8 card wonder template
    *Order this kit by February 15th!
    • Get more than 1 kit to go & save money! Click here to email me and I'll combine shipping. 
    • See the other 8 card wonder kit option here:
    • Order all 3 of my February kits to go and get a FREE Sale-a-Bration choice!

    ~~~

     Hot Deals in February:

    Choose $125 in product PLUS any 2 stamp sets free in February!

    It's just $99. Get FREE shipping too!

    Click here to get yours.


    Host codes:  S9WGFH9Z or 3WCHFFUW

     *click here to order 


    Use the host code above & get a free Easel Calendar kit

    & the Gingham embossing folder with a $55 order in February, 2022! 

    Orders of any size will receive an Easel Calendar kit.


    Leave a Reply

    Your email address will not be published. Required fields are marked *

  • Easel Calendar with a post-it note box; a fabulous gift idea


    I love these Easel calendars; they're a great gift and actually fun to make too.  I was inspired by my friend Melissa's project; see it here.  

    Easel Calendar card measurements

    • Card base 4 ¼” X 11” scored at 5 ½”.
    • Easel 4” X 4” scored at ½”, 2” & 3 ½”
    • DSP 4” X 5 ¼” (or 3 1/2" X 5 1/4" on the above project)
    • Note box 4” X 5 1/8” scored at 3/8” on the short side.  On the long side score at 2 3/8” & 2 ¾”

    Here are some details:

    • The unique scallop edges & cute tag are both made with the Brilliant Rainbow dies – it's part of the Rainbow of Happiness bundle. 
    • The large clouds are punched with our new Cloud Punch. One is punched from the Supple Shimmer specialty paper and the other from the Sunshine & Rainbows DSP/ It's free during our Sale-a-Bration promotion. See it here. 
    • The bright striped paper is also from our Sunshine & Rainbows DSP
    • The card stock colors are Bermuda Bay & Melon Mambo
    • The calendars were purchased from Taylored Expressions. 

    Here are the other two I shared using the Friendly Hello bundle from our Sale-a-Bration promotion:


    Totally different looks from the same Friendly Hello designer paper.  You can go soft or bold with it! 

    On the top right I added the stamped image from the Friendly Hello stamp set (part of the free bundle during SAB) and on the top left I added a few die-cuts from the Tropical Layers dies seen here.  I think they coordinate wonderfully.  

    *I'll be giving away two easel calendar kits with online orders in February. Details tomorrow! 

    This Easel Calendar is the second project I make in the video below. Click on it to watch! 

    ~~~

    January Specials:

    Purchase the Starter Kit during Sale-a-Bration

    and choose ANY 2 stamp sets free plus FREE shipping too!

    Click here to get yours.


    Host codes:  S9WGFH9Z

     *click here to order 

    Use the host code above & get free Iridescent Rhinestones with

    a $50 order in January, 2022! 

    Leave a Reply

    Your email address will not be published. Required fields are marked *

  • Easel Calendar with a post it box; made by Melissa


    I LOVE sharing what my friends make.  Shout out to Melissa who made this adorable, bright & happy Easel Calendar for her club friends this month.  

    She searched for a tutorial and actually found one I did last year!  She added a box for a pack of post-it notes too!  

    She used the Pattern Party host paper seen here or on page 171 of our Annual catalog.  I always encourage my hostesses to choose this paper; it's the BEST deal! It's valued at $30 but hostesses can choose it for just $18 as part of their hostess benefits. Tip: Everyone earns free benefits on orders over $150; even Demonstrators! 

    This is the type of information I want you to know before placing an order.  I want to maximize your value and get you the best deal on our products that I can! *please contact me before ordering so I can help you!

    It's a huge pack of 48 12 X 12" sheets with fun, colorful patterns on one side & Black & White on the other.  It's my favorite DSP in the whole book!  

    Measurements are below.  Or watch the video here.  

    Easel Calendar card measurements

    • Card base 4 ¼” X 11” scored at 5 ½”.
    • Easel 4” X 4” scored at ½”, 2” & 3 ½”
    • DSP 4” X 5 ¼” 
    • Note box 4” X 5 1/8” scored at 3/8” on the short side.  On the long side score at 2 3/8” & 2 ¾”. *Wrap it with DSP if desired. 

    *There's just a few days left to get the free Iridescent Rhinestones FREE.  Details below: 

    ~~~

    January Specials:

    Host codes:  S9WGFH9Z

     *click here to order 

    Use the host code above & get free Iridescent Rhinestones with

    a $50 order in January, 2022! 

    Purchase the Starter Kit during Sale-a-Bration

    and choose ANY 2 stamp sets free plus FREE shipping too!

    Click here to get yours.


    Leave a Reply

    Your email address will not be published. Required fields are marked *


Notice: LeeAnn Greff, Independent Stampin’ Up! Demonstrator, Manager. The content of this website is my sole responsibility as an independent Stampin’ Up! demonstrator and the use of, and content of, the classes, services, or products offered on this website is not endorsed by Stampin’ Up! Copyright 2025