/


Latest Post

24 hour Stamps Sale; Wednesday only!!!!


The Biggest stamp sale of the year starts tomorrow!  

This short, stamp-tacular sale only happens once a year—you won’t want to miss out on these super savings!

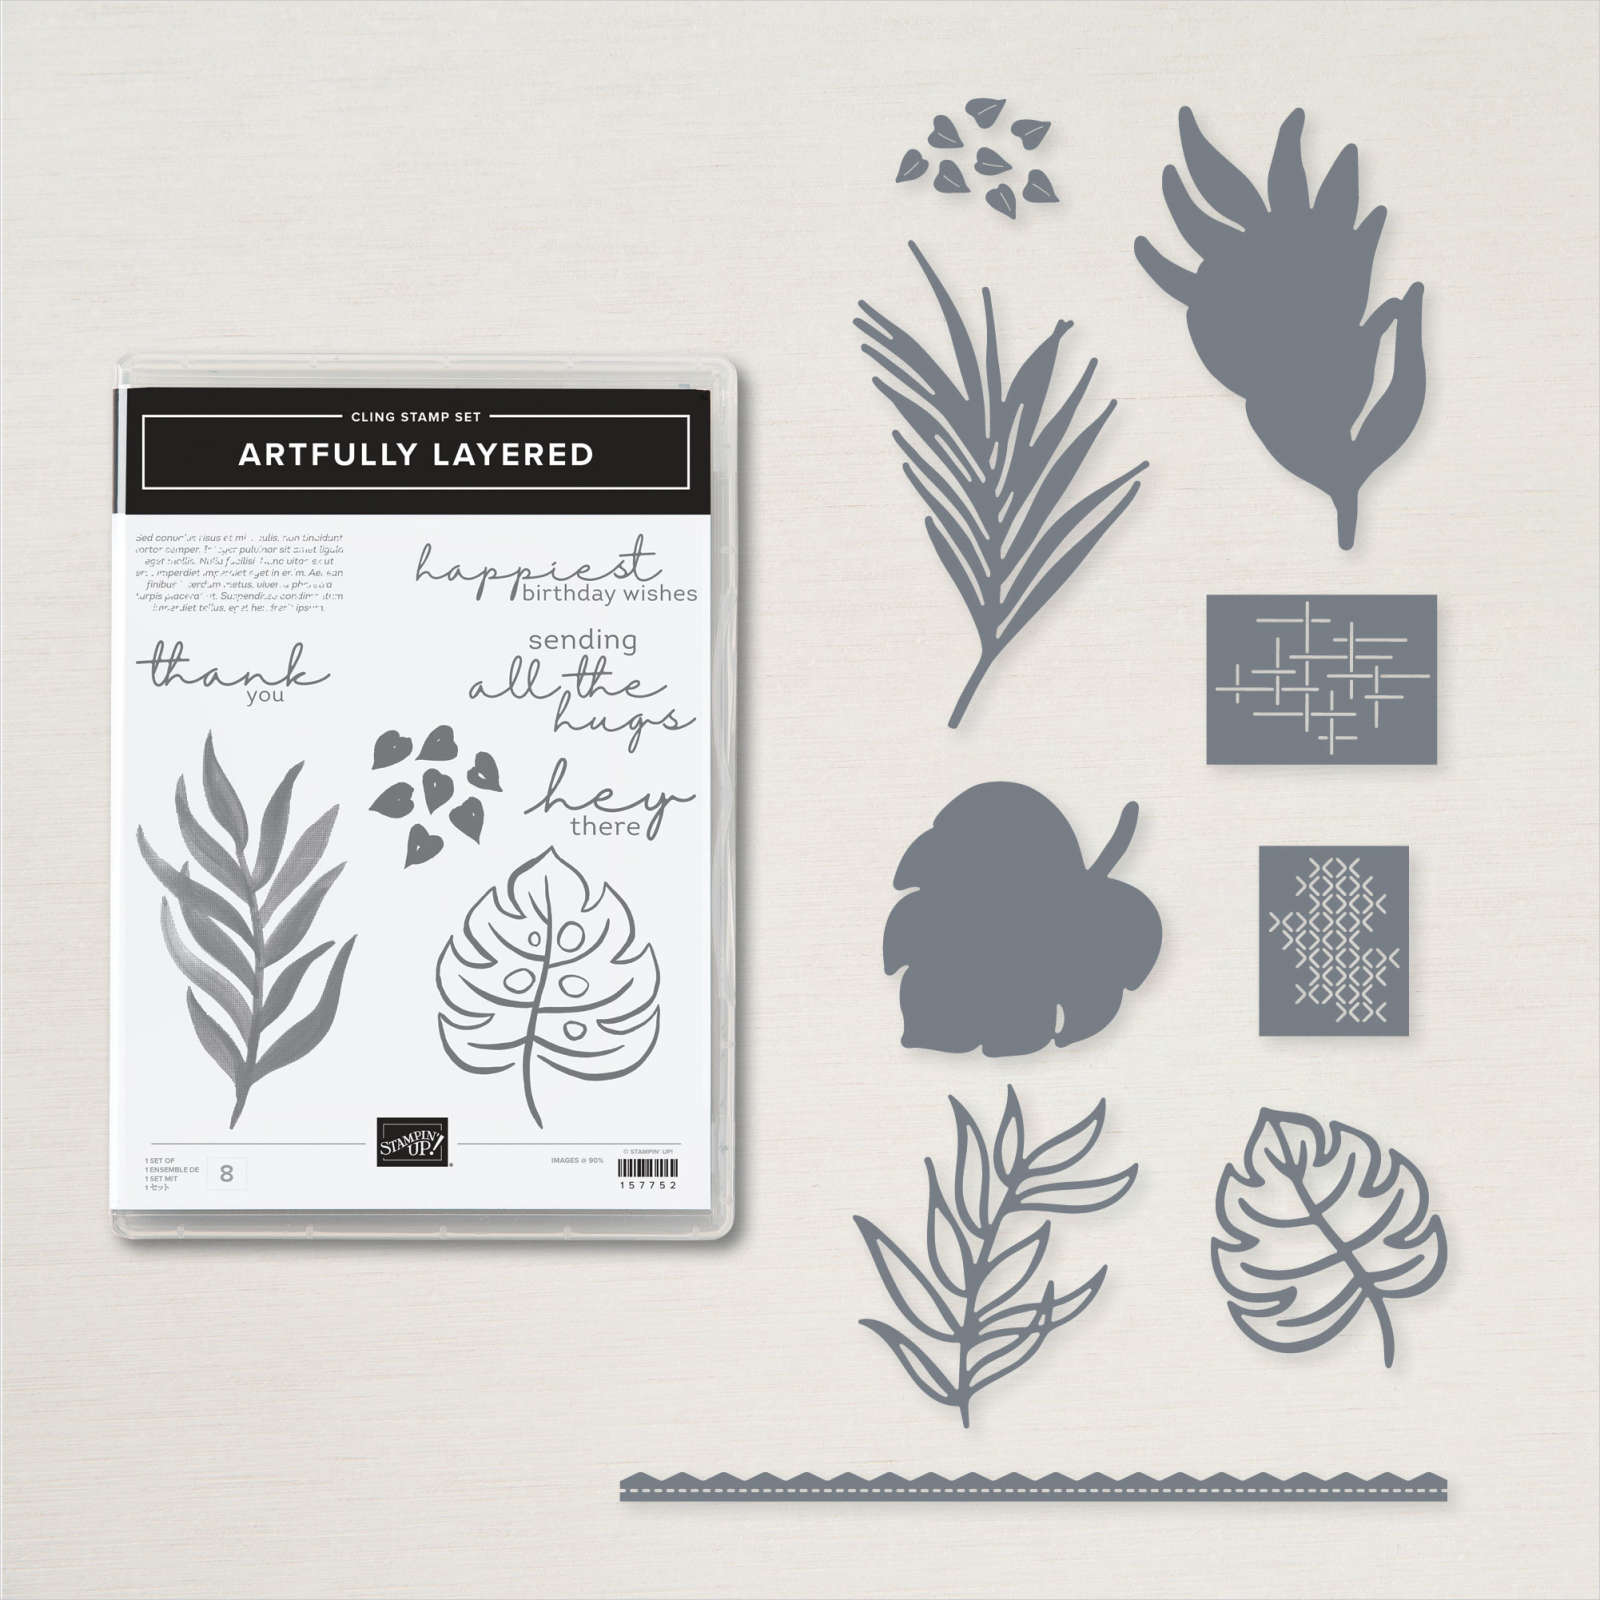
Click on any of the images below to see them in my store.  If you're reading this in an email be sure to click here to get to my actual blog. Then all links will work!  

And it's a Double Whammy!  You can choose to add these discounted stamps to your starter kit for even greater savings!  The Starter Kit is already discounted at 20% off plus free shipping. Add another 15% and WOWsers!!!  Click here to get the deal.


~~~

Current Host code is HYSHW6QB

Get a free package of All the Trimming embellishments in September with an

online order over $55. 

*Remember that if your order is over $99 you should consider purchasing the Starter kit here.

And if it's over $150 you should definitely get the Starter kit.  

Order online here

 Get my Beautiful Autumn pdf tutorial free with any online order in September!


It includes directions, photos and measurements for 13 cards!

All Posts

  • A simple trick makes this Floating Pop-Up card work; with measurements & video!


    This special fancy fold card is super unique and makes you wonder just how it's sort of floating!  You will be shocked at what it takes to make it work.  

    I used the Crane of Fortune bundle to create this card. The colors are so soft & pretty – Gray Granite, Calypso Coral, White & Early Espresso. 

    The front panel flips up as you open the card and it even wobbles a bit.  You can see how it works in the video, or scroll down to the next photo.  

    I stamped the main image on a die-cut from the Stitched So Sweetly dies. They are on the retiring list; so if you don't have them yet you know what you need to do! 

    The Good Fortune dies include the pretty leaves I used to hold my card open. When doing this be sure to add Dimensionals under the image to support the card open.  

    You need two little pieces of card stock under the front layers to make the pop-up work.  Mine are 1/2" X 2 1/2" but size really does not matter here.  Just fold them in half and secure one side to the card base and the other to the top layer. Do this on each side of the front panel. Again, please watch the video here to see how it works.  

    Please follow me on Facebook here to catch my Live videos each week.  I share 6 each month and my focus is to inspire you to stamp by sharing great ways to use Designer Paper, unique fun folds and easy techniques.  


    Click on the photo below to watch the video. 


    ~~~

    The Last Chance list is out!
    Tons of items from the 2021-22 Annual Catalog are retiring and many are deeply discounted from 20-50% off.
     
    Remember that these items are while supplies last and may run out. 
    Click here to see it all online along with the discounts.

    Host codes: E7S6DEAP

     *click here to order 

    If your order is over $50 you'll receive free Polished Dots or In Color jewels and 3 hand made cards from me.


    Don't forget about my loyalty rewards! 

    Click here to download yours and earn a $50 shopping spree!  

    Leave a Reply

    Your email address will not be published. Required fields are marked *

  • Blending Brush border idea with Artfully Layered; so pretty!


    I created these pretty cards on last week's FB Live video.  I LOVE the colors and style; they're so my style!  

    I chose to play with the Artfully Layered bundle seen here in colors of Coastal Cabana and Granny Apple Green.  Having a lot of 'white space' makes the textures & pretty leaves the clear star of the card. 

    I used a blending brush to blend the two inks on a piece of White card stock and then cut the leaf die-cut from that.  

    For the multi-colored border underneath I used the blending brush to add the same colors.  I love the effect!  

    The cross-hatch texture is made with the dies in the bundle.  There are two of them in the set that give textures. 

    I also used the Faux Sea Glass shapes for accents.  

    The measurements are in the post below but here they are again: 

    • White card base 5 ½” X 8 ½”
    • White 3 ½” X 4 ¾”, sponged layer 3 ¾” X 5”

    Click on the photo below to watch the video; it's the first project of three.  And be sure to follow me on Facebook here. 

    ~~~

    The Last Chance list is out!
    Tons of items from the 2021-22 Annual Catalog are retiring and many are deeply discounted from 20-50% off.
     
    Remember that these items are while supplies last and may run out. 
    Click here to see it all online along with the discounts.

    Host codes: E7S6DEAP

     *click here to order 

    If your order is over $50 you'll receive free Polished Dots or In Color jewels and 3 hand made cards from me.


    Don't forget about my loyalty rewards! 

    Click here to download yours and earn a $50 shopping spree!  

    Leave a Reply

    Your email address will not be published. Required fields are marked *

  • Sailboats & Palm Trees featured in today’s card swaps!


    Today's post are the last of my talented Flowerbug Team swaps for April.  Our theme was water, trees or leaves and I've been sharing their cards all week!  It's so fun to see everyone's style and actually receive cards from people across the country.  I LOVE swapping! 

    The first card is made by Candy; she is featuring the Paradise Palms bundle seen here.  Her colors include Mossy Meadow, Crumb Cake and Black.  


    That pretty die-cut across and under the greeting is part of the Palm dies in the bundle.  She used the Double Oval punch for her greeting.  

    It's stunning and a perfect 'guy' card!  Thank you for sharing your fabulous card with us.  

    The next card was made by Tammi. She used the Let's Set Sail bundle in the 2022 Jan-June Stampin' Up! catalog.  This bundle is returning in the upcoming Annual Catalog in May.  I love this punch! 


    She created her own watercolor background by washing diluted color (Pool Party & Balmy Blue) onto her White CS.  She also textured her background with the Tasteful Textile embossing folder.  This folder is retiring now and it's on sale too! I'm so sad about it as I think it's a staple. It is a perfect way to add texture without a lot of busyness.  See it here; get it while you can! 

    ~~~

    The Last Chance list is out!
    Tons of items from the 2021-22 Annual Catalog are retiring and many are deeply discounted from 20-50% off.
     
    Remember that these items are while supplies last and may run out. 
    Click here to see it all online along with the discounts.

    Host codes: E7S6DEAP

     *click here to order 

    If your order is over $50 you'll receive free Polished Dots or In Color jewels and 3 hand made cards from me.


    Don't forget about my loyalty rewards! 

    Click here to download yours and earn a $50 shopping spree!  

    Leave a Reply

    Your email address will not be published. Required fields are marked *


Notice: LeeAnn Greff, Independent Stampin’ Up! Demonstrator, Manager. The content of this website is my sole responsibility as an independent Stampin’ Up! demonstrator and the use of, and content of, the classes, services, or products offered on this website is not endorsed by Stampin’ Up! Copyright 2025