/


Latest Post

3 NEW kit options and they’re all inclusive!


If you're local to me in Minot, ND be sure to stop in for my New Catalog party today. 

Great displays, yummy food, a neat take-a-way projects & of course great deals too!!

It's Saturday, January 7th from 1- 4 pm. 

~~~

Do you know about our Kits Collection?  It features many types of kits; perfect for all kinds of crafters.  They're also a wonderful gift to give since everything but a scissors is included.  

Some feature ink and stamps and others are ready to assemble with pre-printed greetings.  You can see them all here.  

Stampin' Up! recently added three new kits. 

This first kit is called Saying Thanks starts today and includes 9 colorful cards with envelopes.  See it here.

Below are all of the elements in the kit.  It's a non-stamping kit; everything is printed for you.  It's perfect for quick cards or a gift! 


This kit includes: 

  • Enough supplies to create 9 cards—3 each of 3 designs—and 9 coordinating envelopes.
  • Printed die-cut words, precut pieces, and enough adhesive to complete projects.
  • White baker's twine and iridescent diamond sequins.
  • Finished card size: 5-1/2" x 4-1/4" (14 x 10.8 cm).
  • Coordinating colors: Basic Black, Daffodil Delight, Gorgeous Grape, Granny Apple Green, Poppy Parade, Tahitian Tide.

The second is called Timeless Greetings seen here.  It's great for anyone but perfect for guys. Sometimes it's difficult to make men's cards….  

Below is the stamp set that's included in this kit.  The cost is $21.   

This kit includes:
* Timeless Greetings photopolymer stamp set
* Acrylic stamp block
* Soft Suede ink spot
* Pre-designed projects
* Step-by-step instructions
* Precut pieces (No prep work! Get right to crafting)
* Makes 8 cards: 4 each of 2 designs
* Folded card size: 5-1/2" x 4-1/4" (14 x 10.8 cm)
* 8 preprinted envelopes
* Enough adhesive to complete projects
* Brushed silver and copper foil

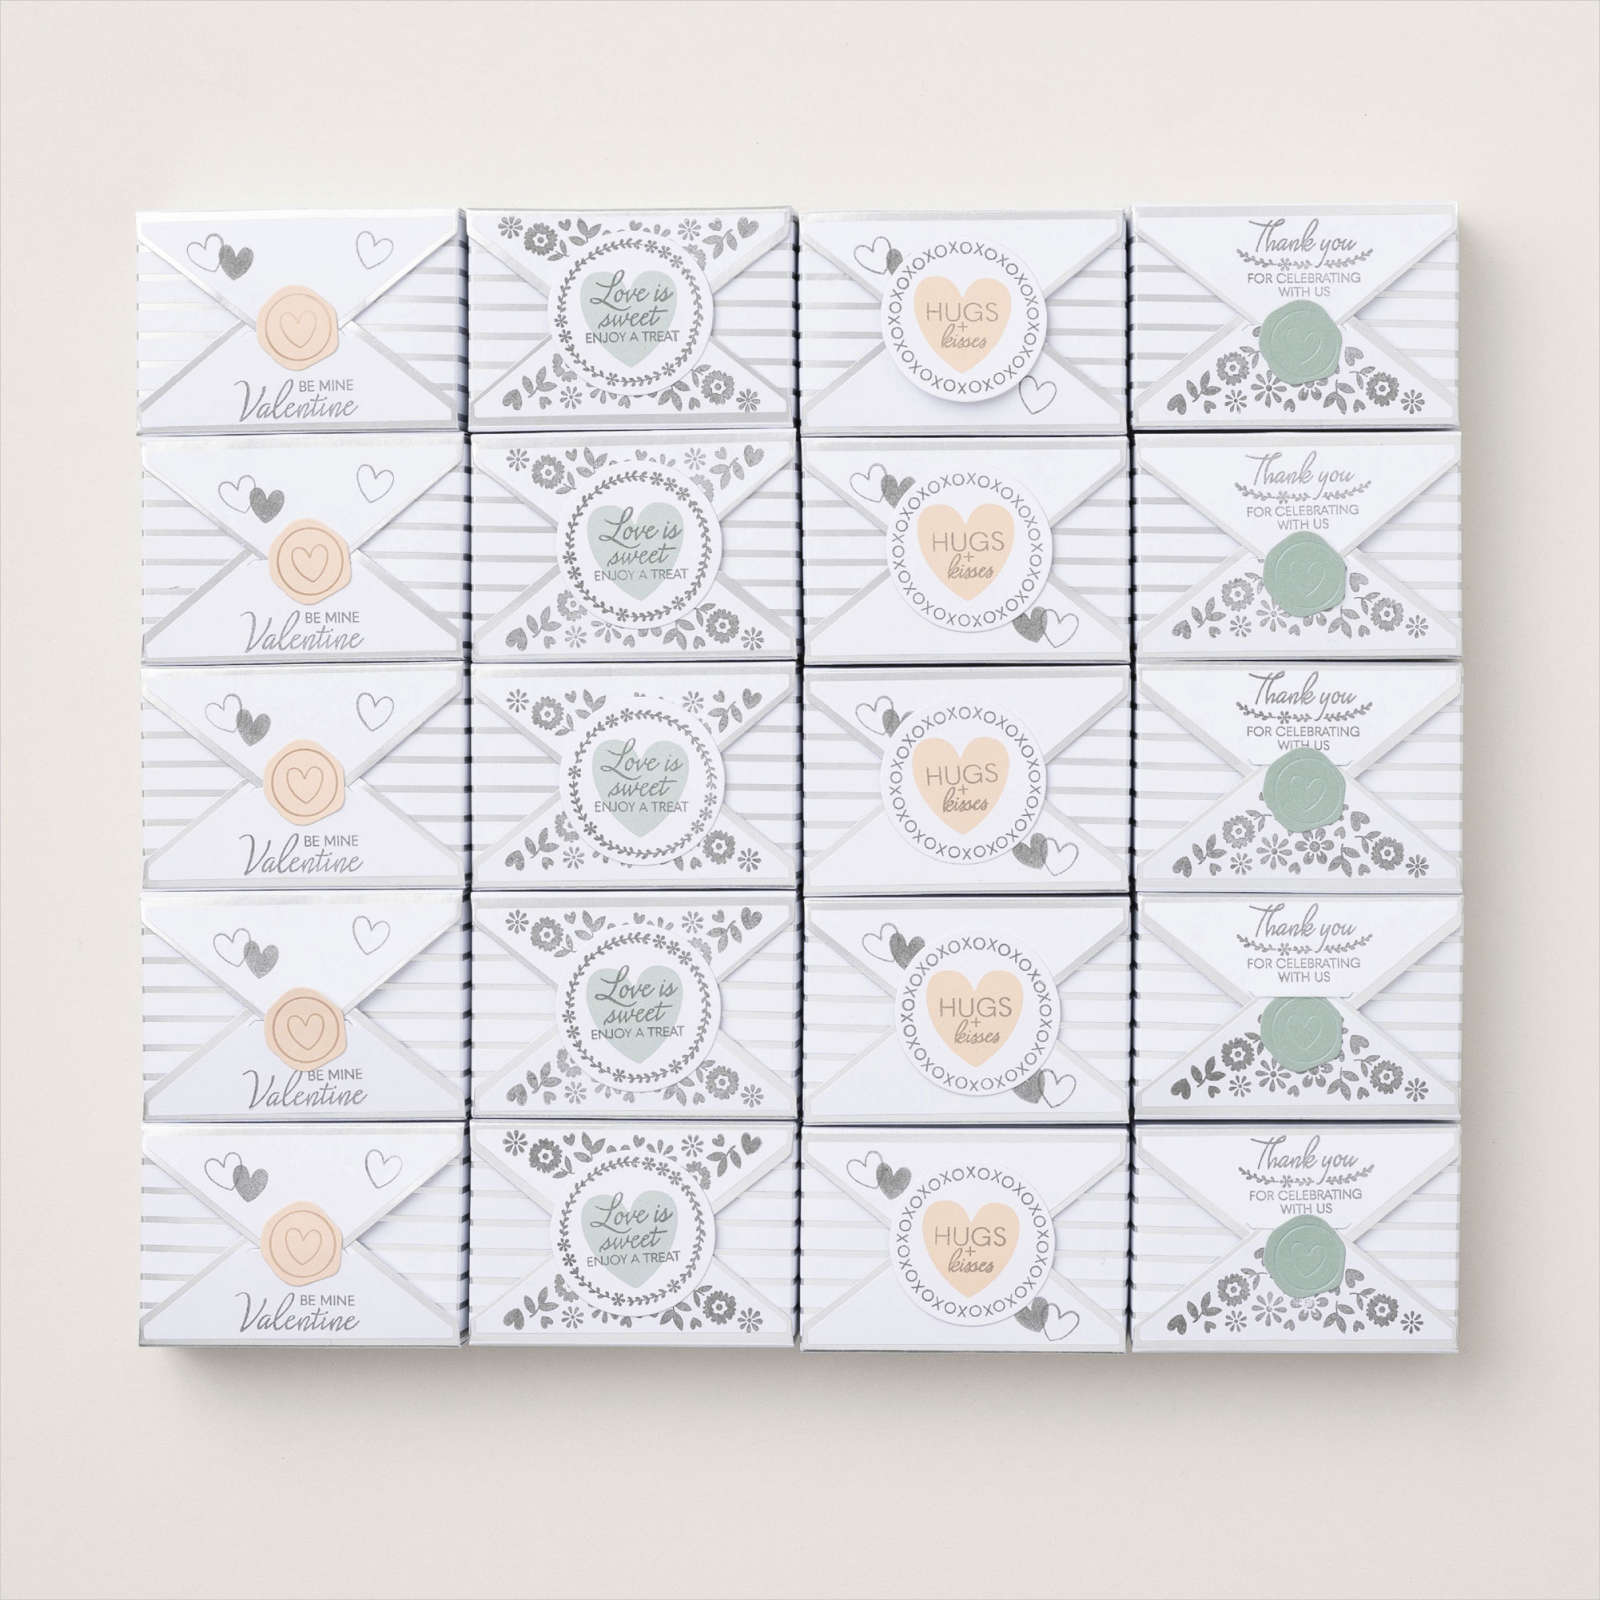
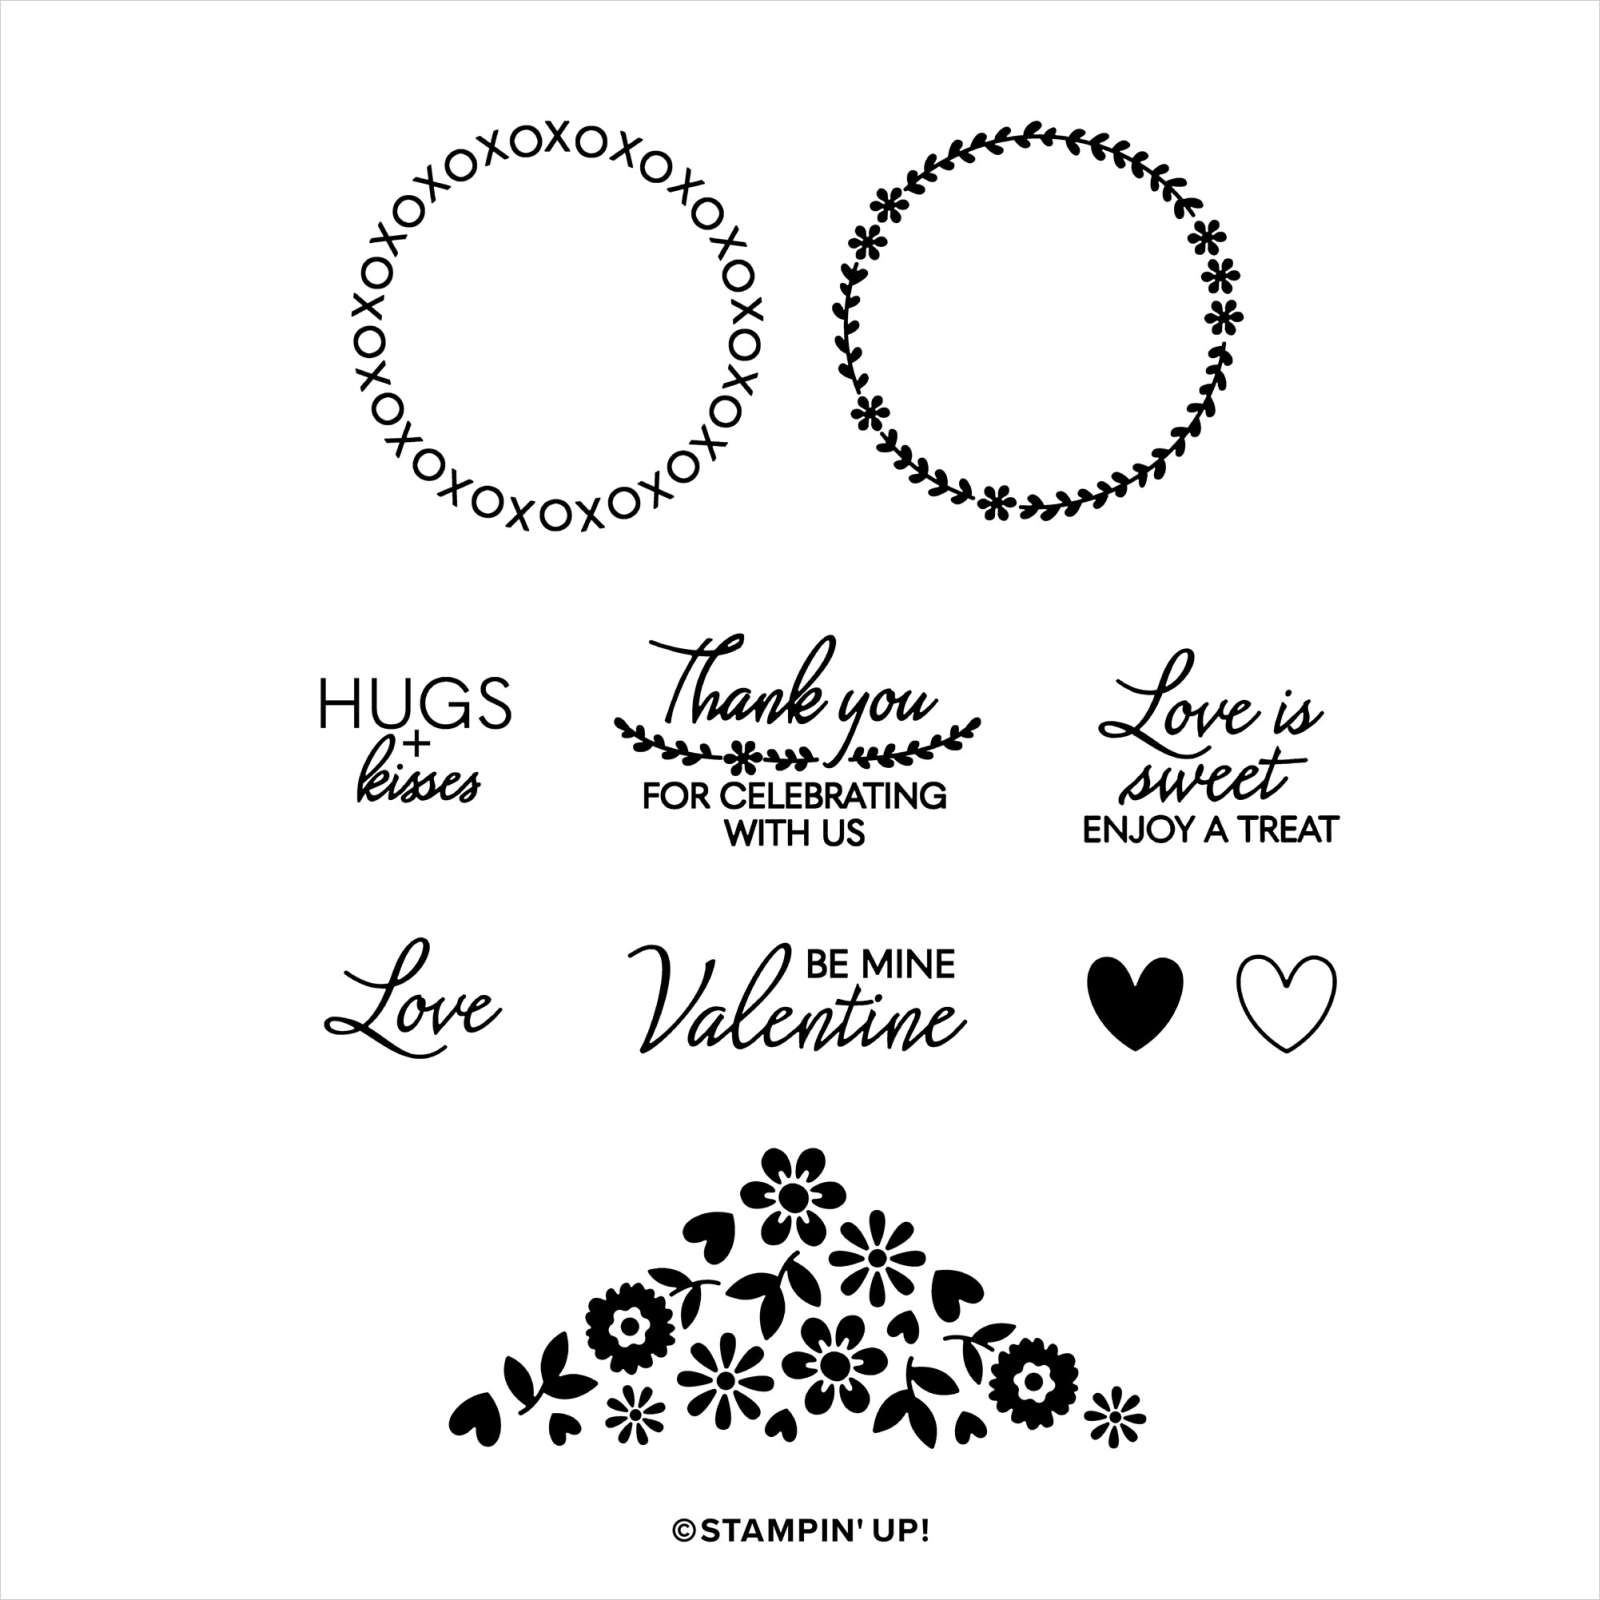
Here's another kit they just added; it's called the Love Treats kit. Here's the link to it:

This kit includes the following:

  • 20 treat boxes measuring 3" x 2" x 15/16" (7.6 x 5.08 x 2.3 cm)
  • One photopolymer love-themed stamp set
  • One Basic Gray Ink Spot
  • Different die-cut stickers with heart designs
  • Coordinating colors include Petal Pink and Soft Succulent
  • Building the 20 treat boxes takes less than 60 minutes to complete


Stampin' Up! just posted their Paper Pumpkin 'year in review' video.  Here's a link to it.  
 

Heads up on getting Paper Pumpkin kits:  If you want to get something free with purchase I highly recommend you order a pre-paid subscription during Sale-a-Bration.  For every $50 – 100 you spend you get free choices from the SAB catalog.  So opt in January 5th – February 28th and get even more!

~~~

Clearance Rack deals!

 Order online using the links below:

January Host code links: QFTB9AST or 69GXSA3B

Get free Pastel Sequins with online orders over $55 when using the host code above! 

January Host code links:  QFTB9AST or 69GXSA3B

 Earn free products with my loyalty rewards! 

Click here to download yours and earn a $50 shopping spree!

All Posts

  • Easy box to gift or store cards in with free project sheet


    I’m thrilled to share this fabulous box to gift or store hand made cards in. It starts with a box from our Kit Collection. They’re sturdy and look what you can do with one!

    I shared how to make this on last week’s Live video. I know many of you have purchased kits from Stampin’ Up! and hopefully have a few of these saved. The inside organizing sections are made with the thin card board from our designer paper packs. Recycle!

    I created a free project sheet so you can replicate this at home. I truly hope you do! Click here to download or print this project sheet and also watch the video below to see how it’s made and see my tips for success too.

    The photo above shows the two sets of cards I made with the Gathering Moments stamp set – 2 sets of colors too! Which do you prefer?

    Here’s the other version of the box I shared:

    Below is the video where I shared how to make the 5 at a time cards shown in the box and the box itself.

    ~~~

      To see all of the new Online items click here.  Or download & save the Download Online Exclusives flyer 

    Get a free project tutorial with any online order in September! 

    Leave a Reply

    Your email address will not be published. Required fields are marked *

  • Gorgeous cards with my ‘5 at a time’ templates! Free project sheet, templates & video tutorial


    I shared these beautiful cards on last week’s Live video. They were a big hit!

    I love making cards with my 5 at a time templates. Making the most of my card stock gives me a great deal of satisfaction. I hope you’ll save these templates and use them in your own crafting.

    Below is the template I stamped on; it’s slightly smaller than the one I used for layering. I often use this or the larger one for the neutral layers inside my cards.

    Tip: I recommend making your first cut vertically at 4 3/4″. Then cut the left 3 pieces into 3 1/2″ layers. Once you cut all 5 pieces you’ll have one small piece left for a greeting or for punching.

    Next is the template for layering the above ‘stamped’ pieces on. It’s just slightly larger – 1/8″ so it’s quite a narrow margin.

    The above template has even less waste! It’s so nice to get 5 layered card pieces from 2 sheets of 8 1/2″ X 11″ card stock. Please save these templates!!

    In the past when I made cards with these templates I stamped before cutting the 5 pieces apart. This was a bit tricky to stamp in the right place. This time I cut my pieces before I stamped on them. *Always start with your greetings!

    As you can see I made sure I stamped three pieces landscape and two vertical. This isn’t necessary but it does change your cards up a bit.

    I used Cherry Cobbler, Timid Tiger; and Pretty Peacock here. I like adding Pretty Peacock and Cherry Cobbler to my fall cards. The stamp set is called Gathering Moments seen here.

    Tip on stamping – always stamp the greeting image first. Then start with the largest image and work your way down to the smallest to fill in any gaps. It’s okay to overlap your images.

    As you can see I blended a light wash of Timid Tiger over the stamped leaves. This softens the appearance and truly enhances your stamping.

    Here you can see the stamped pieces added to the larger layers from the 2nd template above.

    These were made simply with no punches or die-cuts. Sometimes it’s fun to just stamp and create. You can easily add the greetings on another layer (punches or die-cuts) to add more dimension.

    I’ll share my second set of cards using this template later this week. And I’ll also show the fabulous card box I made to gift them in!

    See how pretty they are once they’re added to the card bases and gems and twine have been added.

    I created a free project sheet that includes directions, photos, templates and supplies. Click here to download or print it. Please save this one!!

    Below is the video tutorial. Please subscribe to my YouTube Channel while you’re there.

    ~~~

      To see all of the new Online items click here.  Or download & save the Download Online Exclusives flyer 

    Get a free project tutorial with any online order in September! 

    Leave a Reply

    Your email address will not be published. Required fields are marked *

  • 2 pretty ways to use the emboss resist technique


    Look at these gorgeous projects featuring the Etched Autumn stamp set.

    These pretty cards are projects made by Stampin’ Up! and they’ve provided a free tutorial for both cards! Click here to access this tutorial.

    Both cards use the Etched Autumn stamp set from our newest Online products. See that here.

    ~~~

      To see all of the new Online items click here.  Or download & save the Download Online Exclusives flyer 

    Get a free project tutorial with any online order in September! 

    Leave a Reply

    Your email address will not be published. Required fields are marked *


Notice: LeeAnn Greff, Independent Stampin’ Up! Demonstrator, Manager. The content of this website is my sole responsibility as an independent Stampin’ Up! demonstrator and the use of, and content of, the classes, services, or products offered on this website is not endorsed by Stampin’ Up! Copyright 2025