/


Latest Post

Thoughtful Journey Suite showcased by Judith; our Artist of the Month


Each month one of my Flowerbug's Team is featured as an Artist of the Month.  This month Judith chose the Thoughtful Journey suite to showcase. 

Today I'm sharing a few of her pretty cards. 

This card has is a fancy fold card that has two folds. The Pretty in Pink card base is cut off at an angle and DSP is added. The White front layer is actually a folded piece that folds down over the front diagonal layer.  Very cool and not difficult either. 

Measurements:

  • Card base – 11" X 4 1/4" scored at 5 1/2". Then trim off the front half on the diagonal from bottom left to upper right. 
  • White 8 1/2" X 3" scored at 4 1/4"
  • DSP 5 3/8" X 4 1/8" cut in half on the diagonal

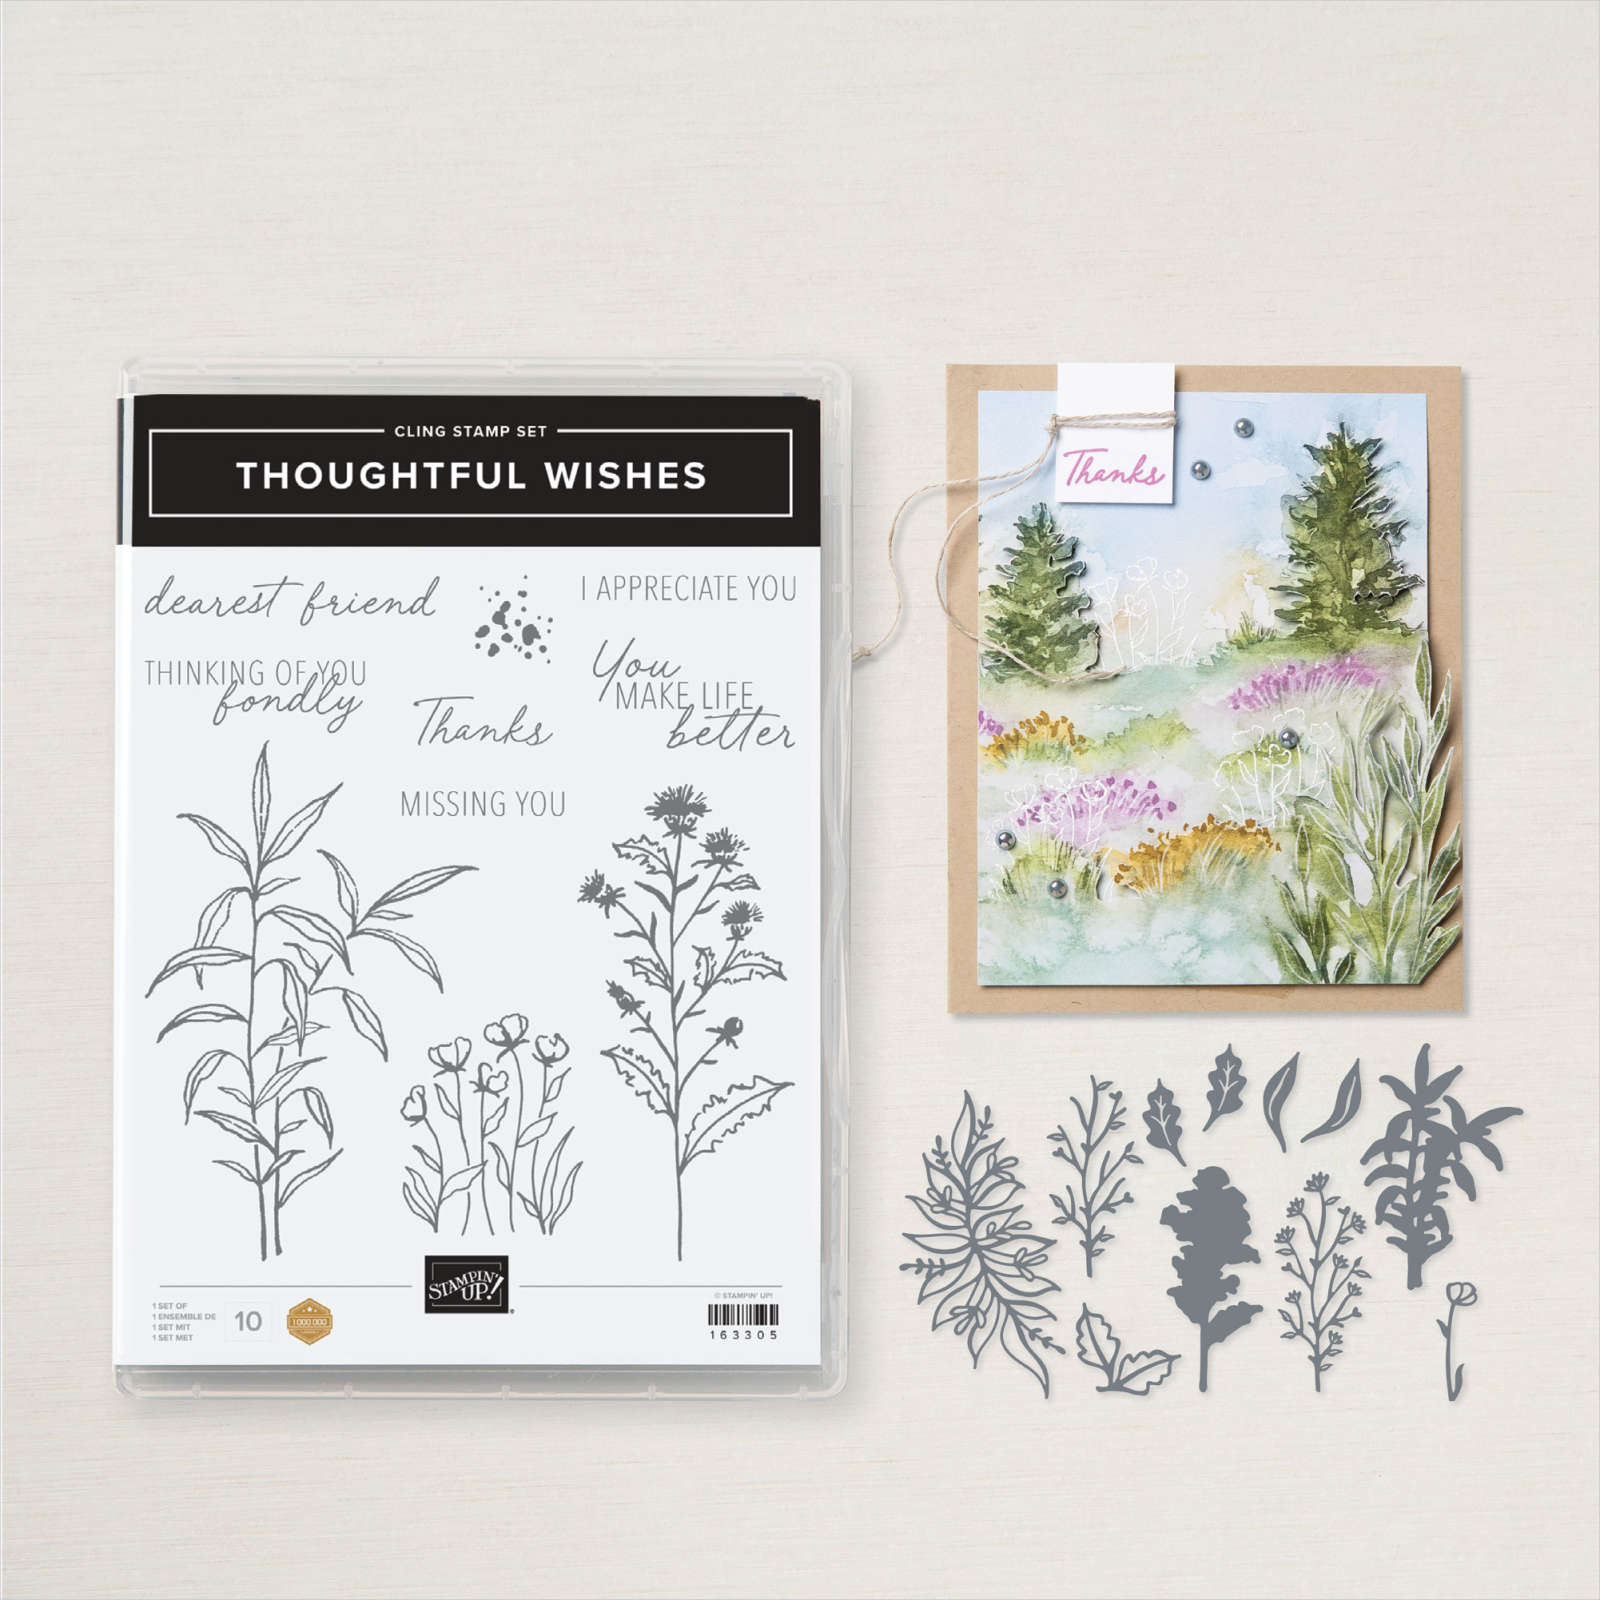
You can see the Thoughtful Wishes bundle here. It's on sale now – 20% off in June! 

The pretty Thoughtful Journey designer paper is unavailable right now but should be back around June 24th. 

Next is a unique fun fold card I haven't seen before.  

She used two pieces of the same DSP and fussy cut the top layer to add it over the lower with Stampin' Dimensionals.  The right side flap folds in towards the center. 

She used the Thoughtful Wishes stamp set on the inside.  So pretty!!

Measurements:

  • Petunia Pop card base 7 3/8" X 5 1/2" scored at 1" and 4 1/4". 
  • DSP – front is4 1`/4" X 5 1/2" and left side is 3 1/8" X 5 1/2" 
  • White inside 3" X 5 1/4" 

Lastly today is a neat idea with scenic designer paper – add a frame to highlight the scene. 

Judith added a frame made from the Perennial Postage dies seen here. 

A simple greeting an an extra die-cut and you're card is done.  Letting the pretty designer paper work for you is so smart!


I'll share the rest of her beautiful cards tomorrow. 

~~~

June Specials:

All Stamp & Die bundles are 20% off in June!

*current host code links: FERX3EKC or GF24T6XG

~~~

All online orders receive my free tutorial of the month & if your order is over $55 you'll also receive a free gift from me

All Posts

  • A gorgeous scene made with Wooded Acres; on the Last Chance List


    I was playing around with the Wooded Acres stamp set and made a pretty scene by adding a blended background. 

    You may know I love creating pretty scenes with my stamps, ink and blending brushes. 

    Here are the steps:

    1. I stamped this image on a long post-it note and fussy cut the area above the ground off.  I stamped it on my White CS and then added the post-it note to mask the sky. 
    2. Now I added Garden Green ink with a Blending Brush for grass. 
    3. I removed the post it and replaced it with the other half to sponge the sky. I used Timid Tiger, Calypso Coral and Balmy Blue. 
    4. I layered it with Black and White card stock. 
    5. I then stamped the same image on the Balmy Blue card base to extend the trees.  

    What do you think?  

    This stamp set is now on sale on the Last Chance List. You can see the stamp set here. 

    If you'd like to get tips on blending a smooth sky please watch this video. 

    ~~~

    July Specials:

    New Online Exclusives are here!  

    ~~~

    Last Chance List has been updated!  see it all here. Don't miss out on the deals!

    ~~~

    Get my Turtle-y Cute PDF tutorial free with any online order in July!

    Leave a Reply

    Your email address will not be published. Required fields are marked *

  • Double Flap fun fold with free project sheet & video tutorial


    Today I'm sharing the second card I made on last week's video.  It's a double flap fold card featuring the Sunrise Sailing bundle.

    The colors include Cloud Cover, Secret Sea, Strawberry Slush and Daffodil Delight.  

    I created a mask for the sun with a 1 7/8" circle punched from a post-it note. I used blending brushes & Strawberry Slush and Daffodil Delight inks. I also added just a hint of Strawberry Slush ink on the bottom of the cloud die-cuts. 

    The Designer Paper is our new 6 X 6" In Color designer paper seen here.  

    I showcased the Sunrise Sailing bundle seen here.  I love the stamp images AND the dies in this bundle.  They're wonderful and really spark creativity. There are THREE different size sailboats in the dies!  

    As you can see in the sample in the photo below you can make a card with just the embossing folder! 

    You can see in the photo below how the front square flap lifts to the right to reveal a peek at the inside. I added the cloud to the back of this square and placed it so it could 'latch' on the larger cloud to hold the card closed.   

    I create a free project sheet for this card. I also share it on the same day as my video on my Flowerbug's Stamp & Share FB group here .       Download Sunrise Sailing Latch card

    You can see the card fully opened below.  I love this easy but fun card fold.


    You'll find the video tutorial for this card and another Sailing card below. Don't forget to subscribe to my YouTube channel while you're watching!  

    I'll share another card with this bundle on Wednesday. 

    ~~~

    July Specials:

    New Online Exclusives are here!  

    ~~~

    Last Chance List has been updated!  see it all here. Don't miss out on the deals!

    ~~~

    Get my Turtle-y Cute PDF tutorial free with any online order in July!


    Leave a Reply

    Your email address will not be published. Required fields are marked *

  • July Specials include new Online Exclusives & 2 new kits


    July Specials include the following:

    Lots of New Online Exclusives are here!  

    The photo above show the three new suites. There are so many more new products including designer paper, lots of amazing stamps & die bundles plus embellishments too.

    Check it all out here.

    ~~~

    Two brand new kits are available!

    *There are 15 treat boxes & 10 cards in these two fun kits!

    ~~~

    Get my Turtle-y Cute PDF tutorial free with any online order in July!

    ~~~

    Last Chance List has been updated!  see it all here. 

    Leave a Reply

    Your email address will not be published. Required fields are marked *


Notice: LeeAnn Greff, Independent Stampin’ Up! Demonstrator, Manager. The content of this website is my sole responsibility as an independent Stampin’ Up! demonstrator and the use of, and content of, the classes, services, or products offered on this website is not endorsed by Stampin’ Up! Copyright 2025