/


Latest Post

Sparkling Snowflakes Easy 5 Card Wonder with free templates & video


I'm excited to share today's project. You may know this but I LOVE stamping one sheet wonders! I have created many of them and the layers & templates to make them super easy to use. *see them here

On last week's Live video I shared these pretty snowflake cards; made with my Easy 5 card wonder templates. 

I used the Sparkling Snowflakes stamp set seen here. Snowflakes can be wintery or holiday; they're quite versatile.  I added greetings using the Tailor Made Tags & Stylish Shapes dies with a bit of Elegant trim cording. 

My colors include Coastal Cabana, Pretty Peacock, Pool Party & Fresh Freesia. 

I started out with a full 8 1/2" X 11" sheet of Basic White card stock. I stamped the snowflakes down the center so some would be on each of the card front pieces.  Each piece measures 3 1/2" X 4 3/4". 

You can see the stamped pieces below.  There is very little waste.  I love being able to create my own patterns with different color combos.  It's so fun and reminds me why I love stamping! 

After you've stamped and cut your 5 layers, you can choose to stamp your greetings in the open area or add greetings using a punch or die-cut.

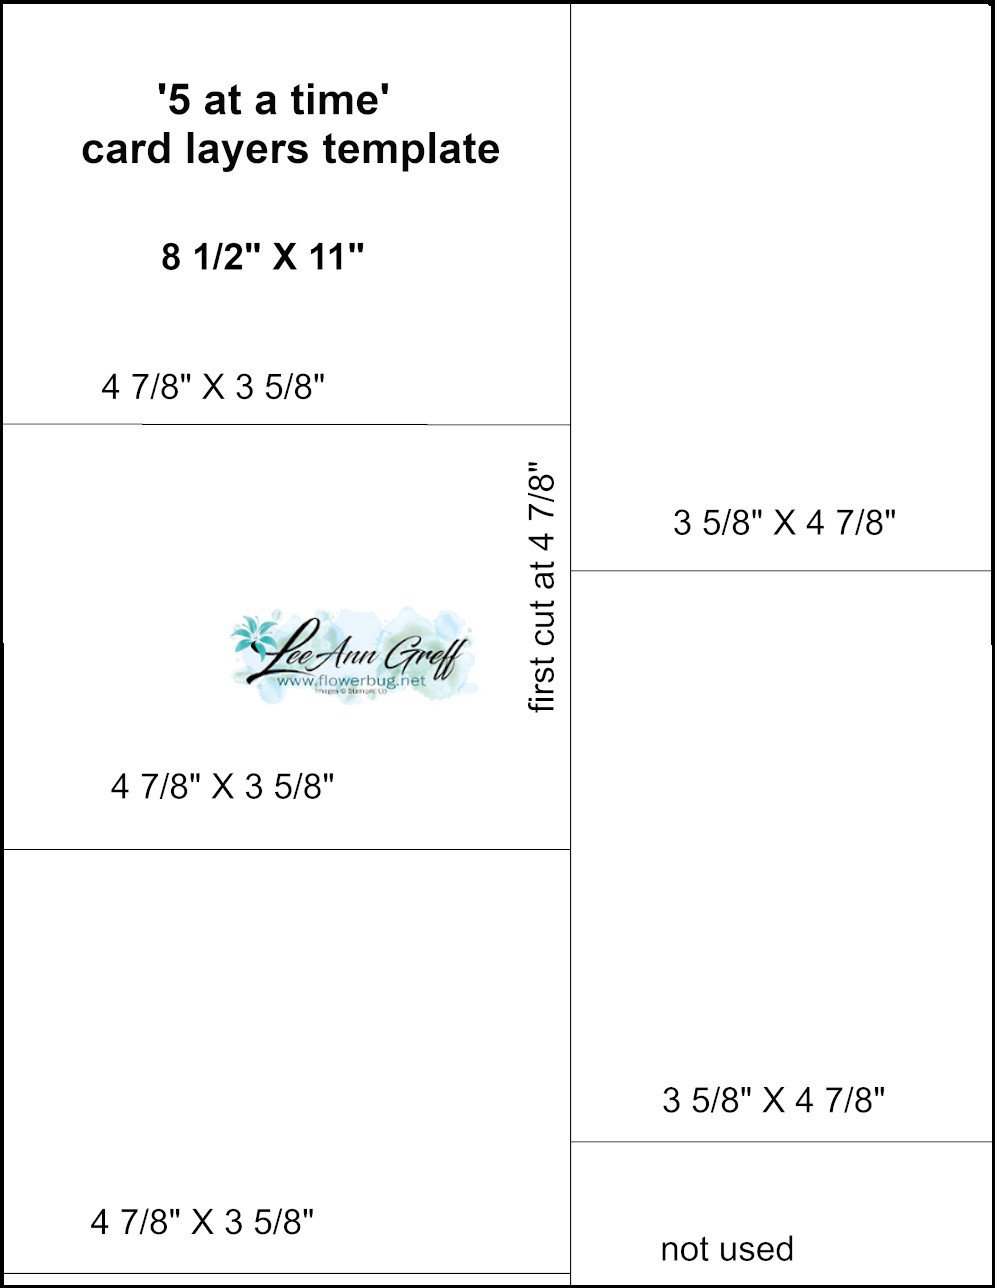
Now choose a coordinating piece of card stock to create the colored layers for the card fronts. Below is the template with measurements. Again it starts with an 8 1/2" X 11" piece of colored card stock. Each piece measures 3 5/8" X 4 7/8".

**Get the free project sheet with measurements, supplies and directions here: Download Easy 5 card wonder Sparkling Snowflakes

Did you know you can see all of my free project sheets in one place? Click here to see them all. Make sure you subscribe to my blog so you don't miss any. *right side column under 'get email updates'.

Click on this link to watch the video or on the photo below.  It's the first project. 

~~~

December Specials: 

Get a free embellishment from the 2023 Holiday catalog with an

online order over $50

*current host codes:  4D2ZDS6Q or 77277NNH

Click on the image below to see the Holiday Last Chance items 

All Posts

  • Striking Botanical Textures card kit or tutorial; Black & White with pops of color!


    Many of us love Black & White designer series paper and the new Botanical Textures DSP fills that need.  I love adding pops of color to the Black & White colors!  Here is another new card kit option for March: 

    Many of the cards are fun fold layouts.  Reserve your pre-cut card kit or choose the PDF tutorial option.  

    This kit includes the following:

    • 10 pre-cut cards with die-cuts and punched pieces
    • 1/2 pkg. Botanical Textures Designer Series Paper (6" X 12)
    • a share of 1/4" White ribbon
    • a share of new Neutral Matte dots
    • the PDF tutorial with measurements, step by step directions, photos and a supply list

    The PDF tutorial will be sent to you via email immediately after payment; please check your junk mail.  The pre-cut kit and product will be mailed out at the end of March, barring any product supply issues. 

    You'll need adhesives, a paper trimmer to cut your new DSP, greeting images, adhesives & Black ink.  I used the So Sincere stamp set for my greetings; but you can substitute others easily. 

    This pre-cut kit costs $31 plus shipping and is found here.  

    The PDF tutorial includes step by step instructions, photos, a supply list and measurements. This tutorial is $16 and can be seen here. 

    Remember I have lots of kits or tutorials available at my Shop here.  Save money on shipping when you purchase more than one. 

    ~~~

    March Specials:

    *current host code link:  

    UBYVA7HN

    Get a free Floral Delight tutorial with any online order in March!

     Free Iridescent Foil gems!


    Contact me here

    Leave a Reply

    Your email address will not be published. Required fields are marked *

  • Pretty Floral Delight card kits to go or tutorial option; reserve yours now!


    I couldn't pass up featuring the Floral Delight designer series paper for March; it's perfect for spring and lifting us up after winter.   Aren't they pretty? 

    Many of the cards are fun fold layouts. The color combos are fresh and springy with the yellows, Olive and Pool Party.  

    Reserve your pre-cut card kit now or choose the PDF tutorial option.  

    This kit includes the following:

    • 10 pre-cut cards with die-cuts and punches
    • 1/2 pkg. Floral Delight Designer Series Paper (6" X 12)
    • a share of 1/8" Daffodil satin ribbon
    • a share of clear Rhinestone gems
    • the PDF tutorial with measurements, step by step directions, photos and a supply list

    The PDF tutorial will be sent to you via email immediately after payment; please check your junk mail.  The pre-cut kit and product will be mailed out at the end of March, barring any product supply issues. 

    You'll need adhesives, a paper trimmer to cut your new DSP, greeting images and Old Olive, Pool Party & Daffodil inks.  I used the Beautiful Butterflies & Sketched Butterflies stamp sets for my greetings; but you can substitute others easily. 

    This pre-cut kit costs $31 plus shipping and is found here.  

    The PDF tutorial includes step by step instructions, photos, a supply list and measurements. This tutorial is $16 and can be seen here. 

    Remember I have lots of kits or tutorials available at my Shop here. 

    ~~~

    March Specials:

    *current host code link:  

    UBYVA7HN

    Get a free Floral Delight tutorial with any online order in March!

     Free Iridescent Foil gems!


    Contact me here

    Leave a Reply

    Your email address will not be published. Required fields are marked *

  • Neat Floral Delight fun fold card with free project sheet & video tutorial


    Can you tell that these cards are an extra special fun fold?  It's a bit sneaky how it works!

    I used the Floral Delight designer paper here along with the Floral & Gingham Vellum too.  The center piece is the vellum – the blue gingham and the yellow flowers on the right card. I used our Multipurpose Liquid glue to adhere it and it didn't show a bit! Use a very light hand for success here. 

    Here's how the card opens.  There's an extra score line on the front of the card that allows the center to fold back.  It's really simple but you may need to watch the video here to catch on.  

    Here's a look at how the card base is made without the front panel added. The upper & lower corners are simply cut off at 1". So simple with a surprising effect! 

    For the greetings I used the Mixed Labels bundle seen here.  I love the stitched dies and the greetings in this bundle. I've used it so often. 

    I created a free project sheet for this card. Click on the following link to print or download it.  Download Floral Delight Fun Fold Feb 25

    Below is the video tutorial for this card. I hope you watch it to learn the simple trick to this neat fun fold. 

    ~~~

    March Specials:

    *current host code link:  

    UBYVA7HN

    Get a free Floral Delight tutorial with any online order in March!

     Free Iridescent Foil gems!


    Contact me here

    Leave a Reply

    Your email address will not be published. Required fields are marked *


Notice: LeeAnn Greff, Independent Stampin’ Up! Demonstrator, Manager. The content of this website is my sole responsibility as an independent Stampin’ Up! demonstrator and the use of, and content of, the classes, services, or products offered on this website is not endorsed by Stampin’ Up! Copyright 2025